
Every project is made up of countless little changes. With a little luck, they will finally form a website, an app, or some other product. Your version control system keeps track of these changes. But only once you understand how to read them will you be able to track your project’s progress.
Using the example of Git, the popular version control system, this article will help you understand these changes.
Key Takeaways
- In version control, differences between one version and another are presented in a “diff” or a “patch”. These diffs are the most frequently-used methods of visualizing changes and can be read and understood using various markers and identifiers, such as symbols assigned to each compared item, and chunks that show the portions that have been changed.
- Diffs can be used to inspect local changes before committing them, inspect committed changes, and compare different branches or revisions. Commands like “git diff” and “git log” can be used to generate and inspect these changes.
- Diffs can be viewed and understood more clearly with dedicated diff tool applications. These tools offer improved visualization and make understanding changes easier. They are essential for every member of a development team to understand how a project has evolved.
Diffs Represent Changes
In version control, the differences between one version and another are presented in what’s called a “diff” (or a “patch”). You’ll encounter diffs when working in technical surroundings like the command line, but also in graphical tools like “Tortoise Git” (Win) or “Tower” (Mac) and in code hosting platforms like “GitHub”. Diffs are the most frequently-used methods of visualizing changes.
Let’s learn to read diffs with an example.
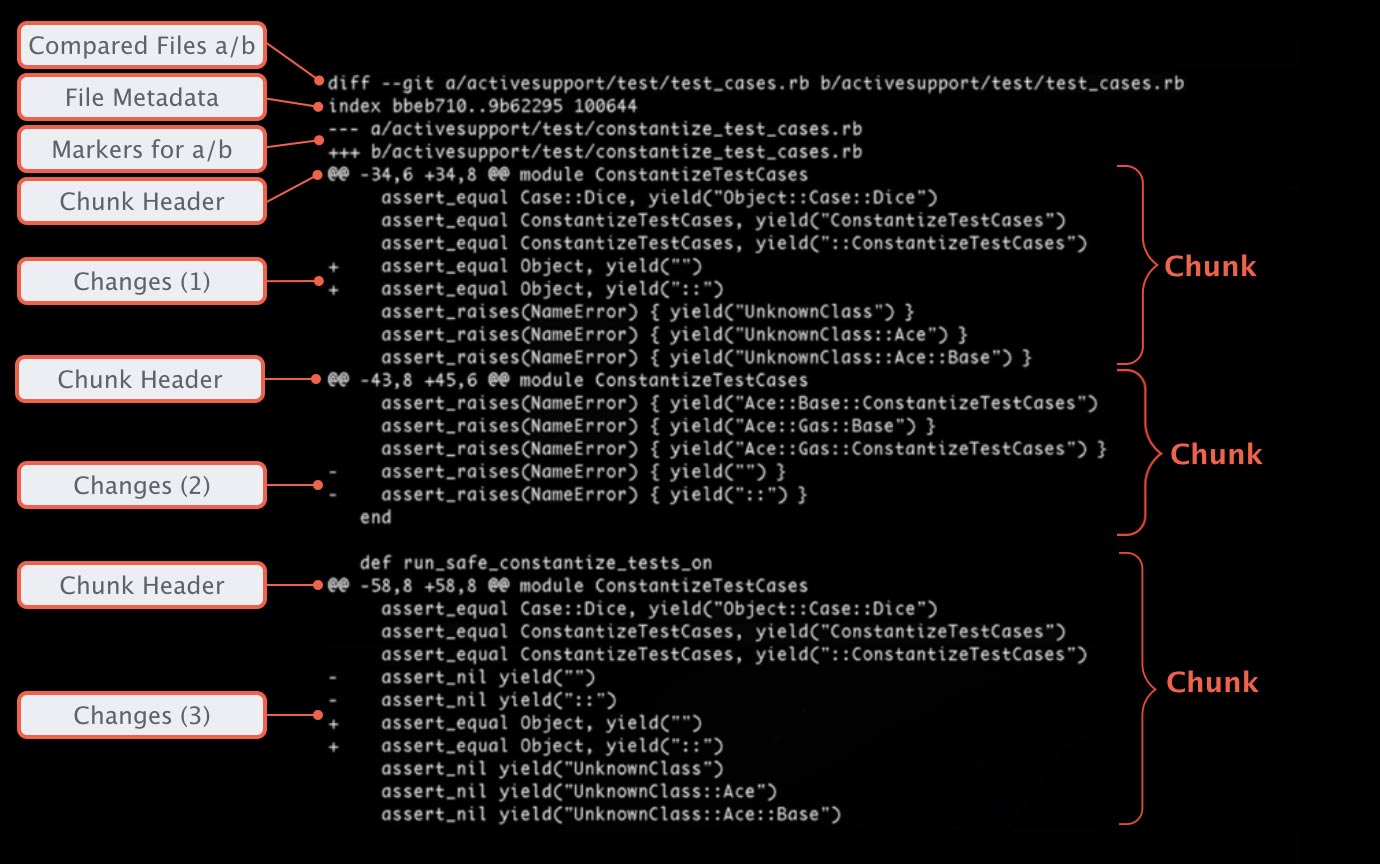
Compared Files A/B
Our example diff compares two items with each other: item A and item B. In theory, A and B can be any file. In most cases, however, you’ll be wanting to compare the same file, but in two different versions.
To set the scene, a diff output always begins by declaring which files are represented by “A” and “B”.
File Metadata
Rather technical information, which you’ll rarely need, follows: the file metadata.
The first two strings represent the object hashes (or “IDs”) of our two files. In the background, Git not only saves versions of the project but also of each file item as an object. Hashes like the ones seen here are used to identify a file from a specific version.
Finally, the number on the right is an internal file mode identifier; ‘100644’ is just a “normal file”,’100755’ specifies an executable file and ‘120000’ represents a symbolic link.
Markers for a/b
A little later in the output, actual pieces of changes are displayed. To be able to identify which come from which version (A or B), each compared item is assigned a symbol: a minus (“-“) sign is used for version A, while a plus (“+”) sign is used for version B.
Chunk
Inspecting a 10,000 line file with only two modified lines would be a tedious process if the diff showed the entire contents of the file at once. Instead, only the portions that have actually been changed are shown. In Git, such a portion is called a “chunk” (or a “hunk”). The actual changed lines are surrounded by unchanged lines before and after the modification. These are called the “context”, because they help the user understand the context in which these modifications were made.
Chunk Header
A header prepends each of these chunks. The first part of the header informs you which lines were affected, enclosed in two “@” signs each. Let’s see which lines were modified in the first chunk of our example diff:
- From file A (represented by a “-“), 6 lines are extracted, beginning from line no. 34
- From file B (represented by a “+”), 8 lines are displayed, also starting from line no. 34
After the closing pair of “@@”, another piece of context is given: Git tries to display a method name or other contextual information about where this chunk was taken from in the file. However, this differs depending on the programming language and doesn’t work in all scenarios.
Changes
To understand a change, you must be able to see both of its states – before and after the modification. This is why Git marks the lines that were actually changed with either a “+” or a “-” sign: a line that is prepended with a “-” sign comes from A, while a line with a “+” sign comes from B.
Git kindly chooses “A” and “B” in such a way that (in most cases) you can think of A (or “-“) as “old” content and B (or “+”) as “new” content.
Our example helps us understand this:
Change #1 contains two lines prepended with a “+”. Because no counterpart in A existed for these lines (no lines with “-“), this means that the lines were added.
Change #2 is exactly the opposite: we have two lines marked with “-” signs in A. Since B doesn’t have an equivalent (no “+” lines), this means they were deleted.
Finally, some lines were actually modified: in Change #3, the two “-” lines were changed to look like the two “+” lines below.
You now know how to read and understand a diff output. Now let’s look at how to generate some of this output in Git.
Inspecting Local Changes
Before committing changes, you’ll want to see what exactly you did. The “git diff” command will show you all of your local changes that haven’t been added to Git’s ‘Staging Area’, yet: $ git diff
If instead you’d like to see only the changes that you’ve already staged, you can do so by adding the “–staged” parameter to the command.
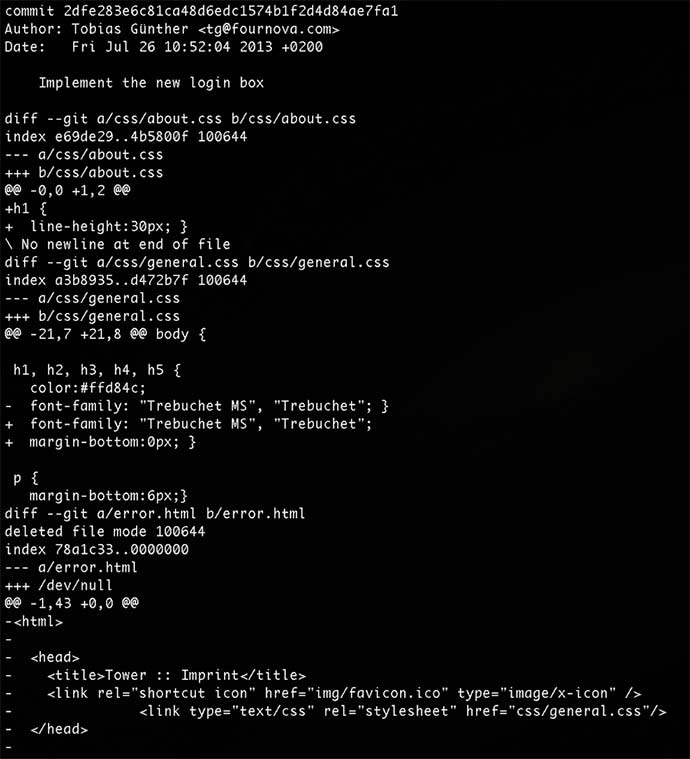
Inspecting Committed Changes
Changes that have already been committed to the repository can be inspected with the “git log” command. By default, it only spits out an overview of the commit’s metadata (like author, message, and date). If you add the “-p” flag, you can also request detailed information about the exact changes:
Comparing Branches & Revisions
Diffs are also useful when you want to understand how a certain branch (or even a specific commit) differs from another. For example, you might be interested in seeing all the changes from the “contact-form” branch that you don’t have in “master”, yet. To achieve this, use the “git diff” command as follows: $ git diff master..contact-form
But you’re not limited to comparing branches. You can even compare two arbitrary commits with each other: $ git diff 0023cdd..fcd6199
Tools for Clearer Visualization
When looking at larger and more complicated modifications, you may need all the help you can get. A dedicated diff tool application will offer an improved visualization – and will thereby make understanding changes easier.
To help you choose from the many available tools in this area, have a look at this overview of recommended apps.
Conclusion
I hope this article showed you that diffs (although they may suggest otherwise on first examination) are not just obscure ASCII art. Once you’ve learned how to read them, they allow you to understand how your project evolved. This makes them an essential tool for every member of a development team.
Frequently Asked Questions (FAQs) about Version Control and Diffs
What is the significance of ‘diff’ in version control?
Diff’ is a powerful tool used in version control systems like Git. It allows developers to see the differences between two sets of code. This can be between different versions of the same file, between different branches, or even between different repositories. By using ‘diff’, developers can easily identify and understand the changes made, making it easier to track progress, debug issues, and collaborate with other team members.
How does ‘diff’ work in Git?
In Git, ‘diff’ works by comparing the contents of files or directories. It can compare the working directory with the staging area (the area where Git tracks changes), the staging area with the latest commit, or any two commits in the repository’s history. The output of ‘diff’ shows the lines added, modified, or deleted, providing a clear picture of what changes have been made.
Can I use ‘diff’ to compare branches in Git?
Yes, ‘diff’ can be used to compare branches in Git. This is particularly useful when you want to see the changes made in a feature branch before merging it into the main branch. The command ‘git diff branch1..branch2’ will show the differences between the two branches.
What is a ‘diff’ tool and how can it help me?
A ‘diff’ tool is a program that takes two files or sets of files as input and produces a report showing the differences between them. This can be extremely helpful in version control systems, as it allows you to see exactly what changes have been made. Some ‘diff’ tools also provide a graphical user interface, making it easier to visualize and understand the differences.
How can I use ‘diff’ to track changes in my code?
Diff’ can be used to track changes in your code by comparing different versions of your files. For example, if you have made some changes to a file but haven’t committed them yet, you can use ‘git diff’ to see what those changes are. If you have already committed the changes, you can use ‘git diff HEAD~1’ to compare the latest commit with the one before it.
What is the difference between ‘diff’ and ‘status’ in Git?
While both ‘diff’ and ‘status’ are used to see changes in Git, they serve different purposes. ‘Status’ gives a high-level overview of the changes, showing which files have been modified, added, or deleted. On the other hand, ‘diff’ provides a detailed view of the actual changes made to the file contents.
Can ‘diff’ be used with other version control systems apart from Git?
Yes, ‘diff’ is a common feature in many version control systems, not just Git. For example, it is also used in Subversion (SVN), Mercurial, and CVS. While the exact commands and options may vary, the basic functionality of comparing file contents remains the same.
How can I resolve conflicts in Git using ‘diff’?
When a conflict occurs in Git, you can use ‘diff’ to see the differences between the conflicting versions of the file. This can help you understand the changes made in each version and decide how to resolve the conflict. Once you have resolved the conflict, you can add the file to the staging area and commit it.
What is a ‘diff’ patch and how can I create one?
A ‘diff’ patch is a file that contains the differences between two sets of code. It can be applied to a codebase to incorporate those changes. To create a patch in Git, you can use the ‘git diff’ command with the ‘–patch’ option, followed by the names of the files you want to compare.
Can I customize the output of ‘diff’ in Git?
Yes, Git provides several options to customize the output of ‘diff’. For example, you can use the ‘–color’ option to highlight the changes in color, or the ‘–stat’ option to show a summary of the changes. You can also use the ‘.gitattributes’ file to specify how ‘diff’ should treat specific file types.