Ask any online business owner and they’ll tell you that marketing is the single most important aspect of driving revenue. The medium itself adds its own dimension to this age-old craft, with social media in particular, offering the marketer the most intriguing opportunities.
Unlike traffic driven by search engines, social media obeys its own rules, and there’s much an ecommerce site owner can do to penetrate these networks of small groups and personal relations. For one, it’s important to make sure that casual visitors can easily Share, Like, Tweet, +1 or otherwise disseminate and promote your products. For another, keeping track of where these shares and clicks are coming from can form an important part of your overall business strategy.
Magento, an out-of-the-box CMS solution specifically for ecommerce, offers many solutions to managing your entire social media strategy. That, in turn, will give you hands-on control of this most important aspect of your marketing campaign.
The extension we’ll be using is AddShoppers’ Social Marketing Apps for ecommerce. The extension is available for PrestaShop, WooCommerce, Shopify and several other platforms. However, for this tutorial, we’ll be sticking to the Magento version, as that’s the platform I run on my own ecommerce site.
For this site, a furniture store dealing entirely in beds, I wanted our customers to be able to share our products with people on social networks. I also wanted to able to run promotions alongside their sharing activity.
AddShoppers has the ability to manage all this and installation is relatively simple.
Start by getting the installation key for AddShoppers and then paste it into Magento Connect Manager in your Magento admin area.
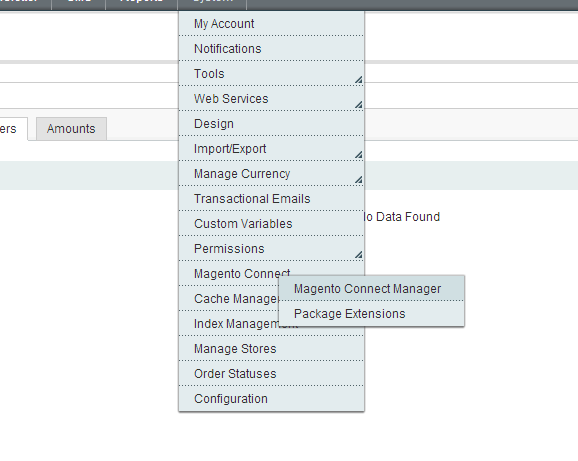
Make sure you are running Magento 1.8 (released September 2013), or the installation might return an error. Once installed, you need to configure your AddShoppers account to run on your store. Still in the Magento admin area, got to System>Configuration.
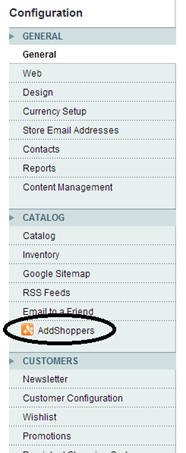
In the left column, under the CATALOG tab you’ll see a new selection for AddShoppers. This particular software integrates itself with your website after you sign up in the Magento back end. However, to use it, you need to access your Dashboard through the AddShoppers website.
Once you’ve signed up for an AddShoppers account in your Magento back end, click the link to the AddShoppers Merchant Admin site, and you’ll be presented with your Social Dashboard.
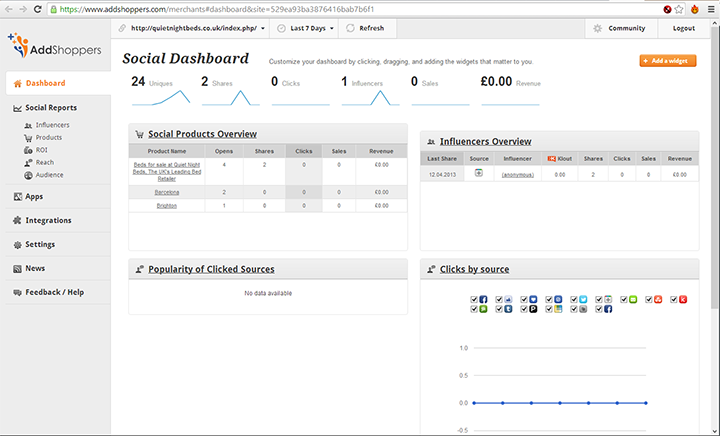
This gives you an overview of your website’s activity on Facebook, Twitter, G+, Pinterest, or any other social network. It also allows you to customise the social media integration of your website. You’ll do this by selecting Apps in the left menu.
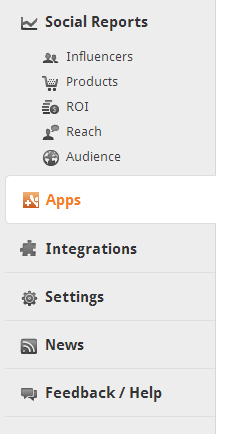
Then select and configure the Sharing Buttons app.
As an owner of an ecommerce store, I had two considerations regarding the placement of social media buttons on my bed retail site. The first was where to place the buttons on the home page and the second where to place them on the products page.
The home page introduces my retail brand to my customers. It’s important to allow this page to be quickly shared in people’s Tweet’s or posted on Facebook Walls. However, with social share buttons on the product page, I can learn about how many people are interested in a particular item as well as where that interest is coming from.
One of the most salient pieces of advice I received regarding social media integration with an ecommerce site came from Jaclyn Freedman, Social Media Manager at Wizler. Her advice is to make sure that your product pages at least contain social media buttons, as your products are what you want to bring to your customers attention, rather than your website itself.
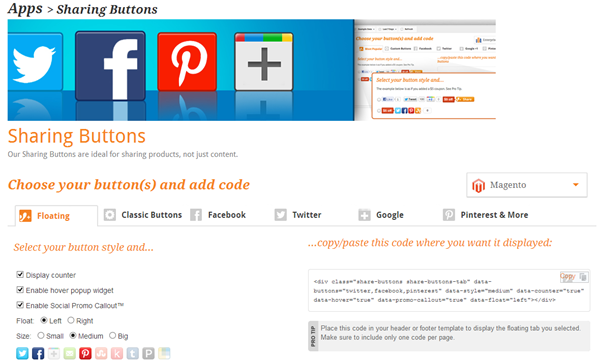
In AddShoppers Dashboard, the first Sharing Buttons tab will allow you to insert Floating social media buttons, including Twitter, Facebook. G+, Email, Pinterest, Stumbleupon and many more, on the home page. In the Dashboard you can select whether to have a counter to display the number of Tweets, Likes etc. your home page has received; enable the hover pop-up; and enable the Social Promo Call Out.
You can also choose whether to have the buttons float on the left or right, and whether to display them small, medium or big.
Once you’ve created your homepage floating buttons, you need to copy the code on the right and paste it into your Magento website’s header or footer area.
<div class="share-buttons share-buttons-tab" data-buttons="twitter,facebook,pinterest" data-style="medium" data-counter="true" data-hover="true" data-promo-callout="true" data-float="left"></div>In your Magento admin area go to System>Configuration. Then in the General tab, click on Design.
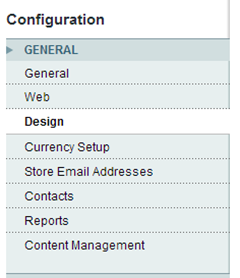
This will bring up the Design menu.

In HTML Head or Footer, paste the above code in the Miscellaneous Scripts/Miscellaneous HTML boxes. This should have the social media buttons floating on your website’s home page.
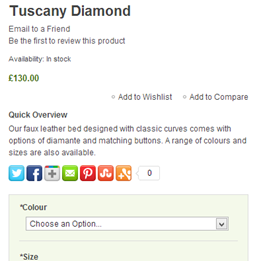
Now we need to put the social media buttons on our products pages. In the AddShoppers Dashboard you need to create the buttons and then manually place them in the product pages template.
You can customise the buttons to stack vertically or horizontally, and choose which individual buttons to display.
The code auto-generated for this set of buttons is:
<div class="share-buttons share-buttons-panel" data-style="medium" data-counter="true" data-oauth="true" data-hover="true" data-promo-callout="left" data-buttons="twitter,facebook,google,email,pinterest,stumbleupon"></div>This needs to be pasted in your product page template, wherever on the page you want the buttons to appear. You can edit this document by accessing view.phtml. If you are using Magento’s default theme for you web store, you can access this file via: app/design/frontend/base/default/template/catalog/product in your host’s file manager. However, if you have installed your own theme, you need to access the product page template in your themes folder. For me, using the Hello Wired theme, I accessed this file via: /app/design/frontend/default/hellowired/template/catalog/product/.
Inside the view.phtml file, you can see in bold where I inserted the social media button codes.
<?php if ($_product->getShortDescription()):?>
                <div class="short-description">
                    <h2><?php echo $this->__('Quick Overview') ?></h2>
                    <div class="std"><?php echo $_helper->productAttribute($_product, nl2br($_product->getShortDescription()), 'short_description') ?></div>
                </div>
            <?php endif;?>

<strong><div class="share-buttons share-buttons-panel" data-style="medium" data-counter="true" data-oauth="true" data-hover="true" data-promo-callout="none" data-buttons="twitter,facebook,google,email,pinterest,stumbleupon"></strong></div>
This places the code just after the Quick Overview description section on the products page.
Setting your website up with social media buttons is just the start of what you can do with the AddShoppers extension. Each time somebody interacts with one of these buttons on your website, data is returned to your AddShoppers dashboard.
This will give you a plethora of analytics information regarding how your site is doing on social networks and even metrics on the return of investment from Tweets, Likes and Pins.
It might be a little complicated to set up, but integrating your site with social media is an essential tool for any ecommerce site.
 kaziz
kazizJai Paul is a programmer and tech writer. Besides his freelance writing, he spends his time running several online ventures. He consults on all things related to web development.