

This is the third installment in my series about Ruby Social Media Gems. Today, I am focusing on Facebook gems.
Key Takeaways
- Koala is a Ruby gem that interfaces with various Facebook APIs, including the Graph API, REST API, Realtime updates, Test users, and OAuth validation. It’s a versatile choice for integrating Facebook functionalities into a Ruby application.
- The application built with the Koala gem can pull user data from Facebook into a Rails application, allowing for customization in how the data is displayed.
- The Koala gem simplifies the process of authenticating a user with Facebook. It only requires two lines of code to create an OAuth object, and the access token can be stored for future use, eliminating the need for repeated user redirections.
- The Graph API, one of the Facebook APIs that Koala interfaces with, is the primary way to get data in and out of Facebook’s social graph. It can be explored using the Graph API Explorer, and Koala’s wiki on Github provides detailed information and examples of how to use it.
Koala Gem
![]()
Koala is a gem that interfaces with the various Facebook APIs (Graph API, REST API, Realtime updates, Test users, and OAuth validation. ) I know there are many Facebook-related gems, but Koala is the gem I have chosen for this article.
The Demo Application
The application we are going to build with the Koala gem is the same as what we’ve built with previous articles. We will get all the user data from Facebook into our rails app so we can display it in whatever format we like.
Starting with the application:
You can download the full source code of the tutorial form github here
Create a new rails app:
rails new rsg_facebook_gem
Add the koala, devise, bootstrap, less gems in path/to/project/Gemfile
gem 'devise'

gem 'koala'

gem "less-rails"

gem 'twitter-bootstrap-rails'
And then run
bundle install
We are going to use bootstrap for the UI component.
Initializing
Before we start we need to run few commands to initialize the project.
Create the User Model and Bootstrap styling
The following commands are found on the github page of the devise project and the twitter bootstrap project
To install devise
rails generate devise:install
To create the user model
rails generate devise user
rake db:migrate
To configure views
rails generate devise:views
To install bootstrap
rails g bootstrap:install
To set a layout bootstrap
rails g bootstrap:layout application fixed
Remove the index file from
path/to/project/public/index.html
Application Structure
Controllers
We will only need to create one controller, which will handle the connection to Facebook. This controller will pull the data from the API and push it to our models.
rails g controller facebook
Add the following line to the beginning of the FacebookController
before_filter :authenticate_user!
Create an application on the Facebook developer site and set the ‘Site URL’ to ‘http://localhost:3000’ and the ‘App Domains’ to ‘localhost’. if you have any problem with setting the callback, you may find a solution in this link.
To explore the Graph API, there is a web interface to it called the Graph API Explorer. You can change the permissions from the “Get Access Token” button on the right and add any number of permissions to your access token.
You will use this access token directly into your rails app to test with your account.
I should note here that you might find a problem with ssl. The simplest way to workaround this problem is run the following line in the console. For our application, we’ve added this line in an initializer file in /path/to/project/config/initializers/openssl.rb
OpenSSL::SSL::VERIFY_PEER = OpenSSL::SSL::VERIFY_NONE
There are more details about this problem in this link.
Now we can add a few helper methods to handle the authentication and API queries.
Koala provides Authentication with only two lines of code.
Facebook sets the application with some default permissions which might not cover the purpose of your application. To add more permissions, go to permissions tab in your application dashboard. There is tons more info about permissions on the facebook docs.
index
* First, we check if we already have a facebook_oauth_setting object which stores the access_token. If so, we don’t have to redirect the user each time to get the access_token. The access_token is stored in the session.
* The first time the user logs in, we create an OAuth object with the app keys and callback, then redirect the user to Facebook to get the permission.
def index

  unless current_user.facebook_oauth_setting

		@oauth = Koala::Facebook::OAuth.new("app_id", "app_secret", "http://#{request.host}:#{request.port}/callback")

		session["oauth_obj"] = @oauth

		redirect_to @oauth.url_for_oauth_code

	else

		redirect_to "/facebook_profile"

	end

end
callback
* If the facebook_oauth_setting object is nil, we use the ‘code’ parameter that Facebook sent back to get the access_token.
* Create a new FacebookOauthSetting object for that user and redirect the user to the facebook_profile action
def callback

  unless current_user.facebook_oauth_setting

		@oauth = session["oauth_obj"]

		FacebookOauthSetting.create({:access_token => @oauth.get_access_token(params[:code]), :user_id => current_user.id})

		redirect_to "/facebook_profile"

	else

		redirect_to "/"

	end

end
facebook_profile
* If the facebook_oauth_setting object exists, use the stored access_token to create an API object.
* Get the user profile info, picture, feed, and friends. and set them into instance variables to display in views, you can store them in models if you want.
def facebook_profile

  if current_user.facebook_oauth_setting

		@graph = Koala::Facebook::API.new(current_user.facebook_oauth_setting.access_token)

		@profile = @graph.get_object("me")

		@picture = @graph.get_picture("me")

		@feed = @graph.get_connections("me","feed")

		@friends = @graph.get_connections("me", "friends")

	else

		redirect_to "/"

	end

end
Routes
Add the following to path/to/project/config/routes.rb
match "/callback" => "facebook#callback"

match "/facebook_profile" => "facebook#facebook_profile"

root :to => 'facebook#index'
Views
We should make few changes before running the server.
Modify the layout view path/to/project/app/views/layouts/application.html.erb as shown here:
<body>
<div class="navbar navbar-fixed-top">
<div class="navbar-inner">
<div class="container">
<a class="btn btn-navbar" data-target=".nav-collapse" data-toggle="collapse">
<span class="icon-bar"></span>
<span class="icon-bar"></span>
<span class="icon-bar"></span>
</a>
<a class="brand" href="#">RsgFacebookGem</a>
<div class="container nav-collapse">
</div><!--/.nav-collapse -->
</div>
</div>
</div>
<div class="container" style="margin-top: 72px;">
<div class="row">
<div class="span9">
<%= yield %>
</div>
</div><!--/row-->
<footer>
<p>© Company 2012</p>
</footer>
</div> <!-- /container -->
<!-- Javascripts
================================================== -->
<!-- Placed at the end of the document so the pages load faster -->
<%= javascript_include_tag "application" %>
</body>
Models
Koala covers, as I’ve mentioned before, the following Facebook APIs: Graph API, REST API, Realtime updates, Test users, and OAuth validation. For an overview, the Koala wiki on github is worth a read, along with the Facebook API reference.
We’ve focused on the Graph API, which is the primary way to get data in and out of Facebook’s social graph. For more information on the Graph API, here’s a detailed guide which also covers the Graph API Explorer.
User
Go to /path/to/project/app/models/user.rb and add a has_one relationship to our OAuth object:
has_one :facebook_oauth_setting
FacebookOauthSetting
This model will store two values for each user: access_token and user_id. These values are used later to access the Facebook account without asking for permission each time.
Run the following commands to create the above model:
rails g model facebook_oauth_setting access_token:string user_id:integer

rake db:migrate
Add the association between the user model and the facebookoauthsetting model:
path/to/project/app/models/facebook_oauth_setting.rb
belongs_to :user
Facebook Graph API Explorer
I would like to emphasize, one last time, the importance of the Graph API Explorer and how helpful it can be.
The Koala wiki on github covers this part of the API very well with many examples and documentation.
Here’s a couple of these examples:
# to get a specific user

# http://graph.facebook.com/koppel

@graph.get_object("koppel")

# => {"name"=>"Alex Koppel", "id"=>"2905623", "last_name"=>"Koppel", "link"=>"http://www.facebook.com/koppel", "first_name"=>"Alex"}
# to get a page's feed

# http://graph.facebook.com/contextoptional/feed

@graph.get_connections("contextoptional", "feed")

# => array_of_stream stories
# to get any user profile picture

# http://graph.facebook.com/koppel/picture

@graph.get_picture("koppel")

# => "http://profile.ak.fbcdn.net/v224/784/109/q2905623_7065.jpg"
# http://graph.facebook.com/search?q=koala

@graph.search("koala")

# => {"data"=> [{"from"=>{"name"=>"Amy", ...}, "id"=>....,

#     "message"=>"My apartment is infested with koala bears...."}]}
@graph.put_wall_post("hey, i'm learning koala")

# => {"id"=>"2905623_123183957698327"}
# navigating feeds

@result = @graph.get_connections('me', 'feed')

# get the next page from the feed and so on

@next_page = @result.next_page
Let’s put it all together and build a simple view to display the stored data.
Create a new file facebook_profile.html.erb at path/to/project/app/views/twitter/
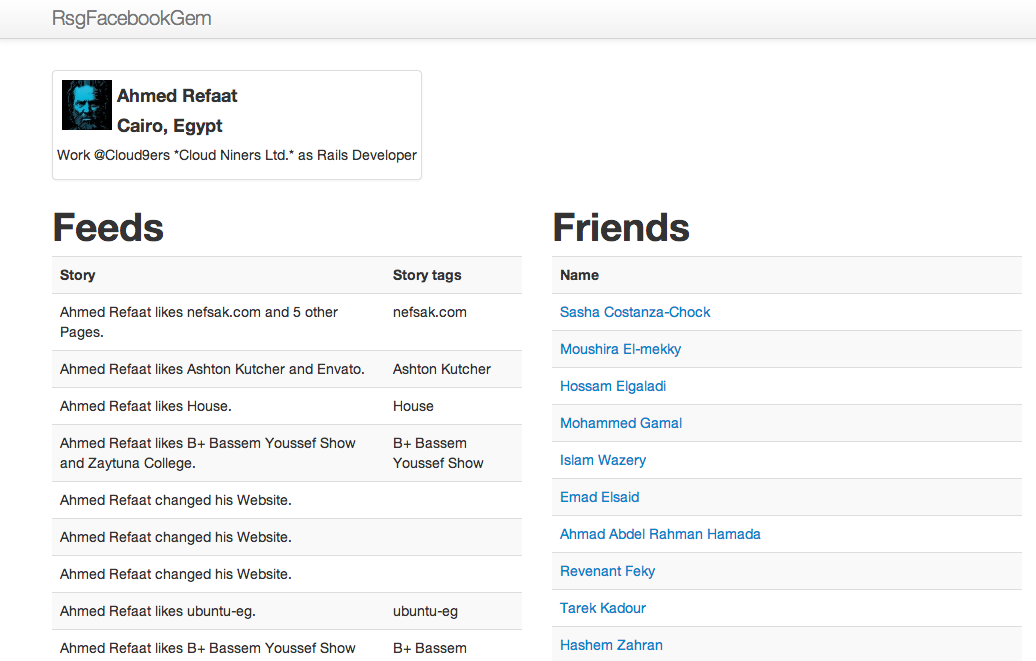
<div class="row">

  <div class="span4">

    <div class="thumbnail">

      <img src="<%= @picture %>" style="float: left;margin: 5px;">

      <h4><%= @profile["name"] %></h4>

      <h4><%= @profile["location"]["name"] %></h4>

      <p>Work @<%= @profile["work"][0]["employer"]["name"] %> as <%= @profile["work"][0]["position"]["name"] %></p>

    </div>

  </div>

</div>
<div class="row" style="margin-top: 16px;width: 1000px;">

  <div class="span5">

  <h1>Feeds</h1>

  	<table class="table table-striped">

  	  <tr>

  	  	<th>Story</th>

  	  	<th>Story tags</th>

  	  </tr>

  		<% @feed.each do |f| %>

	  	  <tr>

	  	  	<td><%= f["story"] %></td>

	  	  	<td><%= f["story_tags"]["19"][0]["name"] %></td>

	  	  </tr>

  	  <% end %>

  	  <% feed_next_page = @feed.next_page %>

  	  <% feed_next_page.each do |f| %>

	  	  <tr>

	  	  	<td><%= f["story"] %></td>

	  	  	<td><%= f["story_tags"]["19"][0]["name"] if f["story_tags"]["19"] %></td>

	  	  </tr>

  	  <% end %>

  	  <% feed_next_page = @feed.next_page %>

  	  <% feed_next_page.each do |f| %>

	  	  <tr>

	  	  	<td><%= f["story"] %></td>

	  	  	<td><%= f["story_tags"]["19"][0]["name"] if f["story_tags"]["19"] %></td>

	  	  </tr>

  	  <% end %>

	</table>

  </div>

	<div class="span5">

	<h1>Friends</h1>

  	<table class="table table-striped">

  	  <tr>

  	  	<th>Name</th>

  	  </tr>

  		<% @friends.each do |f| %>

	  	  <tr>

	  	  	<td><a href="http://facebook.com/<%= f["id"] %>"><%= f["name"] %></a></td>

	  	  </tr>

  	  <% end %>

	</table>

  </div>

</div>
Wrapping Up
I hope this tutorial was useful and a good introduction to using the Koala gem and Facebook APIs. If you would like to suggest the next gem to cover, do so in the comments. Thanks for reading!
Frequently Asked Questions (FAQs) about Ruby Social Gems for Facebook
What are Ruby Social Gems for Facebook and how do they work?
Ruby Social Gems for Facebook are libraries that provide a simple and efficient way to interact with Facebook’s API using Ruby programming language. They encapsulate the complexities of making requests to Facebook’s API and parsing the responses. This allows developers to focus on implementing the functionality they need, rather than dealing with the intricacies of the API.
How do I install Ruby Social Gems for Facebook?
To install Ruby Social Gems for Facebook, you need to have Ruby installed on your system. Once you have Ruby, you can install the gem using the command ‘gem install facebooker’. This will download and install the gem on your system. You can then require it in your Ruby scripts using ‘require ‘facebooker”.
How do I authenticate a user with Facebook using Ruby Social Gems?
Authenticating a user with Facebook using Ruby Social Gems involves redirecting the user to Facebook’s login page, where they can enter their credentials. Once they have logged in, Facebook will redirect them back to your application with an access token. This token can be used to make authenticated requests on behalf of the user.
How do I post to a user’s Facebook wall using Ruby Social Gems?
Posting to a user’s Facebook wall using Ruby Social Gems involves creating a new instance of the Facebooker::Session class, authenticating the user, and then calling the ‘post’ method on the session object. The ‘post’ method takes a message as a parameter, which is the content that will be posted to the user’s wall.
How do I retrieve a user’s Facebook friends using Ruby Social Gems?
Retrieving a user’s Facebook friends using Ruby Social Gems involves creating a new instance of the Facebooker::Session class, authenticating the user, and then calling the ‘friends’ method on the session object. This will return an array of Facebooker::User objects, each representing one of the user’s friends.
How do I handle errors when using Ruby Social Gems for Facebook?
When using Ruby Social Gems for Facebook, errors can be handled using standard Ruby exception handling techniques. The gems will raise exceptions when they encounter errors, which can be caught and handled in your code.
Can I use Ruby Social Gems for Facebook with Rails?
Yes, Ruby Social Gems for Facebook can be used with Rails. They integrate seamlessly with Rails, providing a simple and efficient way to add Facebook functionality to your Rails applications.
How do I test my code that uses Ruby Social Gems for Facebook?
Testing code that uses Ruby Social Gems for Facebook can be done using standard Ruby testing frameworks, such as RSpec or MiniTest. You can write tests that mock the responses from Facebook’s API, allowing you to test your code in isolation.
Are there any limitations when using Ruby Social Gems for Facebook?
The limitations when using Ruby Social Gems for Facebook are primarily determined by Facebook’s API. For example, there may be rate limits on how many requests you can make in a certain period of time, or restrictions on what data you can access.
Where can I find more information about Ruby Social Gems for Facebook?
More information about Ruby Social Gems for Facebook can be found in the gem’s documentation, which is usually included in the gem itself. You can also find more information on the gem’s GitHub page, or by searching online for tutorials and blog posts.

