

A number of plugins and extensions are available for the Firefox browser to allow developers to interact with the DOM and with other exposed parts of a web page. Tools such as the JavaScript Shell Bookmarklet, Firebug, Greasemonkey, and Platypus have proven useful for allowing developers to add custom interactivity to a page, debug DOM and CSS problems, and test ideas.
However, if a user wants to dynamically interact with multiple pages, to automate different parts of the Firefox interface, to script activities across a number of pages, or to work with both the web page and the local file system concurrently, the options have historically been limited. But this has begun to change recently with extensions such as CoScripter, and the extension that forms the subject of this article: Chickenfoot.
Key Takeaways
- Chickenfoot is a versatile Firefox extension that allows users to automate web interactions and manipulate multiple web pages simultaneously, enhancing productivity for developers.
- Installation of Chickenfoot is straightforward, similar to other Firefox extensions, but it performs best on Windows despite being available for Mac users, who may experience some inconsistencies.
- The extension operates in Firefox’s XUL environment, which differs from the standard (X)HTML environment, offering deeper access and interaction capabilities with web page contexts.
- Chickenfoot supports scripting across various sites, enabling tasks like copying text from one page, searching it on Google, and appending results to a local file, which showcases its powerful automation capabilities.
- Users can write and test scripts directly in the browser using Chickenfoot’s interactive shell, which records actions and outputs them as reusable script snippets, simplifying the automation of repetitive tasks.
What is Chickenfoot?
Chickenfoot is a Firefox extension from the MIT User Interface Group. It offers the ability to:
- interact with the chrome of the browser
- use an interactive shell for manipulating the page and to monitor page interactions in various ways
- write scripts that run over multiple sites, so that one can write a script that visits one web page, copies some text from a part of the page, goes to Google, searches for that text, and then appends the first link to a page on the local filesystem
Chickenfoot is an extremely powerful tool for any developer wishing to automate actions or extend the functionality of the web pages he or she utilizes regularly.
Installing Chickenfoot
Chickenfoot is installed in the same way as other Firefox extensions: simply download and accept the XPI file that’s available from the Chickenfoot install page.
Despite the fact that Firefox is a cross-platform browser, the extension works best on Windows. If you’re on a Mac, you can still install Chickenfoot and play along with the code in this article, but you may see inconsistent behaviour. Unfortunately, until the kinks are ironed out, the warning this.docShell has no properties will appear frequently, and your output may not match that described here.
Once you’ve installed the extension and restarted your browser, you can access the Chickenfoot interactive shell by either pressing F8 or selecting the View > Sidebar > Chickenfoot menu option. The shell will open in a sidebar, and will look something like the image below.
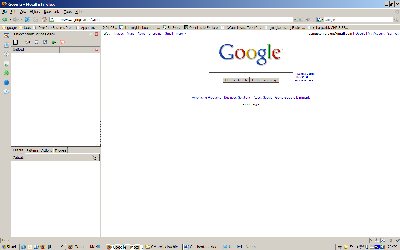
When the Chickenfoot sidebar is first launched, it shows a split view — the top panel contains a text field labeled Untitled; this is the input area where we’ll write our Chickenfoot code.
The bottom panel contains four tabs. The tab that’s selected by default is labelled Output, and displays a history of all your actions, and all of Chickenfoot’s actions, that were applied to the browser. First, we have to tell Chickenfoot to record our actions, though — click on the Actions tab, and make sure that the Record actions option is checked.
Let’s test that our output is being captured. To do so, open a new Firefox tab and load the Google homepage. Once the page has loaded, click on the Images link in the top left of the page, which will take you to Google’s Image Search. If you select the Chickenfoot Output tab once again, you should see the following text:
click("Images")This is more than just a description of what has occurred — it is in fact a snippet of Chickenfoot code! To test this code, click the Back arrow to return to the Google homepage, then copy and paste the snippet we created into the top Chickenfoot panel. Click the green arrow at the top of the panel, and your code snippet will be executed. The page will once again navigate to the Google Image Search page.
Ideas Behind Chickenfoot
Chickenfoot shares certain ideas with other tools that enable a scriptable web.
The main idea behind Chickenfoot is to provide users with a tool for creating macros that anyone can use or write, without needing a programmer’s assistance. I should note here that it’s my opinion that this aim will not be achieved, because there will always be demand for scripts with complex functionality that can only be implemented by a programmer. However, the fact that this idealistic goal is the driving force behind Chickenfoot has resulted in a very useful tool.
These aims are similar to those of CoScripter — indeed, CoScripter uses part of the Chickenfoot version 0.9 code. I won’t go into any details about CoScripter in this article, but if you’re interested in reading more, see Alex Faaborg’s writeup.
Finding Our Feet
Let’s look at how Chickenfoot scripts can be recorded, much like a macro in MS Word or Adobe Photoshop. For this example, we’ll create a script that’s only slightly more involved than the single command we saw in the previous section. For this demo, I’ve taken inspiration from a Getting Started with CoScripter tutorial.
When we’ve finished, our script will cause our browser to:
- Load the page www.google.com.
- Click the Images link.
- Place the text “koalas” into the Search Images textbox.
- Click the Search Images button.
Let’s get scripting! Open your Chickenfoot sidebar if you haven’t already, and type the following command in the top panel:
go("google.com")Then click the green arrow. As you might expect, your browser will load the Google homepage.
To record the rest of our script, we’ll basically just perform the steps I’ve described above. Click on the Images link, then type the text “koalas” in the search box, and hit Tab to exit the field. Finally, click the Search Images button.
Your Output tab should now display something similar to the following:
go("http://www.google.com/")

click("Images")

go("http://images.google.com/imghp?hl=en&tab=wi")

enter("Sign in", "koalas")

click("Search Images button")

go("http://images.google.com/images?hl=en&q=koalas&btnG=Search+Images

&gbv=2")
If you performed these steps while you were logged into your Google account, some of the text values listed may be different, but the actions should still be identical.
Now that we’ve recorded our actions, we can pick and choose from this code output, and copy the desired lines to the top panel of our Chickenfoot sidebar. Voila! We have a working script!
Apart from the initial go action, the commands we’re after are the click and enter commands. We can also simplify the values passed in, so that our script looks something like this:
go("google.com")

click("Images")

enter("koalas")

click("Search Images button")
One thing you may notice from the above example is that Chickenfoot syntax has much in common with many C-based languages, like JavaScript. Chickenfoot commands are, in fact, JavaScript.
Scratching the Surface
One concept that is important to grasp is that Chickenfoot doesn’t run in the normal (X)HTML environment with which most JavaScript users are familiar, but in FireFox’s XUL environment. This environment has been extended for Chickenfoot to allow it to more easily interact with the context of a web page.
If you reference or modify an object to which JavaScript has access in the context of a normal page, it’s likely to behave as you would expect. However, because the Chickenfoot JavaScript engine has a deeper level of access, you can take more liberties than usual, such as accessing objects outside of their default context.
As you explore Chickenfoot further, you may encounter differences between the two environments and how objects behave in them. Most often, the reason for these differences will be down to native functions from the browser environment that have been reimplemented in the XUL Chickenfoot environment for the sake of familiarity.
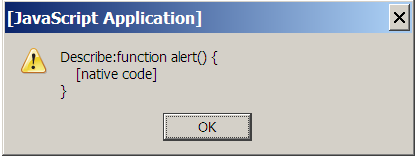
One such example is the alert function; consider the following snippet of JavaScript code:
Object.prototype.describe=function(){alert("Description: " + this);return this;}
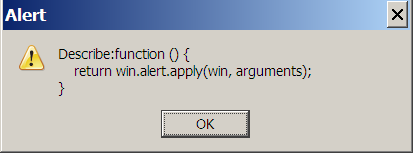
alert("Describe:" + alert);When this code is run in the HTML environment in Firefox, it displays the following dialog box:
When it’s run in the Chickenfoot environment, however, the same code produces the following dialog box:
In addition to the many shared functions, there are some additional functions that are not available in the regular browser-based JavaScript implementation, but are available within the Chickenfoot environment. A list of these functions can be found in the Chickenfoot API documentation.
Pecking at the Chickenfoot API
As with technology, there are certain parts of Chickenfoot that are more useful than others, and parts that you will absolutely need to understand in order to make the most of Chickenfoot.
The following are the parts that I find the most useful.
The Pattern Datatype
Most Chickenfoot functions accept Patterns for parameters. A Pattern is described in the API documentation as “a union of a number of other datatypes.”
It’s easiest to think of a Pattern as a shorthand phrase for accessing objects on an HTML page. For example, the pattern “second Chickenfoot” refers to the second occurrence of the word “Chickenfoot” on a page. If you were to visit the Chickenfoot API page and execute the following code, the second occurrence of the word “Chickenfoot” on the page would be selected:
click("second Chickenfoot");There are a few variations on this approach, and Chickenfoot uses some logic to try to intelligently figure out which pattern your phrase is using. Because of this, certain functions (such as click) don’t work well with Patterns, as they’ll generate errors if they’re given a Pattern that could return more than one possible result.
For example, suppose we were to change the above code to the following:
click("2 Chickenfoot");It’s likely that this will produce an error message in the Output panel similar to the following:
Error: More than one best match for click(2 Chickenfoot)To use Patterns effectively, you therefore need either to make your patterns especially precise (for example, by using XPath syntax or LAPIS query syntax if you have the LAPIS extension installed) or else use the find function, and iterate through the array of objects that this function returns. We’ll look at this approach next.
A Pattern is a union of the following datatypes:
- string
- TC
- Match
- Node
- Range
- Xpath
The find function
The find function takes a Pattern and returns the objects that match that Pattern. Place the following code in your top panel and execute it on this very page:
find("Chickenfoot");You’ll notice an object appear in your Output panel. Clicking on this object will cause all instances of the word “Chickenfoot” to be highlighted.
The object that this function returns is, unfortunately, not a JavaScript array. As a rule of thumb, you’ll need to pipe the results of Chickenfoot’s find function into an array, then loop through the array to pick out the individual object that you’re after.
The include function
The include function allows you to include other JavaScript files in your Chickenfoot script. Chickenfoot comes with some built-in libraries (most of the names are self-explanatory):
prototype.js, a modified version the 1.5.0_rc0 release of Prototype. Unfortunately, at the time of writing, Chickenfoot’s XUL environment raises errors with the Prototype library, rendering newer versions of the Prototype library incompatible.facebook.js, for querying the Facebook API.fileio.js, which provides functions for interacting with the local file system.google-ajax-search.js, for performing AJAX-based Google search queries from any web page.google-maps.js, for querying the Google Maps API.google-search.js, a wrapper for the Google web search API. (Unless you happen to have a Google API key — they’re no longer being issued — this particular library is of little interest.)greasemonkey.js, which implements most of the Greasemonkey API, allowing you to reuse existing Greasemonkey scripts.json.js, for performing JSON serialization and deserialization of data.screenshot.js, which allows you to take screenshots and save them to the local file system via thefileio.jslibrary.scriptaculous.js, version 1.6.1 of the popular Prototype-based effects library.strings.js, which contains functions for removing trailing and leading whitespace from strings.us-geocoder.js, the non-commercially licensed library for geocoding U.S addresses.wz_jsgraphics.js, A version of Walter Zorn’s JavaScript Graphics library.
When you factor in the functionality that each of these libraries brings to the table, you should start to appreciate the potential that Chickenfoot brings to the Web.
You can include a library in your Chickenfoot script in one of four different ways:
- via a chrome URI
- via a file path
- via the name of a file stored in your Chickenfoot profile directory (under Application DataMozillaFirefoxProfiles{profile id}chickenfoot)
- by explicitly referencing the library by name
A note concerning using new libraries: I’ve found that often the kinds of libraries that work best are those that provide specific functionality, like CssQuery or similar libraries, rather than libraries that attempt to be all-encompassing.
The include function also takes an optional object parameter that can be very useful for inspecting what’s available inside a particular library or set of libraries, although this functionality isn’t covered in this article.
Chickenfoot also has several other language constructs, such as after, before, and insert, that allow you to retrieve an element on the page using find, and then to navigate from that element to the element you’re really after. These functions also make it possible to dynamically insert content into that element or into a surrounding HTML element.
Useful Tasks Turned into Chickenfeed
Any technology that purports to automate tasks should make it easy to do useful things quickly. In this section, I’ll describe some tasks for which Chickenfoot is really useful. I’ve included fragments of code, and although they may not illustrate JavaScript best practices, they do a good job of illustrating various uses of Chickenfoot.
Let’s get started! Here are a few handy Chickenfoot scripts.
First, let’s find out what variables are bound at the top level of your FireFox chrome:
list(chromeWindow);This single line should provide you with quite a bit of information. You can also view a heap of information about the current document using this command:
list(chromeWindow.document);Next, let’s output the current web page as an XHTML string to the Output pane:
var xhtmldom = Chickenfoot.domToString(document);

output(xhtmldom);
Now, let’s write the XHTML string above to your desktop. It’s possible to write the XHTML output from the example above to a file on your desktop. Replace the escaped file separator “\” in the last line with “//” if you’re on a Mac or Linux machine:
include("fileio.js");

//use http://lxr.mozilla.org/mozilla/source/xpcom/io/nsDirectoryService

Defs.html

// Firefox directory service to use various built in Windows directories

var xhtmldom = Chickenfoot.domToString(document);

var desktop =

  Components.classes["@mozilla.org/file/directory_service;1"].

  getService(Components.interfaces.nsIProperties).get("Desk",

  Components.interfaces.nsILocalFile);


var fname= "xhtmldom.xml";

write(desktop.path + "\" + fname,xhtmldom);
The above task can actually be performed using even simpler code in the soon-to-be-released version of Chickenfoot, because it uses the default Firefox download directory (usually the Desktop).
Now, let’s interact with the browser chrome that you’ve inspected.
In Firefox, parts of your browser’s window chrome can be accessed if you have the ID of the object in question. This can be retrieved using the function chromeWindow.document.getElementByID. For example, the ID of the Context Menu that’s displayed when you right-click on a page is contentAreaContextMenu. If we were to take the script from example 3 above, which saves the DOM to the desktop, and wrap it in a function, we could then call this function from the Context Menu, like so:
include("fileio.js");


function saveDom() {

  var xhtmldom = Chickenfoot.domToString(document);

  var desktop =

    Components.classes["@mozilla.org/file/directory_service;1"].

    getService(Components.interfaces.nsIProperties).

    get("Desk", Components.interfaces.nsILocalFile);


  var fname= prompt("What filename would you like to save as?");

  write(desktop.path + "\" + fname,xhtmldom);

}

var chromeDoc = chromeWindow.document;

var contextMenu = chromeDoc.getElementById("contentAreaContextMenu");

var menuItem = chromeDoc.createElement("menuitem");

menuItem.setAttribute("label","Save Dom");


menuItem.addEventListener("command", saveDom, false);

contextMenu.appendChild(menuItem);
Note that the Chickenfoot function append function allows you to append data to a document. You use it like this:
append(desktop.path + "\" + fname, "text to append");Hopefully, these examples give you a feel for some of the simple but powerful tasks that can be automated by Chickenfoot script.
A More Advanced Chickenfoot Script
Enough with the simple tasks — let’s do something a bit more advanced with Chickenfoot!
I use the following script to add functionality to Gmail — specifically, to search for and select from a page the conversations that contain text that matches a particular Chickenfoot Pattern. It’s a useful and powerful enhancement to everybody’s favourite web-based email client.
Here’s the script:
var i = 0;

var wasextracted = "";

var  searchstring ="";

var selection = prompt("Select messages with the following text:");

var found = find(selection);

var results = new Array();

for (found;found.hasMatch;found = found.next) {

  results[i]=found.text

  i = i + 1;

}


var searchnumber;

for (var x = 0; x <= results.length; x++) {

  searchnumber = x + 1;

  try {

    extracted=results[x];

    if (wasextracted==extracted) {

      searchstring = searchnumber + " " + extracted;

      check (searchstring);

    } else {

      searchstring = extracted;

      check(searchstring);

      wasextracted=extracted;

    }

  }

  catch(e) {}

}
This script prompts the user for some input, then passes that input as a parameter to a Chickenfoot find function. Remember that find accepts a Chickenfoot Pattern, so the possible uses for this kind of search are almost limitless given that you can ask it to match more than just strings.
You may recall from when we first encountered the find method that it doesn’t return an array. We therefore need to read the results into an array. You’ll probably find the fragment of code that performs this task to be useful in other Chickenfoot scripts that you write:
for (found;found.hasMatch;found = found.next) {

  results[i]=found.text

  i = i + 1;

}
After this, the script loops through the array returned by the find function, and tries to construct a Chickenfoot Pattern that will match the text that contained our search string exactly. We then use the Chickenfoot check function to toggle the checkbox nearest to that section of text, thus selecting that message.
Remember that check needs to be able to make sure it has the exact piece of text, or it will throw an error, which is why we can’t just do a check on found.text.
One notable aspect of the script above is its small size relative to the functionality it achieves. Chickenfoot’s functions provide easier ways of dynamically interacting with a document than such standard APIs as the DOM.
Conclusion
In this article, we looked at a number of ways in which you can easily use Chickenfoot to interact with the browser. We’ve only scratched the surface in terms of what can be done with Chickenfoot in this article — the potential is huge, and it’s limited only by your imagination!
If you’re interested in learning more, check out the following resources:
- The description of Chickenfoot on the CSAIL MIT group’s project page gives some thoughts on the project as well as links to some academic papers. Of these, the thesis by Michael Bolin et. al. (PDF, 0.41MB) contains quite a number of useful examples.
- The Chickenfoot wiki offers some example scripts.
- See the Google Educational talk demonstrating various uses for Chickenfoot.
If you create a killer script, I encourage you to submit it to the Chickenfoot wiki. Happy scripting!
Frequently Asked Questions (FAQs) about Web Rewrite Tools
What is the main purpose of a web rewrite tool?
A web rewrite tool is primarily designed to help users paraphrase or rewrite content. This can be particularly useful for content creators, writers, students, and professionals who need to create unique content from existing sources. These tools use advanced algorithms and artificial intelligence to ensure the rewritten content maintains the original meaning while changing the structure and wording to avoid plagiarism.
How does a web rewrite tool like Chickenfoot differ from others?
Chickenfoot is a unique web rewrite tool that not only rewrites content but also allows users to automate web tasks. It provides a programming environment directly in the browser, enabling users to manipulate web pages and automate web browsing. This feature sets it apart from other rewrite tools that primarily focus on content paraphrasing.
Are web rewrite tools compatible with all browsers?
Most web rewrite tools are designed to be compatible with popular browsers like Google Chrome and Firefox. However, it’s always recommended to check the tool’s specifications or the Chrome Web Store for compatibility information. Some tools, like Outwrite and Wordtune, offer dedicated Chrome extensions for easy access and use.
How reliable are the results from web rewrite tools?
The reliability of results from web rewrite tools can vary. Most tools use advanced AI and machine learning algorithms to ensure the rewritten content is grammatically correct and maintains the original meaning. However, it’s always a good idea to manually review the rewritten content for accuracy and context.
Can I use web rewrite tools for academic purposes?
While web rewrite tools can be helpful in paraphrasing content, they should not be used to plagiarize or misrepresent someone else’s work as your own, especially in academic settings. Always ensure to cite your sources appropriately.
How does the AI in web rewrite tools work?
The AI in web rewrite tools uses natural language processing (NLP) to understand the context and meaning of the original content. It then restructures and rewords the content while maintaining the original intent. Some tools, like Hix.ai, use advanced AI models like GPT-3 for high-quality rewriting.
Are web rewrite tools safe to use?
Most web rewrite tools are safe to use. However, it’s important to review the tool’s privacy policy to understand how your data is handled. Some tools may store your content temporarily for processing, but they usually don’t keep or share your data.
Can web rewrite tools improve my writing skills?
Yes, web rewrite tools can help improve your writing skills by providing alternative ways to express your thoughts and ideas. They can also help you learn new vocabulary and improve your grammar.
Do web rewrite tools support multiple languages?
Some web rewrite tools do support multiple languages, but it’s not a universal feature. Always check the tool’s specifications for language support.
Are there any limitations to using web rewrite tools?
While web rewrite tools are powerful, they may not always capture the nuances of human language perfectly. They may struggle with complex sentences or specific jargon. Therefore, it’s always recommended to review and edit the rewritten content.

