
Republished from last Friday’s Design View
Although it hasn’t received a lot of attention, perhaps the most ambitious and potentially most useful new feature to come to Photoshop CS3 Extended is the ability to interact with 3D files (note: not included in the standard Photoshop CS3 version).
Let’s not underestimate what they’re tackling here. Teaching a 2D image program to think in 3D is an ambitious undertaking. Photoshop was already a behemoth, and if you’ve ever browsed the endlessly cascading menus of an application like 3D Studio, you would probably begin to sweat uncontrollably at the prospect of shoehorning it into Photoshop. I’m thinking something akin to jamming the Taj Mahal into Heathrow Airport.
Sensibly, at least for these first baby steps into the world of 3D, the Photoshop team have kept their ambitions relatively modest.
Firstly, they haven’t attempted to include any 3D modeling tools within Photoshop. All models must be constructed and imported from third-party modeling programs, including Google’s SketchUp (.kmz), Autodesk’s 3D Studio (.3ds), Alias, Maya, and Acrobat 3D. Fortunately both Maya and SketchUp currently have free versions that will allow you to get your feet wet without selling your legs.
If you don’t consider yourself a modeler, or haven’t got time, a huge range of free, downloadable models are available online. Google Earth’s warehouse is probably as good a place as any to start, but there are thousands of 3D libraries offering quality, compatible models in many
of the compatible formats. I grabbed an iPhone
model from the SketchUp warehouse for the example below.
How Does it Work?
 To incorporate 3D objects, Photoshop CS3 Extended adds a new kind of layer, unsurprisingly named a ‘3D layer’. You can add a 3D layer to any document via the main Layers menu (i.e.
 Layer/3D). A dialog box will ask you to select your model and moments later it will appear in your document.
Layers/New Layer from 3D file...
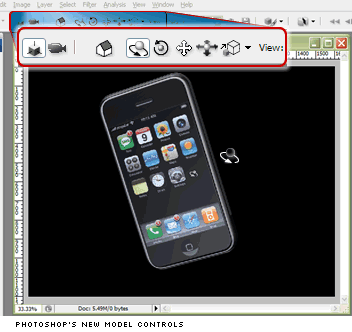
Upon import, there are no obvious ways to interact with your object — most menu items are grayed. However, right-clicking on your 3D object in the Layers palette gives you access to a ‘Transform 3D Model’ option, which in turn gives you access to the model positioning controls (as shown below).
If you’ve had even a little experience with 3D, you’ll likely recognize the spin, scale and move controls shown here, which allow you to position your model in virtual space. A similar set of controls exists for the positioning of your camera in relation to your model/s.
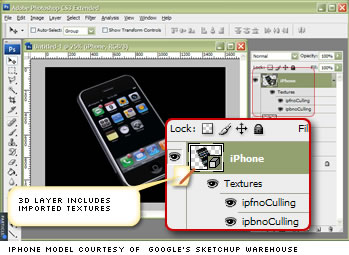
 Your other major area of creative control is the textures and imagery applied to your model’s surfaces. All the textures imported with your model are displayed as linked “child layers” beneath the main model layer.
Double-clicking any of these texture layers will automatically open them as separate, editable documents within Photoshop. Any changes you make and save to these 2D texture images will be immediately reflected in your 3D model view. Of course, when we talk about “surface textures”, we’re really talking about any imagery you might like to apply to a 3D surface — from organic textures, to book covers (as seen in the example below), to car detailing, to sponsors logos and more.
Quirkily, as far as I can tell, there’s no way within Photoshop to apply textures from scratch to a blank model — you need to import your model with some sort of texture, and you’re then free to edit or entirely replace those images inside Photoshop. Of course, as long as you understand this fact, and bring your models in with default texture applied, this shouldn’t particularly impact on what you can accomplish.
 Another interesting feature is the 3D cross-section view tool. This tool allows you to pass an invisible 2D plane through your model, revealing its insides. At this stage I think this feature leans more toward “wow” than useful, but it’s certainly fun to fiddle with.
That’s not to say this new 3D functionality doesn’t have any weaknesses. Lighting control is currently limited to a series of roughly a dozen presets. Of course, Photoshop has some wonderful 2D lighting and levels tools, which all become available to you the second you select the Rasterize 3D menu option, effectively squashing your 3D model into a garden variety 2D layer.
However, if you then decide your model needs to be re-oriented just a smidgen to the left, you might out of luck. You can’t re-inflate your model without winding back history and undoing any other changes you’ve made.
Nevertheless, even allowing for quirks, “first-gen” rough edges, and occasional bugs, it doesn’t take a lot of imagination to see how useful this new feature could be. The ‘3D layer object’ provides any Photoshop user with an entirely new approach to the merchandise shots, 3d logos, product simulations, and 3D illustration they produce
daily.
If you have access to Photoshop CS3 Extended, find some time, grab a few models, and have a play.
Frequently Asked Questions about 3D in Photoshop CS3 Extended
How can I create 3D objects in Photoshop CS3 Extended?
Creating 3D objects in Photoshop CS3 Extended is a straightforward process. First, you need to open a new document and select the 3D layer. Then, choose the type of 3D object you want to create from the 3D menu. You can adjust the properties of the 3D object such as its size, rotation, and position. Once you’re satisfied with the object, you can apply materials and textures to it to make it look more realistic.
Can I animate 3D objects in Photoshop CS3 Extended?
Yes, you can animate 3D objects in Photoshop CS3 Extended. The animation process involves creating keyframes for the properties of the 3D object that you want to animate. You can animate properties such as the object’s position, rotation, and scale. Once you’ve created the keyframes, Photoshop will automatically interpolate the values between them to create a smooth animation.
What are the system requirements for using 3D in Photoshop CS3 Extended?
To use the 3D features in Photoshop CS3 Extended, you need a computer with at least a 1.8 GHz processor, 512 MB of RAM, and a graphics card that supports OpenGL 2.0. You also need at least 1 GB of free hard disk space for installation.
How can I apply textures to 3D objects in Photoshop CS3 Extended?
Applying textures to 3D objects in Photoshop CS3 Extended involves using the Material properties of the 3D object. You can apply different textures to different parts of the object by selecting the appropriate material and then choosing a texture from the Texture menu.
Can I import 3D models from other software into Photoshop CS3 Extended?
Yes, you can import 3D models from other software into Photoshop CS3 Extended. The software supports a variety of 3D file formats, including .3DS, .OBJ, .U3D, and .KMZ. Once you’ve imported the model, you can manipulate it using the 3D tools in Photoshop.
How can I render 3D objects in Photoshop CS3 Extended?
Rendering 3D objects in Photoshop CS3 Extended involves using the Render command in the 3D menu. You can adjust the quality of the render by changing the settings in the Render Settings dialog box. The rendering process can take some time, depending on the complexity of the 3D object and the quality settings.
Can I use Photoshop CS3 Extended to create 3D text?
Yes, you can use Photoshop CS3 Extended to create 3D text. You can do this by creating a text layer and then converting it to a 3D layer. Once the text is in 3D, you can adjust its properties and apply materials and textures to it.
How can I export 3D objects from Photoshop CS3 Extended?
You can export 3D objects from Photoshop CS3 Extended by using the Export command in the 3D menu. The software supports a variety of 3D file formats for export, including .3DS, .OBJ, .U3D, and .KMZ.
Can I use Photoshop CS3 Extended to create 3D animations?
Yes, you can use Photoshop CS3 Extended to create 3D animations. The software has a timeline feature that allows you to create keyframes for the properties of the 3D object that you want to animate. Once you’ve created the keyframes, Photoshop will automatically interpolate the values between them to create a smooth animation.
What are some tips for working with 3D in Photoshop CS3 Extended?
When working with 3D in Photoshop CS3 Extended, it’s important to keep a few things in mind. First, make sure your computer meets the system requirements for using 3D in Photoshop. Second, familiarize yourself with the 3D tools and features in the software. Finally, practice creating and manipulating 3D objects to improve your skills.
Alex has been doing cruel and unusual things to CSS since 2001. He is the lead front-end design and dev for SitePoint and one-time SitePoint's Design and UX editor with over 150+ newsletter written. Co-author of The Principles of Beautiful Web Design. Now Alex is involved in the planning, development, production, and marketing of a huge range of printed and online products and references. He has designed over 60+ of SitePoint's book covers.