


We’ve previously written about Geth, one of the most popular Ethereum nodes.

When you install Geth with helper tools, it comes with a handy tool called Puppeth, which you can use to maintain and install various helper tools for managing and deploying your private blockchain. Puppeth can also be installed independently if you have Go installed, with the following command:
go get github.com/ethereum/go-ethereum/cmd/puppeth
Let’s take a look at the tool.
Note: this tutorial will require you to have two remote machines at your disposal. Whether that is a virtual machine like Homestead Improved or an actual server on your network, or a combination of the two, doesn’t matter. We’ll go through the setup procedure with VMs in this tutorial.
Note: due to a bug in Puppeth, this approach might not work if your virtual machines (see below) are too small. Either make bigger VMs (more RAM) or wait for a fix if that’s not an option.
Key Takeaways
- Puppeth is a versatile tool included with Geth that simplifies the management and deployment of private Ethereum networks, and can also be installed independently with Go.
- The setup process for Puppeth requires two remote machines, such as virtual machines or actual servers, to run separate Ethereum nodes effectively.
- Puppeth supports Docker containers to run helper applications and Ethereum nodes, necessitating Docker installation and configuration on the host machines.
- Key features of Puppeth include creating a genesis block for a new Ethereum network, deploying network components like Ethstats and bootnodes, and managing network validators through a user-friendly command-line interface.
- Puppeth is ideal for developers looking to experiment with blockchain technology by setting up a private network, enabling easy deployment of smart contracts and decentralized applications (dApps).
Bootstrapping
We’ll follow this process to get two virtual machines up and running. We need two machines because we’ll be running two Ethereum nodes, each on its own IP address.
Note: This is a limitation of Puppeth, as it’s not possible to deploy a sealing node on the same machine using this tool.
If you don’t know what Vagrant is, and what tools we’re using here, we recommend you read this introduction to Vagrant, which breaks it down in a newbie-friendly way.
mkdir my_project; cd my_project
git clone https://github.com/swader/homestead_improved hi_puppeth1
git clone https://github.com/swader/homestead_improved hi_puppeth2
Change the IP address of the second clone by going into the hi_puppeth2 folder and modifying the IP address field to be 192.168.10.11 instead of 192.168.10.10.
Next, open up some ports on the VMs by modifying each clone’s Homestead.yaml’s final section, like so:
 ports:
     - send: 8545
       to: 8545
     - send: 30301
       to: 30301
     - send: 30302
       to: 30302
     - send: 30303
       to: 30303
     - send: 30304
       to: 30304
     - send: 30305
       to: 30305
     - send: 30306
       to: 30306
Don’t forget to add these virtual hosts into your host machine’s /etc/hosts file as well. Otherwise the VMs won’t be accessible by their domain name!
192.168.10.10 homestead.test
192.168.10.11 puppethnode.test
Note: change the IP addresses if the addresses of your VMs differ.
Finally, run vagrant up; vagrant ssh to boot each machine and SSH into it. Remember to run this from two separate tabs so you can keep both machines open and running.
Prerequisites
Now let’s install the prerequisite software on each machine.
Puppeth runs helper applications and Ethereum nodes for you in Docker containers, so we need Docker. It’s also useful to install Geth itself.
sudo add-apt-repository -y ppa:ethereum/ethereum
sudo apt-get update
sudo apt-get install \
    apt-transport-https \
    ca-certificates \
    curl \
    software-properties-common \
    ethereum \
    docker.io \
    docker-compose
All other prerequisites will be pulled in by Puppeth through docker itself, but we need to make sure the current user is allowed to operate Docker commands first:
sudo usermod -a -G docker $USER
On the host machine (outside the VMs), we should create new Ethereum accounts in the folder where we’re running our project.
If you’re using the VMs as suggested above, that can be in myproject if myproject is the parent folder which contains hi_puppeth1 and hi_puppeth2.
mkdir node1 node2
geth --datadir node1 account new
geth --datadir node2 account new
Make a note of the addresses generated by this process:
$ mkdir node1 node2
$ geth --datadir node1 account new
INFO [05-20|10:27:20] Maximum peer count                       ETH=25 LES=0 total=25
Your new account is locked with a password. Please give a password. Do not forget this password.
Passphrase:
Repeat passphrase:
Address: {aba88be2dc16eaed464e3991eed5a1eaa5e7b11b}
$ geth --datadir node2 account new
INFO [05-20|10:27:35] Maximum peer count                       ETH=25 LES=0 total=25
Your new account is locked with a password. Please give a password. Do not forget this password.
Passphrase:
Repeat passphrase:
Address: {655a6ea9950cdf9f8a8175fda639555f17277bdf}
We need two accounts because at least two signers are needed in a Proof of Authority blockchain (more on that later).
Puppeth
Now that our VMs are running and our accounts are initialized, let’s see what Puppeth offers. With the remote servers/VMs still running, in a new tab on your host machine run Puppeth with puppeth.
The first thing it’ll ask for is the network name. This is useful for identifying various blockchains if you’re running several on your local machine. We’ll use “puptest” here.
Please specify a network name to administer (no spaces or hyphens, please)
> puptest

Sweet, you can set this via --network=puptest next time!

INFO [05-20|10:32:15] Administering Ethereum network           name=puptest
WARN [05-20|10:32:15] No previous configurations found         path=/Users/swader/.puppeth/puptest
Now let’s connect to our “remote” servers so that Puppeth has them in the list and can do operations on them.
Track new remote server
Using this option lets you connect to the server where your blockchain-related services will be running. Select option 3, then enter the values as follows:
Please enter remote server's address:
> vagrant@192.168.10.10
What's the decryption password for /Users/swader/.ssh/id_rsa? (won't be echoed)
>

The authenticity of host '192.168.10.10:22 (192.168.10.10:22)' can't be established.
SSH key fingerprint is 38:53:d3:c2:85:cf:77:54:a5:54:26:3b:93:5b:6f:09 [MD5]
Are you sure you want to continue connecting (yes/no)? yes
What's the login password for vagrant at 192.168.10.10:22? (won't be echoed)
>
INFO [05-20|10:39:53] Starting remote server health-check      server=vagrant@192.168.10.10
+-----------------------+---------------+---------+--------+-------+
|        SERVER         |    ADDRESS    | SERVICE | CONFIG | VALUE |
+-----------------------+---------------+---------+--------+-------+
| vagrant@192.168.10.10 | 192.168.10.10 |         |        |       |
+-----------------------+---------------+---------+--------+-------+
Puppeth will ask for your SSH key’s passphrase just in case SSH is used to connect to the server. If not, it will ask for the SSH password (as it does in the example above). The default SSH password for the user vagrant on the VM in question is vagrant.
The output at the end echoes the “health” status of the remote server. Since it has no services running, it will just list the IP. You can see the same result by selecting option 1: Show network stats.
Repeat the process for the other VM, so both appear in the health status screen.
New Genesis
To start our blockchain, we should configure a new genesis file. A genesis file is a file from which the first (genesis) block is built, and on which each subsequent block grows.
Select option 2, Configure new genesis, and populate the options like so:
Which consensus engine to use? (default = clique)
 1. Ethash - proof-of-work
 2. Clique - proof-of-authority
> 2

How many seconds should blocks take? (default = 15)
> 10

Which accounts are allowed to seal? (mandatory at least one)
> 0xaba88be2dc16eaed464e3991eed5a1eaa5e7b11b
> 0x655a6ea9950cdf9f8a8175fda639555f17277bdf
> 0x

Which accounts should be pre-funded? (advisable at least one)
> 0x655a6ea9950cdf9f8a8175fda639555f17277bdf
> 0xaba88be2dc16eaed464e3991eed5a1eaa5e7b11b
> 0x

Specify your chain/network ID if you want an explicit one (default = random)
>
INFO [05-20|11:25:55] Configured new genesis block
You can find out about the difference between PoW and PoA here. PoW wastes a lot of computing power and is impractical to run on a local machine, so we’ll pick PoA here. We reduce the block time to 10 seconds so that our transactions confirm faster, and we add the addresses we generated previously as allowed sealers and as pre-funded. Being sealers means that they’re allowed to create new blocks. Since there are no mining rewards in PoA, we also pre-fund them with almost infinite ether so we can test our transactions with those accounts.
The genesis file is now generated, and for backup purposes you can export it into an external file if you wish by selecting option 2 again. This isn’t necessary for now.
Now let’s deploy some blockchain components!
Deploying Network Components
Puppeth deploys these components in separate docker containers using the docker-compose tool. Docker as a tool is outside the scope of this post, but you don’t need to be familiar with it to use this anyway. Let’s start with the first component, Ethstats.
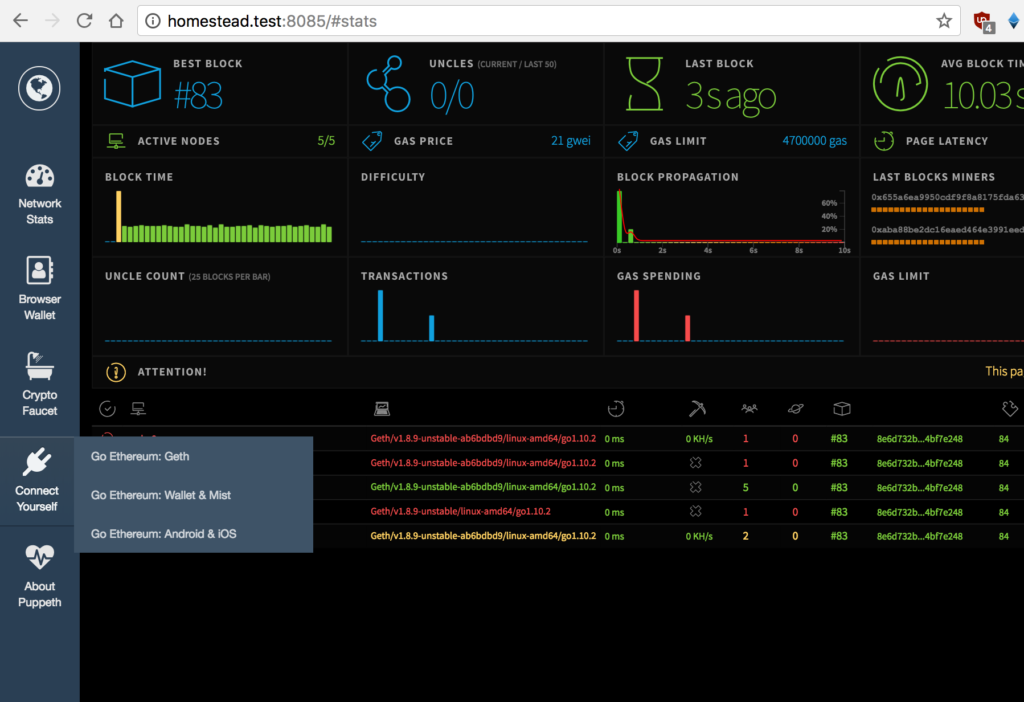
Ethstats
Installing Ethstats installs and runs a local version of the ethstats.net website. Select the first option.
Which server do you want to interact with?
 1. vagrant@192.168.10.10
 2. Connect another server
> 1

Which port should ethstats listen on? (default = 80)
> 8081

Allow sharing the port with other services (y/n)? (default = yes)
>
INFO [05-20|11:43:32] Deploying nginx reverse-proxy            server=192.168.10.10         port=8081
Building nginx
Step 1/1 : FROM jwilder/nginx-proxy
 ---> e143a63bea4b
Successfully built e143a63bea4b
Recreating puptest_nginx_1

Proxy deployed, which domain to assign? (default = 192.168.10.10)
> homestead.test

What should be the secret password for the API? (must not be empty)
> internet2
Found orphan containers (puptest_nginx_1) for this project. If you removed or renamed this service in your compose file, you can run this command with the --remove-orphans flag to clean it up.
Building ethstats
Step 1/2 : FROM puppeth/ethstats:latest
We select the first previously added server. Then we add a port on which to deploy this software, and then name the domain through which we’ll access the app. Finally, we generate a simple “secret” for accessing the API of the app. Docker then takes over and builds the software for us.
The end result should be another health screen output, but this time the table will have another entry: it will also list the ethstats app with its configuration details:
INFO [05-20|11:44:23] Starting remote server health-check      server=vagrant@192.168.10.10
+-----------------------+---------------+----------+-----------------------+----------------+
|        SERVER         |    ADDRESS    | SERVICE  |        CONFIG         |     VALUE      |
+-----------------------+---------------+----------+-----------------------+----------------+
| vagrant@192.168.10.10 | 192.168.10.10 | ethstats | Banned addresses      | []             |
|                       |               |          | Login secret          | internet2      |
|                       |               |          | Website address       | homestead.test |
|                       |               |          | Website listener port | 8081           |
|                       |               |          | --------------------- | -------------- |
|                       |               | nginx    | Shared listener port  | 8081           |
+-----------------------+---------------+----------+-----------------------+----------------+
Visiting the URL homestead.test:8081 in the browser should show a screen like the following:
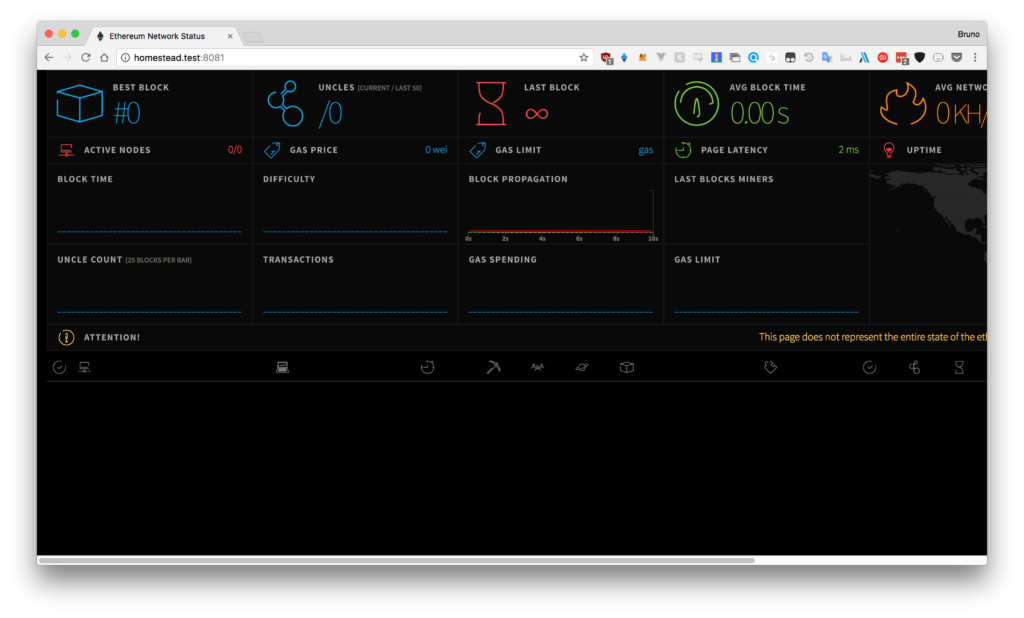
This application is currently useless: we need to deploy at least one node for this app to start showing something!
Bootnode
Let’s deploy a bootnode.
A bootnode is a node which serves just as the first connection point through which an Ethereum node connects to other nodes. It’s basically a relayer of information helping nodes connect.
Pick option 2 to deploy the bootnode. Again, deploy on the same remote server and pick some defaults, then give the node a name for the “health stats” table:
Which server do you want to interact with?
 1. vagrant@192.168.10.10
 2. vagrant@192.168.10.11
 3. Connect another server
> 1

Where should data be stored on the remote machine?
> /home/vagrant/mychain

Which TCP/UDP port to listen on? (default = 30303)
>

How many peers to allow connecting? (default = 512)
>

How many light peers to allow connecting? (default = 256)
>

What should the node be called on the stats page?
> booty
Docker will build the node and run it. The location where to store data on the remote machine is arbitrary. We picked the vagrant user’s home directory.
If you revisit the ethstats page now (homestead.test:8081) you’ll notice that booty is in the list of nodes!
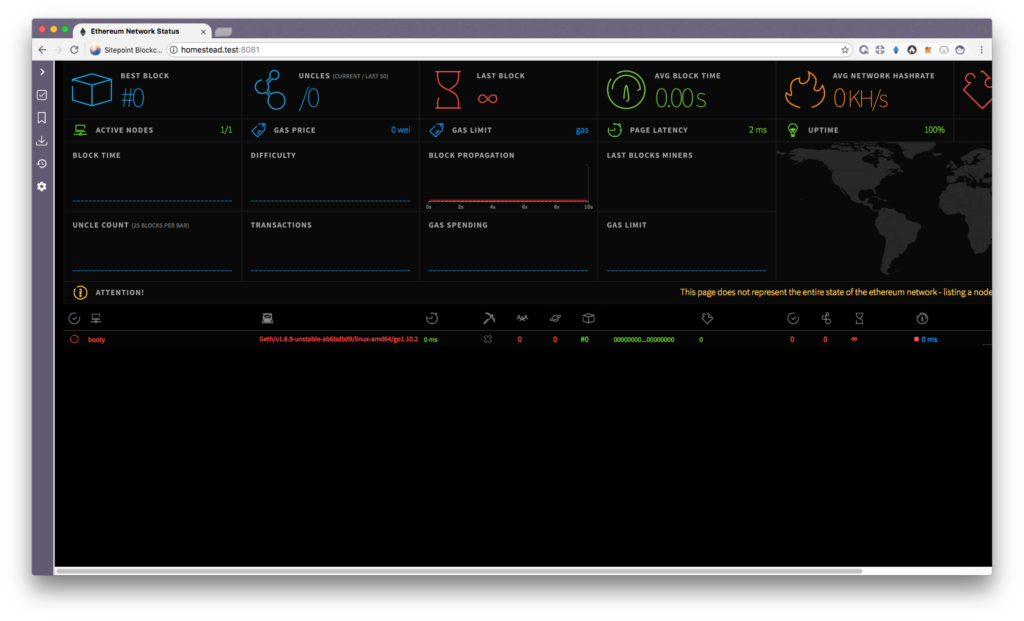
Note: if this is not the case and your bootnode is listed as offline in the healthcheck, reboot the remote server (with the VM, that’s vagrant reload) and then check again.
Sealnode
A seal node is a node which can serve as the miner of new blocks. Let’s deploy that next:
Which server do you want to interact with?
 1. vagrant@192.168.10.10
 2. vagrant@192.168.10.11
 3. Connect another server
> 1

Where should data be stored on the remote machine?
> /home/vagrant/mychainsealer

Which TCP/UDP port to listen on? (default = 30303)
> 30301

How many peers to allow connecting? (default = 50)
>

How many light peers to allow connecting? (default = 0)
>

What should the node be called on the stats page?
> sealer

Please paste the signer's key JSON:
> {"address":"655a6ea9950cdf9f8a8175fda639555f17277bdf","crypto":{"cipher":"aes-128-ctr","ciphertext":"9278db9216e3c58380864bb53edcec245c5bc919a51733333410fe4b22818914","cipherparams":{"iv":"ca6579d08e97c25f46e127e026bafadb"},"kdf":"scrypt","kdfparams":{"dklen":32,"n":262144,"p":1,"r":8,"salt":"93e5f080d76e50c0e08add15d3fdd9b143295d0ccaeec9dae89446e0478ba4a1"},"mac":"28fcdaaf6008d82a0fe22ac60de3398f12a47e471a21618b2333fe15d8d6c9c3"},"id":"20ae40fe-ebf9-4047-8203-711bf67213e9","version":3}

What's the unlock password for the account? (won't be echoed)
>

What gas limit should empty blocks target (MGas)? (default = 4.700)
>

What gas price should the signer require (GWei)? (default = 18.000)
>
All defaults, except location to store data and name of the node. For JSON, grab the content from the file we generated previously when creating new Ethereum accounts. That’s going to be in my_project/node1/keystore. The full contents of that file should be pasted here, and Puppeth will then ask for the password to unlock that wallet. Everything else from then on is automatic again.
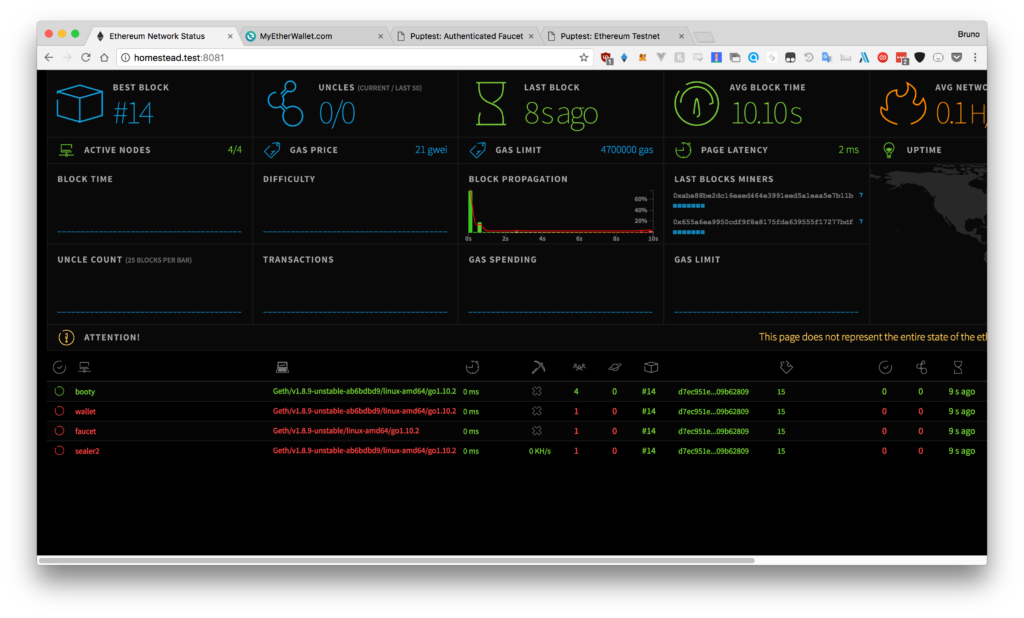
The health screen should show the node as working and it should appear in the Ethstats screen under the name you gave it.

Next, repeat the process for the other machine (the one with the IP address 192.168.10.11). Give that node a different name, and use the other keystore file. In other words, set the other account we created as the sealer in this node.
Your nodes will now be running and mining together. You should be able to see some progress on the Ethstats screen you deployed in the previous step.
Note: if the status isn’t changing or a single block gets mined and then nothing happens, the nodes locked up . This can happen on fresh installations. Reboot the VMs and it will work fine.
Wallet
To be able to easily send Ether and custom tokens around, you can deploy your own version of MyEtherWallet using Puppeth.
Select Wallet in the selection of components to deploy and populate the options as follows:
Which port should the wallet listen on? (default = 80)
> 8083

Allow sharing the port with other services (y/n)? (default = yes)
> no

Where should data be stored on the remote machine?
> /home/vagrant/wallet

Which TCP/UDP port should the backing node listen on? (default = 30303)
> 30304

Which port should the backing RPC API listen on? (default = 8545)
>

What should the wallet be called on the stats page?
> wallet
The wallet should be available and auto-connected to your test network.
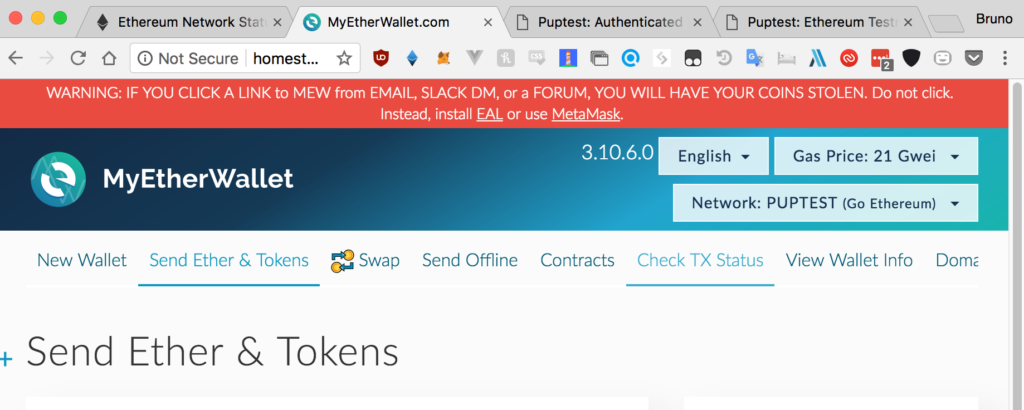
You can open a wallet by selecting JSON file as the means of unlocking it and pointing to one of the JSON files we generated earlier in the my_project/nodeX/keystore folders. Then enter the password, and you’ll have trillions of ether to send. You can use this local version of the wallet to create accounts on your private blockchain and thoroughly test everything. Go ahead and send some ether!
Faucet
A Faucet is a site on which a user can easily request some test ether. Publicly accessible faucets like the Rinkeby Faucet have protection mechanisms against spam, but our local faucet can be much less secure since it’s a test blockchain.
Which port should the faucet listen on? (default = 80)
> 8084

Allow sharing the port with other services (y/n)? (default = yes)
> no

How many Ethers to release per request? (default = 1)
>

How many minutes to enforce between requests? (default = 1440)
> 1

How many funding tiers to feature (x2.5 amounts, x3 timeout)? (default = 3)
>

Enable reCaptcha protection against robots (y/n)? (default = no)
>
WARN [05-20|12:51:13] Users will be able to requests funds via automated scripts

Where should data be stored on the remote machine?
> /home/vagrant/faucet

Which TCP/UDP port should the light client listen on? (default = 30303)
> 30305

What should the node be called on the stats page?
> faucet

Please paste the faucet's funding account key JSON:
> {"address":"655a6ea9950cdf9f8a8175fda639555f17277bdf","crypto":{"cipher":"aes-128-ctr","ciphertext":"9278db9216e3c58380864bb53edcec245c5bc919a51733333410fe4b22818914","cipherparams":{"iv":"ca6579d08e97c25f46e127e026bafadb"},"kdf":"scrypt","kdfparams":{"dklen":32,"n":262144,"p":1,"r":8,"salt":"93e5f080d76e50c0e08add15d3fdd9b143295d0ccaeec9dae89446e0478ba4a1"},"mac":"28fcdaaf6008d82a0fe22ac60de3398f12a47e471a21618b2333fe15d8d6c9c3"},"id":"20ae40fe-ebf9-4047-8203-711bf67213e9","version":3}

What's the unlock password for the account? (won't be echoed)
>

Permit non-authenticated funding requests (y/n)? (default = false)
> y
Once these services have all been added, you should be able to see them in the Ethstats list.
Dashboard
Finally, Puppeth offers the “Dashboard”, a web interface which combines all the interfaces we’ve launched so far. The deployment process is equally simple: just follow the steps, and when asked about linking to existing components, select those that we already booted up. The final result should look something like this:
The dashboard is a collection of all the tools we’ve deployed so far, plus some instructions on how to manually connect to the blockchain we had built.
Conclusion
You can now start developing your smart contracts with ease, and deploy them to your test blockchain through your local version of MyEtherWallet or the MetaMask integration of Remix, or any other combination.
Puppeth is a one-stop shop of blockchain service management tools. It’s very handy when you’re doing blockchain development often, but can be complicated to wrap one’s head around. Hopefully this guide has helped you understand what it does and how it does it, and will assist you in your future blockchain endeavors.
The Docker containers that run the components are configured to auto-run on boot, so rebooting either of the VMs will not require any reconfiguration, but you’ll need to re-add the servers into Puppeth if you want to further tweak some components or install new ones.
Any questions? Ping the author on Twitter!
Frequently Asked Questions (FAQs) about Puppeth
What is the primary function of Puppeth in Ethereum?
Puppeth is a tool in Ethereum that plays a crucial role in setting up and managing Ethereum networks. It is a command-line interface that allows users to deploy and manage Ethereum networks with ease. Puppeth can be used to create new Ethereum networks, monitor existing ones, deploy dApps, and manage network validators. It simplifies the process of setting up a private Ethereum network, making it accessible even for those with limited technical knowledge.
How can I install Puppeth on my system?
Puppeth is part of the Go Ethereum (Geth) suite, so you need to install Geth first. You can download Geth from the official Ethereum website and follow the installation instructions provided. Once Geth is installed, you can access Puppeth from the command line by simply typing ‘puppeth’.
How can I create a new Ethereum network using Puppeth?
After launching Puppeth, you will be prompted to name your new network. After naming, Puppeth will generate a genesis block for your network. You can customize the settings of this block, such as the mining difficulty and the gas limit. Once the genesis block is set up, you can start adding nodes to your network.
How can I add nodes to my Ethereum network?
In Puppeth, after creating your network and genesis block, you can add nodes by selecting the ‘Manage existing network’ option. You will then be prompted to specify the node’s details, such as its IP address and the Ethereum client it’s running (Geth or Parity). Once the node is added, it will start synchronizing with the rest of the network.
Can I deploy dApps on my Puppeth network?
Yes, Puppeth allows you to deploy decentralized applications (dApps) on your Ethereum network. You can do this by selecting the ‘Manage dapp’ option in Puppeth. You will then be prompted to specify the dApp’s details, such as its smart contract address and ABI.
How can I manage validators in Puppeth?
Puppeth provides an option to manage validators in your Ethereum network. Validators are nodes that are responsible for verifying and validating new blocks in the network. You can add or remove validators, and also change their voting policies.
Can I monitor my Ethereum network in Puppeth?
Yes, Puppeth includes a network monitoring feature. This allows you to track the status of your network and its nodes, including their synchronization status, transaction pool, and gas price.
What are the system requirements for running Puppeth?
Puppeth is a lightweight tool and does not require a powerful system. However, running an Ethereum node can be resource-intensive, especially in terms of disk space. It is recommended to have at least 200GB of free disk space for a full Ethereum node.
Can I use Puppeth to connect to the main Ethereum network?
While Puppeth can technically be used to connect to the main Ethereum network, it is primarily designed for setting up and managing private Ethereum networks. Connecting to the main network requires syncing with the entire Ethereum blockchain, which can be resource-intensive and time-consuming.
Is Puppeth open-source?
Yes, Puppeth is an open-source tool. Its source code is available on the Go Ethereum GitHub repository. This means that anyone can contribute to its development, or fork it to create their own version.