


In this tutorial, we’re going to look at managing user authentication in the MEAN stack. We’ll use the most common MEAN architecture of having an Angular single-page app using a REST API built with Node, Express and MongoDB.
When thinking about user authentication, we need to tackle the following things:
- let a user register
- save user data, but never directly store passwords
- let a returning user log in
- keep a logged in user’s session alive between page visits
- have some pages that can only been seen by logged in users
- change output to the screen depending on logged in status (for example, a “login” button or a “my profile” button).
Before we dive into the code, let’s take a few minutes for a high-level look at how authentication is going to work in the MEAN stack.
For more in-depth JavaScript knowledge, read our book, JavaScript: Novice to Ninja, 2nd Edition.
The MEAN Stack Authentication Flow
So what does authentication look like in the MEAN stack?
Still keeping this at a high level, these are the components of the flow:
- user data is stored in MongoDB, with the passwords hashed
- CRUD functions are built in an Express API — Create (register), Read (login, get profile), Update, Delete
- an Angular application calls the API and deals with the responses
- the Express API generates a JSON Web Token (JWT, pronounced “Jot”) upon registration or login, and passes this to the Angular application
- the Angular application stores the JWT in order to maintain the user’s session
- the Angular application checks the validity of the JWT when displaying protected views
- the Angular application passes the JWT back to Express when calling protected API routes.
JWTs are preferred over cookies for maintaining the session state in the browser. Cookies are better for maintaining state when using a server-side application.
The Example Application
The code for this tutorial is available on GitHub. To run the application, you’ll need to have Node.js installed, along with MongoDB. (For instructions on how to install, please refer to Mongo’s official documentation — Windows, Linux, macOS).
The Angular App
To keep the example in this tutorial simple, we’ll start with an Angular app with four pages:
- home page
- register page
- login page
- profile page
The pages are pretty basic and look like this to start with:

The profile page will only be accessible to authenticated users. All the files for the Angular app are in a folder inside the Angular CLI app called /client.
We’ll use the Angular CLI for building and running the local server. If you’re unfamiliar with the Angular CLI, refer to the Building a Todo App with Angular CLI tutorial to get started.
The REST API
We’ll also start off with the skeleton of a REST API built with Node, Express and MongoDB, using Mongoose to manage the schemas. This API should initially have three routes:
/api/register(POST), to handle new users registering/api/login(POST), to handle returning users logging in/api/profile/USERID(GET), to return profile details when given aUSERID
Let’s set that up now. We can use the express-generator tool to create a lot of the boiler plate for us. If this is new for you, we have a tutorial on using it here.
Install it with npm i -g express-generator. Then, create a new Express app, choosing Pug as the view engine:
express -v pug mean-authentication
When the generator has run, change into the project directory and install the dependencies:
cd mean-authentication
npm i
At the time of writing, this pulls in an outdated version of Pug. Let’s fix that:
npm i pug@latest
We can also install Mongoose while we’re at it:
npm i mongoose
Next, we need to create our folder structure.
- Remove the
publicfolder:rm -rf public. - Create an
apidirectory:mkdir api. - Create a
controllers, amodels, and aroutesdirectory in theapidirectory:mkdir -p api/{controllers,models,routes}. - Create a
authenication.jsfile and aprofile.jsfile in thecontrollersdirectory:touch api/controllers/{authentication.js,profile.js}. - Create a
db.jsfile and ausers.jsfile in themodelsdirectory:touch api/models/{db.js,users.js}. - Create an
index.jsfile in theroutesdirectory:touch api/routes/index.js.
When you’re done, things should look like this:
.
└── api
    ├── controllers
    │   ├── authentication.js
    │   └── profile.js
    ├── models
    │   ├── db.js
    │   └── users.js
    └── routes
        └── index.js
Now let’s add the API functionality. Replace the code in app.js with the following:
require('./api/models/db');

const cookieParser = require('cookie-parser');
const createError = require('http-errors');
const express = require('express');
const logger = require('morgan');
const path = require('path');

const routesApi = require('./api/routes/index');

const app = express();

// view engine setup
app.set('views', path.join(__dirname, 'views'));
app.set('view engine', 'pug');

app.use(logger('dev'));
app.use(express.json());
app.use(express.urlencoded({ extended: false }));
app.use(cookieParser());
app.use(express.static(path.join(__dirname, 'public')));

app.use('/api', routesApi);

// catch 404 and forward to error handler
app.use((req, res, next) => {
  next(createError(404));
});

// error handler
app.use((err, req, res, next) => {
  // set locals, only providing error in development
  res.locals.message = err.message;
  res.locals.error = req.app.get('env') === 'development' ? err : {};

  // render the error page
  res.status(err.status || 500);
  res.render('error');
});

module.exports = app;
Add the following to api/models/db.js:
require('./users');
const mongoose = require('mongoose');
const dbURI = 'mongodb://localhost:27017/meanAuth';

mongoose.set('useCreateIndex', true);
mongoose.connect(dbURI, {
  useNewUrlParser: true,
  useUnifiedTopology: true
});

mongoose.connection.on('connected', () => {
  console.log(`Mongoose connected to ${dbURI}`);
});
mongoose.connection.on('error', (err) => {
  console.log(`Mongoose connection error: ${err}`);
});
mongoose.connection.on('disconnected', () => {
  console.log('Mongoose disconnected');
});
Add the following to api/routes/index.js:
const ctrlAuth = require('../controllers/authentication');
const ctrlProfile = require('../controllers/profile');

const express = require('express');
const router = express.Router();

// profile
router.get('/profile/:userid', ctrlProfile.profileRead);

// authentication
router.post('/register', ctrlAuth.register);
router.post('/login', ctrlAuth.login);

module.exports = router;
Add the following to api/controllers/profile.js:
module.exports.profileRead = (req, res) => {
  console.log(`Reading profile ID: ${req.params.userid}`);
  res.status(200);
  res.json({
    message : `Profile read: ${req.params.userid}`
  });
};
Add the following to api/controllers/authentication.js:
module.exports.register = (req, res) => {
  console.log(`Registering user: ${req.body.email}`);
  res.status(200);
  res.json({
    message : `User registered: ${req.body.email}`
  });
};

module.exports.login = (req, res) => {
  console.log(`Logging in user: ${req.body.email}`);
  res.status(200);
  res.json({
    message : `User logged in: ${req.body.email}`
  });
};
Ensure that Mongo is running and then, finally, start the server with npm run start. If everything is configured properly, you should see a message in your terminal that Mongoose is connected to mongodb://localhost:27017/meanAuth, and you should now be able to make requests to, and get responses from, the API. You can test this with a tool such as Postman.
Creating the MongoDB Data Schema with Mongoose
Next, let’s add a schema to api/models/users.js. It defines the need for an email address, a name, a hash and a salt. The hash and salt will be used instead of saving a password. The email is set to unique as we’ll use it for the login credentials. Here’s the schema:
const mongoose = require('mongoose');

const userSchema = new mongoose.Schema({
  email: {
    type: String,
    unique: true,
    required: true
  },
  name: {
    type: String,
    required: true
  },
  hash: String,
  salt: String
});

mongoose.model('User', userSchema);
Managing the Password without Saving It
Saving user passwords is a big no-no. Should a hacker get a copy of your database, you want to make sure they can’t use it to log in to accounts. This is where the hash and salt come in.
The salt is a string of characters unique to each user. The hash is created by combining the password provided by the user and the salt, and then applying one-way encryption. As the hash can’t be decrypted, the only way to authenticate a user is to take the password, combine it with the salt and encrypt it again. If the output of this matches the hash, the password must have been correct.
To do the setting and the checking of the password, we can use Mongoose schema methods. These are essentially functions that you add to the schema. They’ll both make use of the Node.js Crypto module.
At the top of the users.js model file, require crypto so that we can use it:
const crypto = require('crypto');
Nothing needs installing, as crypto ships as part of Node. Crypto itself has several methods; we’re interested in randomBytes to create the random salt and pbkdf2Sync to create the hash.
Setting the Password
To save the reference to the password, we can create a new method called setPassword on the userSchema schema that accepts a password parameter. The method will then use crypto.randomBytes to set the salt, and crypto.pbkdf2Sync to set the hash:
userSchema.methods.setPassword = function(password) {
  this.salt = crypto.randomBytes(16).toString('hex');
  this.hash = crypto
    .pbkdf2Sync(password, this.salt, 1000, 64, 'sha512')
    .toString('hex');
};
We’ll use this method when creating a user. Instead of saving the password to a password path, we’ll be able to pass it to the setPassword function to set the salt and hash paths in the user document.
Checking the Password
Checking the password is a similar process, but we already have the salt from the Mongoose model. This time we just want to encrypt the salt and the password and see if the output matches the stored hash.
Add another new method to the users.js model file, called validPassword:
userSchema.methods.validPassword = function(password) {
  const hash = crypto
    .pbkdf2Sync(password, this.salt, 1000, 64, 'sha512')
    .toString('hex');
  return this.hash === hash;
};
Generating a JSON Web Token (JWT)
One more thing the Mongoose model needs to be able to do is generate a JWT, so that the API can send it out as a response. A Mongoose method is ideal here too, as it means we can keep the code in one place and call it whenever needed. We’ll need to call it when a user registers and when a user logs in.
To create the JWT, we’ll use a package called jsonwebtoken, which needs to be installed in the application, so run this on the command line:
npm i jsonwebtoken
Then require this in the users.js model file:
const jwt = require('jsonwebtoken');
This module exposes a sign method that we can use to create a JWT, simply passing it the data we want to include in the token, plus a secret that the hashing algorithm will use. The data should be sent as a JavaScript object, and include an expiry date in an exp property.
Adding a generateJwt method to userSchema in order to return a JWT looks like this:
userSchema.methods.generateJwt = function() {
  const expiry = new Date();
  expiry.setDate(expiry.getDate() + 7);

  return jwt.sign(
    {
      _id: this._id,
      email: this.email,
      name: this.name,
      exp: parseInt(expiry.getTime() / 1000)
    },
    'MY_SECRET'
  ); // DO NOT KEEP YOUR SECRET IN THE CODE!
};
Note: it’s important that your secret is kept safe: only the originating server should know what it is. It’s best practice to set the secret as an environment variable, and not have it in the source code, especially if your code is stored in version control somewhere.
And that’s everything we need to do with the database.
Set up Passport to Handle the Express Authentication
Passport is a Node module that simplifies the process of handling authentication in Express. It provides a common gateway to work with many different authentication “strategies”, such as logging in with Facebook, Twitter or Oauth. The strategy we’ll use is called “local”, as it uses a username and password stored locally.
To use Passport, first install it and the strategy, saving them in package.json:
npm i passport passport-local
Configure Passport
Inside the api folder, create a new folder config and create a file in there called passport.js. This is where we define the strategy:
mkdir -p api/config
touch api/config/passport.js
Before defining the strategy, this file needs to require Passport, the strategy, Mongoose and the User model:
const mongoose = require('mongoose');
const passport = require('passport');
const LocalStrategy = require('passport-local').Strategy;
const User = mongoose.model('User');
For a local strategy, we essentially just need to write a Mongoose query on the User model. This query should find a user with the email address specified, and then call the validPassword method to see if the hashes match.
There’s just one curiosity of Passport to deal with. Internally, the local strategy for Passport expects two pieces of data called username and password. However, we’re using email as our unique identifier, not username. This can be configured in an options object with a usernameField property in the strategy definition. After that, it’s over to the Mongoose query.
So all in, the strategy definition will look like this:
passport.use(
  new LocalStrategy(
    {
      usernameField: 'email'
    },
    function(username, password, done) {
      User.findOne({ email: username }, function(err, user) {
        if (err) {
          return done(err);
        }
        // Return if user not found in database
        if (!user) {
          return done(null, false, {
            message: 'User not found'
          });
        }
        // Return if password is wrong
        if (!user.validPassword(password)) {
          return done(null, false, {
            message: 'Password is wrong'
          });
        }
        // If credentials are correct, return the user object
        return done(null, user);
      });
    }
  )
);
Note how the validPassword schema method is called directly on the user instance.
Now Passport just needs to be added to the application. So in app.js we need to require the Passport module, require the Passport config and initialize Passport as middleware. The placement of all of these items inside app.js is quite important, as they need to fit into a certain sequence.
The Passport module should be required at the top of the file with the other general require statements:
const cookieParser = require('cookie-parser');
const createError = require('http-errors');
const express = require('express');
const logger = require('morgan');
const passport = require('passport');
const path = require('path');
The config should be required after the model is required, as the config references the model.
require('./api/models/db');
require('./api/config/passport');
Finally, Passport should be initialized as Express middleware just before the API routes are added, as these routes are the first time that Passport will be used:
app.use(passport.initialize());
app.use("/api", routesApi);
We’ve now got the schema and Passport set up. Next, it’s time to put these to use in the routes and controllers of the API.
Configure API Endpoints
With the API we’ve got two things to do:
- make the controllers functional
- secure the
/api/profileroute so that only authenticated users can access it
Code the Register and Login API Controllers
In the example app, the register and login controllers are in /api/controllers/authentication.js. In order for the controllers to work, the file needs to require Passport, Mongoose and the user model:
const mongoose = require('mongoose');
const passport = require('passport');
const User = mongoose.model('User');
The Register API Controller
The register controller needs to do the following:
- take the data from the submitted form and create a new Mongoose model instance
- call the
setPasswordmethod we created earlier to add the salt and the hash to the instance - save the instance as a record to the database
- generate a JWT
- send the JWT inside the JSON response
In code, all of that looks like this. This should replace the dummy register function we coded earlier:
module.exports.register = (req, res) => {
  const user = new User();

  user.name = req.body.name;
  user.email = req.body.email;

  user.setPassword(req.body.password);

  user.save(() => {
    const token = user.generateJwt();
    res.status(200);
    res.json({
      token: token
    });
  });
};
This makes use of the setPassword and generateJwt methods we created in the Mongoose schema definition. See how having that code in the schema makes this controller easier to read and understand.
Don’t forget that, in reality, this code would have a number of error traps, validating form inputs and catching errors in the save function. They’re omitted here to highlight the main functionality of the code, but if you’d like a refresher, check out “Forms, File Uploads and Security with Node.js and Express”.
The Login API Controller
The login controller hands over pretty much all control to Passport, although you could (and should) add some validation beforehand to check that the required fields have been sent.
For Passport to do its magic and run the strategy defined in the config, we need to call the authenticate method as shown below. This method will call a callback with three possible parameters err, user and info. If user is defined, it can be used to generate a JWT to be returned to the browser. This should replace the dummy login method we defined earlier:
module.exports.login = (req, res) => {
  passport.authenticate('local', (err, user, info) => {
    // If Passport throws/catches an error
    if (err) {
      res.status(404).json(err);
      return;
    }

    // If a user is found
    if (user) {
      const token = user.generateJwt();
      res.status(200);
      res.json({
        token: token
      });
    } else {
      // If user is not found
      res.status(401).json(info);
    }
  })(req, res);
};
Securing an API Route
The final thing to do in the back end is make sure that only authenticated users can access the /api/profile route. The way to validate a request is to ensure that the JWT sent with it is genuine, by using the secret again. This is why you should keep it a secret and not place it in the code.
Configuring the Route Authentication
First we need to install a piece of middleware called express-jwt:
npm i express-jwt
Then we need to require it and configure it in the file where the routes are defined. In the sample application, this is /api/routes/index.js. Configuration is a case of telling it the secret, and — optionally — the name of the property to create on the req object that will hold the JWT. We’ll be able to use this property inside the controller associated with the route. The default name for the property is user, but this is the name of an instance of our Mongoose User model, so we’ll set it to payload to avoid confusion:
// api/routes/index.js

const jwt = require('express-jwt');

const auth = jwt({
  secret: 'MY_SECRET',
  userProperty: 'payload'
});

...
Again, don’t keep the secret in the code!
Applying the Route Authentication
To apply this middleware, simply reference the function in the middle of the route to be protected, like this:
router.get('/profile', auth, ctrlProfile.profileRead);
Notice that we’ve changed /profile/:userid to /profile, as the ID will be obtained from the JWT.
If someone tries to access that route now without a valid JWT, the middleware will throw an error. To make sure our API plays nicely, catch this error and return a 401 response by adding the following into the error handlers section of the main app.js file:
// catch 404 and forward to error handler
app.use((req, res, next) => { ... });

// Catch unauthorised errors
app.use((err, req, res) => {
  if (err.name === 'UnauthorizedError') {
    res.status(401);
    res.json({ message: `${err.name}: ${err.message}` });
  }
});
At this point you can attempt to GET the /api/profile endpoint using a tool such as Postman, or in your browser, and you should see a 401 response.
Using the Route Authentication
In this example, we only want people to be able to view their own profiles, so we get the user ID from the JWT and use it in a Mongoose query.
The controller for this route is in /api/controllers/profile.js. The entire contents of this file look like this:
const mongoose = require('mongoose');
const User = mongoose.model('User');

module.exports.profileRead = (req, res) => {
  // If no user ID exists in the JWT return a 401
  if (!req.payload._id) {
    res.status(401).json({
      message: 'UnauthorizedError: private profile'
    });
  } else {
    // Otherwise continue
    User.findById(req.payload._id).exec(function(err, user) {
      res.status(200).json(user);
    });
  }
};
Naturally, this should be fleshed out with some more error trapping — for example, if the user isn’t found — but this snippet is kept brief to demonstrate the key points of the approach.
And that’s it for the back end. The database is configured, we have API endpoints for registering and logging in that generate and return a JWT, and also a protected route.
On to the front end!
Initialize the Angular App
We’re going to use the Angluar CLI in this section, so before you go any further, make sure it’s installed globally:
npm install -g @angular/cli
Then, in the project’s root directory, run:
ng new client

? Would you like to add Angular routing? Yes
? Which stylesheet format would you like to use? CSS
...
✔ Packages installed successfully.
    Successfully initialized git.
This generates a new client directory with an AppModule and AppRoutingModule. By answering “Yes” to “Would you like to add Angular routing”, the AppRoutingModule is automatically created and imported into AppModule for us.
Because we’ll make use of Angular forms and Angular’s HTTP client, we need to import Angular’s FormsModule and HttpClientModule. Change the contents of client/src/app/app.module.ts like so:
import { BrowserModule } from "@angular/platform-browser";
import { NgModule } from "@angular/core";

import { AppRoutingModule } from "./app-routing.module";
import { AppComponent } from "./app.component";
import { FormsModule } from "@angular/forms";
import { HttpClientModule } from "@angular/common/http";

@NgModule({
  declarations: [
    AppComponent
  ],
  imports: [BrowserModule, AppRoutingModule, FormsModule, HttpClientModule],
  providers: [],
  bootstrap: [AppComponent]
})
export class AppModule {}
Create an Angular Authentication Service
Most of the work in the front end can be put into an Angular service, creating methods to manage:
- saving the JWT in local storage
- reading the JWT from local storage
- deleting the JWT from local storage
- calling the register and login API endpoints
- checking whether a user is currently logged in
- getting the details of the logged-in user from the JWT
We’ll need to create a new service called AuthenticationService. With the CLI, this can be done by running:
$ cd client
$ ng generate service authentication
CREATE src/app/authentication.service.spec.ts (397 bytes)
CREATE src/app/authentication.service.ts (143 bytes)
In the example app, this is in the file /client/src/app/authentication.service.ts:
import { Injectable } from "@angular/core";

@Injectable({
  providedIn: "root"
})
export class AuthenticationService {
  constructor() {}
}
Local Storage: Saving, Reading and Deleting a JWT
To keep a user logged in between visits, we use localStorage in the browser to save the JWT. An alternative is to use sessionStorage, which will only keep the token during the current browser session.
First, we want to create a few interfaces to handle the data types. This is useful for type checking our application. The profile returns an object formatted as UserDetails, and the login and register endpoints expect a TokenPayload during the request and return a TokenResponse object:
export interface UserDetails {
  _id: string;
  email: string;
  name: string;
  exp: number;
  iat: number;
}

interface TokenResponse {
  token: string;
}

export interface TokenPayload {
  email: string;
  password: string;
  name?: string;
}
This service uses the HttpClient service from Angular to make HTTP requests to our server application (which we’ll use in a moment) and the Router service to navigate programmatically. We must inject them into our service constructor:
constructor(private http: HttpClient, private router: Router) {}
Then we define four methods that interact with the JWT token. We implement saveToken to handle storing the token into localStorage and onto the token property, a getToken method to retrieve the token from localStorage or from the token property, and a logout function that removes the JWT token and redirects to the home page.
It’s important to note that this code doesn’t run if you’re using server-side rendering, because APIs like localStorage and window.atob aren’t available. There are details about solutions to address server-side rendering in the Angular documentation.
So far, this gives us:
import { Injectable } from "@angular/core";
import { HttpClient } from "@angular/common/http";
import { Router } from "@angular/router";
import { Observable } from "rxjs";
import { map } from "rxjs/operators";

export interface UserDetails {
  _id: string;
  email: string;
  name: string;
  exp: number;
  iat: number;
}

interface TokenResponse {
  token: string;
}

export interface TokenPayload {
  email: string;
  password: string;
  name?: string;
}

@Injectable({
  providedIn: "root"
})
export class AuthenticationService {
  private token: string;

  constructor(private http: HttpClient, private router: Router) {}

  private saveToken(token: string): void {
    localStorage.setItem("mean-token", token);
    this.token = token;
  }

  private getToken(): string {
    if (!this.token) {
      this.token = localStorage.getItem("mean-token");
    }
    return this.token;
  }

  public logout(): void {
    this.token = "";
    window.localStorage.removeItem("mean-token");
    this.router.navigateByUrl("/");
  }
}
Now let’s add a method to check for this token — and the validity of the token — to find out if the visitor is logged in.
Getting Data from a JWT
When we set the data for the JWT (in the generateJwt Mongoose method) we included the expiry date in an exp property. But if you look at a JWT, it seems to be a random string, like this following example:
eyJ0eXAiOiJKV1QiLCJhbGciOiJIUzI1NiJ9.eyJfaWQiOiI1NWQ0MjNjMTUxMzcxMmNkMzE3YTRkYTciLCJlbWFpbCI6InNpbW9uQGZ1bGxzdGFja3RyYWluaW5nLmNvbSIsIm5hbWUiOiJTaW1vbiBIb2xtZXMiLCJleHAiOjE0NDA1NzA5NDUsImlhdCI6MTQzOTk2NjE0NX0.jS50GlmolxLoKrA_24LDKaW3vNaY94Y9EqYAFvsTiLg
So how do you read a JWT?
A JWT is actually made up of three separate strings, separated by a dot (.). These three parts are:
- Header: an encoded JSON object containing the type and the hashing algorithm used
- Payload: an encoded JSON object containing the data, the real body of the token
- Signature: an encrypted hash of the header and payload, using the “secret” set on the server.
It’s the second part we’re interested in here — the payload. Note that this is encoded rather than encrypted, meaning that we can decode it.
There’s a function called atob that’s native to modern browsers, and which will decode a Base64 string like this.
So we need to get the second part of the token, decode it and parse it as JSON. Then we can check that the expiry date hasn’t passed.
At the end of it, the getUserDetails function should return an object of the UserDetails type or null, depending on whether a valid token is found or not. Put together, it looks like this:
public getUserDetails(): UserDetails {
  const token = this.getToken();
  let payload;
  if (token) {
    payload = token.split(".")[1];
    payload = window.atob(payload);
    return JSON.parse(payload);
  } else {
    return null;
  }
}
The user details that are provided include the information about the user’s name, email, and the expiration of the token, which we’ll use to check if the user session is valid.
Check Whether a User Is Logged In
Add a new method called isLoggedIn to the service. It uses the getUserDetails method to get the token details from the JWT token and checks if the expiration hasn’t passed yet:
public isLoggedIn(): boolean {
  const user = this.getUserDetails();
  if (user) {
    return user.exp > Date.now() / 1000;
  } else {
    return false;
  }
}
If the token exists, the method will return if the user is logged in as a Boolean value. Now we can construct our HTTP requests to load data, using the token for authorization.
Structuring the API Calls
To facilitate making API calls, add the request method to the AuthenticationService, which is able to construct and return the proper HTTP request observable depending on the specific type of request. It’s a private method, since it’s only used by this service, and exists just to reduce code duplication. This will use the Angular HttpClient service. Remember to inject this into the AuthenticationService if it’s not already there:
private request(
  method: "post" | "get",
  type: "login" | "register" | "profile",
  user?: TokenPayload
): Observable<any> {
  let base$;

  if (method === "post") {
    base$ = this.http.post(`/api/${type}`, user);
  } else {
    base$ = this.http.get(`/api/${type}`, {
      headers: { Authorization: `Bearer ${this.getToken()}` }
    });
  }

  const request = base$.pipe(
    map((data: TokenResponse) => {
      if (data.token) {
        this.saveToken(data.token);
      }
      return data;
    })
  );

  return request;
}
It does require the map operator from RxJS in order to intercept and store the token in the service if it’s returned by an API login or register call. Now we can implement the public methods to call the API.
Calling the Register and Login API Endpoints
Just three methods to add. We’ll need an interface between the Angular app and the API, to call the login and register endpoints and save the returned token, or the profile endpoint to get the user details:
public register(user: TokenPayload): Observable<any> {
  return this.request("post", "register", user);
}

public login(user: TokenPayload): Observable<any> {
  return this.request("post", "login", user);
}

public profile(): Observable<any> {
  return this.request("get", "profile");
}
Each method returns an observable that will handle the HTTP request for one of the API calls we need to make. That finalizes the service; now it’s time to tie everything together in the Angular app.
Apply Authentication to Angular App
We can use the AuthenticationService inside the Angular app in a number of ways to give the experience we’re after:
- wire up the register and sign-in forms
- update the navigation to reflect the user’s status
- only allow logged-in users to access the
/profileroute - call the protected
/api/profileAPI route
To get started, we first generate the components we need using Angular CLI:
$ ng generate component register
CREATE src/app/register/register.component.css (0 bytes)
CREATE src/app/register/register.component.html (23 bytes)
CREATE src/app/register/register.component.spec.ts (642 bytes)
CREATE src/app/register/register.component.ts (283 bytes)
UPDATE src/app/app.module.ts (458 bytes)

$ ng generate component profile
CREATE src/app/profile/profile.component.css (0 bytes)
CREATE src/app/profile/profile.component.html (22 bytes)
CREATE src/app/profile/profile.component.spec.ts (635 bytes)
CREATE src/app/profile/profile.component.ts (279 bytes)
UPDATE src/app/app.module.ts (540 bytes)

$ ng generate component login
CREATE src/app/login/login.component.css (0 bytes)
CREATE src/app/login/login.component.html (20 bytes)
CREATE src/app/login/login.component.spec.ts (621 bytes)
CREATE src/app/login/login.component.ts (271 bytes)
UPDATE src/app/app.module.ts (614 bytes)

$ ng generate component home
CREATE src/app/home/home.component.css (0 bytes)
CREATE src/app/home/home.component.html (19 bytes)
CREATE src/app/home/home.component.spec.ts (614 bytes)
CREATE src/app/home/home.component.ts (267 bytes)
UPDATE src/app/app.module.ts (684 bytes)
Connect the Register and Login Controllers
Now that our components have been created, let’s have a look at the register and login forms.
The Register Page
First, let’s create the registration form. It has NgModel directives attached to the fields, all bound to properties set on the credentials controller property. The form also has a (submit) event binding to handle the submission. In the example application, it’s in /client/src/app/register/register.component.html and looks like this:
<form (submit)="register()">
  <div class="form-group">
    <label for="name">Full name</label>
    <input
      type="text"
      class="form-control"
      name="name"
      placeholder="Enter your name"
      [(ngModel)]="credentials.name"
    />
  </div>
  <div class="form-group">
    <label for="email">Email address</label>
    <input
      type="email"
      class="form-control"
      name="email"
      placeholder="Enter email"
      [(ngModel)]="credentials.email"
    />
  </div>
  <div class="form-group">
    <label for="password">Password</label>
    <input
      type="password"
      class="form-control"
      name="password"
      placeholder="Password"
      [(ngModel)]="credentials.password"
    />
  </div>
  <button type="submit" class="btn btn-default">Register!</button>
</form>
The first task in the controller is to ensure our AuthenticationService and the Router are injected and available through the constructor. Next, inside the register handler for the form submit, make a call to auth.register, passing it the credentials from the form.
The register method returns an observable, which we need to subscribe to in order to trigger the request. The observable will emit success or failure, and if someone has successfully registered, we’ll set the application to redirect them to the profile page or log the error in the console.
In the sample application, the controller is in /client/src/app/register/register.component.ts and looks like this:
import { Component } from "@angular/core";
import { AuthenticationService, TokenPayload } from "../authentication.service";
import { Router } from "@angular/router";

@Component({
  templateUrl: "./register.component.html",
  styleUrls: ["./register.component.css"]
})
export class RegisterComponent {
  credentials: TokenPayload = {
    email: "",
    name: "",
    password: ""
  };

  constructor(private auth: AuthenticationService, private router: Router) {}

  register() {
    this.auth.register(this.credentials).subscribe(
      () => {
        this.router.navigateByUrl("/profile");
      },
      err => {
        console.error(err);
      }
    );
  }
}
The Login Page
The login page is very similar in nature to the register page, but in this form we don’t ask for the name, just email and password. In the sample application, it’s in /client/src/app/login/login.component.html and looks like this:
<form (submit)="login()">
  <div class="form-group">
    <label for="email">Email address</label>
    <input
      type="email"
      class="form-control"
      name="email"
      placeholder="Enter email"
      [(ngModel)]="credentials.email"
    />
  </div>
  <div class="form-group">
    <label for="password">Password</label>
    <input
      type="password"
      class="form-control"
      name="password"
      placeholder="Password"
      [(ngModel)]="credentials.password"
    />
  </div>
  <button type="submit" class="btn btn-default">Sign in!</button>
</form>
Once again, we have the form submit handler and NgModel attributes for each of the inputs. In the controller, we want the same functionality as the register controller, but this time to call the login method of the AuthenticationService.
In the sample application, the controller is in /client/src/app/login/login.component.ts and look like this:
import { Component } from "@angular/core";
import { AuthenticationService, TokenPayload } from "../authentication.service";
import { Router } from "@angular/router";

@Component({
  templateUrl: "./login.component.html",
  styleUrls: ["./login.component.css"]
})
export class LoginComponent {
  credentials: TokenPayload = {
    email: "",
    password: ""
  };

  constructor(private auth: AuthenticationService, private router: Router) {}

  login() {
    this.auth.login(this.credentials).subscribe(
      () => {
        this.router.navigateByUrl("/profile");
      },
      err => {
        console.error(err);
      }
    );
  }
}
Now users can register and sign in to the application. Note that, again, there should be more validation in the forms to ensure that all required fields are filled before submitting. These examples are kept to the bare minimum to highlight the main functionality.
Change Content Based on User Status
In the navigation, we want to show the Sign in link if a user isn’t logged in, and their username with a link to the profile page if they are logged in. The navbar is found in the App component.
First, we’ll look at the App component controller. We can inject the AuthenticationService into the component and call it directly in our template. In the sample app, the file is in /client/src/app/app.component.ts and looks like this:
import { Component } from "@angular/core";
import { AuthenticationService } from "./authentication.service";

@Component({
  selector: "app-root",
  templateUrl: "./app.component.html",
  styleUrls: ["./app.component.css"]
})

export class AppComponent {
  constructor(public auth: AuthenticationService) {}
}
Now, in the associated template we can use auth.isLoggedIn() to determine whether to display the sign-in link or the profile link. To add the user’s name to the profile link, we can access the name property of auth.getUserDetails()?.name. Remember that this is getting the data from the JWT. The ?. operator is a special way to access a property on an object that may be undefined, without throwing an error.
In the sample app, the file is in /client/src/app/app.component.html and the updated part looks like this:
<ul class="nav navbar-nav navbar-right">
  <li *ngIf="!auth.isLoggedIn()"><a routerLink="/login">Sign in</a></li>
  <li *ngIf="auth.isLoggedIn()">
    <a routerLink="/profile">{{ auth.getUserDetails()?.name }}</a>
  </li>
  <li *ngIf="auth.isLoggedIn()"><a (click)="auth.logout()">Logout</a></li>
</ul>

<router-outlet></router-outlet>
Protect a Route for Logged in Users Only
In this step, we’ll see how to make a route accessible only to logged-in users, by protecting the /profile path.
Angular allows you to define a route guard, which can run a check at several points of the routing life cycle to determine if the route can be loaded. We’ll use the CanActivate hook to tell Angular to load the profile route only if the user is logged in.
To do, this we need to create a route guard:
$ ng generate guard auth
? Which interfaces would you like to implement? CanActivate
CREATE src/app/auth.guard.spec.ts (331 bytes)
CREATE src/app/auth.guard.ts (456 bytes)
It must implement the CanActivate interface, and the associated canActivate method. This method returns a Boolean value from the AuthenticationService.isLoggedIn method (basically checks if the token is found, and still valid), and if the user is not valid also redirects them to the home page.
In auth.guard.ts:
import { Injectable } from "@angular/core";
import {
  CanActivate,
  ActivatedRouteSnapshot,
  RouterStateSnapshot,
  UrlTree,
  Router
} from "@angular/router";
import { Observable } from "rxjs";
import { AuthenticationService } from "./authentication.service";

@Injectable({
  providedIn: "root"
})
export class AuthGuard implements CanActivate {
  constructor(private auth: AuthenticationService, private router: Router) {}

  canActivate(
    next: ActivatedRouteSnapshot,
    state: RouterStateSnapshot
  ):
    | Observable<boolean | UrlTree>
    | Promise<boolean | UrlTree>
    | boolean
    | UrlTree {
    if (!this.auth.isLoggedIn()) {
      this.router.navigateByUrl("/");
      return false;
    }
    return true;
  }
}
To enable this guard, we have to declare it on the route configuration. There’s a route property called canActivate, which takes an array of services that should be called before activating the route. The routes are defined in the AppRoutingModule, which contains the routes like you see here:
const routes: Routes = [
  { path: "", component: HomeComponent },
  { path: "login", component: LoginComponent },
  { path: "register", component: RegisterComponent },
  { path: "profile", component: ProfileComponent, canActivate: [AuthGuard] }
];
The whole file should look like this:
import { NgModule } from "@angular/core";
import { RouterModule, Routes } from "@angular/router";
import { HomeComponent } from "./home/home.component";
import { LoginComponent } from "./login/login.component";
import { RegisterComponent } from "./register/register.component";
import { ProfileComponent } from "./profile/profile.component";
import { AuthGuard } from "./auth.guard";

const routes: Routes = [
  { path: "", component: HomeComponent },
  { path: "login", component: LoginComponent },
  { path: "register", component: RegisterComponent },
  { path: "profile", component: ProfileComponent, canActivate: [AuthGuard] }
];

@NgModule({
  imports: [RouterModule.forRoot(routes)],
  exports: [RouterModule]
})
export class AppRoutingModule {}
With that route guard in place, now if an unauthenticated user tries to visit the profile page, Angular will cancel the route change and redirect to the home page, thus protecting it from unauthenticated users.
Call a Protected API Route
The /api/profile route has been set up to check for a JWT in the request. Otherwise, it will return a 401 unauthorized error.
To pass the token to the API, it needs to be sent through as a header on the request, called Authorization. The following snippet shows the main data service function, and the format required to send the token. The AuthenticationService already handles this, but you can find this in /client/src/app/authentication.service.ts:
base$ = this.http.get(`/api/${type}`, {
  headers: { Authorization: `Bearer ${this.getToken()}` }
});
Remember that the back-end code is validating that the token is genuine when the request is made, by using the secret known only to the issuing server.
To make use of this in the profile page, we just need to update the controller, in /client/src/app/profile/profile.component.ts in the sample app. This will populate a details property when the API returns some data, which should match the UserDetails interface:
import { Component, OnInit } from "@angular/core";
import { AuthenticationService, UserDetails } from "../authentication.service";

@Component({
  templateUrl: "./profile.component.html",
  styleUrls: ["./profile.component.css"]
})
export class ProfileComponent implements OnInit {
  details: UserDetails;

  constructor(private auth: AuthenticationService) {}

  ngOnInit() {
    this.auth.profile().subscribe(
      user => {
        this.details = user;
      },
      err => {
        console.error(err);
      }
    );
  }
}
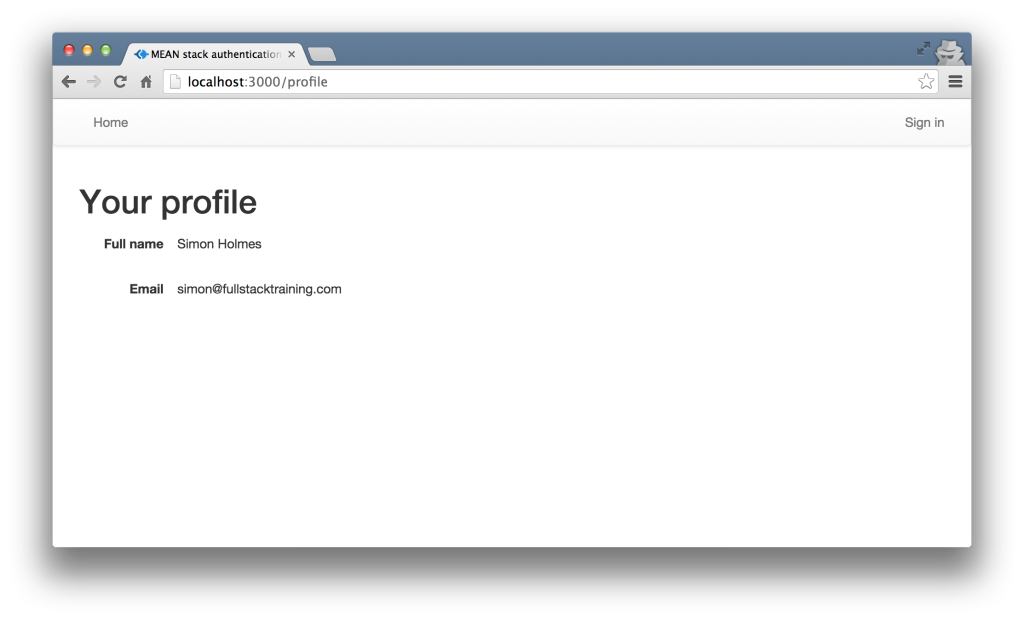
Then, of course, it’s just a case of updating the bindings in the view (/src/app/profile/profile.component.html). Again, the ?. is a safety operator for binding properties that don’t exist on first render (since data has to load first):
<div class="form-horizontal">
  <div class="form-group">
    <label class="col-sm-3 control-label">Full name</label>
    <p class="form-control-static">{{ details?.name }}</p>
  </div>
  <div class="form-group">
    <label class="col-sm-3 control-label">Email</label>
    <p class="form-control-static">{{ details?.email }}</p>
  </div>
</div>
Running the Angular App
To run the Angular app, we’re going to need to route any requests to /api to our Express server running on http://localhost:3000/. To do this, create a proxy.conf.json file in the client directory:
touch proxy.conf.json
Also add the following content:
{
  "/api": {
    "target": "http://localhost:3000",
    "secure": false
  }
}
Finally, update the start script in client/package.json:
"start": "ng serve --proxy-config proxy.conf.json",
Now, make sure Mongo is running, start the Express app from within the root of our project using npm start and start the Angular app from within the client directory using the same command.
Then, visit http://localhost:4200, to see the (almost) finished product. Attempt to register an account at http://localhost:4200/register and to log in, to assure yourself that everything is working as it should.
Some Final Touches
As you’ll doubtless have noticed, the final app is without any styles. As this is a bit of a lengthy tutorial, I haven’t included them here. But if you take a look at the finished code on GitHub, you can grab everything from there. The files to look at are:
- /client/src/index.html — where I am pulling in Bootstrap.
- /client/src/app/app.component.html
- /client/src/app/home/home.component.html
- /client/src/app/login/login.component.html
- /client/src/app/profile/profile.component.html
- /client/src/app/register/register.component.html
If you copy the extra markup out of these files, you should end up with this:
And that’s how to manage authentication in the MEAN stack, from securing API routes and managing user details to working with JWTs and protecting routes.
Frequently Asked Questions (FAQs) about MEAN Stack
What are the key differences between MEAN Stack and other full-stack frameworks?
MEAN Stack is a JavaScript-based full-stack framework, which makes it unique as it uses a single language for both front-end and back-end development. This provides a seamless and efficient development process. Other full-stack frameworks often use different languages for front-end and back-end, which can lead to complexities in development and integration. Moreover, MEAN Stack includes MongoDB, a NoSQL database, which offers more flexibility in data handling compared to SQL databases used in other frameworks.
How does Angular CLI enhance MEAN Stack development?
Angular CLI (Command Line Interface) is a powerful tool that simplifies the process of initializing, developing, and maintaining Angular applications, a key component of MEAN Stack. It provides a range of commands for generating components, services, routes, modules, and more, which significantly speeds up the development process. It also includes built-in testing tools for ensuring code quality.
Can I use other databases with MEAN Stack instead of MongoDB?
While MongoDB is the default database in MEAN Stack, it is possible to use other databases. However, this may require additional configurations and adjustments in your code, as MEAN Stack is specifically designed to work seamlessly with MongoDB.
How does MEAN Stack handle data?
MEAN Stack uses MongoDB, a NoSQL database, for data handling. Unlike SQL databases, MongoDB stores data in a flexible, JSON-like format, which allows for varied data structures. This flexibility makes it easier to store and manage data, especially when dealing with large volumes of data or when the data structure is complex or likely to change.
What are the benefits of using MEAN Stack for web development?
MEAN Stack offers several benefits for web development. It uses JavaScript for both front-end and back-end development, which simplifies the development process and reduces the learning curve for developers. It also includes powerful tools like Angular for front-end development and Node.js for back-end, which enhance productivity and performance. Moreover, MEAN Stack is open-source and has a large and active community, which means you can find plenty of resources and support.
Is MEAN Stack suitable for large-scale applications?
Yes, MEAN Stack is suitable for large-scale applications. It includes MongoDB, which is designed to handle large volumes of data and can be scaled horizontally. Node.js, the back-end component of MEAN Stack, is also highly scalable and can handle numerous simultaneous connections.
How secure is MEAN Stack?
MEAN Stack includes several built-in security features. For instance, Express.js, the web application framework in MEAN Stack, includes features for handling cookies and sessions securely. Moreover, you can add additional security measures, such as data encryption and user authentication, using various libraries and modules.
How can I learn MEAN Stack?
There are many resources available for learning MEAN Stack. You can start with online tutorials and guides, which provide step-by-step instructions for setting up and developing applications with MEAN Stack. You can also join online courses or coding bootcamps, which provide structured learning paths and mentorship.
What is the role of Node.js in MEAN Stack?
Node.js is the back-end component of MEAN Stack. It is a JavaScript runtime that allows you to run JavaScript on the server side. It is built on Chrome’s V8 JavaScript engine and is designed to build scalable network applications. It provides a non-blocking, event-driven architecture, which makes it efficient and lightweight.
Can I use MEAN Stack for mobile app development?
While MEAN Stack is primarily used for web development, it can also be used for mobile app development. You can use technologies like Ionic or React Native in conjunction with MEAN Stack to develop mobile apps. However, this may require additional learning and expertise.

