In a previous article, Akash Mehta detailed how to use the Yahoo! Maps API to create your own mashup. In this article, we’ll look at using some other Yahoo! APIs to create our very own music mashup. Along the way, I’ll introduce you to the Zend Framework, a time-saving, well-organised, open source framework for developing web applications in PHP 5.
To build the demo, we’ll be using the Audioscrobbler API (from last.fm), the Flickr API, and Yahoo News.
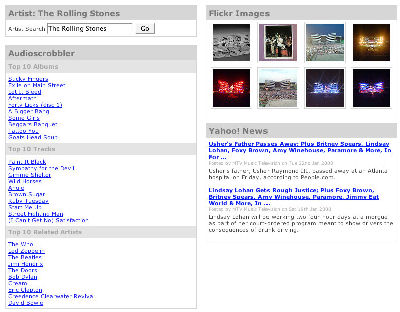
The demo application we’ll build will prompt users to enter their favorite band or artist. The mashup will:
- Find links to that artist’s top-rated albums and tracks.
- Show related artists.
- Display pictures of the artist from Flickr.
- Display recent news items about the artist from Yahoo! News.
A screenshot of the final application is below. You can try it out yourself in this live demo, and if you’d like to play along at home, feel free to download the code.
Objectives
This article is not going to give you a total in-depth review of every class and method of the Zend Framework, nor are you likely to make millions from the demo mashup that we’ll build (sorry about that!). Rather, it’s intended to whet your appetite for what the Zend Framework can do. Pulling data from external sources is extremely easy with the framework, and it’s my hope that you’ll use this article as a jumping point for exploring other aspects of the framework that you might be able to integrate into your everyday PHP coding.
I won’t explain every part of the demo application — just those parts of the code that demonstrate various features of the Zend Framework. However, the code is well commented if you’re interested in delving deeper into its workings.
What Do You Need?
This article assumes a working knowledge of PHP5. To play along at home, you’ll need a web server with PHP installed (version 5.1.4, at least). For the demo, I’ll assume you’re using Apache. You’ll also need:
- a Yahoo account
- a Yahoo application ID
- an API key from Flickr
- a copy of the Zend Framework
The Zend Framework
The Zend Framework is an open-source component library from Zend, (the company involved in the creation of PHP). The idea behind the framework is to provide developers with a large proportion of the functionality that they use every day. To quote the web site:
Extending the art & spirit of PHP, Zend Framework is based on simplicity, object-oriented best practices, corporate-friendly licensing, and a rigorously tested agile code base … a lightweight, loosely-coupled component library simplified to provide 4/5s of the functionality everyone needs.
Zend Framework Highlights
Here’s a snapshot of what the framework can do (I’m really only skimming the surface):
- Model-View-Controller components for separating design from development
- database abstraction to allow unified access to multiple databases such as MySQL, Oracle, Microsoft SQL Server, IBM DB2, PostgreSQL and SQLite
- internationalization and localization of currency, dates, language, time, calendars and measurements
- authentication, authorization, and session management
- built-in support for web services such as Akismet, Amazon, Audioscrobbler, Delicious, Flickr, Simpy, StrikeIron, and Yahoo!
- SOAP, Feeds, Google Data
- mail, search, validation, caching, and much more
Rails, eat your heart out!
Who’s Using the Framework?
The Zend framework is powering some large PHP applications, such as IBM‘s QEDWiki project, Magento (an open-source ecommerce engine), and Right Media for its Right Media Exchange, to name three. This should give you an indication of the framework’s take-up — if you decide to invest time learning the Zend Framework, it’s a skill that will likely hold you in good stead in the future.
Getting Started
Extract the folders and files of the Zend Framework to your local web server. The folder you want is: Zend Framework-<version number>/library/Zend. This holds all the classes.
Setting the Application Path
Before we can use the framework, we need to specify the include path of the Zend folder (the one with all the classes). There are a few ways we can do this — either in the .htaccess file, in the php.ini file, or from the page itself:
1. To add the include path via your .htaccess file, add the following line at the bottom of the .htaccess file in your server’s web root folder (note that the value you use will depend on where you place the files):
php_value include_path "/home/sitepoint/public_html/"2. To make the change in your php.ini file, add the following line:
include_path "/home/sitepoint/public_html/"3. Finally, to add the include path from the page itself, use the set_include_path() function. Here’s an example:
<?php

if(set_include_path('/home/sitepoint/public_html/') === false){

  die('Include path failed');

}

?>
Note that you can’t just use include() or required() to implement the framework — doing so will result in a fatal error.
The Loader Class
Now that we’re all set to use the framework, let’s load some classes. The loader class is a great shortcut for dynamically adding other files and classes to your application. It’s not strictly necessary to use it, as once you’ve set your include_path, you can use the require_once() or include_once() functions to achieve the same objective.
However, the loader class gives you some added flexibility in terms of the way you load your classes. There are two main ways to use the class — you can use it to load files, or to load classes.
In this example, we’ll use the class loader as follows:
<?php

// include the loader

require_once ('Zend/loader.php');


// Load 'Zend_Filter_Input' class i.e. Zend/Filter/Input.php

Zend_Loader::loadClass('Zend_Filter_Input');

?>
Filtering and Validating
The Zend_Filter_Input component is effectively a holding area for data — an area that will only allow data to be released on the basis of the requirements of the requestor. It’s a bit like airport security — only people with valid credentials and luggage are allowed to board the aircraft. The people are the data, the luggage screening is the filter, and passport control is the validator. Therefore, any dangerous objects are removed (filtered) at luggage security screening, and only people with correct passports and tickets can board the aircraft through passport and ticket control (validation).
The filter and validation class Zend_Filter_Input is a powerful component that can not only simplify the code you write, but also save you a lot of time and effort on the onerous (but necessary) tasks of filtering and validating data. Helpfully, the data is also escaped for HTML output when it’s returned, which should immediately translate to fewer XSS worries.
Available Filters and Validators
There are 12 standard filter/validation classes, each of which takes a string as an argument:
Alnum– removes all non-alphabetical or numeric charactersAlpha– removes all non-alphabetical charactersBaseName– returns the base name of a fileDigits– removes all non-digit valuesDir– returns the directory name of a pathHtmlEntities– converts characters to their HTML equivalents (if they exist)Int– returns an integerRealPath– converts relative paths, i.e.../../somefile.php, to absolute path name, i.e./root/home/somefile.phpStringToLower– converts alphabetical characters to lowercaseStringToUpper– converts alphabetical characters to uppercaseStringTrim– strips characters from the beginning and end of the stringStripTags– strips HTML and PHP tags other than those that are specifically allowed, as well as the attributes of those allowed tags; it can also remove or allow comments, i.e.<!-- some HTML comment -->
For our demo app, we’ll be using StripTags and StringTrim. For more information on the other filters, refer to the Zend Framework’s manual.
Declaring Filters and Validator Rules
In order to use the filter input class, we need to declare our filters and validators as arrays. Let’s take a look at our first bit of code from our demo application:
<?php

$filters = array(

  'artist' => array(

    'StripTags',

    'StringTrim'

  )

);


$validators = array(

  'artist'  => array(

    'Alnum',

  )

);

?>
In the above example, we’re using a filter on the field artist to remove tags and trim whitespace from either end of the string. We’ve also created a validator for the artist field to check that it contains only alphabetical or numerical characters.
Filters and validators can be applied one at a time, as we’ve done here, but it’s also possible to chain them together…
Chaining
Sorry to disappoint you — we’re not talking about anything kinky here. Chaining refers to executing filters and/or validators one after another, each using the outputted value of the previous filter. This functionality in fact occurs by default. But, as we’ll see later, it can be switched off when you’re performing validation. In the above code, any HTML markup or PHP code is removed from the field artist, then the surrounding whitespace is removed.
For example, the string <strong> Hello World </strong> would be converted to “Hello World”.
Creating a Processor for the Filters and Validators
Once we’ve declared our filters and validators, the next step is to use them to process our data. In the demo, we make use of the super global variable $_GET to retrieve all the query string input, like so:
$input = new Zend_Filter_Input($Filters, $Validators, $_GET);Getting Invalid, Missing or Unknown Fields
The framework provides us with three methods for checking for invalid, missing, or unknown data. Each method returns a Boolean value:
hasInvalid– returns true if the data has not passed the validation checkshasMissing– data specified to be present by the metacommand'presence' => 'required'is missing (More on this later.)hasUnknown– fields that are not specified for validation, but are included in the input data
In our demo app, we’ll use hasInvalid and hasMissing as simple checks that our request has at least returned something useful. We can then get further information on the erroneous data using any of the following four methods:
getInvalid– Get information on any invalid data.getMissing– Get information on any missing data.getUnknown– Get information on any unexpected data.getMessages– Get information on any invalid and missing data.
Each of these methods returns an array in this format:
Array

(

    [field] => Array

        (

            [0] => Error message

        )

)
To keep things simple, we’ll use getMessages to print out any error messages:
<?php

if ($input->hasInvalid() || $input->hasMissing()) {

  print_r($input->getMessages());

}

?>
Getting at Our Data
Now that we’ve checked the data, it’s time to retrieve it. For the purposes of our demo, we’ll use the magic accessor to retrieve the HTML-escaped output for the field artist:
echo $input->artist;It’s also possible to use the getEscaped and getUnescaped methods to retrieve data that’s escaped or unescaped, respectively.
There’s a lot more that you can do to take control of your filters and validators with the Zend_Filter_Input component, including using metacommands and creating your own filters. To learn more, check out the manual.
Next, we’ll take a look at web services and how to implement them.
Audioscrobbler
The Zend_Service_Audioscrobbler component provides a simple way to access the REST web service available from Audioscrobbler.com (Last.fm). This service gives us access to:
- users
- artists
- albums
- tracks
- tags
- groups
- forums
For our demo application, we’ll retrieve the top ten albums for a given artist, and display them with a link to Audioscrobbler.
First, we need to load and instantiate the Zend_Service_Audioscrobbler class:
Zend_Loader::loadClass('Zend_Service_Audioscrobbler');

$Audioscrobbler = new Zend_Service_Audioscrobbler();
Next, we specify the artist that we want to retrieve information for, in this case, The Rolling Stones.
Don’t forget to urlencode() the name, as Audioscrobbler uses the artist’s name in the URL of the XML data file that it creates.
Let’s specify the artist:
$Audioscrobbler->set('artist', urlencode('The Rolling Stones'));

$results = $Audioscrobbler->artistGetTopAlbums());
Now that we have some data, we’ll loop through the result set and print the album name, linking it back to its page on Audioscrobbler.com:
foreach ($results as $info) {

  echo '<a href="' . $info->url . '">' . $info->name. '</a><br />';

}
And that’s all there is to it. Easy, huh?
Flickr
The Flickr web service follows much the same pattern as Audioscrobbler. There are however, a few more things to consider, including:
- the license under which the image is made available
- crediting the image owner
Licensing Images
There are six different licenses under which an image may be made available on Flickr. The “all rights reserved” images should not be republished on another site unless you are the owner, or you have permission from the owner. The rest of the licenses are variations on the Creative Commons license, and dictate specific usage that’s acceptable for each image covered by that license:
- 0 = All rights reserved
- 1 = Attribution Non Commercial Share Alike License
- 2 = Attribution Non Commercial License
- 3 = Attribution Non Commercial No Derivatives License
- 4 = Attribution License
- 5 = Attribution Share Alike License
- 6 = Attribution No Derivatives License
Load ’em Up
Again, we first load the appropriate class and instantiate it with our API key:
Zend_Loader::loadClass('Zend_Service_Flickr');

$flickr = new Zend_Service_Flickr('<- YOUR API KEY HERE ->');
Searching for Images
Flickr provides the ability to search for images either by tag or user. For our demo, we’ll use the artist name as the tag for our search. We’re also going to:
- limit the results to eight images per page
- display only the first page of results
- only use images that are licensed under licences 1, 2, 3, 4, 5 or 6 (see above)
Here’s how we would perform our Flickr search for those classic rockers that just keep on keeping on:
$options = array(

  'per_page' => 8,

  'page'=> 1,

  'license' => '1, 2, 3, 4, 5, 6'

 );

$results = $flickr->tagSearch('The Rolling Stones', $options);
There are further options to refine your search — see the documentation for more details.
Now we (hopefully) have some results from our image search. You can check the number of returned results with any of the following functions:
Zend_Service_Flickr_ResultSet::totalResultsAvailable– returns the total number of images available for the current search termsZend_Service_Flickr_ResultSet::totalResultsReturned– returns the total number of images returned by the last searchZend_Service_Flickr_ResultSet::firstResultPosition– returns the position of the most recently returned set of images, relative to the entire result setZend_Service_Flickr_ResultSet::totalResults()– returns the total number of images in the result set
Information is available for each result image, including the image ID, the ID of the image owner, the date the image was taken, whether the image is public, and much, much more. You can also access up to six different versions of an image:
Square– 75×75-pixel thumbnailThumbnail– 100-pixel thumbnailSmall– 240-pixel version of the imageMedium– 500-pixel version of the imageLarge– 640-pixel version of the imageOriginal– the original image
Additionally, for each version of the image, you can access four properties:
uri– the URI for the original imageclickUri– link to the Flickr page of the imagewidth– the width of the Image in pixelsheight– the height of the Image in pixels
For more information on the image details that are available to you, read the Zend_Service_Flickr documentation.
Enough theory, already — let’s add some Flickr photos to our mashup!
The following code sample will loop through the results of a search and, if more than one image is available (and it’s public), display a square thumbnail of the image, with a link to the original image on Flickr:
$results = $Flickr->tagSearch($Artist, $FlickrOptions);

if($results->totalResultsAvailable > 0) {

  foreach ($results as $result){

    if (isset($result->Square) && $result->ispublic =='1') {

      $FlickResults .= '<a href="http://www.flickr.com/photos/'

             + $result->owner.'/'.$result->id.'/"><img src="'

             + $result->Square->uri.'" alt="'

             + $HTMLFilter->filter($result->title).'

             + " title="Picture from: '

             + $HTMLFilter->filter($result->ownername)

             +' at Flickr" /></a>'."n";

    }

  }

}

else {

  // no results found

  $FlickResults .= 'No Images Found';

}
Note how we get the individual image’s properties (in this case the clickUri):
$result->Square->clickUriIf we wanted to display the full, original image, we’d use:
$result->Original->clickUriThat’s a quick and dirty way to search for and access information on images at Flickr. Next up, we’ll take a look at searching Yahoo News.
Yahoo News
For our demo application, we’ll restrict our search to only relevant news stories, but this could be easily extended to include:
- searching for web pages
- searching for images
- searching local businesses and services
As with our previous web services, we load the web service class — in this case Zend_Service_Yahoo — then instantiate the class using our Yahoo application ID.
Zend_Loader::loadClass('Zend_Service_Yahoo');

$Yahoo = new Zend_Service_Yahoo('<- Your Yahoo! App ID ->');
Set the Options
There’s a stack of options that you can use to refine your news search, although most of them have default values. For the entire list, visit the Yahoo Developer Network documentation.
In our mashup application, we’re using the following options:
- return only three results
- display the first result first
- sort our news items by rank (i.e. relevance)
- display the results in English
- require results to contain all query terms listed
- show us results from MTV.com only
Here’s how those options are represented in PHP code:
$newOptions = array(

'results' => 3,

        'start' => 1,

        'sort' => 'rank',

        'language' => 'en',

        'type' => 'all',

        'site' => 'mtv.com'

       );
To send a query to Yahoo with these options, we just call the newsSearch function, passing the options array and our query term:
$YahooResults = $Yahoo->newsSearch('The Rolling Stones', $newsOptions);When our query is returned, we can check the results that we’ve received by inspecting a number of properties on the object that we get back:
totalResultsAvailable– the total number of results available for the searchResultSettotalResultsReturned– the total number of results returnedfirstResultPosition– the position of the returned news items relative to the complete result settotalResults()– the total number of items in the result set
Each of the news items returned has the following properties:
Title– title of the news itemUrl– URL of the news itemClickUrl– URL for linking to the news result itemSummary– news result summaryNewsSource– the company that distributed the articleNewsSourceUrl– URL of the article distributing companyLanguage– language in which the article is writtenPublishDate– date the article was published (UNIX timestamp)ModificationDate– date the article was last modified (UNIX timestamp)Thumbnail– thumbnail for the article, if one is available
In our demo application, we’ll:
- check for a result from the search
- loop through the results
- display the title linked to the story
Here’s the code:
$results = $Yahoo->newsSearch($Artist, $NewsOptions);

if($results->totalResultsReturned > 0){

  foreach ($results as $result) {

    $YahooNewsResults.= '<strong><a href="'.$result->ClickUrl

    + '">'.$HTMLFilter->filter($result->Title)

    + '</a></strong>'."n";

    $YahooNewsResults.= '<div class="newscredit">Posted by  '

    + $result->NewsSource. ' on '.date('D jS M Y', $result->PublishDate)

    + '</div>'."n";

    $YahooNewsResults.= $HTMLFilter->filter($result->Summary)

       + '<br /><br />'."n";

  }

}

else {

  $YahooNewsResults.= 'No News Items Found';

}
For more information on accessing Yahoo web services, refer to the Zend Framework documentation.
Bringing it All Together
In this article, we’ve explored several aspects of the Zend framework — hopefully from what you’ve seen, you can appreciate just how powerful and simple a framework it is.
Along the way, we looked at some of the code that you would use to build a music mashup application — don’t forget to download all of the source code if you’d like to play with this application at home. The live demo is far from a polished, production-ready application, but it’s a good starting point from which you can experiment with ideas of your own. The code is well commented and should give you a strong basis from which to create your own mashups, and experiment with the Zend Framework. Enjoy!
 Toby Somerville