

Key Takeaways
- Adobe AIR enhances web application capabilities by allowing cross-domain Ajax requests, enabling the creation of client-side mashups without the need for server-side proxies.
- The tutorial focuses on practical application development in AIR, including user authentication, file uploads, and handling RSS feeds, using a combination of HTML, JavaScript (jQuery), and PHP.
- Adobe AIR applications can interact with server-side scripts and handle sensitive data securely, emphasizing the importance of HTTPS and client-side hashing for secure data transmission.
- File handling in AIR goes beyond typical web interactions, supporting direct file uploads through the AIR API, which bypasses traditional limitations found in web browsers.
- AIR’s robust session management allows applications to persist user authentication across multiple interactions, making it suitable for creating more complex, stateful applications that operate both online and offline.
Whoever said that the desktop was dead? Large sites such as eBay make available desktop applications for their web services due to the fact that they’re often more stable, more lightweight, and provide a smoother user experience.
One of the big features of Adobe AIR is the rethink of Ajax – in particular, the cross-domain security restrictions. Before AIR, a web application could only make Ajax requests to the same domain from which it originated, with some exceptions. To fetch data from another domain, a server-side proxy script was needed to relay the request. In AIR, Adobe has enabled cross-domain Ajax requests to support the wide variety of potential uses of AIR applications that consume web services and interact with server-side applications. This opens the door for all sorts of handy mashups that operate entirely on the client side.
In this article, we’re going to look at consuming web services from a simple PHP application – we’ll work with login mechanisms, file uploads, and reading an RSS news feed. We’ll be building a simple interface to enable a firm’s clients to log in and submit files, as well as browse internal notices from the newsfeed.
Continuing our recent theme, there’ll be a quiz at the end, to test you on what you’ve learned. The first 100 people to undergo the quiz will receive, free-of-charge, the Adobe AIR For JavaScript Developers pocket guide in the post. Remember, the book can be downloaded free as a PDF, so get cracking!
NOTE: Background Knowledge
To gain the most from this tutorial, I suggest you read through my introductory HTML/Ajax AIR articles, Build a Customer Management App and Build a Note Storage App, or are at least comfortable with AIR and jQuery. We’ll be using the AIR SDK again, along with Aptana and jQuery. If you haven’t set these up already, I cover this process in my first article, under the section A Powerful Tool for Building AIR Apps. For the purposes of this example, you’ll also need access to a PHP-enabled web server. Alternatively, you can rewrite the trivial PHP routines in your server-side language of choice.
Starting with the Sample Project
To get ready to build the application, download the baseline project files. You’ll find a single HTML file with separate div elements for the key sections of the application interface – we’ll use jQuery to show and hide the relevant sections as needed. Open Aptana, and create a new project in the same directory that you extracted the baseline files, or use the “Existing Folder as New Project” in the File > Import dialog.
The archive also includes a folder named serverfiles – you’ll need to upload these files to a PHP-enabled web server if you want to modify and experiment with the backend. Alternatively, you can create your own with the instructions in this tutorial. For now, we’ll use a hosted demonstration copy of these files.
Within our new project, all the action happens within the index.html file. Here’s a screenshot of the file with all the sections revealed.
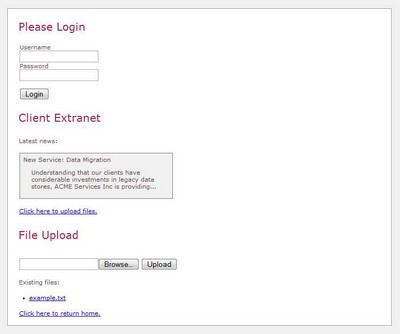
We’ll store all our behavior logic in the behavior.js JavaScript file.
Running on AIR
Now that we’ve got our AIR project ready and our interface in place, let’s start adding functionality with the APIs.
Authentication
The front line of our application is the authentication dialog. Creating our client-side login system is quite similar to creating a server-side login system, with a couple of exceptions: the authentication API is accessed over HTTP, and we have to take an extra level of care regarding sensitive data.
Here’s the HTML for our login form as it stands:
<div class="form">

  <div class="input">

    <label for="username">Username</label>

    <input type="text" id="username"/>

  </div>

  <div class="input">

    <label for="password">Password</label>

    <input type="password" id="password"/>

  </div>

  <div class="input">

    <input type="submit" value="Login" id="loginbtn" />

  </div>

</div>
Let’s open the behavior.js file and add some JavaScript. The file is currently empty, except for a $(document).ready() function with some basic interface management code. We’ll use this to bind to the form’s submit event, so that we can catch the user clicking that Login button. Inside the $(document).ready() function, add the following:
server = 'http://bitmeta.org/air/';

$("#loginbtn").click(function(){

  params = 'username='+$("#username").val()+'&password='+$("#password").val();

  request = new air.URLRequest(server + 'loginService.php');

  request.data = params;

  request.method = air.URLRequestMethod.POST;

  loader = new air.URLLoader();

  loader.addEventListener(air.Event.COMPLETE, loginComplete);

  try {

    loader.load(request);

  } catch (error) {

    alert("Error connecting to login server.");

  }

});
We start by using jQuery to bind to the click event of our Login button (from the HTML snippet above). Here, we’re using two key AIR APIs: URLRequest, and URLLoader. URLRequest manages the request information – in our case, the URL to load, request method to use, parameters to pass and so on – while URLLoader handles the actual HTTP transfer and deals with the results. The request object has a data property that takes variables in name=value&name=value format, just like any POST request body. We really shouldn’t transmit the password in plaintext either, even though we do above – consider using HTTPS, client-side hashing, or both.
The loader object has a number of events, including request progress, identification of response status code, and IO error – see here for a full list. At present, we’re only interested in the completion of the request, and so we use the generic air.Event.COMPLETE to catch this, with the callback function: loginComplete.
We’ll receive an XML document from the web service, which we’ll handle with jQuery in a moment. For now, we’ll define our callback handler – insert this right after the previous block:
function loginComplete(event) {

  handleLogin(event.target.data);

}
With this line, we pass the XML response to our handleLogin function, and away we go!
Reading Our Response Body
It’s time to start thinking about our server backend – our demonstration server runs at bitmeta.org/air/ with the username and password “test”.
We referenced our callback function loginComplete, which is passed a single argument – an Event object. This has a target property, referring to the “target” of the event – the URLLoader – which in turn will always place the response body in its data property. Now, loginService.php will give us an XML response like this:
<?xml version="1.0" encoding="utf-8"?>

<response xmlns="https://www.sitepoint.com/air/a3/login">

  <login code="LOGIN_PASS">4d0vncb4j41mpu...</login>

  <latestNews>

    <item>

      <heading>New Service: Data Migration</heading>

      <content>Understanding that our clients...</content>

      <guid>http://example.com/rss/article/1</guid>

    </item>

    <item>

      <heading>Security Breach!</heading>

      <content>On 1/1/1 we were made aware of a...</content>

      <guid>http://example.com/rss/article/2</guid>

    </item>

  </latestNews>

</response>
Within the login element is our session token; this is unique for each successful login. A login failure response looks like this:
<?xml version="1.0" encoding="utf-8"?>

<response xmlns="https://www.sitepoint.com/air/a3/login">

  <login code="LOGIN_FAIL"/>

</response>
All we need now is a handleLogin function to process this response. We’ll rely on jQuery to handle the tricky XML traversing and DOM manipulation here. Copy this into the very end of your behavior.js file:
function handleLogin(data) {

  if ($("login", data).attr("code") == 'LOGIN_PASS') {

    air.trace('Our session token is '+$("#login", data).text());

    $("#latestnews").empty();

    $("latestNews item", data).each(function(i) {

      item = $("latestNews item", data).get(i);

      story = $('<div class="rssitem"></div>')

          .append('<span>'+$("heading",item).text()+'</span>'+

          '<p>'+$("content",item).text()+'</p>'+

          '<a href="'+$("guid",item).text()+'">Read More...</a>')

          .appendTo('#latestnews'    });

    $(".rssitem a").click(function(){

      air.navigateToURL(new air.URLRequest(this.href));

      return false;

    })

    $("#login").hide();

    $("#main").show();

  } else {

    alert('Login Failed: Please Try Again.');

  }

}
We first check whether the code="LOGIN_PASS" attribute value is present in the login element; if so, we record the session token we received on the console. We then empty the <div id="latestnews"> element on our main page and start filling it with the faux RSS entries included in the response. (Parsing a real RSS feed is similarly trivial.) At this point, we could also use Javascript’s usual DOM traversal functions – the data variable holds a perfectly normal XML document. To launch a URL in the default web browser (and not inside our AIR application), we need to call air.navigateToURL(new air.URLRequest(url)) – in this snippet, we use the hyperlink of the current object, as we’re binding to all the links in the news section.
We use a lot of CSS selectors here – remember that the jQuery selector syntax, $("css selector", domdocument) will try to select elements matching the selector within the provided DOM document, defaulting to the current document. We specify our XML response document to set the context of the operation.
NOTE: Maintaining a Session
In our login routine, we’re loading the authentication information as well as the latest news in one go. Often, however, you’ll need to make further HTTP requests after authentication. In our server script here, loginService.php includes a session ID of sorts. In our case it’s generated by PHP’s session extension, but it could just as well have been any login token.
To persist with this in an AIR application, it’s quite feasible to store it in a variable upon receipt, and if needed, a cookie as well. Any JavaScript code in your application can then make use of this token by including it in future requests. Of course, if you use a cookie-based session mechanism, your application could leave the entire process to PHP, thus avoiding the need to store a session token; on the client side, the URL request libraries will automatically handle cookies for you.
Handling File Uploads
Now that we’ve authenticated the user and displayed the latest news, all that’s left for us to do is enable the file upload feature. The typical and most convenient approach we can take is to use a plain old form. Just as we can use Ajax file uploads on a typical web page within Safari, we can do likewise in AIR. Unfortunately, it’s not quite that simple – an Ajax file upload doesn’t actually exist; the JavaScript XMLHttpRequest object can’t handle files. Most implementations of the concept involve redirecting the form to an iframe, and as AIR places security restrictions on remote content, this isn’t a reliable option for us.
Instead, AIR provides an upload method within every File object. Given a reference to a file, we can upload with just a URLRequest object and the name of the faux form field of which the file should pretend to be a part. It will then make an HTTP request, as per the URLRequest data; the only real limitation is that we can’t handle the response – we have to make a second request to list our files after the upload.
Here’s how our form appears at this point:
<div class="form">

  <div class="input">

    <input type="file" name="file" id="file" />

    <input type="submit" value="Upload" id="uploadbtn" />

  </div>

</div>
To implement Ajax for the file upload, we just work out when that upload button is clicked, construct a File object, construct a URLRequest object, and then upload the File object to the URLRequest. Just inside the end of the $(document).ready block in the behavior.js file, add the following:
$("#uploadbtn").click(function(){

  filePath = $("#file").val();

  file = air.File.userDirectory.resolvePath(filePath);

  request = new air.URLRequest(server + 'uploadService.php');

  request.method = air.URLRequestMethod.POST;

  request.data = "token="+sid;

  file.addEventListener(air.Event.COMPLETE, uploadComplete);

  file.upload(request, "AIRfile");

});
The form field with the id “file” has a value corresponding to the appropriate file path. The first two lines in this block calculate that file path, and give us an air.File object (in the variable: file) pointing to the file the user has chosen; it’s this File object that will manage the upload. We then construct our request variable, pointing it to our upload web service and passing in our session ID stored in sid. Finally, we bind the uploadComplete function as a callback to the air.Event.COMPLETE event and then upload the file.
Our server-side upload script
Let’s have a look at the upload service in serverfiles/uploadService.php. Here’s the PHP code:
<?php

session_start();


if (empty($_FILES['AIRfile']) && !empty($_SESSION['latestfile'])) {

  echo "<li>$_SESSION[latestfile]</li>n";

}

if (!empty($_FILES['AIRfile'])) {

  $_SESSION['latestfile'] = $_FILES['AIRfile']['name'] .

      ' - '

 . $_FILES['AIRfile']['size'];

  exit;

}

?>

<li><?php print_r($_REQUEST); ?></li>

<li><a href="http://bitmeta.org/air/dump/example.txt">example.txt</a></li>

<li>Your session token is <?=$_REQUEST['token']?></li>
This script first initializes the session handler, and checks to see if a “latestfile” variable has been stored for the current user. If so, we output it. Next, we check if any files are being uploaded – here, we don’t upload any files, as this is a demonstration server. If a file is being uploaded, we set that latestfile session variable, so that it will be visible the next time we check back; we then end the script there. If the script continues past this point:
  exit;

}
We know that we’re not currently uploading a file, but are instead checking back after uploading a file. We then proceed to output some sample information for the end user.
Checking back after the upload
Now that we’ve uploaded the file, we need to check back to grab the current list of files from the server. We used a callback function in behavior.js here:
file.addEventListener(air.Event.COMPLETE, uploadComplete);We now need to write that uploadComplete function. Add the following code inside the $("#uploadbtn").click(function(){ block:
function uploadComplete(event) {
request = new air.URLRequest(server + 'uploadService.php');
request.data = "token="+sid;
loader = new air.URLLoader();
loader.addEventListener(air.Event.COMPLETE, statusComplete); try {
loader.load(request)
} catch (error) {
air.trace("Could not retrieve file list.");
}
function statusComplete(event) {
$("#filelist").html(event.target.data);
}
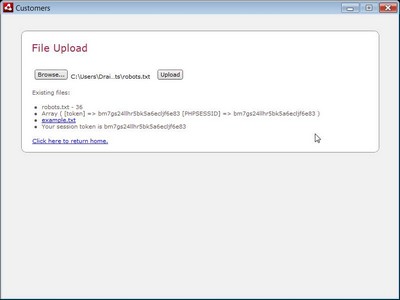
} This makes another call to uploadService.php, passing in the session ID – only this time we use a URLLoader object as we want to read the response. The uploadService.php script will output a series of <li> tags for our list, so we use the html jQuery function to take the response body – in loader.data, or event.target.data inside the callback – and place it straight into our <ul id="filelist"> on the page. When we run this script with a sample robots.txt file, the result appears as expected.
And we’re done! You can download our completed behavior.js file from the code archive.
Further Reading
Now that we’ve completed a simple web-enabled AIR application, you’re ready to take your web applications and services beyond the browser. You might find these handy references useful in further exploring the topics we’ve covered:
- Working with external data
- Using the URL
Requestclass - Working with
Fileobjects - Language reference –
URLLoadersamples - Available events on
async URLLoaderloads
Test Yourself
You can test your comprehension of this tutorial with a short quiz, and stand to receive a FREE copy of the pocket guide, Adobe AIR For JavaScript Developers, for your efforts. The guide will be delivered FREE, courtesy of Adobe Systems, but this offer is only available to the first 100 people, so get in quick! (If you do miss out, you can still download the book in PDF format for free.)
Frequently Asked Questions about Adobe AIR
What is the security model of Adobe AIR?
Adobe AIR uses a sandbox security model, similar to what is used in web browsers. This model separates the application from the system to prevent unauthorized access. It also uses a system of permissions, where the application must request permission from the user to perform certain actions. This ensures that the user has control over what the application can do.
How does Adobe AIR handle updates?
Adobe AIR has a built-in update framework that allows developers to deliver updates to their applications. This framework checks for updates at regular intervals and notifies the user when an update is available. The user can then choose to install the update or ignore it.
Can Adobe AIR applications access the file system?
Yes, Adobe AIR applications can access the file system, but only with the user’s permission. The application must request permission to read or write to the file system, and the user can choose to grant or deny this request.
What is the difference between Adobe AIR and Flash?
While both Adobe AIR and Flash are platforms for building rich internet applications, there are some key differences. Adobe AIR is designed for building standalone applications that can be installed on a user’s computer, while Flash is designed for building web-based applications that run in a browser.
How can I secure my Adobe AIR application?
There are several steps you can take to secure your Adobe AIR application. First, make sure to use the latest version of Adobe AIR, as it includes the most recent security updates. Second, use the sandbox security model to isolate your application from the system. Finally, always request user permission before performing actions that could potentially harm the user’s system.
What are the system requirements for Adobe AIR?
Adobe AIR requires a system with at least a 2.33GHz or faster x86-compatible processor, 512MB of RAM, and a graphics card that supports DirectX 9.0 or later. It also requires an operating system that supports Adobe AIR, such as Windows, macOS, or Linux.
Can Adobe AIR applications run offline?
Yes, Adobe AIR applications can run offline. They are installed on the user’s computer and can run without an internet connection. However, some features may require an internet connection to function.
How do I uninstall an Adobe AIR application?
To uninstall an Adobe AIR application, you can use the standard uninstall process for your operating system. For example, on Windows, you can go to the Control Panel and select “Uninstall a program.”
Can I use Adobe AIR to develop mobile apps?
Yes, Adobe AIR can be used to develop mobile apps for both iOS and Android. It provides a unified development environment that allows you to build apps for multiple platforms using the same codebase.
What programming languages can I use with Adobe AIR?
Adobe AIR supports several programming languages, including ActionScript, JavaScript, HTML, and CSS. This makes it a versatile platform for developing a wide range of applications.

