

Key Takeaways
- Windows 7 Home Basic and Premium users can use XP Mode integration to run IE6, IE7, and IE8, despite these versions being unsupported on these editions. This involves checking your PC’s compatibility, downloading Virtual PC for Windows 7, creating a new Virtual Machine, installing Windows XP in the VM, enabling integration, installing the Windows XP SP3 RemoteApp upgrade, configuring the VM resolution and color depth, and creating IE6 and IE7 VMs and desktop shortcuts.
- Running multiple versions of Internet Explorer on the same machine can be challenging due to the browser’s integration with the Windows operating system. However, third-party tools and virtual machines can enable multiple versions for testing purposes.
- For secure browsing on Internet Explorer, always use the latest version of the browser as older versions may not have the latest security updates. Be cautious when downloading files or visiting unfamiliar websites and consider using a trusted security software for added protection.
 My recent article, Run IE6, IE7, and IE8 on the Same Machine Using Windows 7 XP Mode, provided instructions for installing Virtual PC and XP Mode on a Windows 7 PC. Unfortunately, it only worked on the Professional, Ultimate or Enterprise versions of Windows 7.
Windows 7 Home Basic and Premium users are unable to use XP Mode. This is unfortunate since the vast majority of new PCs have those editions installed. However, there is a workaround that allows Windows 7 Home developers to use XP Mode integration.
1. Check your PC’s compatibility
XP Mode requires hardware-assisted virtualization (HAV). This is supported by most modern processors, but it may need to be enabled in your BIOS. The BIOS menu is normally accessed by pressing DEL, F2, or ESC immediately after switching on your PC. Microsoft provide a useful HAV detection tool which can help you with BIOS configuration.
2. Download Virtual PC
You must download Virtual PC for Windows 7 from the following location rather than the Microsoft Virtual PC website:
http://www.microsoft.com/downloads/details.aspx?FamilyID=2b6d5c18-1441-47ea-8309-2545b08e11dd
You might be prompted to install Genuine Windows Validation Component in your browser if you’ve not installed it before.
3. Create a new Virtual Machine
Start Virtual PC from Start > Programs > Windows Virtual PC > Virtual Machines then click Create virtual machine on the toolbar.
You will be prompted to enter the name, location, RAM (256MB is enough) and create a new virtual hard disk.
4. Install Windows XP in the VM
You will now need to start your VM and install Windows XP using an original CD or disk image. You will also require an XP licence — you may have one if you’ve scrapped or upgraded a PC.
Alternatively, you’ll need to buy a copy of Windows XP. The OEM versions generally cost less and you might be able to grab a copy on eBay — but ensure it’s legitimate.
You will also need to install the latest updates including SP3. However, do not install IE7 or IE8 just yet!
5. Enable integration
From the VM Tools menu, choose to install the Integration Components. Once installed, click Tools > Enable Integration.
6. Install the Windows XP SP3 RemoteApp upgrade
Within your XP VM guest (NOT the Windows 7 host), you should download and install the RemoteApp upgrade from:
http://www.microsoft.com/downloads/details.aspx?FamilyID=2f376f53-83cf-4e5b-9515-2cb70662a81b
7. Configure the VM resolution and color depth (optional)
By default, IE6 and IE7 will run in 16-bit color mode and your subtly-shaded web application can look a little strange. To fix it, refer to step 3 of Running XP Mode for the First Time at the bottom of the original XP Mode article.
8. Create IE6 and IE7 VMs and desktop shortcuts
You can now follow the instructions on page 2 of the original XP Mode article to create two cloned VMs and Windows 7 desktop shortcuts for IE6 and IE7.
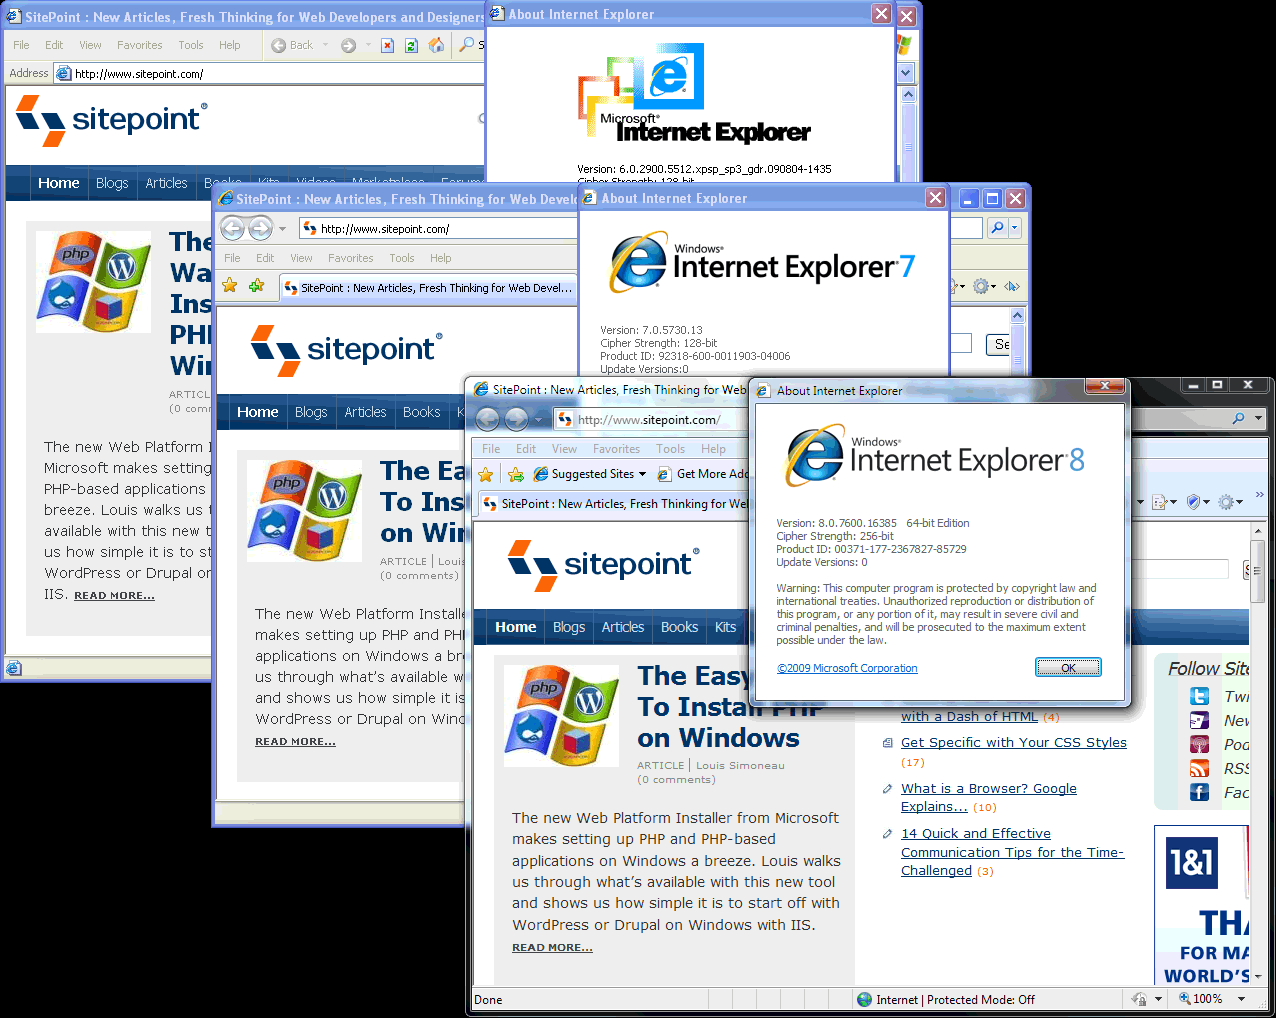 click to enlarge
Many thanks to logic_earth on the SitePoint forums for providing a great solution for Windows 7 Home users.
Are You Considering a Windows 7 Upgrade?
The solution above is ideal if you’re already using Windows 7 Home and have a spare XP licence. However, if you’re considering a Windows 7 upgrade, purchasing the Professional edition may save you time and money.
Prices appear to have reduced a little in the US:
- US Microsoft Windows 7 Professional Upgrade — $175
- US Microsoft Windows 7 Professional (full version) — $265
- US Microsoft Windows 7 Ultimate Upgrade — $200
- US Microsoft Windows 7 Ultimate (full version) — $292
UK prices have not altered significantly, but the full version price is confusingly similar to the upgrade and less expensive than the US:
- UK Microsoft Windows 7 Professional Upgrade — £150
- UK Microsoft Windows 7 Professional (full version) — £150
- UK Microsoft Windows 7 Ultimate Upgrade — £167
- UK Microsoft Windows 7 Ultimate (full version) — £170
Has Windows 7 XP Mode reduced your IE testing time?
Frequently Asked Questions (FAQs) about Internet Explorer on Windows 7
Can I still use Internet Explorer on Windows 7?
Yes, you can still use Internet Explorer on Windows 7. However, it’s important to note that Microsoft officially ended support for Internet Explorer versions 7, 8, 9, and 10 in January 2016. This means that these versions will no longer receive security updates or technical support, making them potentially vulnerable to security risks. It’s recommended to upgrade to a newer version of Internet Explorer or switch to a different browser for a safer browsing experience.
How can I upgrade Internet Explorer on Windows 7?
To upgrade Internet Explorer on Windows 7, you can download the latest version from the official Microsoft website. Once downloaded, follow the on-screen instructions to install the new version. Remember to back up your bookmarks and other settings before upgrading, as these may not be preserved during the installation process.
Can I run multiple versions of Internet Explorer on Windows 7?
Running multiple versions of Internet Explorer on the same machine can be challenging due to the way the browser is integrated with the Windows operating system. However, there are third-party tools and virtual machines available that can help you run multiple versions for testing purposes.
How can I troubleshoot issues with Internet Explorer on Windows 7?
If you’re experiencing issues with Internet Explorer on Windows 7, you can try resetting the browser settings, clearing the cache, or disabling add-ons. If the problem persists, consider reinstalling the browser or upgrading to a newer version.
How can I improve the performance of Internet Explorer on Windows 7?
To improve the performance of Internet Explorer on Windows 7, you can clear the cache, disable unnecessary add-ons, and ensure that you’re running the latest version of the browser. Additionally, keeping your Windows 7 operating system up to date can also help improve browser performance.
Is Internet Explorer compatible with all websites?
While Internet Explorer should be compatible with most websites, some newer websites may not display correctly due to the use of newer web technologies not supported by older versions of the browser. If you’re having trouble viewing a website, try upgrading to the latest version of Internet Explorer or using a different browser.
How can I ensure my browsing is secure on Internet Explorer?
To ensure secure browsing on Internet Explorer, make sure you’re running the latest version of the browser, as older versions may not have the latest security updates. Additionally, be cautious when downloading files or visiting unfamiliar websites, and consider using a trusted security software for added protection.
Can I customize the appearance and functionality of Internet Explorer?
Yes, Internet Explorer allows you to customize its appearance and functionality. You can change the home page, modify the toolbar, manage add-ons, and adjust various other settings to suit your preferences.
How can I import bookmarks from another browser to Internet Explorer?
To import bookmarks from another browser to Internet Explorer, you can use the Import/Export feature found in the File menu. This allows you to import bookmarks from a file or directly from another browser, depending on the version of Internet Explorer you’re using.
How can I use Internet Explorer’s Enterprise Mode?
Enterprise Mode is a feature in Internet Explorer that allows businesses to use old web applications in modern versions of IE. This mode can be enabled through the Tools menu or via Group Policy settings. Once enabled, it allows the browser to emulate an older version of IE, ensuring compatibility with older web applications.

