How To Build a Speedy WordPress Sandbox VM

Key Takeaways
- Setting up a Linux virtual server provides a dedicated environment for WordPress development, ideal for beginners looking to practice web server administration skills.
- Using VirtualBox, a free and open-source virtualisation system, you can install and configure a Ubuntu virtual machine (VM) from scratch, which can then be used to install WordPress.
- For a simpler and faster installation process, you can use a pre-packaged VM appliance such as TurnKey Linux’s WordPress Appliance, which comes pre-installed and configured with WordPress.
- Whether you choose to build your own VM or use a pre-packaged one, once set up, you’ll have a safe and isolated environment for WordPress development and testing.
If you’re planning to break into the world of WordPress development, it makes sense to set up a dedicated development environment — and one of the best ways to do it is with a virtual machine. I prefer VMs to my Mac’s built-in server or servers like MAMP because you can run them only when you need them, pack them away when you’re done, set up as many different ones as you need, and share them with friends and co-workers with ease. And if you’re new to web server administration, setting up and maintaining a Linux VM is the perfect beginner project to practice your skills.
In this article, we’ll take a look at setting up a Linux virtual server with all the bits and pieces required to support a WordPress installation. If the words “Linux”, “administer”, and “server” give you the heebie-jeebies, you’re in luck — we’ll also show you how to use a pre-packaged WordPress server that takes just minutes to install and requires no knowledge of the command line. What’s more, since we’ll be making use of free and open source software, all it costs is a bit of your time and hard drive space!
Download and Install VirtualBox
Your first step is to acquire a virtualisation system for your desktop machine. We’ll be concentrating on VirtualBox, a free and open source virtualisation system for Windows, Mac, and Linux — you can grab it for free from the VirtualBox website.
Those of you who have shelled out for another application, like VMWare Fusion or Parallels, never fear — you can still set up these VMs in the system you already have, but you’ll need to consult your product’s documentation for how to do this.
Setting Up a Ubuntu Virtual Machine
If you’re confident with the command line — or you’d like to become confident — installing and configuring a VM from scratch might be the method for you. In late ’09, Louis showed us how easy it is to build your own dev server with VirtualBox. The steps to do so here in 2011 are largely the same, so there’s no need for us to repeat every step in this article — go ahead and check out that article for the full play-by-play. Before you do so, however, keep these three things in mind:
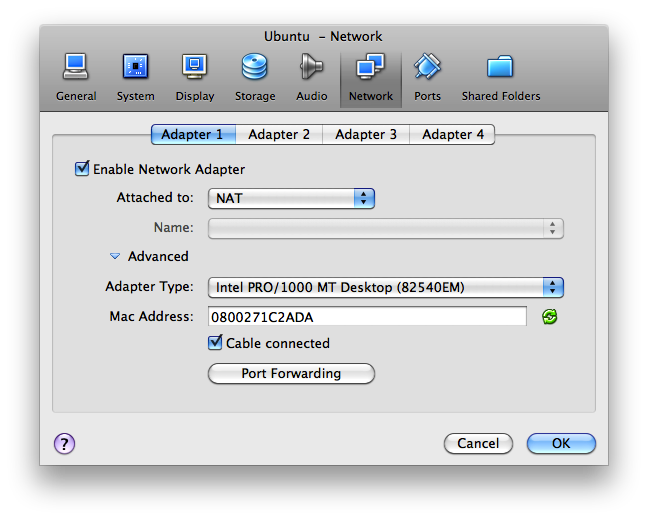
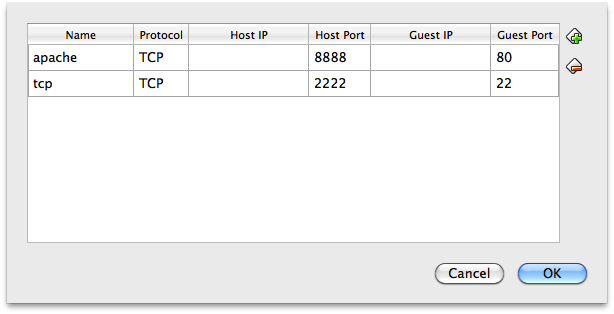
- In the article, Louis shows us how to set up port forwarding with an XML configuration file. In the latest version of VirtualBox, you can now also set up port forwarding in the VM’s Network Adapter settings panel. You can see these settings in figures 1 and 2, below.
- During the installation process, the Ubuntu 10.10 Server installer will ask you to choose the type of system you’d like to run. We’re after a LAMP server and we’d like to be able to log in using OpenSSH, so be sure to select that when asked. You can see this panel in figure 3, below:
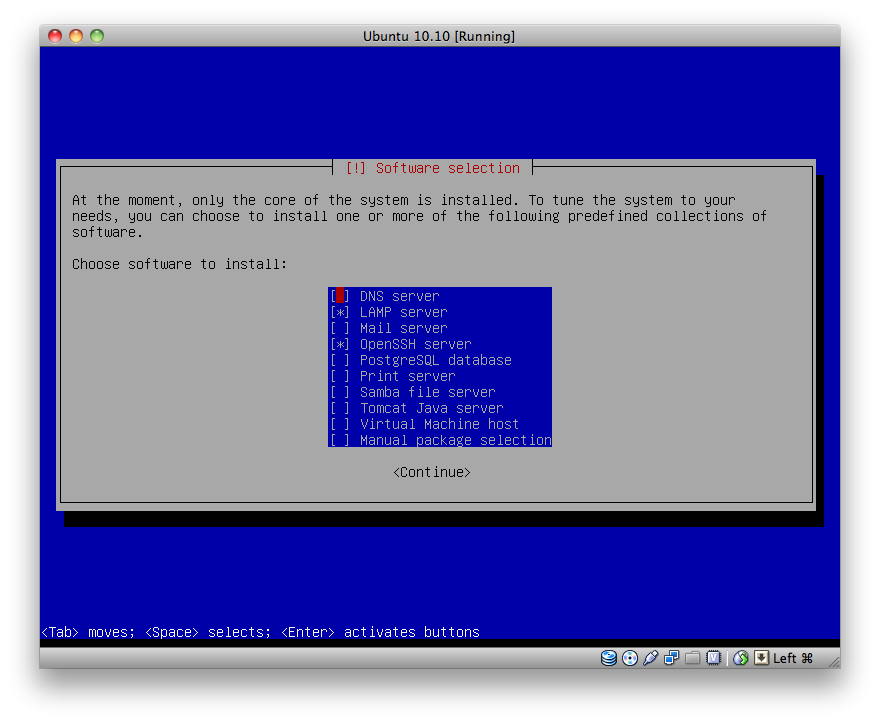
Doing so ensures that Apache, MySQL, PHP, and the OpenSSH packages are downloaded and installed from the outset.
- This process takes a while, and you’ll need to set a few passwords and answer quite a few prompts — go brew up some tea or coffee, and pay close attention to every question, especially the ones that ask you for a password.


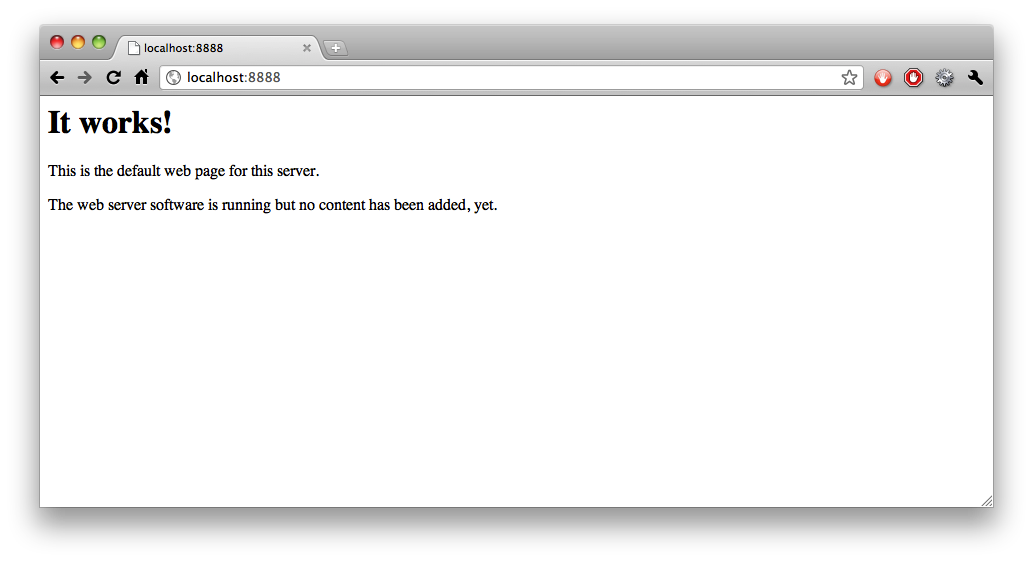
If you followed Louis’ instructions to the letter, and if all went well, you should now have a working Linux web server. Test this out by opening a web browser and heading over to http://localhost:8888. If you see a page that exclaims “It works!”, you’re on the right track.
In your VM window, you should also be greeted by a login prompt. Log in now, using the admin username and password you chose when you installed Ubuntu.
Grab WordPress
While it’s possible to install WordPress using Ubuntu’s package manager, it’s kind of idiosyncratic and fiddly. WordPress’ famous five-minute install is called that for a reason, and it works perfectly, so let’s install it this way, instead. First, head on over to the web directory, which should be /var/www:
cd /var/www
To grab the latest WordPress version, save yourself some tedious FTP-ing and have your VM download it direct with wget:
wget http://wordpress.org/latest.tar.gz
Now, unpack the zip:
tar -zvxf latest.tar.gz
All the WordPress files will be unpacked into a subdirectory of your website called wordpress. I’d prefer my blog to live at the root directory of my website, so I’ll be moving all these up one level:
mv wordpress/* /var/www
The default index.html file (that’s the one that says “It works!”) and empty wordpress directory can be removed:
rm -r index.html wordpress
Create A Database User and Password
During the Ubuntu installation process, the wizard asked you to specify a “root” password for MySQL. You’ll need that now, as we’re about to create a database for WordPress to use. The process for doing so is explained over on the WordPress codex, and goes a little something like this:
raena@wordpress:~$ mysql -u root -p
Enter password:
Welcome to the MySQL monitor.  Commands end with ; or g.
...
mysql>
Now, you’ll create the new database:
mysql> CREATE DATABASE wordpress;
Query OK, 1 row affected (0.00 sec)
Next, set up a database user:
mysql> GRANT ALL PRIVILEGES ON wordpress.*
    -> TO "wp_user"@"localhost"
    -> IDENTIFIED BY "password";
Clean up after yourself, and you’re done:
mysql> FLUSH PRIVILEGES;
mysql> EXIT
Bye
raena@wordpress:~$
Easy! You can now start installing WordPress using the web-based installer — head on over to http://localhost:8888 again and follow the instructions from the WordPress Codex.
Setting Up A Pre-Packaged WordPress Appliance
If you’re less confident with the command line, or if you’d prefer a simpler and faster installation process, a pre-packaged VM appliance might be the solution for you. A VM appliance is a virtual machine file that’s already been installed and configured, with little or no need for adjustments on your part. WordPress’ Codex suggests two appliances: BitNami’s WordPress VM, and TurnKey Linux’s WordPress Appliance. The TurnKey Linux VM is the most user-friendly, particularly for less confident Linux users, and it’s the one we’ll use for this example.
First of all, you’ll need to grab the appliance. TurnKey provides appliances in a number of different formats, one of which is the Open Virtualisation Format, or OVF. This is a common format for appliances, and bundles up all the software a VM needs in one easy-to-digest package. Look for the OVF link in the download bar, near the top of the TurnKey WordPress page.
Once you have that file, simply open it in VirtualBox — you’ll be asked to confirm the settings inside it. There should be little need to play with anything you find here, except perhaps the name of the virtual machine (vm is the default — a little generic, right?). VirtualBox will import the file and convert it into a virtual machine; when it’s complete, you’ll see it appear in the left of your VirtualBox window.
Next, start the machine and keep an eye on the screen. You’ll set up your machine through a wizard, which will ask you to set up usernames and passwords for the machine’s root account, for MySQL, and for WordPress’ administration account. You can see the wizard in action in figure 5, below:

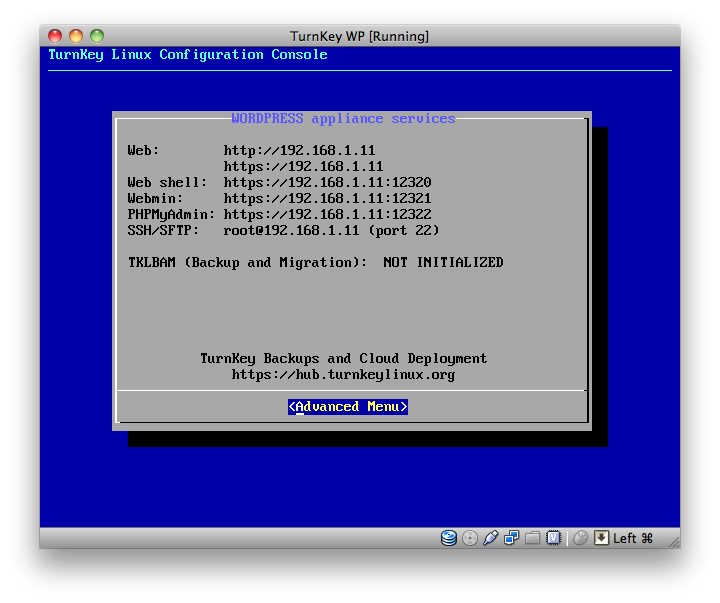
Be sure to make a note of these passwords. You’ll also be asked to set up the TurnKey cloud backup service, daily security checks, and whether you’d like to update your machine right away. It’s fine to skip the TurnKey backup setup for the time being (you can always enable it later), but it’s definitely important to set up your security updates now. It’ll take a few minutes, so grab a cup of tea or coffee while your machine does its thing. When it’s finished, you’ll see the TurnKey configuration console, which tells you everything you need to know to reach your website and to administer it — check it out in the figure below. Your WordPress blog is installed and ready for action at the address specified under “Web”, and you can administer your new server’s other goodies using the command line or the easy Webmin interface. Double-check now that you can log in to your system and that the WordPress site is definitely installed.
Since your appliance may have originally been created days or even weeks ago, you may find that you need to update some of your plugins, or even WordPress itself. Once you’ve done that, though, you’re ready to rumble!
Conclusion
Now that you’re up and running, you’re ready to fill your blog with interesting test content and start hacking on your plugins or themes. As with most things WordPress, the Codex is your best friend when it comes to tips, tricks, and troubleshooting advice — start with the Server and Database heading on the Advanced Topics page for some great information on what’s going on under the hood there. Don’t forget about the WordPress, Hosting and Apache sections of our forums, too!
Frequently Asked Questions (FAQs) about Building a Speedy WordPress Sandbox VM
How does a WordPress Sandbox VM improve my website development process?
A WordPress Sandbox VM (Virtual Machine) provides a safe and isolated environment for testing and development purposes. It allows developers to experiment with different themes, plugins, and codes without affecting the live website. This way, any potential issues or errors can be identified and resolved before they impact the actual site. It also enables developers to test updates and new features, ensuring they work correctly before implementation.
What are the system requirements for setting up a WordPress Sandbox VM?
The system requirements for setting up a WordPress Sandbox VM can vary depending on the specific VM software you’re using. However, generally, you’ll need a computer with a 64-bit processor, at least 4GB of RAM (though 8GB is recommended), and sufficient hard drive space to accommodate the VM and the WordPress installation. You’ll also need a stable internet connection for downloading necessary software and updates.
How can I ensure the speed of my WordPress Sandbox VM?
Ensuring the speed of your WordPress Sandbox VM involves several factors. Firstly, allocate sufficient resources (RAM, CPU, and disk space) to your VM. Secondly, use a lightweight operating system for your VM, such as Ubuntu Server. Thirdly, optimize your WordPress installation by using caching plugins, optimizing images, and minimizing the use of resource-intensive plugins and themes.
Can I use a WordPress Sandbox VM for production?
While it’s technically possible to use a WordPress Sandbox VM for production, it’s not recommended. Sandbox environments are designed for testing and development, not for handling real-world traffic and data. For production, it’s better to use a dedicated hosting solution that can provide the necessary performance, security, and reliability.
How do I migrate my work from the Sandbox VM to my live WordPress site?
Migrating your work from the Sandbox VM to your live WordPress site can be done using various methods. One common method is using a WordPress migration plugin, which can automate the process of transferring your site’s files and database. Alternatively, you can manually copy your site’s files and export/import your database using tools like phpMyAdmin.
How do I secure my WordPress Sandbox VM?
Securing your WordPress Sandbox VM involves several steps. Firstly, ensure your VM software and operating system are up-to-date with the latest security patches. Secondly, use strong, unique passwords for your WordPress admin account and database. Thirdly, limit login attempts to prevent brute force attacks. Lastly, consider using a security plugin for additional protection.
Can I run multiple WordPress Sandbox VMs on the same machine?
Yes, you can run multiple WordPress Sandbox VMs on the same machine, provided your machine has sufficient resources (RAM, CPU, and disk space). Each VM operates independently, allowing you to test different configurations, themes, or plugins simultaneously.
How do I backup my WordPress Sandbox VM?
Backing up your WordPress Sandbox VM can be done using various methods. One way is to use the snapshot feature of your VM software, which creates a point-in-time copy of your VM. Alternatively, you can use a WordPress backup plugin to backup your site’s files and database.
What should I do if my WordPress Sandbox VM crashes?
If your WordPress Sandbox VM crashes, first try to identify the cause of the crash. Check the VM’s logs for any error messages. If the crash is due to a lack of resources, consider allocating more resources to your VM. If the crash is due to a problem with WordPress, try disabling plugins or switching to a default theme to see if that resolves the issue.
Can I share my WordPress Sandbox VM with others?
Yes, you can share your WordPress Sandbox VM with others. This can be useful for collaborative development or for getting help with troubleshooting. To share your VM, you’ll need to export it as an OVA or OVF file, which can then be imported into the VM software on another machine.
Raena Jackson Armitage is an Australian web developer with a background in content management, public speaking, and training. When she is not thinking about the Web, she loves knitting, gaming, all-day breakfasts, and cycling.