
Key Takeaways
- Vector graphics, created in programs like Adobe Illustrator and Freehand, are scalable and maintain quality even when resized, making them ideal for logos and diagrams that need to be presented in different sizes.
- Adobe Illustrator and Freehand are both vector graphic editing software, but Illustrator is known for its advanced features and is widely used in the industry, while Freehand, although user-friendly, is no longer updated or supported.
- Basic shapes can be easily created in Illustrator and Freehand using their respective shape tools, and these shapes can be further refined by changing their dimensions and properties.
- Converting a JPG image to a vector image in Illustrator involves opening the image in Illustrator, selecting the image, going to the ‘Image Trace’ option in the ‘Object’ menu, and choosing the preset that best suits your needs.
This article was written in 2009 and remains one of our most popular posts. If you’re keen to learn more about using images and graphics, you may find this recent article on sprite animations of great interest.
Many designers I talk to love Photoshop. They’re experienced with it and know how it works, so they use it for almost everything. But when it comes to using Illustrator or Freehand, they’re a lot less comfortable. “I know I can do that Photoshop,” they think. “Why bother with Illustrator?”
I’ll answer that question in this, the first article from a series on vector images. In subsequent parts of the series, we’ll take the fundamentals we’ll learn here and see how they can be applied to a range of more complex design tasks.
If you think Adobe Illustrator and Freehand are all about creating boring geometric shapes, think again. By the end of this article, you’ll have seen some very cool applications of vector graphics in design practice.
Why Vectors?
Once upon a time, people had to use pen and paper to compose letters or write articles. College papers were drafted on stacks of notebook paper; lots of lines crossed out unwanted words or sentences, while little carets inserted additional words or phrases. It wasn’t unusual to see garbage cans full of crumpled pieces of paper (this was also before recycling), or for writers to mark pages with arrows or footnotes that pointed to other places where they wanted to insert another paragraph or two.
In contrast, I am writing this article while sitting in front of a screen, my fingers on a keyboard. If I decide I don’t like something, I move my hand over to the mouse, highlight the offending text, and with a simple click of a button, delete it. As I read over what I’ve written, I decide a clarifying remark would be in order, so I move my cursor up and type in my new thought.
Learning how to create and use vector graphics is as powerful as learning how to use a word-processing program.
What Are Vector Graphics?
Most images that you see on a Website are raster graphics — images made up of little dots (pixels) of color. If you were to take a gif or jpeg and zoom in, you’d see the individual pixels that make up the graphic:

If you use an imaging program to shrink the graphic, it makes some calculations that “average” neighboring pixels together to create an image with smaller dimensions. But if you wanted to enlarge the graphic, the imaging program would take the existing pixels, perform some calculations, and add in lots of extra pixels to make the image larger. This usually results in a blurry picture. In the diagram below, you can see our original 100×102 pixel image, enlarged 300%. Raster images do not enlarge well!

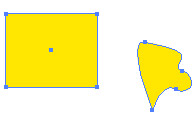
Time to contrast raster graphics with vector graphics: Vector graphics are made up of points that define lines and curves. For example, the rectangle below is a vector graphic made up of four points connected by lines, and the abstract shape is made up of points connected by curved lines. The graphics hold information about the direction of the line or curve, how thick the line is, and what color or pattern fills the shape.
The great thing about vector graphics is that, because you’re only dealing with points and lines, you can enlarge them quite easily without any loss of detail. This makes vector graphics great for logos and diagrams that might need to be output at different sizes. For example, when designing a logo, I’ll often use a vector graphics program to make the initial file, and then create a raster version for an optimized, Web-ready file.
Another good thing about vector graphics is that their file size is usually smaller. Raster graphics have to store information about each pixel. Vector graphics only have to store information about the points.
By now, you should be pretty excited about vector graphics. Let’s start to make them!
Basic Shapes
Adobe Illustrator and Macromedia Freehand have many basic shape tools that make it easy to create rectangles, circles, and other shapes. Let’s take a quick tour of the Tools palettes (palettes may vary slightly depending on what version of the program you have):
Both Illustrator and Freehand display the Ellipse and Rectangle Tools by default:
Illustrator: 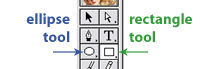
Freehand: 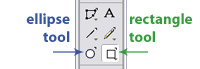
In Illustrator, hold down the ellipse and rectangle buttons to view more tools for other types of shapes — polygons, spirals, and rounded rectangles.
Illustrator tools:
![]()
![]()
Freehand has an additional Polygon tool under the Rectangle Tool option, as well as the Arc Tool and Spiral Tool, accessible from the Xtra Tools Palette (Window > Toolbars > Xtra Tools). To create rounded rectangles or star shapes, you can modify some of the options of the tools or objects (more about this later).
Freehand tools:

![]()
Drawing a shape using one of these shape tools is really, really easy.
- Select the tool.
- Click in the document, hold, and drag.
- Release the mouse button when the shape is as big as you want it to be. You’re done!
The polygon and spiral tools will always draw from the center; that is, the place you initially click will be the center starting point of the object. The rectangle and ellipse tools will, by default, draw from the top-left corner. If you want rectangles and ellipses drawn from the center, hold the Alt (PC) or Option (Mac) key while you draw. This tip works for both Illustrator and Freehand.
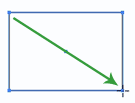
Default draws from corner
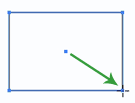
Holding alt or option key draws from center.
Changing Options or Properties of Basic Shapes
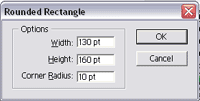
Illustrator: When using the shape tools in Illustrator, you may select the tool and then simply click once on the page (don’t hold and drag) to pull up the options dialog box for that shape. The options dialog box allows you to define specific dimensions for a shape (for example, a precise 2×3-inch rectangle, or a 200×200-pixel circle) and, for some shapes, to provide additional options. For example, the Rounded Rectangle Tool option box allows you to specify the radius for the rounded corners:
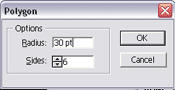
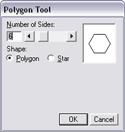
Similarly, the Polygon (and Star) Tools have options that allow you to define the number of sides (or points) the shape will have:
After you define the options, click “OK” to create a shape with those specifications. The shape tool will remember the options for other shapes that you create with that tool. To change them, simply click once to bring up the options dialog box again.
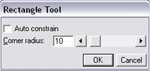
Freehand: Freehand’s shape options can be accessed by double-clicking on the tool button itself, which, in the case of the Rectangle Tool, allows you to specify a corner radius to create a rounded rectangle:

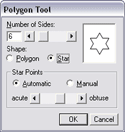
Double-click the polygon tool, and you’ll be able to specify the number of sides — whether the shape is a polygon or a star — and even the angles of the star points.
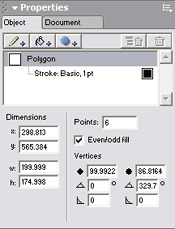
After you create a shape in Freehand, you can further refine its dimensions and properties by selecting the shape and changing the numbers and options in the Properties > Object palette.
If exact dimensions don’t matter to you, but you want to enlarge or shrink an object in Illustrator or Freehand, switch to the black arrow tool (known as “Selection Tool” in Illustrator, “Pointer Tool” in Freehand, and “black arrow” for us low-tech types), then select the object, and finally drag on the corner handles to get the object to your ideal size.

Now that you’ve mastered basic shapes, it’s time to get familiar with the Pen Tool.
Frequently Asked Questions about Graphics Illustrator and Freehand
What is the difference between Adobe Illustrator and Freehand?
Adobe Illustrator and Freehand are both vector graphics editing software, but they have some key differences. Adobe Illustrator, developed by Adobe Systems, is widely used in the industry and is known for its advanced features and tools. It offers a wide range of options for creating and editing vector graphics, making it a popular choice for professionals. On the other hand, Freehand, which was developed by Macromedia and later acquired by Adobe, is no longer updated or supported. It was known for its user-friendly interface and ease of use, but it lacks the advanced features and tools found in Illustrator.
How can I convert a JPG image to a vector image in Illustrator?
Converting a JPG image to a vector image in Illustrator is a straightforward process. First, open the JPG image in Illustrator. Then, select the image and go to the ‘Image Trace’ option in the ‘Object’ menu. Choose the preset that best suits your needs, and Illustrator will automatically convert the image into a vector. You can then fine-tune the result using the ‘Image Trace Panel’.
What is Adobe Freehand used for?
Adobe Freehand was a vector graphics editor used for creating and editing vector graphics. It was popular among graphic designers and illustrators for its user-friendly interface and ease of use. However, Adobe discontinued Freehand in 2007 and no longer provides updates or support for it. Today, most designers and illustrators use Adobe Illustrator or other modern vector graphics editors.
How can I learn to use Adobe Illustrator?
There are many resources available for learning Adobe Illustrator. Online tutorials, video courses, and guides can provide step-by-step instructions on how to use the software. Adobe also offers tutorials and resources on its website. Practice is key when learning any new software, so be sure to spend time experimenting with Illustrator’s tools and features.
Can I use Adobe Illustrator for free?
Adobe Illustrator is a paid software, but Adobe offers a 7-day free trial for new users. This allows you to test out the software and see if it meets your needs before committing to a subscription. After the trial period, you will need to purchase a subscription to continue using Illustrator.
What are the alternatives to Adobe Illustrator?
There are several alternatives to Adobe Illustrator, including CorelDRAW, Inkscape, and Affinity Designer. These programs offer similar features and capabilities, and some are available for free or at a lower cost than Illustrator.
How can I convert an image to vector in other software?
The process for converting an image to vector can vary depending on the software. In general, you will need to import the image into the software, then use a tracing or conversion tool to create a vector version of the image. Some software may offer more advanced options for fine-tuning the result.
What is the advantage of using vector graphics?
Vector graphics have several advantages over raster graphics. They are scalable, meaning they can be resized without losing quality. This makes them ideal for logos, illustrations, and other graphics that need to be displayed at various sizes. Vector graphics are also easier to edit and manipulate than raster graphics.
Can I use Freehand files in Adobe Illustrator?
Yes, Adobe Illustrator can open and edit Freehand files. However, since Freehand is no longer supported, some features or elements may not be fully compatible with Illustrator.
What skills do I need to use Adobe Illustrator effectively?
To use Adobe Illustrator effectively, you will need a basic understanding of graphic design principles, such as color theory, typography, and composition. You will also need to familiarize yourself with Illustrator’s tools and features, and learn how to create and edit vector graphics. Practice and experimentation are key to mastering Illustrator.