The 4 Best Linux Distros for Helping You Stay Anonymous

In this article, we’ll look at four Linux distros that help to keep you anonymous on the Web. The Linux operating system offers a lot of privacy options, and it’s arguably the best OS to use if online security and privacy is important to you.
Key Takeaways
- Diverse Options for Anonymity: The four Linux distros discussed, Tails, Parrot OS, Whonix, and Qubes, offer varying degrees of anonymity and privacy, each with unique features tailored to different user needs.
- Tor Integration: All distros emphasize the importance of using Tor to enhance online anonymity, with Tails and Whonix providing built-in Tor services for all internet traffic, and Parrot OS offering it via Anonsurf.
- Usage Flexibility: Depending on your anonymity needs, these distros offer different installation methods such as live USBs, virtual machines, or direct installation, with Tails being particularly noted for its amnesic feature which leaves no trace after use.
- Security Features: Each distro comes with specific security tools and configurations. Qubes, for instance, uses Xen-based virtualization to isolate applications, while Parrot OS includes security auditing tools and Firejail for application sandboxing.
- Considerations and Drawbacks: While these distros enhance privacy and security, they also come with limitations such as potential compatibility issues with everyday applications and increased system resource requirements, particularly noted in Qubes and Whonix setups.
The Privacy Problem
It’s difficult to stay anonymous online these days. Whether you’re browsing the Web or even using programs connected to the Internet, you’re being tracked. Even your operating system is watching you.
By running an operating system like Windows, or a program like VS Code, you’re being tracked via telemetry. Most of the data that’s collected about you is used to improve the software you use every day, but if your priority is to stay anonymous, you should be looking for better options.
Various distros of the Linux operating system offer features that enhance anonymity and privacy. But being anonymous can have drawbacks.
Before I go on, a disclaimer of sorts. The aim of this article is to show what’s available for protecting your privacy. It’s not intended as an encouragement to engage in practices prohibited by your country’s laws.
What Does It Mean to Be Anonymous?
Staying anonymous can mean different things to different people, so let’s clarify this concept before moving on.
To stay anonymous online, you need to establish who you’re hiding from, and what tools will enable you to hide your real identity.
You can use a threat modeling approach to identify the risks you might be exposed to. To put it simply, the U.S. National Institute of Standards and Technology (NIST) has four steps:
- identify and characterize the system and data of interest
- identify and select the attack vectors to be included in the model
- characterize the security controls for mitigating the attack vectors
- analyze the threat model
If you want to know more about threat modeling, follow the NIST draft, which includes detailed information about this process.
For example, a journalist may want to stay anonymous while sharing their thoughts on the Web. This would cut out the fear of discrimination or retaliation. Simply put, they don’t want people to know who they are, so they know who they must hide from.
Once you know who you want to stay anonymous from, it’s time to use tools like Tor or the anonymity-focused Linux distributions shown next.
Of course, anonymity has many advantages, but here are the main ones:
- freedom of speech: you can share your thoughts without the fear of being judged
- Less tracking: it’s more difficult to track what you’re doing online
- Personal safety: no one knows your real identity
- Data security: your data is precious, and staying anonymous makes it harder to steal it
Various Methods for Using the Following Linux Distros
In general, Linux-based operating systems are more secure and privacy-oriented than proprietary ones. Taking this into account, it’s important to know how the following Linux distros work, and how they’ll help you stay anonymous.
Using Virtual Machines
Virtual machines (VMs) are environments that work as a virtual computer that runs on top of your physical computer.
VMs are isolated from the rest of the system, and they can be used to run almost any operating system, so they support the following Linux distributions.
The most popular software for running VMs is VirtualBox, which is an open-source hypervisor created by Oracle. It works in Windows, Linux, and macOS, and is easy to set up.
From a normal user perspective, the main advantage of using a VM is that you can run it along with your host operating system, which means you can use both at the same time.
Using a Live Boot USB
A live USB runs an operating system without installing it on your computer. A live USB lets you jump into a live environment when you use it to install a Linux distro. A good example of this is the Parrot OS live environment, pictured below.

The main advantage of this method is that you don’t need to install anything, so you can run the live USB on your computer, use the Linux distro, unplug the USB, and continue using your daily-driver OS.
Take a look at Qubes for a total VM-based operating system.
Installing on Bare Metal
If you want to stay anonymous, installing a Linux distro as the main OS on your system isn’t the best option, since you’ll be using your computer through multiple sessions.
Each time you use your computer, you leave traces of information about the websites you’ve visited, files you opened, and even the Wi-Fi network you used.
That’s why using a live boot USB, or a VM, is usually more secure.
Once you’re done with the live environment, shut it down and all the data will go away. Likewise with VMs, you can delete them once the job is done.
Before Jumping In, What’s Tor?
Tor — The Onion Router — is an open-source project that hides your IP address when browsing the Internet. It redirects your web request to a worldwide overlay network with over six thousand relays.
When you use Tor, you’re routing all of your internet traffic through three machines selected from thousands of volunteer computers from different people and organizations.
The first relay knows who are you, but not the next relay you’re going to connect to. The third relay only knows where you’re going (an external server, such as a web page) but not your original IP address.
All of this occurs in an encrypted environment, and that’s why it’s so important to avoid insecure pages — those without HTTPS.
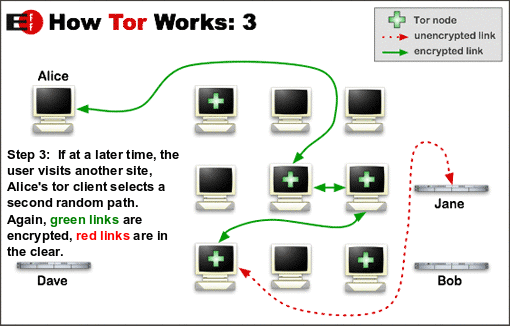
This process makes it almost impossible for anyone (websites, internet providers, and so on) to know your IP address.
What not to do when using Tor
Tor lets you hide your IP address, but it becomes useless if you don’t use it properly. Here are a couple of things you shouldn’t do when using Tor:
- authenticate using your cellphone
- use personal social accounts in Tor (Twitter, Facebook, Gmail)
- share personal information
- use an old Tor version
- use Google search; DuckDuckGo doesn’t collect user data
- browse any non-HTPPS (unencrypted) web pages
Once you’ve internalized these tips, you can use a shortcut made for the average user, the Tor browser bundle.
Nowadays, you can download the Tor Browser which is a browser that runs on top of Tor in all major operating systems. If you want, you can also download and compile Tor source code.
But using Tor has some drawbacks. The most important one is that it limits your internet speed. This occurs because you’re routing your traffic through the Tor network, which means each web request you do has to pass by multiple computers.
Another disadvantage is that some websites like Netflix, Bank sites, and so on, are blocked by Tor. Also, if you use Tor regularly, you’ll need to fill in CAPTCHA forms in most pages you visit.
Of course, this is a small price to pay for online security and anonymity.
Tails
Tails is an anonymous Linux distribution based on Debian. It’s a lightweight and fast operating system which uses Gnome as its default desktop environment.

It starts from a clean state and leaves no trace when you leave. That’s called “amnesia”, and it’s the magic that makes Tails a secure OS. You can use someone else’s computer securely because Tails doesn’t write to disk at any point.
Another awesome thing about Tails is that it uses the Tor relay as the only way to access the Internet. That means that all the networking programs you use (programs that need to connect to the Internet) must redirect their traffic through a Tor network.
So even if you’re using a simple app like Thunderbird, all the information it sends or retrieves from the Internet must pass through Tor.
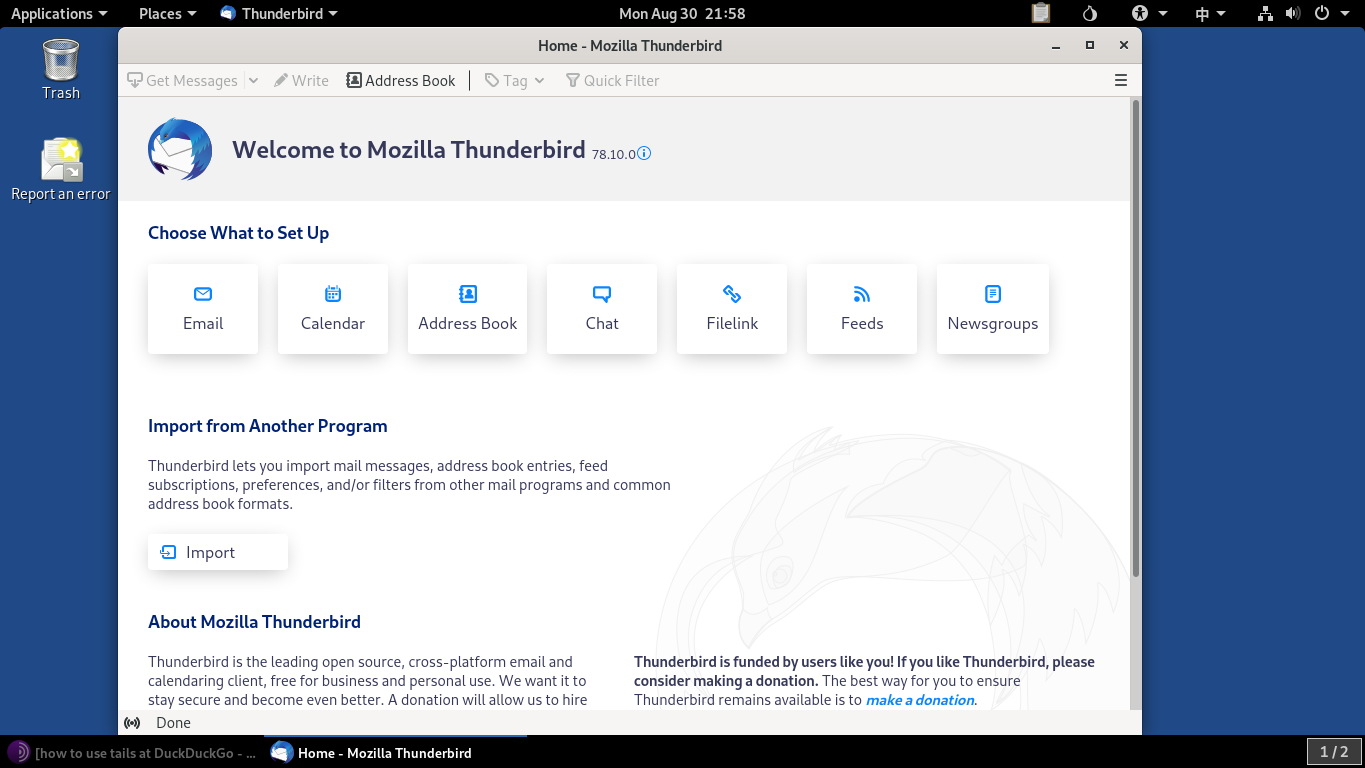
By default, Tails has installed the following apps:
- Thunderbird
- Tor Browser, with Ublock Origin, and DuckDuckGo as the default search engine
- Libre Office
- graphical editing apps like GIMP and Inkscape
After using it for a while, it feels like a solid yet lightweight operating system, so you could run it on old computers. (It’s based on Debian 10)
Also, I found this distro comes in handy when using a friends’ computer, so you can keep both users’ data safe.
Tails Features
- Tor relay for everything.
- Tails’ storage isn’t persistent, so there’s no way to track you after you log out. However, you can enable an encrypted/persistent storage in case you need to install some other program or save some additional settings.
- It connects to the hardware of the computer but doesn’t interact with disk drives.
- In most cases, you can use it on virus-infected devices without any risk.
- It includes common-use apps, as well as encryption and privacy-focused software.
- It allows you to install any package available in official Debian repositories.
You can access a more detailed list of features on Tails’ official website.
Tails download options
You’ll need to download Tails’ USB stick version and install it on an 8Gb USB (or greater).
If you want other options, Tails offers two ways of usage: via USB stick, and via virtualization (for use inside a VM).
Here are the different installation images:
Note: Running Tails in a VM has two problems. Your host OS and hypervisor can monitor what you’re doing in Tails, and Tails can leave traces on the hard disk, which is why it warns you when you’re using it in a VM.
It’s up to you if you want to gain some degree of comfort (using Tails without restarting your PC) while losing a little bit of security.
Parrot OS
Parrot OS is used for ethical hacking, security audits, and pen-testing. It’s a Debian-based Linux distribution, so you can get access to the reliability of the apt package manager.
It comes with Tor, Tor Browser, and OnionShare out of the box, so you can use this anonymity-oriented browser right out of the box.
It’s considered an anonymous distro because most of its users know what they’re doing (most of them work in the cybersecurity industry), and they use the right set of tools to stay anonymous.
Maybe you’d think it’s just a normal Debian distribution with cool and dangerous ethical hacking software, but the Parrot security team created a script named Anonsurf that lets you root all of your traffic through Tor.
If you use Parrot with Anonsurf, it results in a similar experience to using Tails OS.
Parrot uses Firejail in all compatible applications by default. Firejail is a program that reduces the risk of security breaches by restricting the access a program needs to work.
Also, you have different networking tools like EtherApe (a graphical network monitor), chat clients like Ricochet (an anonymous, Tor-based chat client), and a share file utility like OnionShare.
On the other hand, this is the only Linux distro of this article that can be used as a daily driver because of the new Parrot’s home edition.
This can result in a disadvantage, because, unlike with Tails, you’re leaving traces of your activity on your computer. But if you’re a normal user seeking anonymity, Parrot can fit your needs.
You can consider Parrot as the sweet spot of a security and anonymity-focused Linux distro, without the technical complications of other distros like Qubes.
Features
- has a great community
- has low system requirements
- offers home and security editions
- is user friendly (compared to the other Linux distros on this list)
- comes with pre-installed software
- includes several tools to turn your computer into an anonymous machine
Parrot download options
You can download any Parrot OS edition on the official Parrot website, and also use it with different methods:
- USB stick
- Virtual machine OVA file
- bare metal
Whonix
Whonix is different from all the other Linux distros we’ve looked at so far. It works in two parts: a gateway that acts as the Tor gateway (which redirects all of your traffic just as Tails does), and a workstation that routes all the connections via that Tor gateway.
Since it doesn’t give a complete OS experience, it needs a host OS that can run VirtualBox.
The image below shows how it looks to have both the gateway and the workstation working.
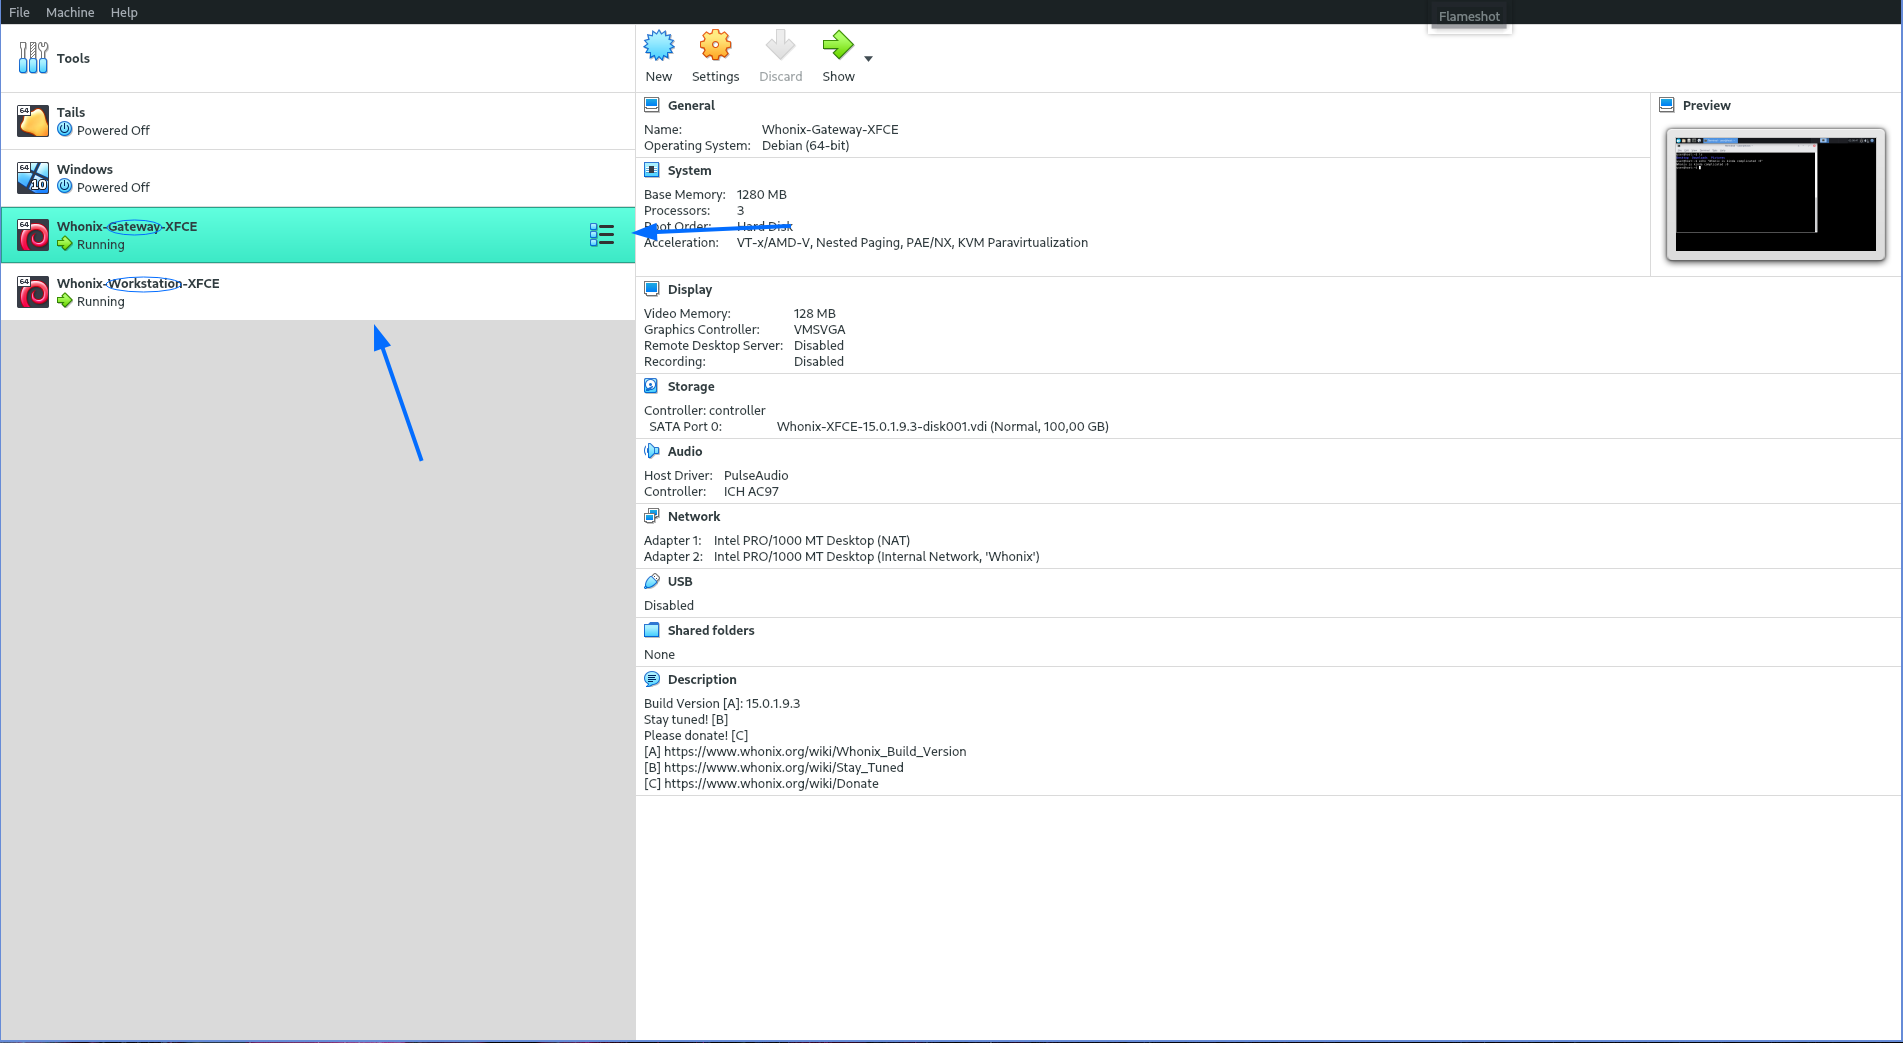
The gateway must be running at the same time as the workstation.
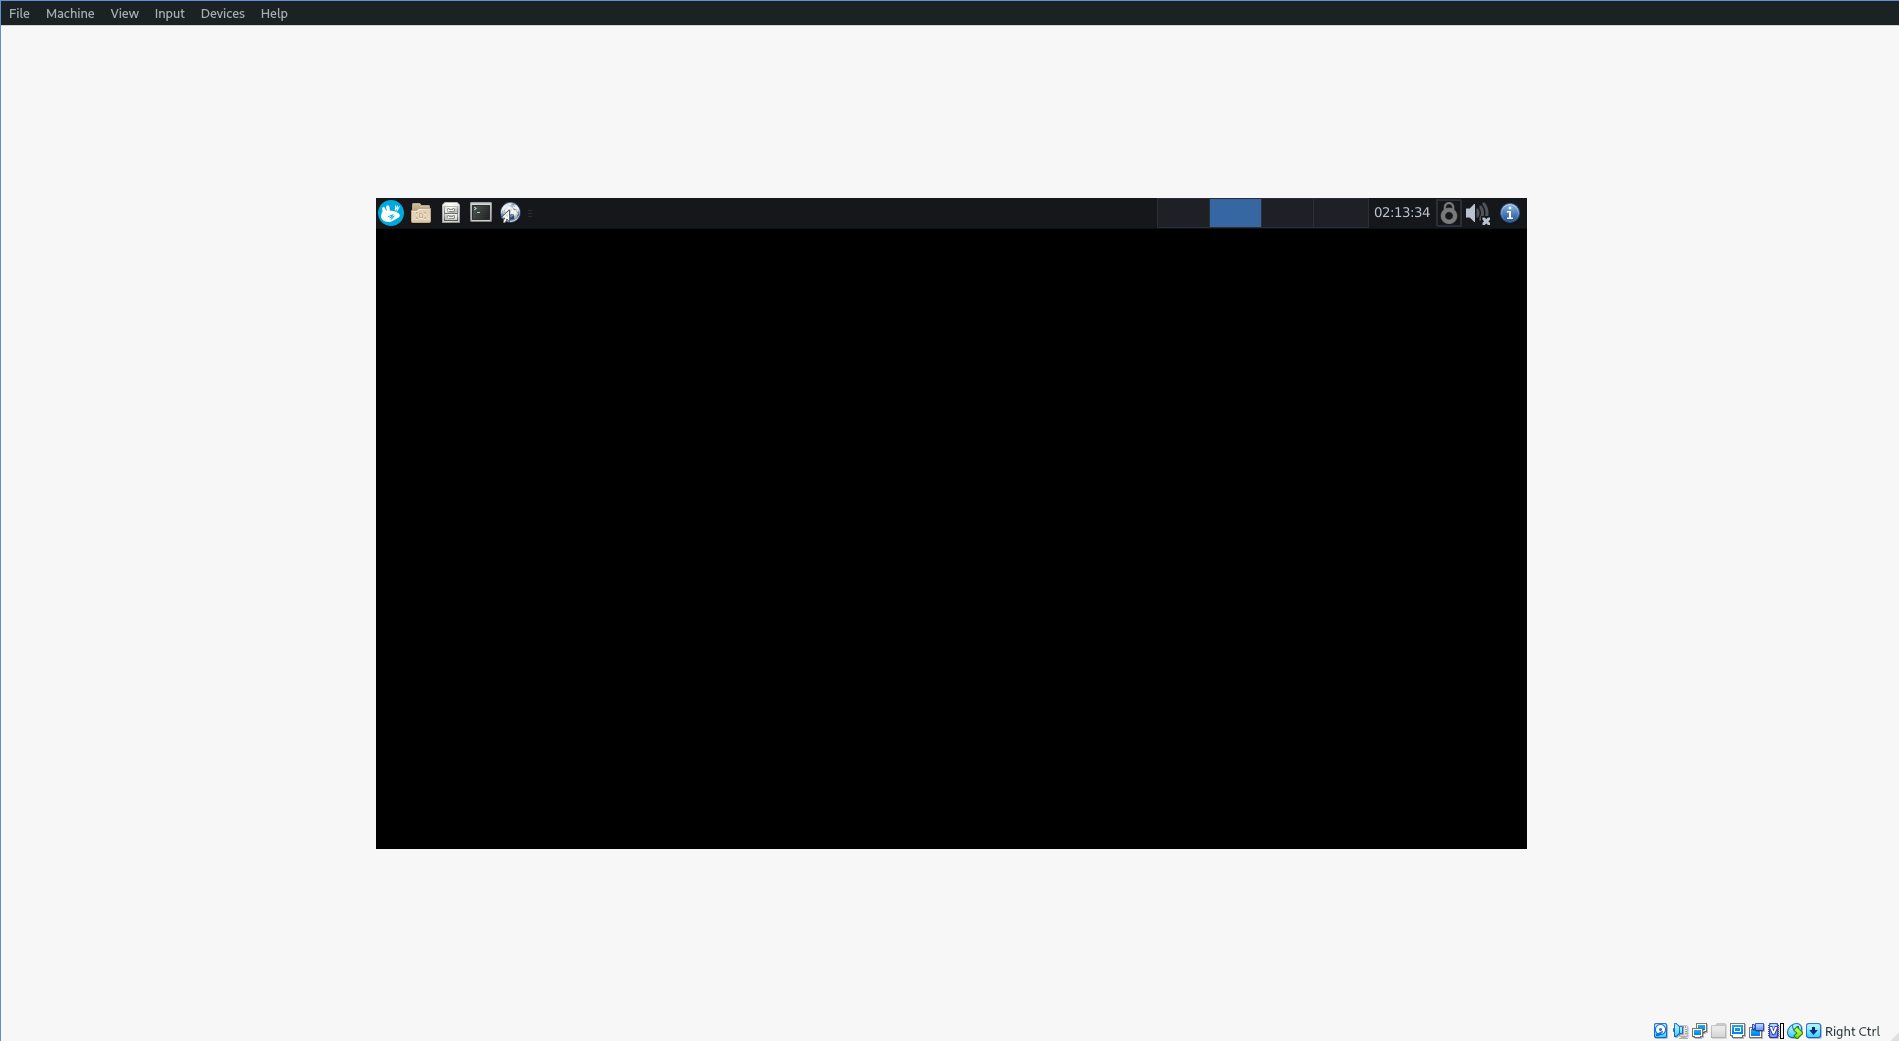
Although the gateway shows off a basic XFCE environment, it’s not meant to be used. Just leave it there handling the Tor routing.
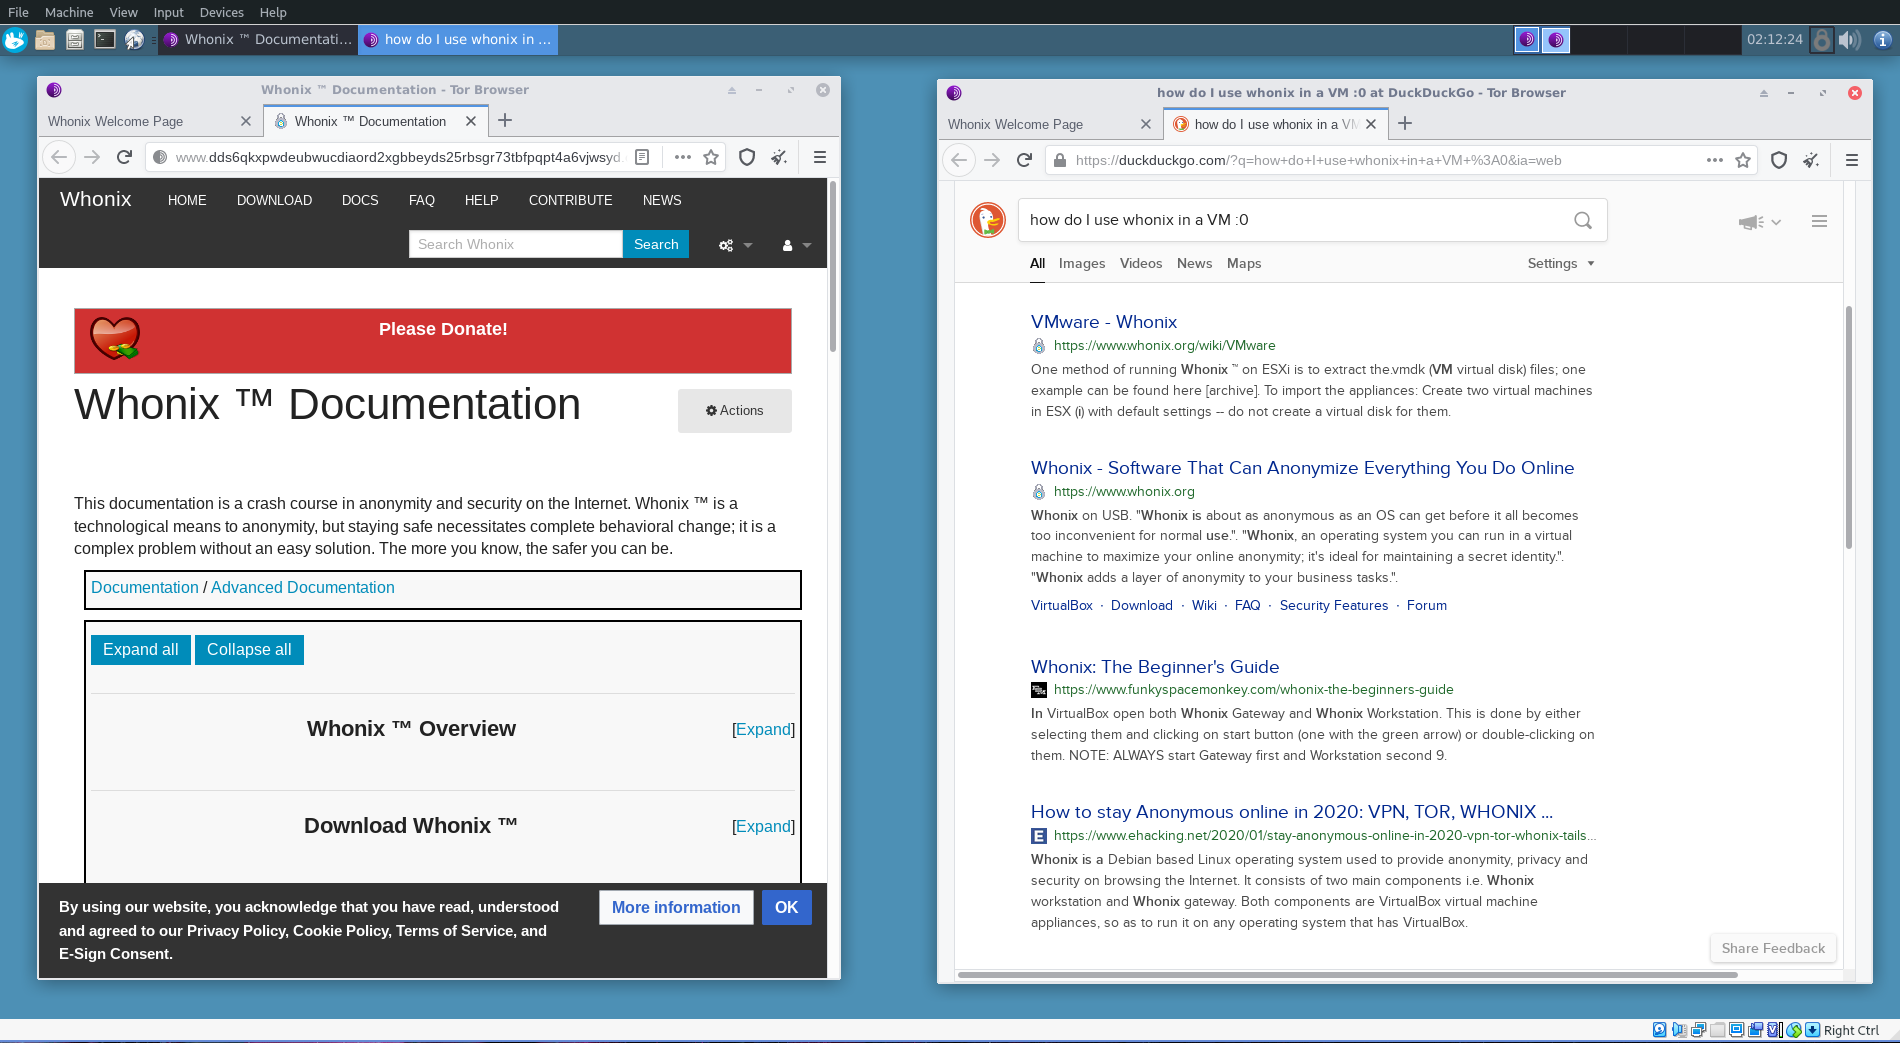
And here’s the workstation, where you can launch the Tor browser, and several applications which only connect to the Internet through a Tor relay.
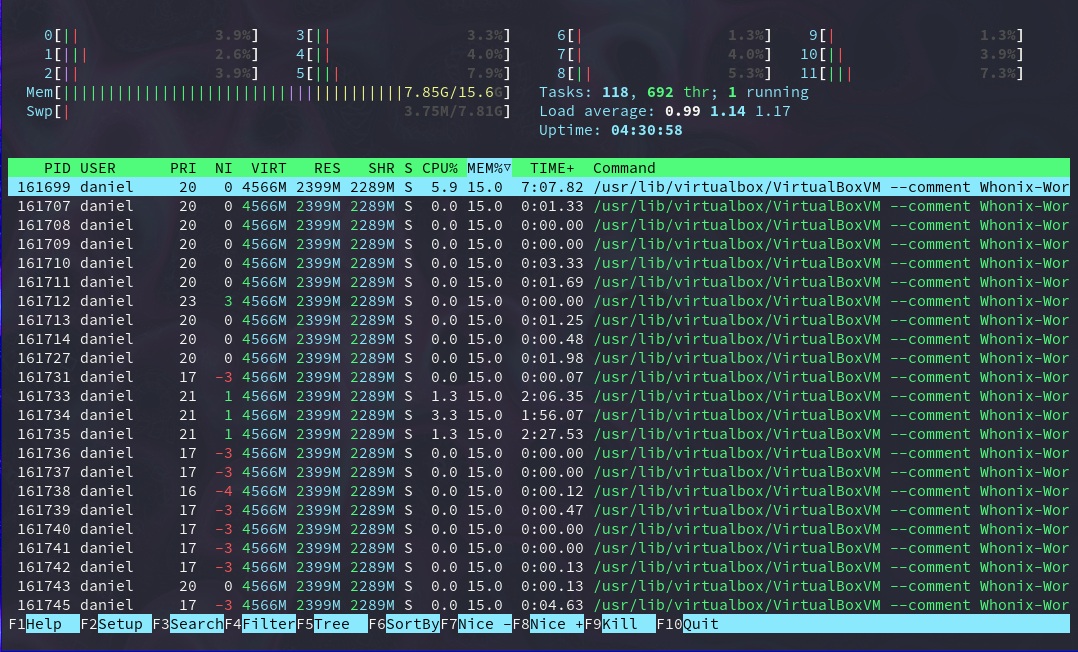
But there’s a huge problem with this anonymity-based distro: resource consumption. You’re using VirtualBox, which it’s a heavy application, to run two virtual machines. And remember, the workstation depends on the gateway.
Even though Whonix is very well optimized to work inside VirtualBox, you can see how much resources it’s consuming without much usage.
But once you take away these drawbacks, you get an extremely secure and anonymous virtual machine running on top of your operating system. If you care about being anonymous, Whonix is a good-to-go option.
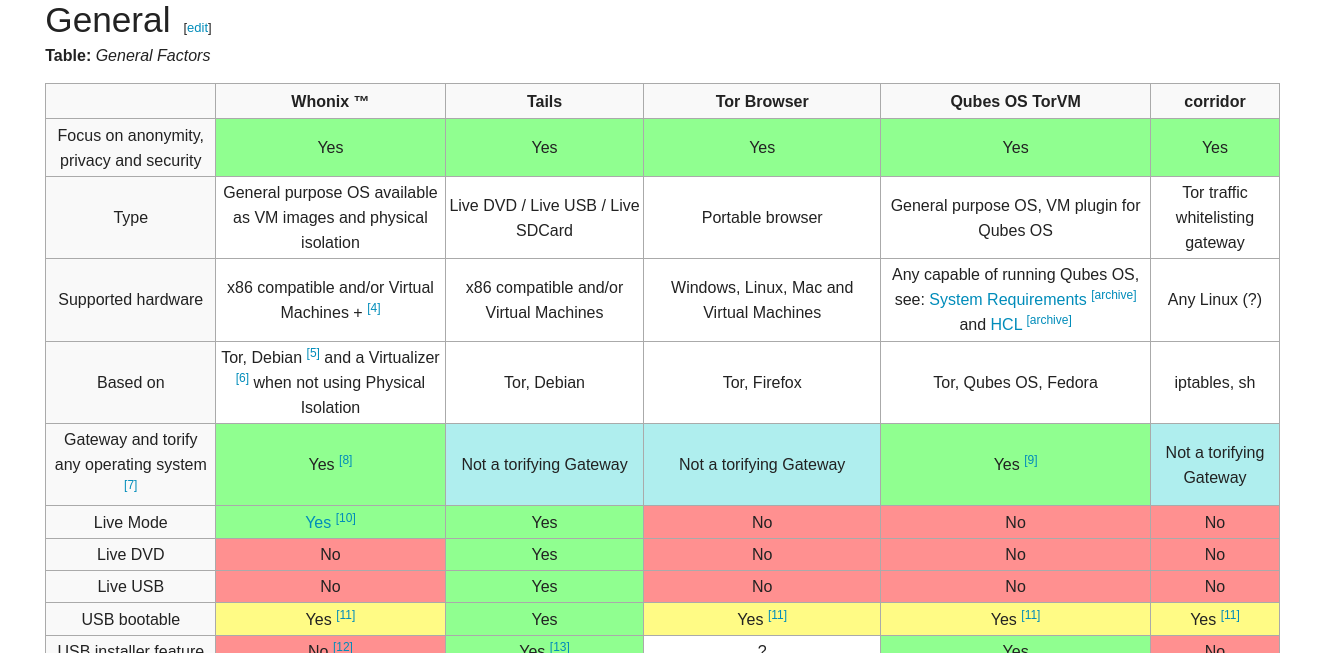
Whonix’s team has done an outstanding job comparing their Linux distribution to other anonymity OSs.
In general, Whonix is the best Linux distro you can run on top of your host OS, since it’s optimized to run as two separate VMs. It has additional security hardening like that strength Linux account isolation, and a VM live mode that prevents malware propagation.
Also, you have the option of using only a CLI, in case you don’t care about GUI programs.
Whonix Features
- Tor routing for every application
- Live mode, hence a non-persistent way to use Whonix
- keystroke anonymization
- a rock-solid system because of its Debian base
- free and open-source access, like any other Linux-based OS
Whonix download methods
Virtual machines are the only way to run Whonix OS, so you can choose the right download method according to your current OS.
Qubes
Qubes is an open-source, security-oriented operating system. Unlike other Linux OSs covered in this article, Qubes need to be installed directly on your computer.
Qubes uses Xen level virtualization (bare-metal virtualization) to create tiny isolated compartments called “qubes”.
You can use different templates to run different kinds of software. For example, run Microsoft Word on top of a Windows template, or use a terminal app qube based on the Debian template.
Each qube is a virtual machine that can be configured to run any program you want. These little VMs have different purposes, natures, colors, or levels of trust (green for trusted, red for untrusted), and can use Whonix to route all their internet traffic through Tor.
That being said, don’t expect Qubes to run on a low-end machine. It creates a VM for each program you run, so it it has extensive hardware requirements.
To be clear, Qubes isn’t meant for beginner Linux users. You can use it if you have extremely crucial private data on your PC. But if you only want to use it to browse the Internet anonymously, it would be better to use some of the options above.
Qubes OS has its drawbacks, but it’s one of the most secure operating systems you can run.
Qubes Features
- isolates the software you use
- it’s an extremely secure system
- it has extensive documentation
- it includes Whonix integration
- it offers device isolation
Qubes download methods
You can download Qubes’ ISO images from its official downloads page and check Qubes’ installation process right after.
Conclusion
All of the Linux distros presented above can help you stay anonymous when using the Internet through the Tor network, but they aren’t flawless. Which to choose, and how much anonymity they offer, depends on a number of factors.
To decide which Linux distro is the right for you think about the usage you’ll give it.
Are you an exposed person, with crucial private data to protect? Or maybe it’s extremely important to you to hide your real identity on the Internet? If some of the answers to these questions are “yes”, you should take a look at Qubes or Whonix.
Or perhaps you’re an average user looking for a little bit of online privacy. Then, using Parrot and the Tor browser could be the best fit for you.
Maybe you just want to use someone else’s computer securely. In that case, Tails is a good choice.
It’s all about how much you care about your data, and if you’re willing to use more private software with a higher learning curve.
Finally, remember that, in general, any Linux distro is more secure and private than Windows or macOS, because:
- Linux OSs are less targeted by cybercriminals than Windows or macOS
- Linux OSs have few security leaks, and if found, they’re fixed extremely quickly
- Most software installed in Linux is open-source and malware-free
If you’re new to Linux, check out SitePoint’s beginner’s guide to using Linux.
There are, of course, other ways to stay anonymous online, including using a VPN. Check out “VPNs: What They Are, and Why You Need One” for more on this.
FAQs About Best Linux Distros for Helping You Stay Anonymous
What Makes a Linux Distro Secure and Anonymous?
A secure and anonymous Linux distro is designed to protect the user’s privacy and data. It comes with built-in security features such as encryption, sandboxing, and secure deletion of files. It also uses anonymity networks like Tor to hide the user’s IP address and location. Some distros even run entirely in RAM, leaving no trace on the hard drive. They also come with privacy tools like VPNs, ad blockers, and anti-tracking software.
How Do I Choose the Right Linux Distro for Privacy and Security?
Choosing the right Linux distro for privacy and security depends on your specific needs and technical skills. If you’re a beginner, you might want a distro that’s easy to use, like Ubuntu Privacy Remix or Tails. If you’re an advanced user, you might prefer a distro that gives you more control over your system, like Qubes OS or Whonix. You should also consider the distro’s community and support, update frequency, and compatibility with your hardware.
Can I Use a Secure and Anonymous Linux Distro for Everyday Computing?
Yes, you can use a secure and anonymous Linux distro for everyday computing. However, keep in mind that these distros prioritize privacy and security over convenience. Some features that you’re used to, like certain web services or apps, might not work or be blocked for security reasons. Also, using these distros might require more technical skills than regular ones.
How Do I Install a Secure and Anonymous Linux Distro?
Installing a secure and anonymous Linux distro is similar to installing a regular one. You download the ISO file from the distro’s website, burn it to a DVD or USB stick, and boot your computer from it. Then, you follow the installation instructions. Some distros can be run directly from the DVD or USB stick without installation, which is useful if you want to try them out or use them on a computer that’s not yours.
What Are the Risks of Using a Secure and Anonymous Linux Distro?
While secure and anonymous Linux distros offer enhanced privacy and security, they’re not 100% foolproof. If you’re not careful, you can still expose your data or identity. For example, if you use the same usernames or passwords across different services, or if you give out personal information. Also, these distros can’t protect you from hardware vulnerabilities or physical attacks.
Can I Use a Secure and Anonymous Linux Distro on an Old Computer?
Yes, one of the advantages of Linux distros is that they’re lightweight and can run on older hardware. However, some distros require more resources than others. Check the system requirements of the distro you’re interested in to make sure it can run on your computer.
Can I Use a Secure and Anonymous Linux Distro on a Virtual Machine?
Yes, you can use a secure and anonymous Linux distro on a virtual machine. This allows you to use the distro without affecting your main operating system. However, keep in mind that the host operating system can still be compromised, which could potentially expose the data on the virtual machine.
How Do I Update a Secure and Anonymous Linux Distro?
Updating a secure and anonymous Linux distro is usually done through the distro’s package manager. Some distros automatically check for updates and prompt you to install them. Others require you to manually check for updates. It’s important to keep your distro up-to-date to benefit from the latest security patches and improvements.
Can I Use Windows or Mac Software on a Secure and Anonymous Linux Distro?
Some secure and anonymous Linux distros support Wine, a compatibility layer that allows you to run Windows software. However, not all Windows software works perfectly under Wine, and using it could potentially expose your data. As for Mac software, it’s generally not compatible with Linux.
How Do I Get Help with a Secure and Anonymous Linux Distro?
Most secure and anonymous Linux distros have a community of users and developers who can help you with any issues. You can find them on the distro’s forums, mailing lists, or chat rooms. Some distros also have documentation or a wiki that can answer your questions.
Self-taught Python/Django Developer, Technical Writer, and long life learner. I enjoy creating software from scratch and sharing knowledge with stunning technical articles.