In Part 1 we considered Web development from a small business perspective. Here, we look at the approach a freelancer might take…
As a new freelancer, there’s nothing scarier than starting your first project. This article will take a close look at the steps you should follow to develop a project. Hopefully, if you’re aware of what the process should be, you won’t be as concerned about getting things right. I’ll assume that this is your first client, and that return business is essential to the growth of your business. So follow these steps from start to finish, and you should have both a happy client, and a check in your hands.
1. Track Time
It’s important to track your time as you work on a project. Start tracking your time as soon as you start to give your attention to a project. Place a time log into a new docket and write onto this log your start and finish times, along with other detailed information every time you work on that particular project.
Here’s an exmaple:

For several reasons, it’s important to use the time log accurately. First and foremost, your client might expect you to break down your hours so that they can see exactly where their money’s going. Secondly, in order to increase your productivity, a thorough examination of where your time is being spent will be essential. After you freelance for a while, experience will allow you to easily figure out how much to bid on projects.
2. Open Up a Docket
A docket is a huge envelope or sleeve that keeps all your papers together. Nothing looks worse than arriving at a meeting with a client, only to realize that you’ve forgotten essential paperwork. In order to avoid this possibility, I suggest you use a docket for each individual project.
I recommend using a black marker to distinguish between each project you complete. I’ve always named my project’s computer files and dockets by the company’s name and then follow this with consecutive numbers. So for example, the file marked XYZCompany001 would contain all my information on XYZ Company’s first project.
3. Information Sheet
If this is the first time you’ve ever worked with the client, start an information sheet on them. You mightn’t think that this is important, but if this client ends up being a dead beat who won’t pay their bill, you’ll be glad you made a note of his or her address and phone number back in the early days of the project.
After you have completed the information sheet place it in your docket.
4. Scheduling the Stages of the Job
Consider the project from start to finish. List the steps that you anticipate will be involved in order finish production. Use this list as your guide — without it, you might find that you have to go back three steps in order to be able to finally progress the project.
Sometimes stages of a project will need to be reworked because you didn’t take the time to write down your game plan, or you weren’t thorough in your planning. Try not to let this happen to you. And if the client changes their mind about the project, and you have to re-work your plan, it’ll be easier to do if you already have something to work from. Planning each stage of the job is essential.
5. The Contract
Protect yourself against problem clients by writing a contract. Have your client sign and send back the contract before you start the project. You can find generic contracts for your business on the Internet at:
- Manage Jobs Software
- Digital Contracts Online
- Smart Agreements
- Contract Swipe File
- Law.net
- Legal Documents Online
- Sample Freelance Contract
6. Organize Your Thoughts on the Project
A great way to begin your project is to plan out how the web site is going to be organized. A mind map is one way to do this. Write down a word or two that matches the subject of your previous notes on the client’s project. Branch out with lines to related topics. Here’s an example:
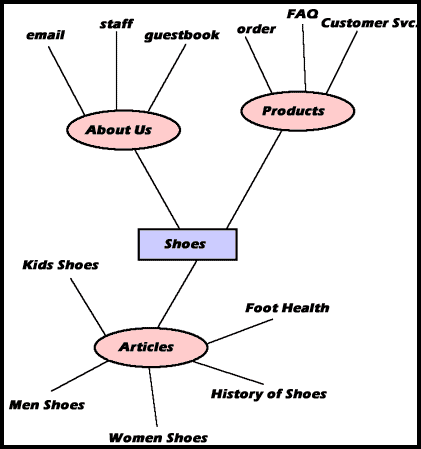
Your mind map is similar to a Flow Chart. Make sure that all navigational routes have been mapped out. And if possible, have someone else take a look at your Flow Chart to see if you’ve missed anything.
7. Think Art
One of the most engaging attractions of a good Website is its graphics. Listen carefully to your client and find out what they really want. If the client can’t explain what they visualize for the site, help out with a few questions:
- What sites are visually appealing to you?
- On a scale of 1 to 10, how important is a fast-loading site to you?
- What colors are you partial to?
- Do you already have existing collateral (brochures, catalogs, etc.)? If so, what flexibility do I have with your fonts, logo, and colors?
- Do you have any art that I’ll need in order to complete this project?
And if you’re having a hard time finding your creative self, take a look at CoolHomePages.com for some inspiration. Once you have an idea of what your client expects, you’re ready to storyboard the site.
8. Storyboarding
Storyboarding is a device that’s used to lay out the design and navigation of a site. It could simply be a rough sketch on a scrap of paper, however, I always send out a storyboard to a client before I start to actually lay out the site. For your storyboard, try laying out rough sketches in Illustrator or Freehand. Use your mind map or flow chart to guide you through this process. Once you have a polished storyboard, ask your client to sign it off so that you’re sure you have their agreeance to your concept.
9. Photoshop
Now that your client has signed off on your storyboard, it’s time to start the design process. Follow these steps:
- Take a screen shot of your browser.
- Bring this image into Photoshop and save the file.
- Layout all design elements into layers for the home page of the site.
- Design at least three different variations of the site look and feel.
- Go to your local service bureau to print out 2 copies of each design, one for you and one for the client. Remember to charge the client for printouts with 5% – 10% markup. Place one of each printout copy into the project’s docket — this is your copy.
- Mount the other printouts onto separate sheets of black board. Place a label with your company name and a space for the client to sign off, on the back of each.
If your client is local, organize an appointment to show them the mockups. If you have a long distance relationship, use Fed Ex to ship the mockups to your client, and ask them to sign off on the back of the mockup that they like.
If the client doesn’t like any of your layouts, which happens to the best of us, it’s back to the drawing board. But be sure to find out exactly why they didn’t like any of your designs. Make notes about what they don’t like, as well as what they do. These will help you redesign to an acceptable point.
Once your client signs off on a layout, rename the corresponding Photoshop file to reflect this, and move the unused files into an “idea file”. There is no reason why these unused mockups couldn’t be modified for your next client. Take the unused mockup copies out of the project’s docket, leaving in the docket the chosen mockups.
The rejected mockups are by no means wasted. Place them into a binder that new clients can look through — it’s a handy sales tool and can speed up the design process for future clients.
Now, turn to the Photoshop file for the approved concept. Duplicate the existing file and make mockup files for the inside pages of the site.
10. Optimize Images
Now that you have all your pages laid out in Photoshop, it’s time to cut out the images that you will use on each Web page. A good rule of thumb is not to exceed 30K per page, otherwise your Web page will take too long to load. Also:
- Save illustrations in gif format.
- Save photographs in jpeg format.
- Keep the number of colors in an image to a minimum.
- Aliased images are smaller than non-aliased images.
- The more compression you apply to a jpeg, the smaller the image will be.
11. Build a Prototype
Take your printed mockups and flow chart, and use them to layout your page. Create your pages so that they’re all linked together. To help organize your files:
- Place all images in a folder called “images”.
- Place every section of your site in a separate file.
- Structure your directories to roughly match your flow chart.
- Make sure your file names make sense (it’s a good idea to have a company code in front of each file. For example, for XYZ Company’s About Us page, I would use xyz_about.html.).
- Have an archiving system in place in order to backup your files. Name your files accordingly, so that you can link all your html files together to create a working prototype that the client can test.
12. Testing
Before you send the prototype to your client, test the usability of your design with a few friends who haven’t been involved with the project. Write down all the feedback they give you — both good and bad. Also, try as many different browsers, plugins, and operating systems as the site’s visitors are likely to use. Be sure to fix any problems and bugs, and make notes on what works and what doesn’t for reference on future projects.
After you finish this internal check, upload the site to the host server and test out access speed, plugins, and configurations. When you’re sure that things are in full working order, it’s time to let the client loose on the prototype site. There will probably be several things that your client won’t like. Listen carefully to your client and give merit to all suggestions that the client makes. Once the client is happy with the site, have them sign off on the prototype so that you can go ahead and make the site live.
13. Make it Live
Once the testing phase is complete, it’s time to launch the site. Cross your fingers and hope for the best. Inevitably, visitors will always find something that they aren’t happy with — and unhappy customers often means an unhappy client for you. So support your newly-launched sites for at least 2 to 4 weeks, until any issues are ironed out.
14. Review and Invoice
Now that you’ve completed the project, it’s time to fulfill your administrative duties. Firstly, review your time sheet. Calculate total hours you’ve spent on the project, and break this number into the number of hours spent on each phase of the project.
Make a copy of the time sheet for the client and create an invoice that reflects your hourly fee and the amount of time you spent on the job. Always reference the client’s purchase order number on your invoice — without this, many Accounts Payable departments won’t pay your invoice. If your client hasn’t given you a purchase order number, contact them to confirm whether there is a purchase order number linked to the project. Include on your invoice:
- Your logo, name, company name, address, and phone number
- Client Contact ‘s name, company name, address, and phone number
- Purchase order date (date job was ordered)
- Invoice date
- Invoice number
- Payment terms (for example, net 45 days)
- Break down of how many hours were spent on each phase of the project
- Add on expenses (eg. Printing, couriers, etc.)
Make sure that your invoice is neat and professional, staple the purchase order to it, and send it out to the client.
15. Archive the Project
Now that you’re finished, you can use the docket to archive this project. Place a filing tab on each docket, and ensure its contents are in alphanumeric order.
Make sure that everything that belongs in the docket is there. Place all corresponding electronic files on a Zip or Jazz disk, and include this in the project’s docket. All the job’s administrative documents, such as invoices and purchase orders should also be placed in the docket. Finally, be sure to include any printouts, emails, or notes that correspond to the project.
Everything is Reusable… Almost
You shouldn’t ever reuse projects that are copyrighted by your client. However, portions of every project are reusable. For example, you wouldn’t reuse a design that you specifically created for a client, but you could reuse the Photoshop paths or textures that you created to enhance other jobs.
You’ll find that, as you complete more and more projects, each one becomes a little bit easier. As you start out as a freelancer, use each project as a learning experience. And remember: each project you complete increases your experience makes you a more valuable freelancer.
 Rachel Goldstein
Rachel owns AllFreelance (a directory for freelancers), and AllFreelanceWork (freelance job site and resume distribution service).