Many Websites that use Flash could be optimized to load much more quickly than they currently do. By breaking up one large .swf into multiple smaller .swf files, you can decrease the time it takes your site to load, while at the same time making the site easier to manage. This article will look at how to break your Website into multiple .swf files, and discuss why it’s a good idea.
Let’s start with the why. After all, you won’t care about the how until you realize why this could benefit your site.
Why Modularize?
Why should you create multiple smaller .swf files instead of one big one? That seems like more work, right?
Actually, as we’ll see later, it really isn’t that much more work. In fact, you’ll only have to add a single line of code, and the benefits are great!
Faster Load Times
The first and perhaps greatest benefit is the load time. Let’s say we have a single Flash file (.swf) that’s 200k in size. For my math skills we will keep this really simple and imagine the file takes 40 seconds to load on a 28.8 connection. At the end of 40 seconds, the whole site is loaded and ready for viewing. Now assume this 200k Website has four main sections: ‘About’, ‘History’, ‘News’ and ‘Products’. What if a visitor is only interested in a single section of your site, for instance, the ‘About’ section? You’ve made them wait for the entire site to load when all they wanted was this single section!
To avoid this unnecessary wait, what I propose you do is create five separate .swf files: one main .swf, and a separate .swf for each section of the site: ‘About’, ‘History’, ‘News’ and ‘Products’. Of course, together these .swfs will also equal 200k, but here is where we see the load time benefit. You want this .swf to only contain the essentials — the navigation buttons and interface. As we’ve removed all the other sections from the file, the main .swf should now load quickly.
We’ll assume we were able to get the main .swf to load in five seconds. Now, when the user clicks on the ‘About’ link, it also takes five seconds to load. The complete load time in this example is 10 seconds, saving this user a total load time of 30 seconds! They may not come right out and thank you for saving them time, but chances are they are more likely to revisit your site.
Ease of Maintenance
The second benefit of a more modular Flash site is that this approach makes it a lot easier to maintain and update the site in the future. If you want to revamp the ‘About’ section of your site you can — without having to mess with the entire site. You can just make changes to the ‘About’ .swf and that’s it! And if you want to add or remove sections of your site, you won’t have to modify the entire site, shifting entire frame sets from layer to layer. Modularization turns finicky maintenance into a much simpler process.
Planning a Modularized Site
So let’s review. At this point we have five .swfs: one main .swf that’s as small as possible to ensure a quick load time — I try to keep this main .swf under 70k, and smaller if possible. If you’re wondering what to include in the main .swf, a good rule of thumb is to incorporate the elements that will always be on the screen, or things that don’t change from section to section. So in my sites, this main .swf usually contains some of the interface, and the navigation buttons.
We also have a .swf for each additional section of the site. When the section’s navigation button is selected from the main .swf, the desired .swf is loaded into the main .swf. It goes without saying that each .swf should have a preloader.
Ok, now that we know the benefits of modularizing your Flash site, let’s figure out how you do it.
Load the External .swfs into the Main Flash Movie
As I promised, this really is quite simple.
1. Add a MovieClip
The first thing you need to do is add a MovieClip to your main .swf at the location where you want the external .swf to appear when it’s loaded. This MovieClip is just a holder for the external .swf, so it doesn’t have to have anything in it. Once you’ve added the MovieClip to your main .swf, give it an Instance Name; I usually just call mine, "movieholder".
Great. Your MovieClip is in place where you want the external .swf to play when its navigation button is selected, and you have given it an Instance Name — now for the code.
2. Insert the Code
Go to layer of your main .swf that’s just used for code. You do have one of these, right? If not, you should — the bottom layer of all my .swfs is always reserved strictly for code, so that I can find it easily when I’m making changes or amendments to the files.
In this layer, find the keyframe into which you added the MovieClip in step 1. Insert this code:
loadMovie("external.swf", "movieclip_instance_name"); That should do it! This code will now load your external movie into your main .swf — and hopefully do it seamlessly!
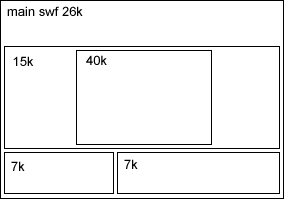
An example of how a modularized Flash site might be put together can be seen in the layout below. This illustrates the design layout of a site I designed recently, showing the position and sizes of each .swf.
Bring Your .swfs Together
- Once Flash is opened with a new blank stage, add another layer, giving you two layers in total.
loadMovie("external.swf","movieholder");to the first frame in the layer titled "actionscript".
That should do it! Just remember that all .swfs should have a preloader.
I hope this article has shed some light on how to get the most out of your Flash site, and make it load as quickly as possible. Flash has taken too much criticism about its load times — these criticisms should have more rightly been directed at the designers, rather than the technology. Designers, go and make Flash proud!
 Mark Angeletti
Mark runs Search-This.com, a resource site for Internet marketing and web development. He also enjoys talking about faith, music, and all things web-related on his blog, What a Savage.