Export Zoomable Images for the Web Using Photoshop
The Zoomify feature first appeared in Photoshop CS3. It allows you to publish high-resolution images on the Web that viewers can pan and zoom to see more detail. The nice part about the feature is that the basic size image downloads in the same time as an equivalent size JPEG file. From Photoshop you export the HTML file and the JPEG files that you’ll need to upload to your website. The Zoomify capabilities work with any web browser.
1. In Photoshop, open up a large image that you want your users to be able to pan and zoom around. Although the image can be large in terms of width and height, the resolution still only needs to be 72ppi because it will only be viewed on screen. The image I’m using for this example is 1200x803px at 72ppi.
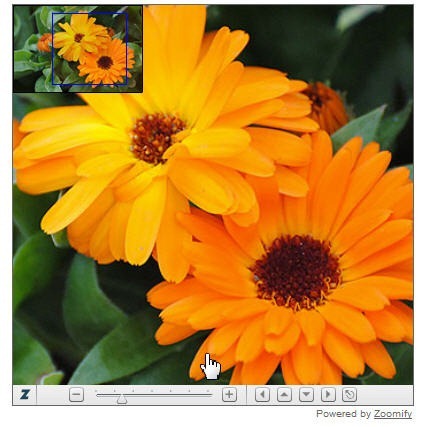
You’ll convert the flower image into a file that will appear smaller on screen, with a small magnifying box in one corner and zoom controls along the bottom.
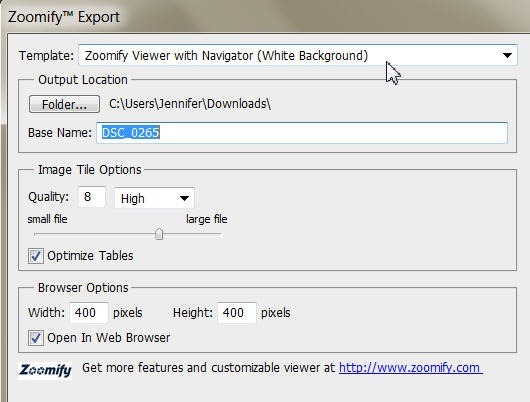
2. Choose File > Export > Zoomify. The Zoomify dialog box opens.
3. In the Zoomify Export dialog box, click Folder, and select your image. For Base Name, type “Flowers.” Set the Quality to 8; the Width to 400, and the Height to 400 for the base image in the viewer’s browser. Make sure that the Open In Web Browser option is selected.
4. Click OK to export the HTML file and images. Zoomify opens them in your web browser.
5. Use the controls in the Zoomify window to zoom and pan around the flower image.
And that’s it! Easy zoomable images that you can add to your website. You can find out more about Zoomify here.
If you want to read more from Jennifer, subscribe to our weekly web design newsletter, The SitePoint Design View.
Frequently Asked Questions (FAQs) about Exporting Zoomable Images for the Web Using Photoshop
Why can’t I find the Zoomify feature in my Photoshop 22.1?
Adobe has removed the Zoomify feature from Photoshop 22.1 and later versions. However, you can still create zoomable images using other methods. For instance, you can use the ‘Save for Web’ tool to optimize your images for the web. This tool allows you to adjust the quality and size of your image to ensure it loads quickly on web pages without losing too much detail.
How can I optimize my images for the web using Photoshop?
Photoshop offers a variety of tools for optimizing images for the web. The ‘Save for Web’ tool is particularly useful for this purpose. It allows you to adjust the quality, size, and format of your image to ensure it loads quickly on web pages. You can also use the ‘Image Size’ dialog box to resize your image without losing too much detail.
What is the Photoshop Save for Web tool and how do I use it?
The Photoshop Save for Web tool is a feature that allows you to optimize your images for the web. To use it, simply open your image in Photoshop, go to ‘File’ > ‘Export’ > ‘Save for Web (Legacy)’. This will open a dialog box where you can adjust the quality, size, and format of your image. Once you’re happy with your settings, click ‘Save’ to save your optimized image.
Is there a plugin I can use to create zoomable images in Photoshop?
Yes, there are several plugins available that can help you create zoomable images in Photoshop. One such plugin is ‘Zoomable for Adobe Photoshop’. This plugin allows you to create high-resolution, zoomable images that can be easily embedded in web pages.
How can I optimize my images for the web without using Photoshop?
If you don’t have access to Photoshop, there are several other tools you can use to optimize your images for the web. These include online image optimizers like TinyPNG and ImageOptim, as well as standalone software like GIMP and Paint.NET. These tools allow you to adjust the quality and size of your images to ensure they load quickly on web pages.
Why is it important to optimize images for the web?
Optimizing images for the web is important for several reasons. Firstly, it ensures your images load quickly on web pages, which can improve your site’s performance and user experience. Secondly, it can help reduce the amount of data your site uses, which can be beneficial for users with limited data plans. Finally, it can help improve your site’s SEO, as search engines often favor sites that load quickly.
What image formats are best for web use?
The best image format for web use depends on your specific needs. However, JPEG and PNG are two of the most commonly used formats. JPEG is best for photographs and other images with lots of colors, while PNG is best for images with transparent backgrounds or sharp lines, like logos or icons.
How can I resize an image without losing quality in Photoshop?
To resize an image without losing quality in Photoshop, you can use the ‘Image Size’ dialog box. Simply open your image in Photoshop, go to ‘Image’ > ‘Image Size’, and enter your desired dimensions. Make sure the ‘Resample’ box is unchecked to maintain the image’s original resolution.
Can I create zoomable images in Photoshop Elements?
Yes, you can create zoomable images in Photoshop Elements. However, the process is slightly different than in the full version of Photoshop. You’ll need to use the ‘Save for Web’ tool to optimize your image, then use the ‘Image Size’ dialog box to resize it.
How can I improve the quality of my images for web use?
There are several ways to improve the quality of your images for web use. Firstly, make sure your images are properly exposed and in focus. Secondly, use a high-quality camera to capture your images. Finally, use an image editing software like Photoshop to adjust the color, contrast, and sharpness of your images.
Jennifer Farley is a designer, illustrator and design instructor based in Ireland. She writes about design and illustration on her blog at Laughing Lion Design.


