


Key Takeaways
- Dreamweaver CC 2014.1 is the first web development tool that allows direct access to PSD comps, enabling users to extract any image, color, or CSS value from Photoshop documents directly into their coding window. This reduces the need to constantly switch between applications.
- The Extract panel in Dreamweaver allows users to interact with PSDs, providing a ‘top down’ inventory view of what is being used in the document, including colors, fonts, and gradients. The panel also allows users to copy CSS, text, and export images directly from the PSD file.
- The new approach taken by Dreamweaver aims to bridge the gap between the design and code stages of web development, resulting in a decrease in app switching and a more focused workflow. This process may require slight adjustments to the way users work, but offers many benefits, particularly for web designers using design elements from PSD files in their projects.
This article was sponsored by Adobe. Thank you for supporting the sponsors that make SitePoint possible!
Where is the biggest bottleneck in your web development process? The part where things tend to bog down?
No doubt that it varies from project to project, but I suspect for most of us it’s the translation step from design to code — usually that means PSD to HTML. In fact, a thriving, global ‘HTML & CSS cutters’ industry has grown up around only servicing designers who work in PSD.
There have been many attempts to merge these two very different processes to essentially create a graphic design tool that can output production-ready code. While their intentions have been noble, we all understand the difficulty in auto-generating code that is as clean as the code that you manually craft.
Adobe are taking a new approach to bridging that design-code gap. Dreamweaver CC 2014.1 is the first web development tool that can give you direct access to your PSD comps. That’s right, you can surgically extract any image, color or CSS value from Photoshop document straight into your coding window.
This isn’t about push-button generation of big slabs of markup. Essentially, YOU are still the complete master and ‘gatekeeper’ for every line of code that gets written — a situation that appeals to many of us. However, suddenly the need to constantly ‘ALT+TAB’ (or ‘CMD+TAB’ on Mac) between applications is reduced dramatically.
It’s an ambitious idea, right? Let’s have a look at how it works in practice.
The Extract Workspace
You may not instantly notice the new Extract UI controls upon first opening Dreamweaver, so first let’s find them. Firstly, if you open the ‘Workspaces’ dropdown at the top right of the application, you’ll see that ‘Extract’ is now an option below the ‘Code’ and ‘Design’ views.
However it’s also easy to launch the Extract panel at any time via the Windows > Extract menu (see diagram).

If you like, try loading any of your own PSDs into the Extract panel. Apart from preparing the file for use with Dreamweaver, this will also sync the file to your online Creative Cloud Assets account, making it easy to share the file with friends, colleagues and clients at any stage.
For this demo, I’m going to use Nicolas Kayser’s elegant Taspire dashboard PSD as my base.
Interacting with PSDs in Dreamweaver
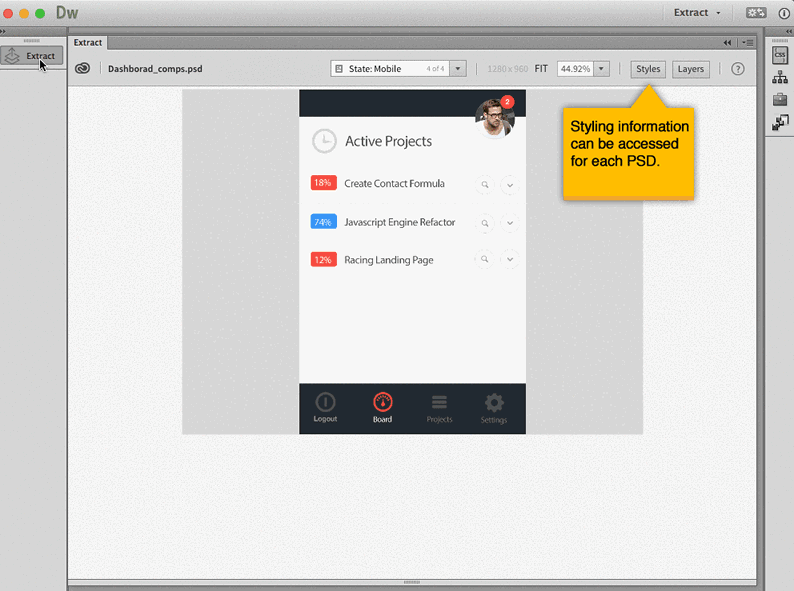
Once it’s loaded, your PSD will be displayed in the Extract panel, but most of the useful tools are hidden by default. At the top right there are two buttons — Styles and Layers.
Styles
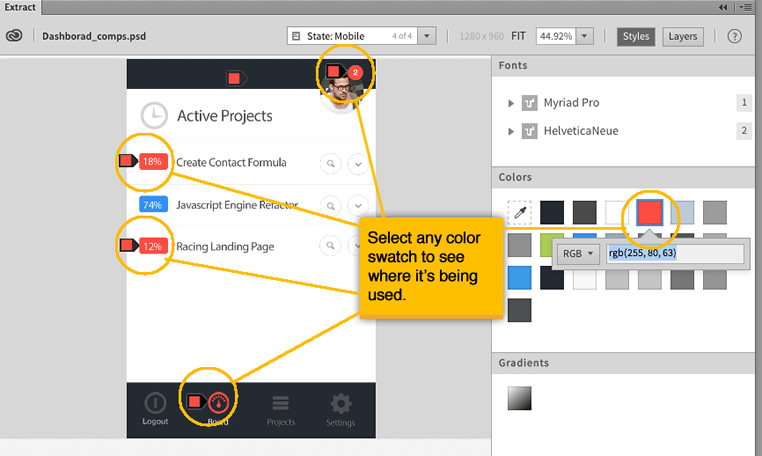
The styles panel gives you a ‘top down’ inventory view of what is being used in your document — colors, fonts, and gradients.
With eyedroppers and various rounding errors, it’s not hard to end up with 2 or 3 slight variations of the same color. Clicking on any color swatch highlights all the places where that color is being used. This is the perfect place to clean up your color palette and perhaps rationalize your font list.
Layers
Clicking on the Layers panel button reveals a simplified rendering of Photoshop’s layers panel. As you might expect, you can show and hide any layer from here.
You can start working with any page element (i.e. images, menus, text, etc) by directly selecting it in the Extract view — although in some cases you might find it easier to select your page element using the layers panel.
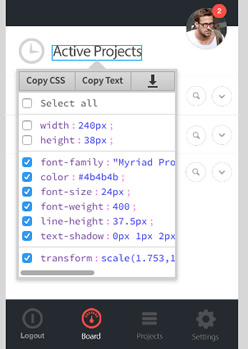
Clicking on any page element will pop out an elegant little flyout panel containing three options:
- Copy CSS: Often this may just be CSS width and height for simple items, but can also be much more extensive for text elements. All viable CSS properties are listed, but you only copy the properties you tick. You can inject these properties straight into any rule within your CSS file with a click.
- Copy Text: This is particularly handy for lifting page headings and menus titles into your HTML code.
- Image Export Controls (via the down arrow button): We’ll focus on this a little further down.
Photoshop Layer Comps are your Friend
In my last article we talked about using ‘layer comps’ in Photoshop to manage your responsive layouts. If you missed it, essentially, each new layer comp is a snapshot of how your layers appeared at that moment in time. You are then able to return to that state any time you like with a single click.
Typically you would create a layer comp in Photoshop for each of your responsive layout states — and in Dreamweaver, this is where it really pays off.
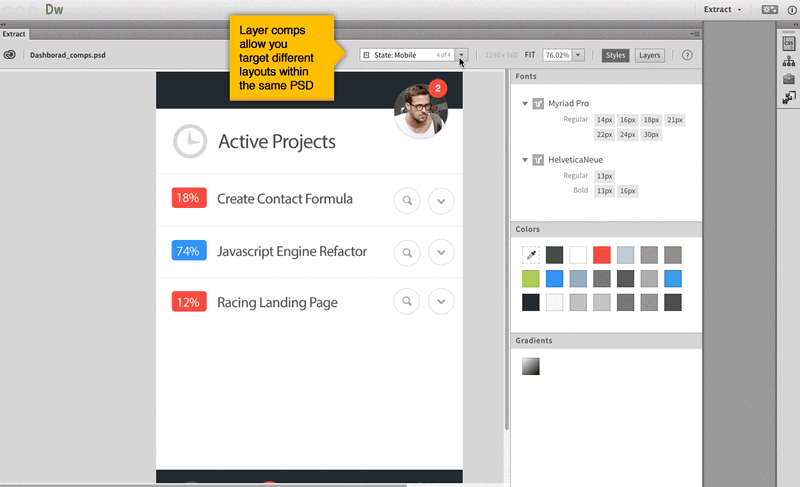
You can switch between layer comps using the dropdown at the top the Extract workspace. For a ‘mobile first’ design, you would begin with your mobile layout, and begin lifting CSS out to your default stylesheet.
Later in the project you can switch to a larger layout and extract those assets out to your media queried CSS.
Extracting images can be such a drag (and drop)
Yes, I know, a terrible pun. However, this is cool functionality.
During the early stages of coding a layout, often you’re just trying to pin down some of the signature design elements — hero images, avatars and illustrations. Dreamweaver really speeds things along now by letting you drag images from your PSD comp straight into your Live View window.

It’s a simple process. Dreamweaver will automatically export the image, ask you for a filename and folder, and insert an IMG tag into your HTML.
I found this to be a super-fast method for blocking out big areas quickly.
Summary
Most web layouts start in Photoshop and eventually finish in a code editor.
But there’s an in-between stage where you’re straddling two big applications — your graphics app and your code editor. It’s a little like stepping between two canoes. Each may well be a fine vessel, but having a foot in each one is naturally awkward.
Dreamweaver’s new approach is to shorten the distance between the comp and the web development tool. The result is a dramatic decrease in your app switching, and a generally more settled, focussed workflow.
It’ll take a slight adjustment to the way you work, but there really is a lot to like about this process.
Related
- Generating Responsive Image Assets with Photoshop CC 2014
- What is Adobe Extract – And Why Should You Care?
Frequently Asked Questions about Dreamweaver 2014 and PSDs
How can I open a PSD file in Dreamweaver 2014?
To open a PSD file in Dreamweaver 2014, you need to first ensure that you have Adobe Photoshop installed on your computer. Once you have Photoshop, you can open the PSD file in Photoshop and then use the ‘Extract’ panel in Dreamweaver to extract the design elements from the PSD file. This panel allows you to extract images, text, colors, and gradients from the PSD file and use them in your Dreamweaver project.
What is the ‘Extract’ panel in Dreamweaver?
The ‘Extract’ panel in Dreamweaver is a feature that allows you to extract design elements from a PSD file and use them in your Dreamweaver project. This includes images, text, colors, and gradients. The ‘Extract’ panel is a great tool for web designers who want to use the design elements from a PSD file in their web design projects.
Why won’t the ‘Extract’ panel load in Dreamweaver CC?
If the ‘Extract’ panel won’t load in Dreamweaver CC, it could be due to a number of reasons. One common reason is that you don’t have Adobe Photoshop installed on your computer. The ‘Extract’ panel requires Photoshop to function. Another reason could be that your version of Dreamweaver is not up-to-date. Make sure you have the latest version of Dreamweaver installed.
How can I use the design elements from a PSD file in my Dreamweaver project?
To use the design elements from a PSD file in your Dreamweaver project, you need to use the ‘Extract’ panel. This panel allows you to extract images, text, colors, and gradients from the PSD file and use them in your Dreamweaver project. Simply open the PSD file in Photoshop, then use the ‘Extract’ panel in Dreamweaver to extract the design elements you want to use.
Can I use Dreamweaver without Photoshop?
Yes, you can use Dreamweaver without Photoshop. However, if you want to use the ‘Extract’ panel to extract design elements from a PSD file, you will need to have Photoshop installed on your computer. Without Photoshop, you won’t be able to open or extract elements from PSD files.
How can I update my version of Dreamweaver?
To update your version of Dreamweaver, you need to go to the Adobe website and download the latest version of the software. Make sure to uninstall the old version of Dreamweaver before installing the new one to avoid any potential conflicts.
What are the benefits of using the ‘Extract’ panel in Dreamweaver?
The ‘Extract’ panel in Dreamweaver offers several benefits. It allows you to extract design elements from a PSD file and use them in your Dreamweaver project. This includes images, text, colors, and gradients. The ‘Extract’ panel is a great tool for web designers who want to use the design elements from a PSD file in their web design projects.
Can I use the ‘Extract’ panel with other file types?
The ‘Extract’ panel in Dreamweaver is specifically designed to work with PSD files. It allows you to extract design elements from a PSD file and use them in your Dreamweaver project. If you want to use design elements from other file types, you will need to convert them to PSD format first.
How can I convert other file types to PSD format?
To convert other file types to PSD format, you will need to use a software like Adobe Photoshop. Photoshop allows you to open and edit a wide range of file types, and you can then save them in PSD format.
What is a PSD file?
A PSD file is a layered image file used in Adobe Photoshop. PSD stands for Photoshop Document. These files are often used by web designers and graphic designers because they allow for a lot of flexibility and control over the design elements.

