
Designers will often find themselves tasked with creating designs that aren’t typical. Clients come up with imaginative designs that they want the designer to bring to life and as a designer it is your job to do just that. Designing your own typography opens a door that is full of endless possibilities whether you are designing around an event or a word.
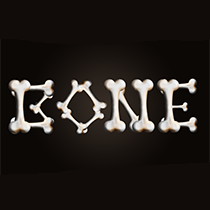
Typography is a great way to experiment and create some interesting work. You can create various creative types that you would usually not think of using in your every day designs. From anything to exploding typography to melting typography there are tons of things you can think of. In today’s tutorial we will create a bone filled typography that you can use for all of your horror and spooky inspired projects. Power up your Photoshop and let’s get started.
Step 1 New Canvas
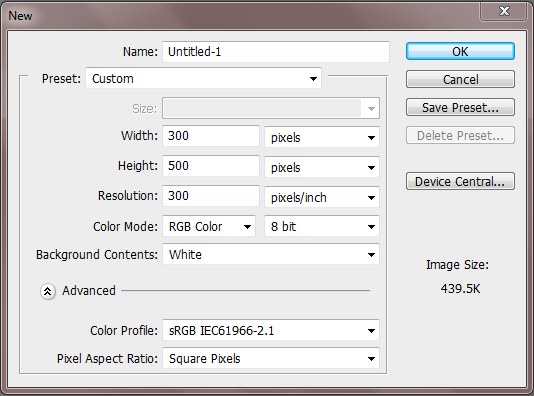
We first need to create a new canvas where we can design our bone. Go to File > New or Ctrl+N and make your canvas 300px by 500px.
Step 2 Fill Background
Since the base color for our bone will be white we need to add a background color to the canvas to discern the background from our shape. Make a new layer and fill it in with #b3c54d.

Step 3 Column
We can now begin on creating our bone. Start first by changing your foreground color to white or #ffffff. Next select the Rectangle Tool and add a skinny column in the middle of the canvas. This will be the base of our bone.

Step 4 Bend
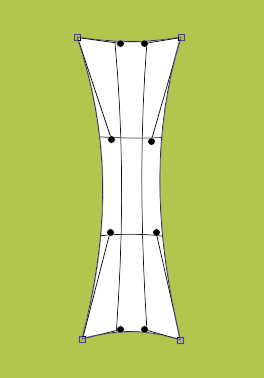
Now we must add a slight bend to our column. Use the Warp Tool to extend the corners and pinch the middle as shown below.
Step 5 Bone Tops
To create the top parts of your bone change your tool to the Ellipse Tool and create a good size circle.

Duplicate your circle and then move both circles so that they are sitting on top of the column and slightly overlapping.

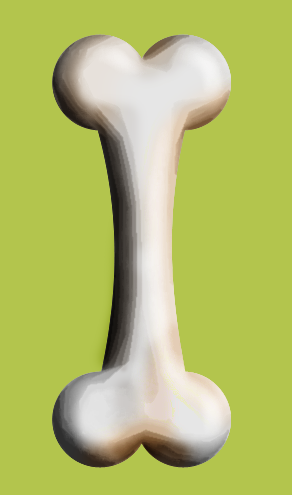
Now duplicate your pair and move them to the bottom of the column until you finally have something that looks like a bone.

Step 6 Duplicate Bone
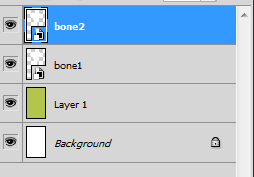
Select all of your bone elements and then convert them into a smart object. Afterwards duplicate the image so that you have two layers.
Step 7 Gray Bone
Before we make our bone look 3D we need to change the color of the first bone layer. Hide the “Bone2” layer and go to the blending options of “Bone1”. Check the Color Overlay box and change the color to #7b7b7b. Change the opacity to 20%.

Step 8 Gray Bone Effects
On the same layer go to the Blending Options again and check the box for both the Inner Shadow and Bevel and Emboss.
For the Inner Shadow change the settings to match the image below.
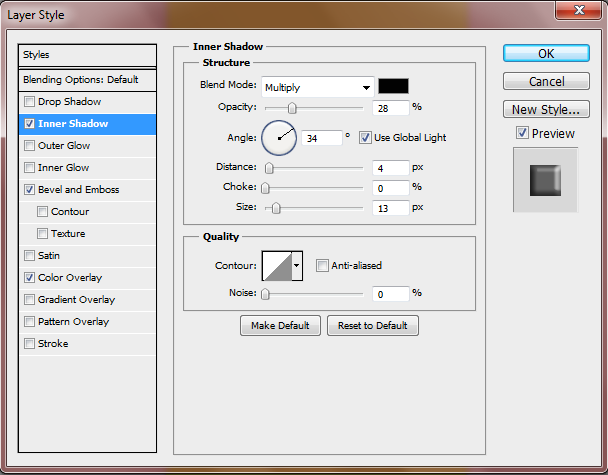
For the Bevel and Emboss change the settings as shown below.

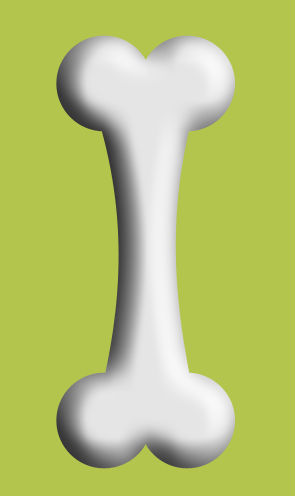
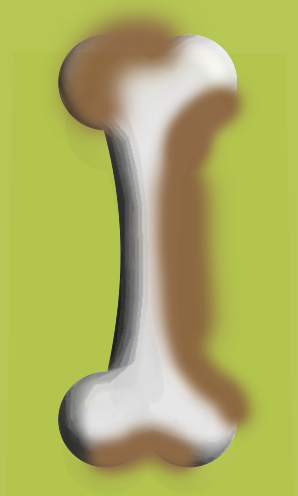
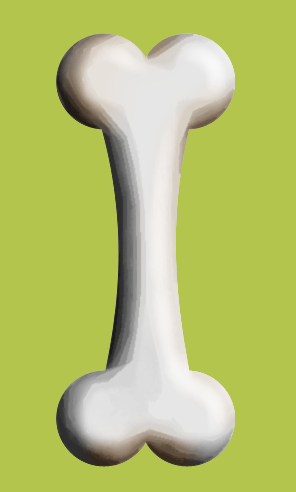
The final image should look like this.
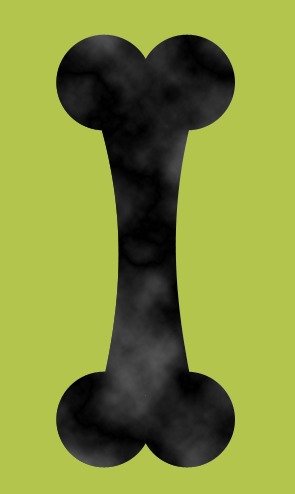
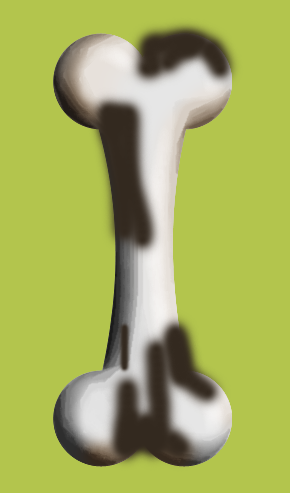
Step 9 Difference Clouds
Make “Bone2” layer visible again. Next go to Filter > Render > Difference Clouds. Do this Twice so that your image looks like this.
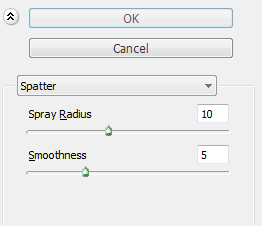
Step 10 Spatter
Staying on the same layer go to Filter > Brush Strokes > Spatter and enter the same settings as shown below.
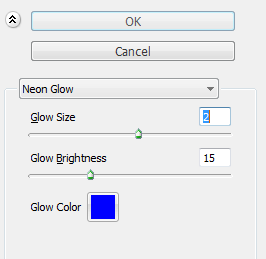
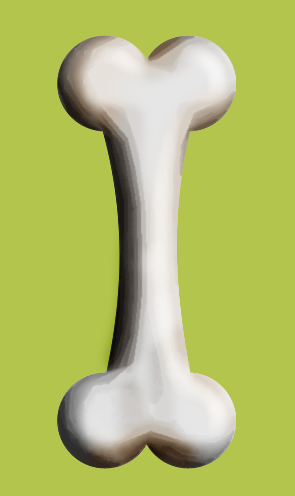
Step 11 Neon Glow
Next go to Filter > Artistic > Neon Glow and change the settings as done in the image below.
Once the filters are added change the layer mode to Color Burn.

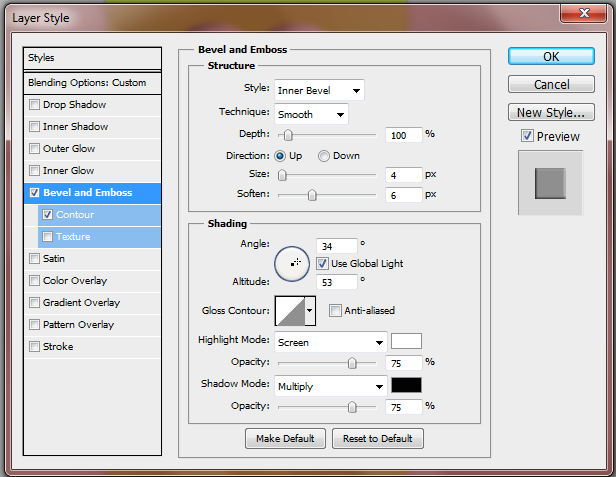
Step 12 Bevel and Emboss
Open up the Blending Options menu on the “Bone2” layer check the Contour and the Bevel Box. Change the settings for the Bevel and Emboss but leave the Contour settings on default.
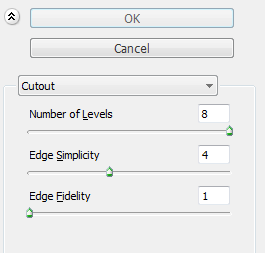
Step 13 Cutout
Merge your bone elements together so that you have only one bone layer and then duplicate this layer. Next go to Filter > Artistic > Cutout and leave the settings as is and press OK. Change the layer mode to Lighten.
Step 14 Color
We now want to add some color to our bone. Pick the color #8b6540 and with a soft round brush paint random edges of the bone.
Next change the layer mode to Soft Light and delete any excess.
Step 15 Color 2
Change your foreground color to #33291f and on a new layer color in sections of the bone to add darker shadows.
Change the layer mode to Soft Light and once again remove any excess.
Step 16 Color 3
To finish with adding color to our bone we need to create one more layer. Change the foreground color to #ea6654 and paint the right side of the bone.
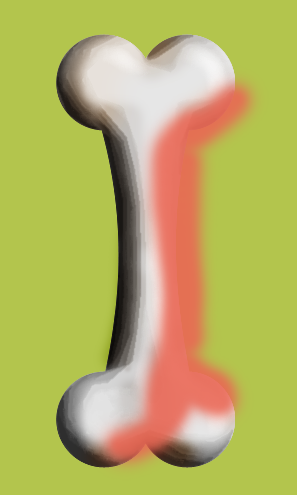
Change the layer mode to Saturation and drop the opacity down to around 27. Erase any excess color like you did before.
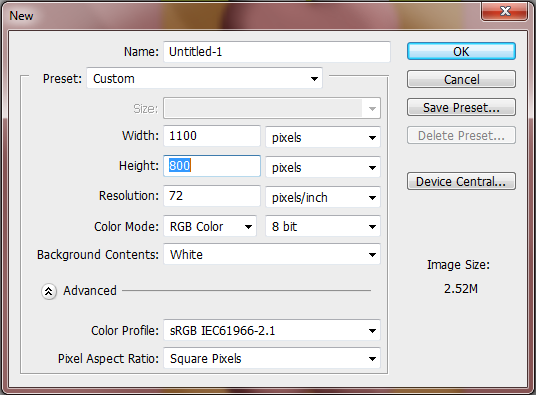
Step 17 New Canvas
Create a new canvas and give it the dimensions of 1100px and 800px.
Step 18 Background Color
Fill the background with the color #372d26.

Making sure your foreground is #372d26 and the background is #fffff. Once this is done add a radial gradient via the Blending Options but make sure that the reverse option is checked.

Step 19 Text
Now you can go ahead and write your desired text on your canvas. It doesn’t matter the typeface you use, you only need it as a guide. In this case I simply typed “bone” using Arial font.

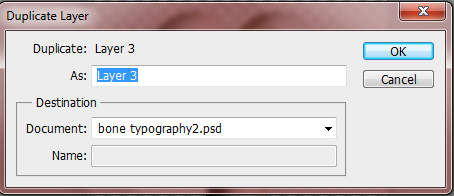
Step 20 Import Bone
We now have our text set up so we need to import our bone to begin building our text. To do that simply merge your bone elements together except for the background and once done, right-click on the single layer, click duplicate layer and select the proper canvas.
Step 21 Resize
You will notice that your one is fairly large compared to your text. To fix this simply scale down the bone so that it is the desired size so you can make your letters.

Step 22 Duplicate and Rotate
To make our letters you are going to have to duplicate your original bone layer and rotate them in order to create your letter. Notice how I am having the bone pieces overlap.
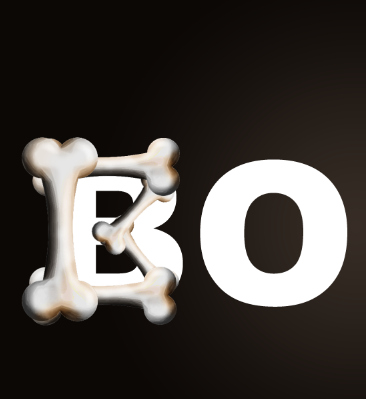
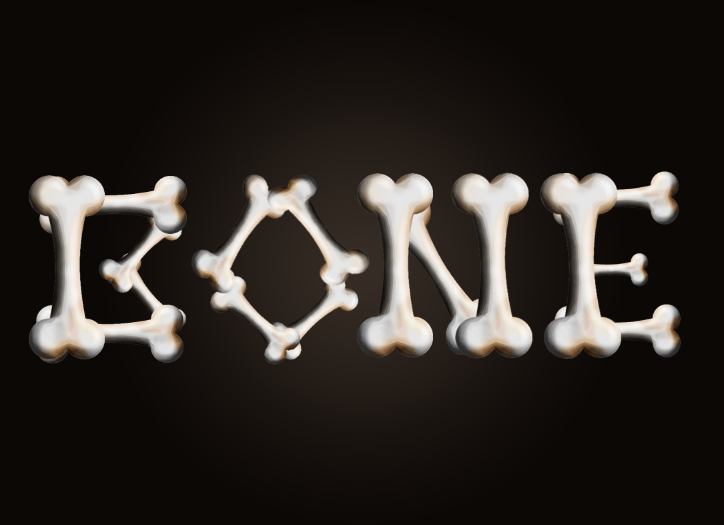
Step 23 Finish
Continue duplicating, rotating and resizing your bones until your desired word is spelled out.
Frequently Asked Questions about Bone Typography in Photoshop
What is bone typography in Photoshop?
Bone typography in Photoshop refers to a unique design technique where the text or font is manipulated to resemble the structure of a bone. This technique involves the use of various Photoshop tools such as the pen tool, layer styles, and blending options to create a realistic bone-like texture and appearance. It’s a creative way to add a unique and eye-catching element to your design projects.
How can I create bone typography in Photoshop?
Creating bone typography in Photoshop involves several steps. First, you need to create a new document and type your text using the text tool. Then, you can use the pen tool to draw the bone structure around the text. After that, you can apply layer styles such as Bevel & Emboss, Inner Shadow, and Gradient Overlay to give the text a bone-like texture. Finally, you can use the eraser tool to refine the edges and make the text look more like a bone.
What tools do I need to create bone typography in Photoshop?
To create bone typography in Photoshop, you need several tools including the text tool for typing your text, the pen tool for drawing the bone structure, the layer styles for adding texture and depth to the text, and the eraser tool for refining the edges. You may also need the gradient tool for adding color and the blending options for blending the text with the background.
Can I use bone typography in Photoshop for commercial projects?
Yes, you can use bone typography in Photoshop for commercial projects. However, you need to make sure that the font you are using is licensed for commercial use. Also, if you are using any images or graphics in your design, you need to ensure that they are also licensed for commercial use.
How can I improve my bone typography skills in Photoshop?
To improve your bone typography skills in Photoshop, you can practice by creating different types of bone typography designs. You can also watch tutorials or take online courses to learn new techniques and tips. Additionally, you can experiment with different fonts, colors, and textures to create unique and creative bone typography designs.
What are some common mistakes to avoid when creating bone typography in Photoshop?
Some common mistakes to avoid when creating bone typography in Photoshop include not using the right font, not applying the layer styles correctly, and not refining the edges properly. Also, you should avoid using too many colors or textures as it can make the design look cluttered and unprofessional.
Can I use bone typography in Photoshop for my logo design?
Yes, you can use bone typography in Photoshop for your logo design. It can add a unique and creative touch to your logo. However, you need to make sure that the bone typography fits with the overall theme and style of your logo.
How can I add color to my bone typography in Photoshop?
To add color to your bone typography in Photoshop, you can use the gradient tool. You can choose a color from the color picker and then apply it to your text using the gradient tool. You can also adjust the opacity and blending mode to achieve the desired effect.
Can I save my bone typography design in Photoshop for future use?
Yes, you can save your bone typography design in Photoshop for future use. You can save it as a PSD file which will preserve all the layers and styles. This way, you can easily edit or modify the design in the future.
Can I share my bone typography design in Photoshop online?
Yes, you can share your bone typography design in Photoshop online. You can post it on your website, social media platforms, or online portfolios. However, you need to make sure that you have the rights to share the font and any images or graphics used in your design.