The Scenario
A problem that all businesses face, when creating a dynamic website, either for the first time or to expand on a new venture, is what software to use. Everyone has a vague idea of what forms of content they want, and systems for user interaction, but there’s never an absolute solution for all.
Limitations of ‘limitless extending’
To overcome this problem, the most common approach is to have one platform and build or extend it to meet the needs. With software like Joomla or WordPress, this can be achieved with plugins/extensions. Even so, the complex functionality some businesses may require, may not be available as a plugin, and could require a large investment in a proprietary plugin or extension that costs a lot of money to make and maintain. And may become outdated in functionality, or cause problems for further business expansion.
Relyiance on paying for existing commercial addons can also cause some negative implications when it comes to tweaking paid-for code. From not having the legal option, because of the licenses involved, or the developers don’t provide a straight forward way to achieve your tweaks, if their addons are too simplified and fit a blackbox standard (serve an easily identifiable purpose but no one knows how it actually functions).
Combining ‘tailored for a specific purpose’ software
Another option to limitless extending, is to use multiple software pieces that each serve a specific purpose, and just rely on using a different piece of software for the different online environments you need to offer. The only problem with this approach is keeping data intact that would most likely be the same in either software, and transitioning from one software to another smooth as well.
In particular, the main areas site owners would consider to be seamless are:
- Themes/Templates
- User credentials and personal information
- Generic user actions
Themes can be an issue with smaller companies, as it can often to too expensive to contract someone to craft a theme compatible with their setup. Already employed designers may not harbor the required experties to clone a theme that’ll work with a particular platform.
Where JFusion comes in
JFusion is, as of this article, the most popular user integration extension for Joomla to integrate users with Joomla from other PHP software seamlessly, by syncing user data. The extension uses it’s own plugin system (known as JFusion plugins) which can be created to support any other software, so long as you can figure out the inner workings of the other software. Most likely from looking at the documentation, code comments, and good old hacking. For the developer that wants to tie users from Joomla across to other software without worrying about creating an entire framework of their own from scratch, this extension is the best of it’s kind in the open source space and will save you a lifetime of coding.
The user integration implementations this extension offers are the most common you can find from other software which you can currently offer for any plugin you create:
- Dual login (SSO)
- Dual logout
- Dual registration
- Template integration
- Activity integration
- User sync
- Delete multiple instances of user
- Change password from multiple instances of user
Installing JFusion
To install JFusion head over to the JFusion website. Once there you can download it directly.
When ready, head over to your Joomla site (preferably a testing server, not production) which you feel comfortable to test in during the stages of development of your JFusion plugin. Be sure to have your admin credentials ready and go to the administrator page of Joomla (http://yoursite.com/joomla/administrator) and login.
Once you’re logged in click the extension manager logo (icon below) or select it from the main menu by going to extensions, then ‘extension manager’.
This will lead you to the extension manager page, where there’s several options for installing extensions. Look for ‘Upload Package File’, inside this box is an upload field to add and install Joomla extensions. Without extracting the archive you just downloaded click ‘choose’ and find the jfusion download and confirm uploading it.
Once the file has uploaded you should see a new page with a blue installation confirmation message at the top of the screen similar to the screen-shot below.
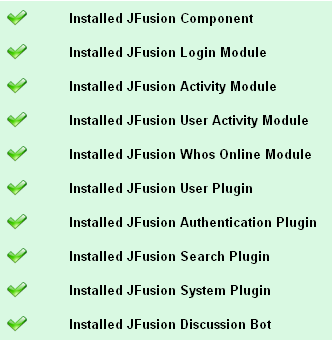
Along with this, you should see a list of installed components that this plugin depends on (see screen-shot below). Make sure each item on the list corresponds with a tick to confirm the items successful installation. If any items have a cross next to them, reinstall, or request support on the JFusion site.
Now that everything is installed you can configure the main plugin, known as the master. This needs to be configured to allow all the other plugins to function and allocates which software the user actions occur before triggering the effects onto other software.
Configuring the master plugin
To configure the master plugin select ‘Joomla Options’ from the JFusion menu, which is the components menu (components > JFusion > Joomla Options), or go to components > cPanel and select ‘Joomla Options’.
This will bring you to a page that allows you to edit the configuration of (what is currently) the only master plugin (master plugin applies to current joomla installation) that can be enabled in JFusion due to the current restrictions of the framework.
By default, thanks to the settings, JFusion can figure out automatically that you won’t actually need to configure any special requirements for the site at this stage, and you can simply click ‘apply’ or ‘save’ and the plugin should now be ready for enabling.
Select ‘Configure Plugins’ from the JFusion menu. On this page you will see a table filled with a list of plugins you can use by default with JFusion. At this stage all the boxes should be grayed out except for the row with the plugin called joomla_int (Joomla internal plugin, what we’ve just been working with). This row should be filled mostly with red crosses in each box and a few grayed out boxes, with the exception of one column labelled ‘Status’ which should contain a green tick with the words ‘good config’ written next to it if the configuration was automatically detected.
Click the red cross on the ‘joomla_int’ row which corresponds to the ‘Master’ Column and you should now see a line of configuration settings similar to the screen-shot below:
If you do, JFusion will now be ready to work on your site and you can simply pick any pre-developed plugin you want to configure to setup as a slave plugin with your Joomla site, or start work on your plugin, both of which I’ll be covering.
What JFusion offers by default
The current developers and contributors of JFusion have already created plugins which are included (but not configured) within the extension by default.
As of JFusion 1.6, the current plugins are available for the different software you can setup JFusion with, without any coding within a matter of minutes. These plugin folders (with plugin files inside) can be found in the joomla/administrator/components/com_jfusion/plugins folder.
- DokuWiki
- eFront
- Elgg
- Gallery2
- External Joomla site (synching users from one joomla to another)
- Internal Joomla site (IMPORTANT: This allows the JFusion operations that happen within Joomla)
- Magento
- MediaWiki
- Moodle
- MyBB
- OSCommerce
- phpBB3
- PrestaShop
- SMF
- SMF2
- vBulletin
- WordPress
There’s other plugins available on the JFusion third party plugin forum, that have been created by people that you should check out, that way you can see if what you want to integrate hasn’t already been previously developed.
These plugins are only limited to support from the authors if the author chooses, and there’s no guarantee of the plugin being functional, bug free, or safe. None the less the option is always there, and most third party plugins like JFusion are open source and free to modifications or code contributions.
Creating your own plugin
Before coding a plugin, you first need to consider what you’re setting out to achieve. JFusion allows you to sync and work with all variations of user data, but you don’t necessarily need to comply with offering all the different functionality that the JFusion framework offers. You only need to incorporate what aspects you or anyone else would use.
How to create a blank plugin
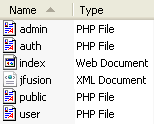
Whenever you create a new plugin for JFusion, you must always use the following structure, making sure to also mimic file names exactly as stated. This folder and the contained files go inside the directory joomla/administrator/components/com_jfusion/plugins/:
Folder
nameofyourplugin
(Replace nameofyourplugin with the actual name of your software in the style represented above which is letters only, lowercase, no spaces or special characters).
Inside of the folder
Inside the folder, create 5 blank files with specific filenames and file type extensions, see below. These files , and the folder they are contained in, are absolutely mandatory for any plugin.
admin.php
This contains functions specific to the administration of JFusion, and your plugin, such as deleting users and configuring the aspects of integration.
auth.php
This contains functions that handle formatting data and preparing it for the authentication processes that are required to occur when working around other platforms with custom data encryption methods.
index.html
Simply, a static html file with some very basic text to fend off people peaking into your development directories.
jfusion.xml
A common practice, used in a lot of web software now, is to provide an xml file containing documentation about the plugin itself, such as author, date created, and so on. It also contains templating information for the configuration page of the plugin which will be explained later.
public.php
A file containing a collection of functions for use within any other function of this plugins php files
(an include file).
user.php
This file contains functions relevant to the user sync operations you want to perform.
You can also create any number of other files of any type within this folder, and incorporate any dependencies on the custom files you have created, simply by including them in the primary plugin files that depend on them.
Quick note
For the purpose of this tutorial I am using eyeOS as the software I want to integrate with the plugin wrote in this tutorial although the approach and techniques in these tutorials will apply to all plugins.
What’s next?
This tutorial is part of the series and this continues on in another part next week.
Wade Penistone is a self employed website designer/developer who specialises and freelances in many open source PHP software packages and contributes to the development of many major open source software solutions, and also produces videos tutorials on teaching them.


