
Key Takeaways
- This tutorial walks through the process of creating a vibrant, vectorized sofa from scratch in Photoshop, focusing on how to illustrate “soft and fluffy” objects like sofa pillows.
- The tutorial covers the usage of the pen tool, different layer styling techniques, and how to cast a subtle shadow of an object, all within Photoshop.
- The process involves creating the various parts of the sofa (seat backs, seats, base, arms, foot) separately, applying different layer styles and colors to each, and then assembling them together.
- The tutorial also explains how to create a darker room background for the display, using gradient adjustment layers and textures, to enhance the focus on the vectorized sofa.
You can’t always find the perfect vectorized object online. Designers are often asked for very specific illustrations for unique purposes. Because of this, it’s critical to keep your illustration skills sharp. Anyone can hunt for the perfect stock photo or vector image, but you need to keep your skills sharp for those highly-specialized client requests that won’t be sufficed with a simple stock purchase.
In this tutorial, I’ll walk you through the process of creating a stylish sofa vector from scratch in Photoshop. Illustrators rarely focus on “fuzzy” objects such as sofa pillows when designing vector images; this tutorial will help you keep “soft and fluffy” at the ready in your vectorized skill set. Plus, if you don’t already have a comfy couch in your office, you can design your own in minutes. Along the way, you will learn the use of the pen tool, different layer styling techniques, and how you can caste a subtle shadow of an object. We’ll also create a darker room background for the display. So, let’s get started!
Resources:
Grunge texture by Starnetblog
Wood texture by deiby
Illustration by Fil Dunsky
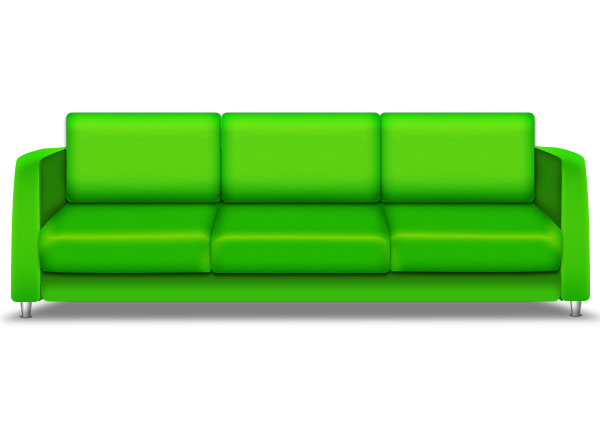
Final result:
Before we start, let’s look ahead at our end result:

Step 1
Create a new document in Photoshop with a 900px width and a 650px height.

Step 2
Firstly, we’ll create seat backs of the sofa. For that, set #43c609 as your foreground color and select the rounded rectangle tool to draw a rectangle.
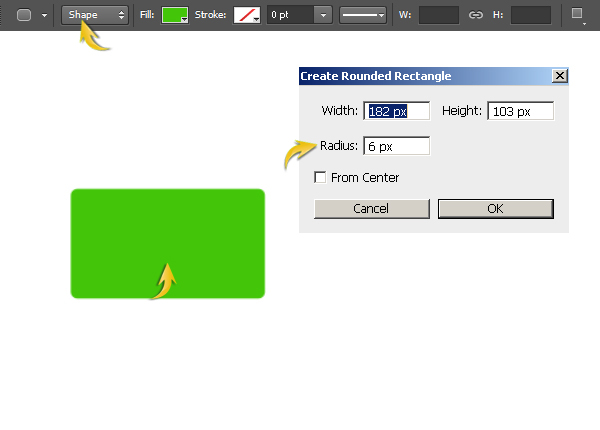
Step 3
Double-click on the rectangle layer to open the “Layer Style” window. Apply the following settings:

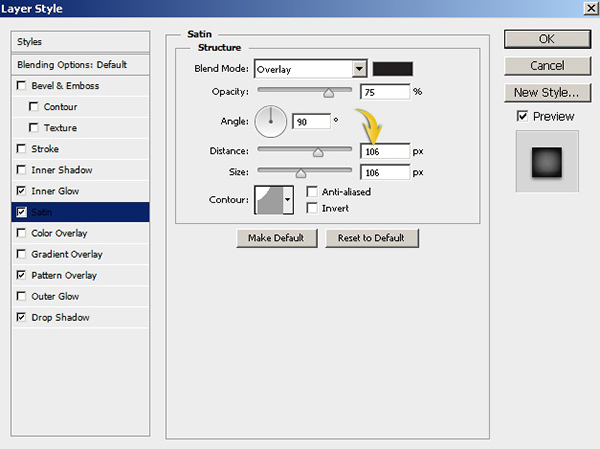

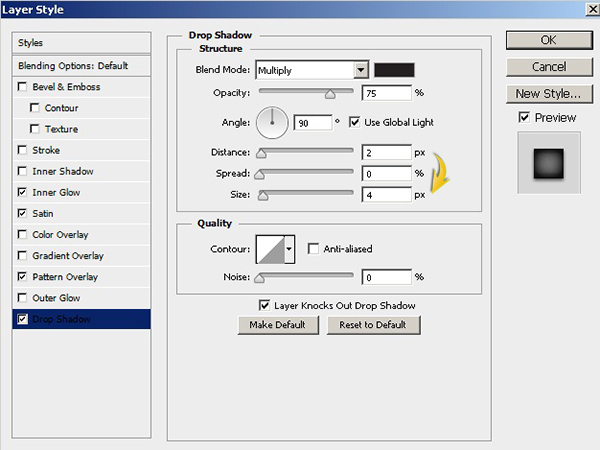

Step 4
To give it more character, press Ctrl + <click on the rectangle layer> to make selection around it, and then create a new layer. After that, go to “Edit” > “Fill,” use 50% gray in the contents box, and change the blending mode of this layer to “Overlay.”
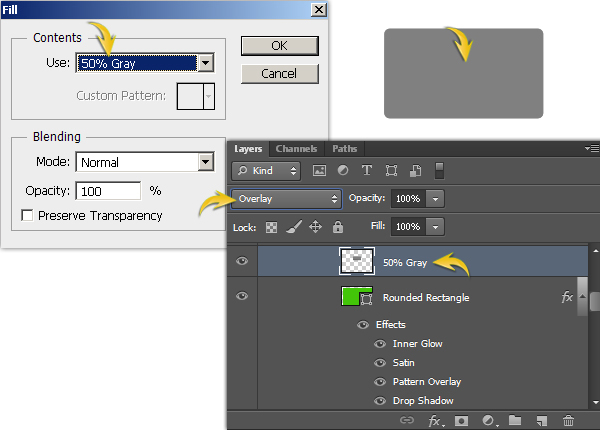
Now use the burn tool (Range: Shadows, Exposure: 45%) at the bottom border of this selection and use the dodge tool (Range: Highlights, Exposure: 45%) at the top border. Once you are done, collect the rounded rectangle layer and this gray layer in a group and label it as “back1.”

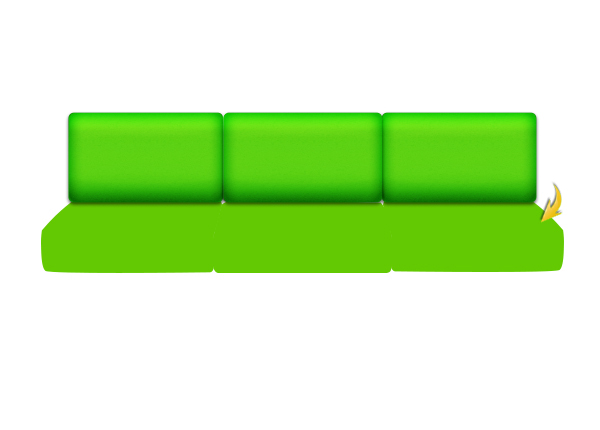
Step 5
Duplicate the “back1” group twice by going to “Layer” > “Duplicate group,” and then arrange them as shown below with the help of the move tool (“V”).

Step 6
Now, we’ll create seats of the sofa. For that, set #63c902 as your foreground color and select the pen tool (Tool mode: Shape) to draw the shape as shown below.

Step 7
Now, draw the side seat as below using the pen tool.

After that, duplicate this new shape and go to “Edit” > “Transform” > “Flip Horizontal,” and arrange it on the right side as shown below.
Step 8
Now we’ll stylize the seats. To start with, double-click on the central seat layer and use the following settings.


Step 9
Right-click on the central seat layer, select “Copy Layer Style,” and then right-click on the side seats layers one by one, selecting “Paste Layer Style” to apply the same effects on each of them. However, you need to adjust the angle for “Satin” for the right and left seats separately. Double-click on the left seat layer and use the angle of 73⁰ for “Satin.” For the right seat, use a 106⁰ angle.

Step 10
Next, we’ll create the base for the sofa. For that, set #37ba0b as your foreground color and draw a rectangle on a layer just above the background layer using the rounded rectangle tool.

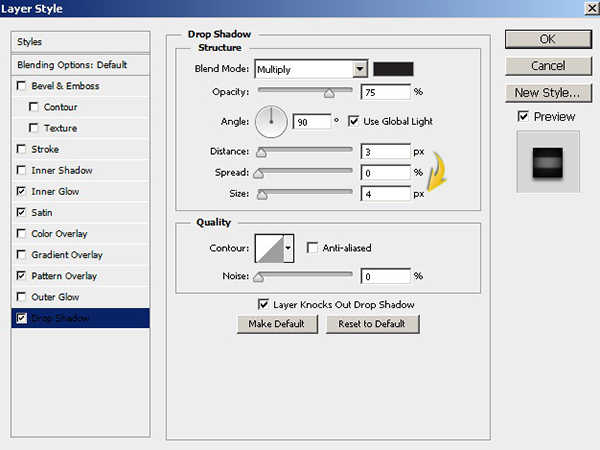
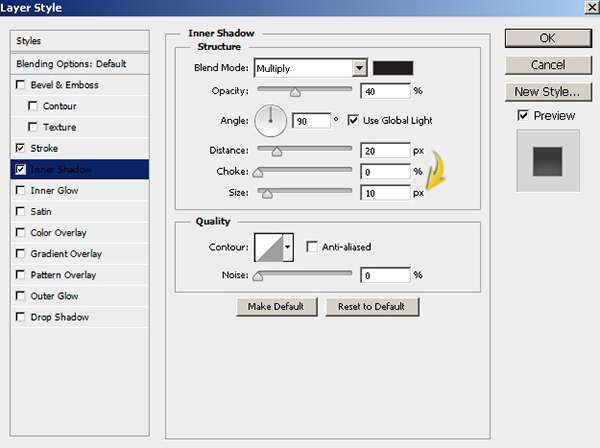
Step 11
Now, apply the following settings for “Stroke” and “Inner Shadow” on this new rectangle layer.

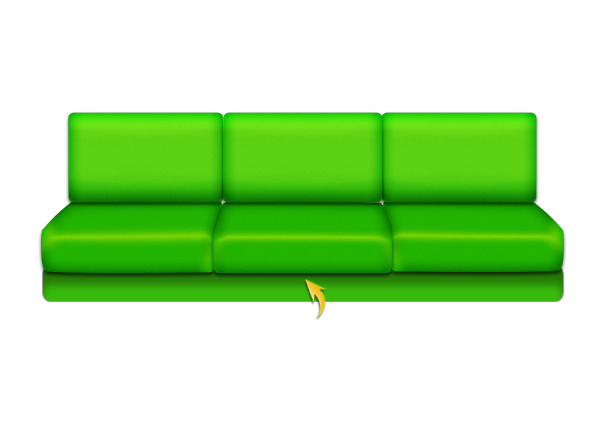
Step 12
Next, draw a large rectangle using the rectangular marquee tool below the rest of the layers, and fill it with color #0d5c00 using the paint bucket tool. The intent is to fill all the minute gaps between the seats.
Step 13
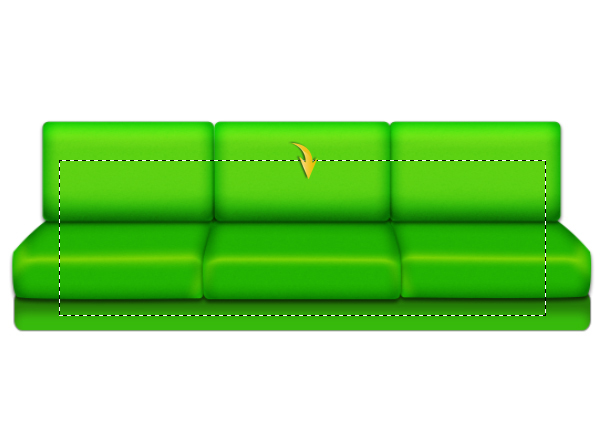
Next, we’ll make the sofa’s arms. Set #43c609 as the foreground color and pick the pen tool (Tool mode: Shape) to draw the shape shown below.
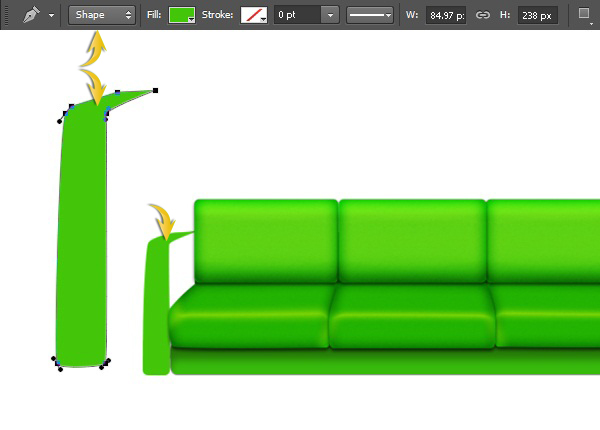
Step 14
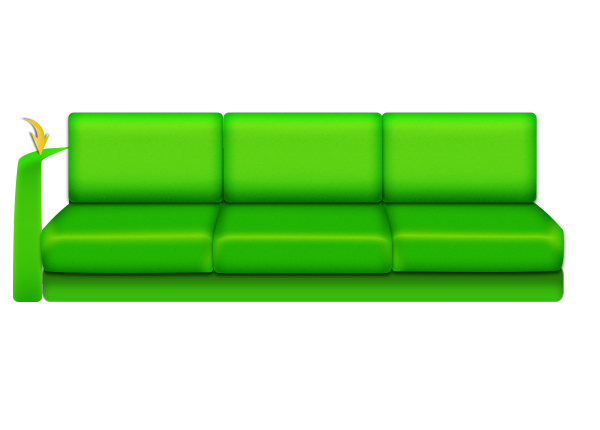
Apply the following layer style settings on the arm shape:


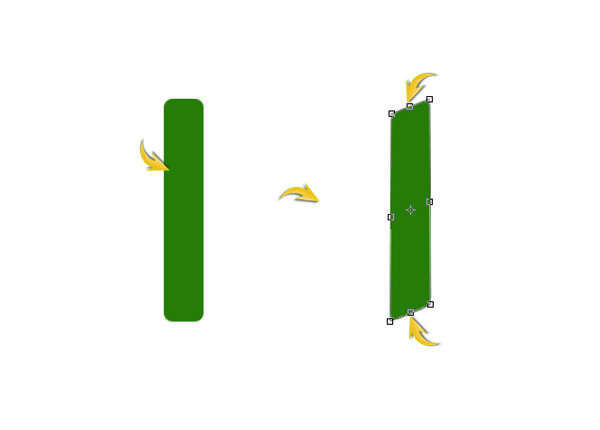
Step 15
Now, to complete the arm, draw a vertical rounded rectangle using color #257c07, and go to “Edit” > “Transform” > “Distort.” Use”‘Distort” to give it a shape like the one shown below.
Now, press Ctrl + <click on this rectangle layer> to make a selection around it, create a new layer above the rectangle, and fill this selection with “50% gray.” Then, apply the burn tool on this layer, as shown below. Finally, change the blending mode of this new layer to “Overlay,” as we did in step 4.
Step 16
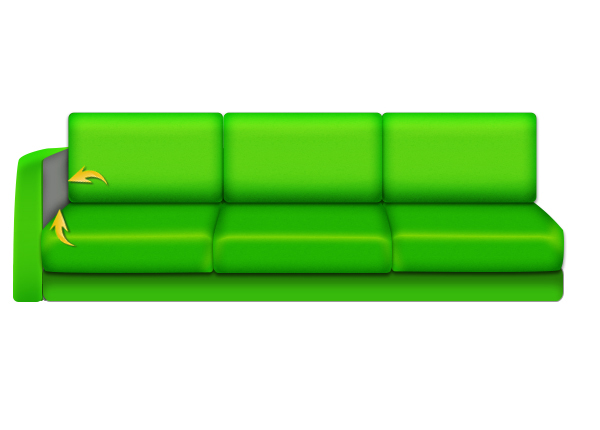
Collect all layers forming the arm into a single group, duplicate the group and flip this group horizontally to form the opposite arm of the sofa.

Step 17
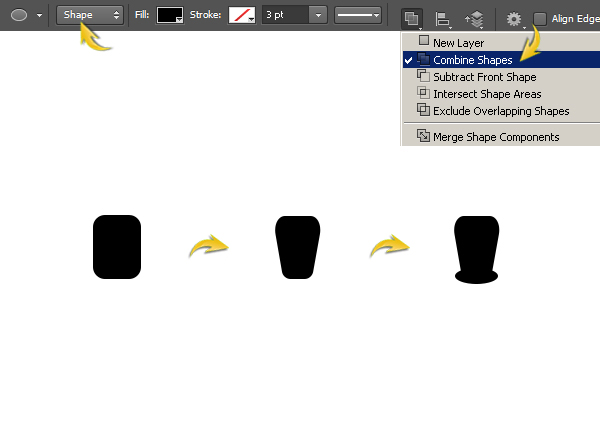
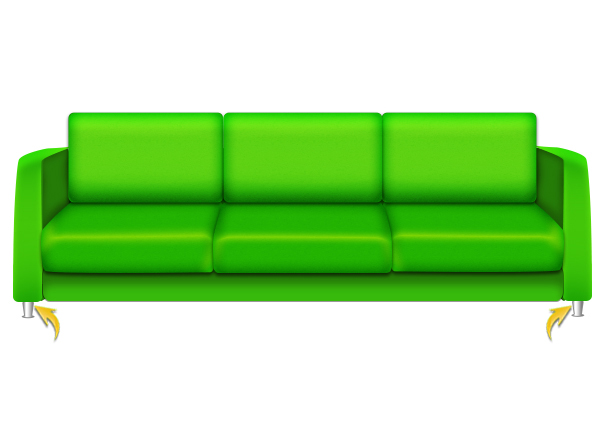
Next, we’ll create sofa’s foot. Create a rectangle using the rounded rectangle tool with a 3px radius. Then, give it the shape shown below using the “Distort” tool. After that, select the ellipse tool, choose ‘“Combine Shapes” from top properties bar, and draw an ellipse at the lower edge of the rectangle to complete the foot.
Step 18
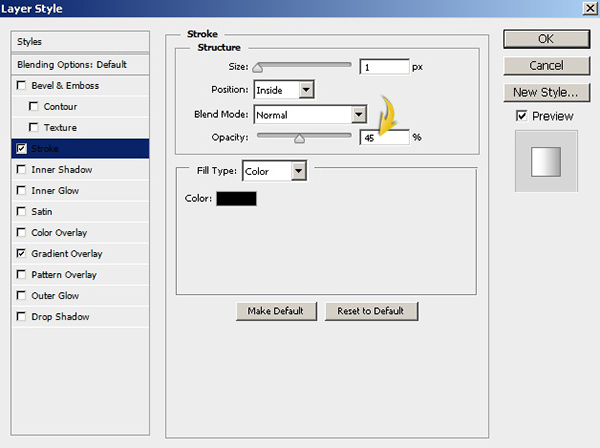
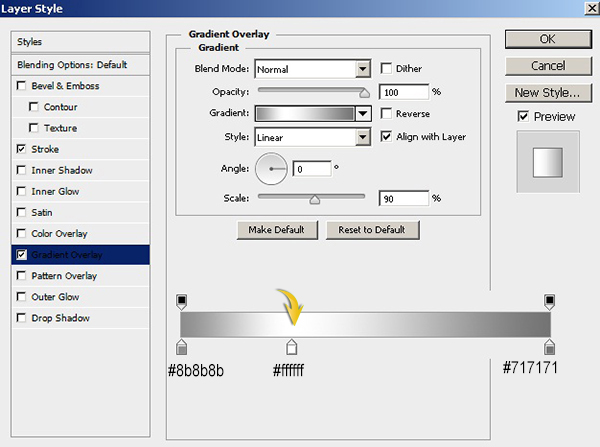
Now, apply following layer style settings on the foot layer:
After that, duplicate the foot layer and flip it horizontally to form the other foot of the sofa.
Step 19
Next, we’ll create shadow. Select the rectangle tool to draw a rectangle in pure black color just above the background. Give it a shape like the one below with the help of the “Distort” tool.
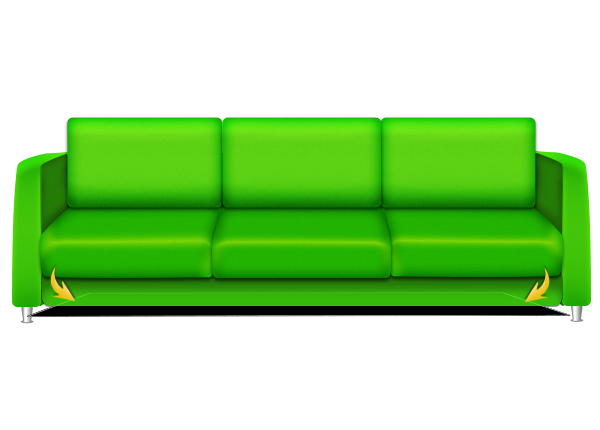
Step 20
Right-click on the shadow layer and choose the option of “Rasterize Layer.” Then, go to “Filter” > “Blur” > “Gaussian blur.” Use ta value of 3.5px for the Gaussian blur. Now, stretch the shadow as shown below using the free transform tool (Ctrl + “T”). Once you are done, change the blending mode of the shadow layer to “Multiply” and reduce its opacity to 50%.

The sofa mockup is ready. Here is how it looks.
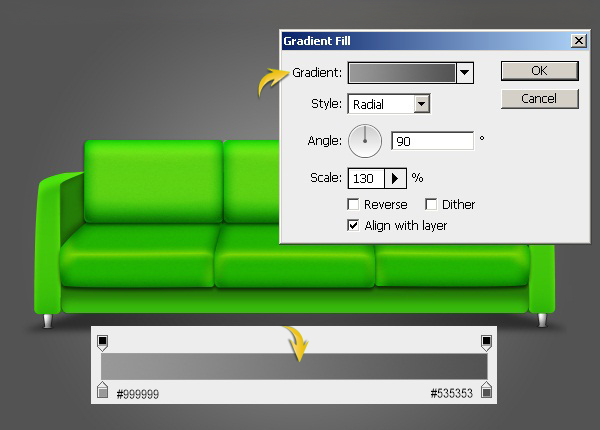
Step 21
Now, we’ll create a darker room background for the display, which will enhance the focus on the mockup and your product. Create a gradient adjustment layer just above the background by clicking the icon of “Create new fill or adjustment layer,” which is present at the bottom of the layers panel.
Open the grunge texture in Photoshop and drag it to your document above the gradient layer. Change the blending mode of texture to “Luminosity” and reduce its opacity to 10%.

Step 22
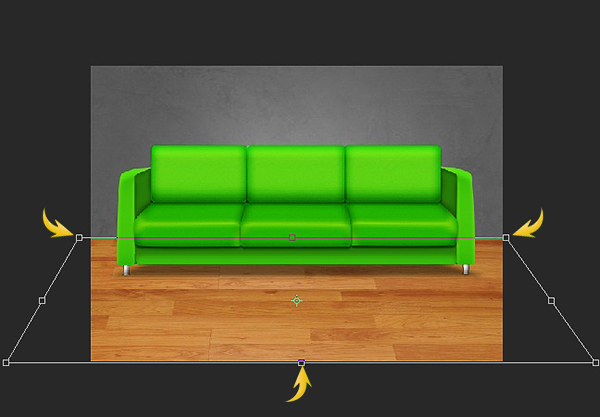
Now, place the wood texture just above the grunge texture and arrange it as shown below using the “Distort” tool.
We need two more adjustment layers above the wood texture: “Hue/Saturation” to desaturate the texture and “Brightness/Contrast.” Use the following settings for them.

Step 23
Draw a rectangle in color #cdcdcd above the background layer and use the following settings for “Bevel and Emboss” on this layer.


Here is how it looks supporting and adding context to an advertisement that takes the form of modern art:

That’s it guys. I hope you enjoyed the tutorial and learned something useful. Do share your thoughts regarding it.
Frequently Asked Questions about Creating a Vibrant Vectorized Sofa in Photoshop
How can I add more depth and dimension to my vectorized sofa in Photoshop?
To add more depth and dimension to your vectorized sofa, you can use the Gradient tool in Photoshop. This tool allows you to apply a gradient effect to your sofa, giving it a more three-dimensional look. Start by selecting the area you want to apply the gradient to, then choose the Gradient tool from the toolbar. You can adjust the colors and direction of the gradient in the options bar. Experiment with different gradient styles and colors until you achieve the desired effect.
Can I use different shapes to create my vectorized sofa?
Absolutely! You can use a variety of shapes to create your vectorized sofa in Photoshop. The Pen tool is particularly useful for creating custom shapes. You can use it to draw the outline of your sofa, then fill it in with color. You can also use the Rectangle tool or the Ellipse tool to create more geometric shapes. Don’t be afraid to experiment with different shapes and styles to create a unique design.
How can I create a realistic texture for my vectorized sofa?
Creating a realistic texture for your vectorized sofa can be achieved by using the Pattern Overlay effect in Photoshop. This effect allows you to apply a pattern to your sofa, giving it a more realistic look. You can choose from a variety of pre-made patterns, or you can create your own. To apply a Pattern Overlay, select the layer you want to apply the effect to, then go to Layer > Layer Style > Pattern Overlay. Choose your desired pattern and adjust the settings as needed.
Can I add a background to my vectorized sofa design?
Yes, you can add a background to your vectorized sofa design in Photoshop. You can use the Paint Bucket tool to fill in the background with a solid color, or you can use the Gradient tool to create a gradient background. You can also import an image and use it as a background. To do this, go to File > Place and select the image you want to use. Resize and position the image as needed, then click Enter to place it.
How can I make my vectorized sofa look more vibrant?
To make your vectorized sofa look more vibrant, you can adjust the color and brightness settings in Photoshop. Go to Image > Adjustments > Hue/Saturation to adjust the color of your sofa. You can also go to Image > Adjustments > Brightness/Contrast to adjust the brightness and contrast. Experiment with these settings until you achieve the desired vibrancy.
Can I save my vectorized sofa design as a vector file?
Yes, you can save your vectorized sofa design as a vector file in Photoshop. To do this, go to File > Save As and choose the EPS format. This will save your design as a vector file, which can be scaled without losing quality.
How can I add shadows to my vectorized sofa?
Adding shadows to your vectorized sofa can be done by using the Drop Shadow effect in Photoshop. This effect creates a shadow that appears to be cast by your sofa, giving it a more three-dimensional look. To apply a Drop Shadow, select the layer you want to apply the effect to, then go to Layer > Layer Style > Drop Shadow. Adjust the settings as needed to achieve the desired effect.
Can I use different brushes to create my vectorized sofa?
Yes, you can use different brushes to create your vectorized sofa in Photoshop. The Brush tool allows you to paint on your design with a variety of brush styles. You can adjust the size, shape, and hardness of the brush in the options bar. Experiment with different brush styles to create unique textures and effects.
How can I create a pattern for my vectorized sofa?
Creating a pattern for your vectorized sofa can be done by using the Pattern Maker in Photoshop. This tool allows you to create custom patterns that you can apply to your sofa. To use the Pattern Maker, go to Filter > Pattern Maker. You can choose from a variety of pre-made patterns, or you can create your own. Once you’ve created your pattern, you can apply it to your sofa using the Pattern Overlay effect.
Can I animate my vectorized sofa in Photoshop?
Yes, you can animate your vectorized sofa in Photoshop using the Timeline panel. This panel allows you to create frame-by-frame animations of your design. To open the Timeline panel, go to Window > Timeline. From there, you can create a new frame animation, add frames, and adjust the timing of each frame. Once you’re happy with your animation, you can export it as a GIF or video file.