Key Takeaways
- The tutorial provides step-by-step instructions on how to create a visually appealing travel agency advertisement in Photoshop, emphasizing the use of imagery, layer styling techniques, and the pen tool.
- The process includes creating a new document, drawing and styling rectangles, creating highlights, adding text, and incorporating images such as ocean scenes and air balloons. It also covers creating a bus vector and adding details such as windows, doors, and tires.
- The tutorial concludes with the addition of cloud brushes and adjustment layers to enhance the overall effect, demonstrating the importance of fine-tuning and adjusting the advertisement to achieve a professional and appealing result.
Vacations are highly visual, so the travel industry and travel marketing must be visual as well. Vacationers are attracted by imagery: they go on “sightseeing” trips, and they usually return with hundreds of vacation photographs that they use to pester their friends and family and litter the social media landscape.
If you’re going to sell some travel trips, you’re going to have to produce some imagery of your own, and unlike typical vacation photos, yours will have to be well composed, interesting, relevant, and full of mass appeal.
In this tutorial, I’ll show you how to create an attractive and fun advertisement of a travel agency in Photoshop. Along the way, we’ll use pen tool, different shape tools and layer styling techniques. I’ll also show you how to create a bus vector. Hopefully, you will learn some handy tips. So, let’s get started!
Resources:
Ocean image by samluvsnj
Air Balloons by sean&mistischweitzer
Air Balloons by tempete2pixel
Birds of a Feather II by midnightstouch
Cloud Brushes by para-vine
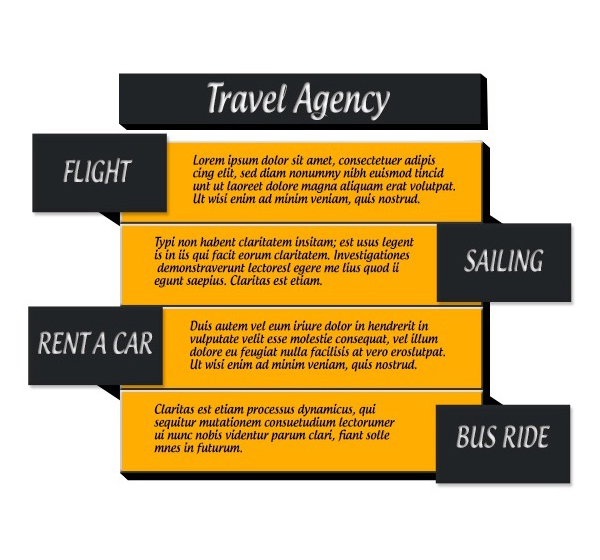
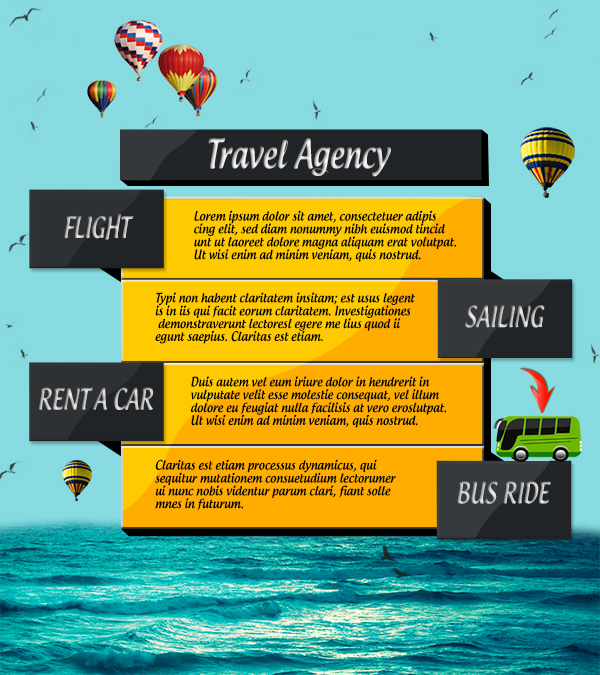
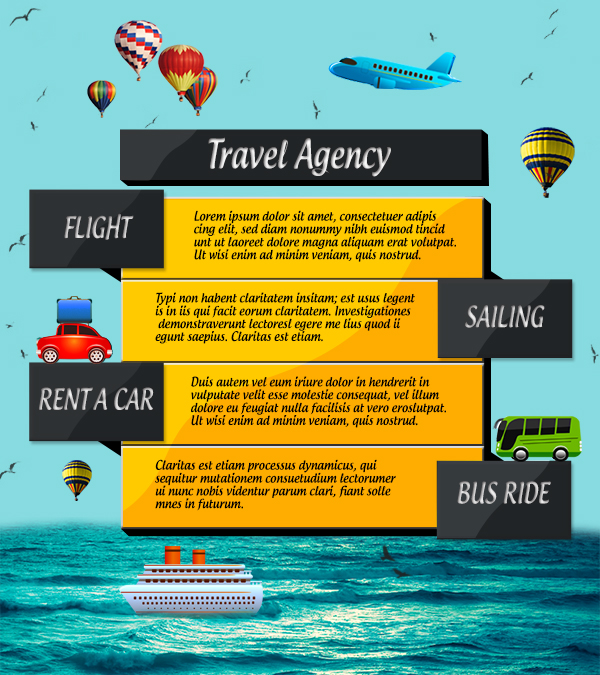
Final result:
Before we start, let’s look ahead at our end result:

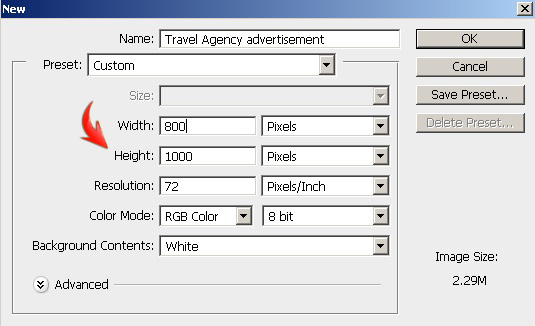
Step 1
Create a new document in Photoshop with an 800px width and a 1000px height.
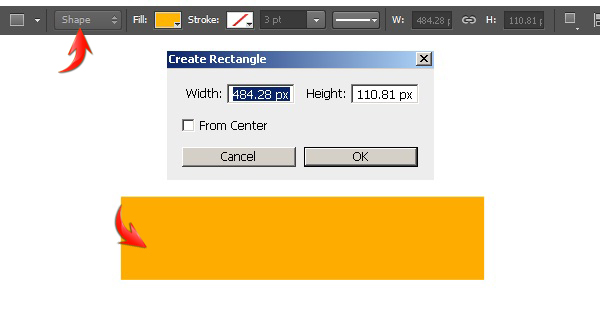
Step 2
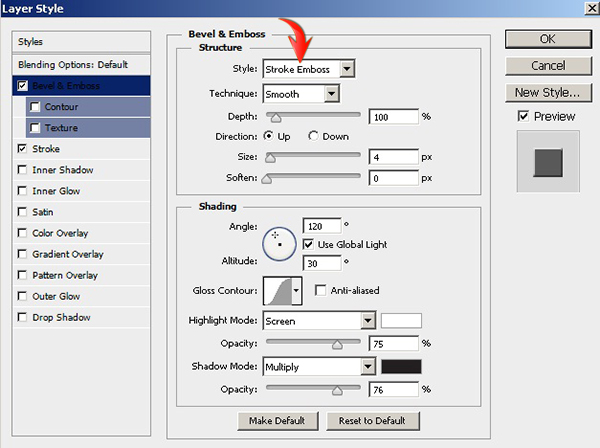
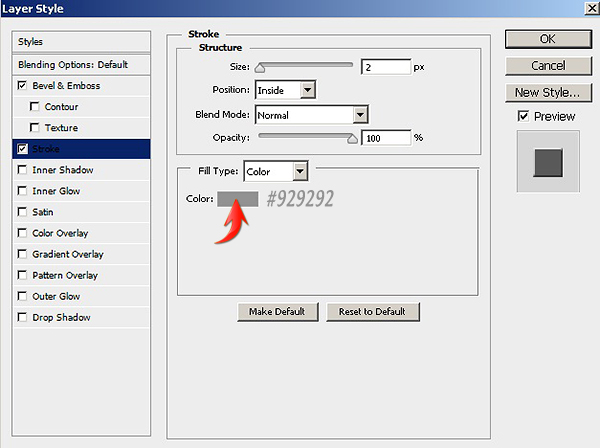
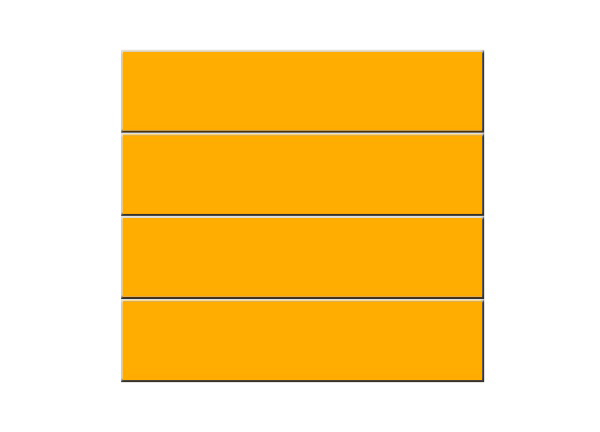
Draw a rectangle using the rectangle tool (tool mode: shape) in color #fead00.
Double-click on this rectangle layer to open the “Layer Style” window and apply the following settings.

Step 3
Duplicate this rectangle layer three times by going to “Layer” > “Duplicate layer” and arrange them as shown below.
Step 4
Make another rectangle using color #242729 and position it as shown below.
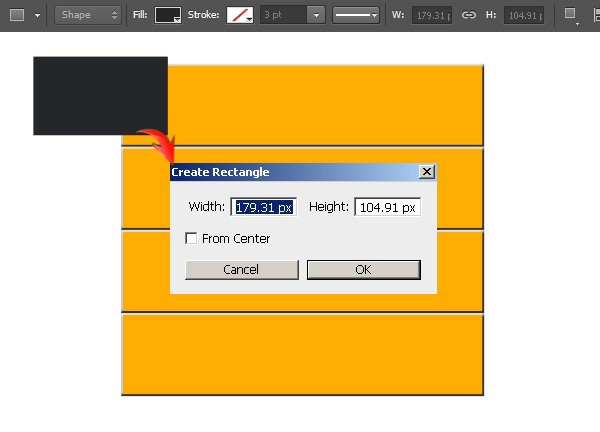
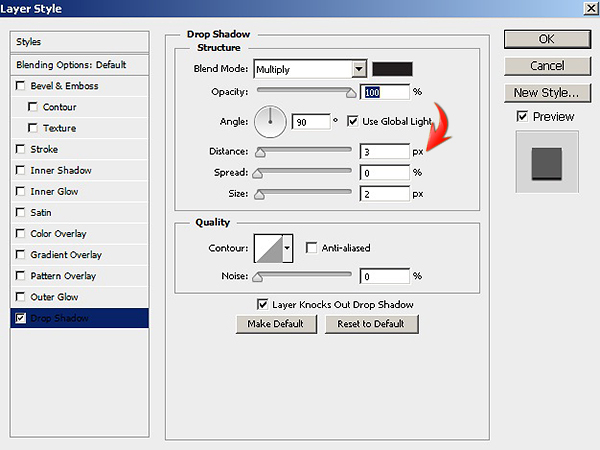
Apply the following settings for “Drop Shadow” on this rectangle.

Duplicate the rectangle 3 times and arrange it as below.

Step 5
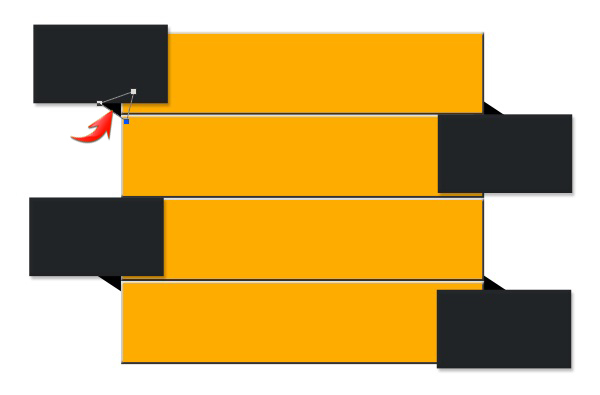
Make four triangles using the pen tool (tool mode: shape) in color #000000 just above the background layer.
Step 6
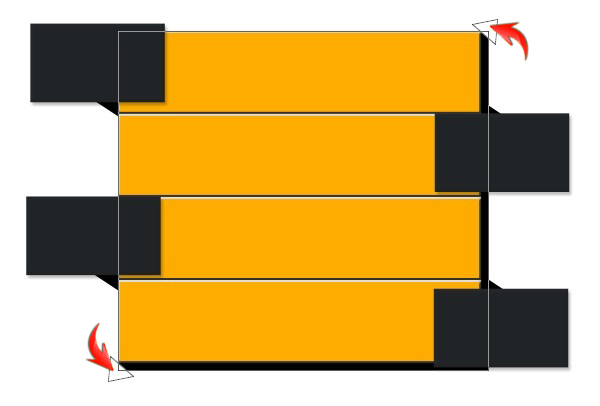
Make a rectangle above the background layer using color #000000.

Now, make a triangle over the top-right corner above the rectangle layer, then select both the rectangle and triangle layers and go to “Layer” > “Combine shapes” > “Subtract front shape.” Make another triangle for the bottom-left corner and subtract it from the main rectangle layer to get the shape shown below.
Step 7
Make another rectangle at the top in color #212426, duplicate and drag it a bit to the right. Change the color of the duplicated rectangle to pure black, and trim off the top-right and bottom-left corners like we did for the larger rectangle in step 6.

Step 8
Set #ffffff as your foreground color, and select the type tool to add text. I am using “Androgyne” font here.
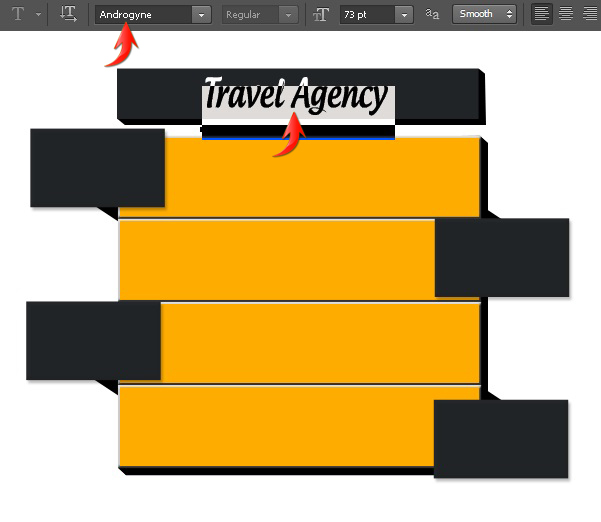
Apply an inner shadow on the test using the following settings.

Add text over rest of the boxes using the same font.
Step 9
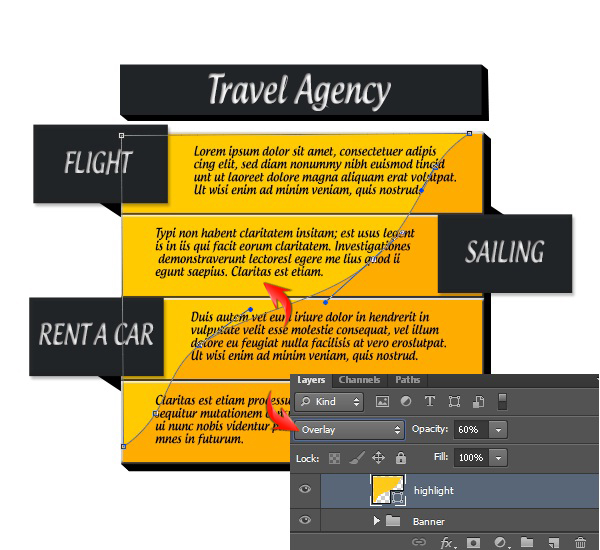
Next, we’ll create highlights over the boxes. Set #ffca19 as your foreground color, and draw the shape shown below using the pen tool. Change the blending mode of this layer to “Overlay,” and reduce its opacity to 60%.
Step 10
Make highlights over the rest of the blocks like we did in step 9. However, use a pure white color for these highlights.

Step 11
Fill the background layer with color #87dbe0 using the paint bucket tool.
Step 12
Open the ocean image in Photoshop, select the water part using the pen tool, and copy and paste the water into the advertisement document above the background layer. Now select the soft round eraser tool with 30% opacity and apply it at the top edges of the water to blend the edges.

Step 13
Open the air ballo0n images in Photoshop; you can use any selection tool to select them, I’ve used the quick select tool here. Then, copy and paste them into your document. Resize and position the air ballo0ns using the free transform tool (Ctrl +“T”).

Step 14
Set #202020 as your foreground color, load the bird brushes mentioned in our resources, and apply them on 2-3 layers so you can easily erase unwanted birds on the canvas.

Step 15
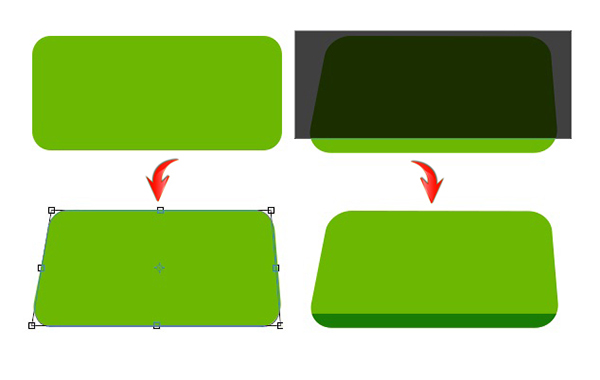
Next, we’ll add few vectors. I’ll show you how to create a bus vector. Set #6cb701 as your foreground color and select the rounded rectangle tool with a 20px radius to draw a rectangle. After that, go to “Edit” > “Transform” > “Distort.” Use the distort tool to make the rectangle shape shown below. Then, duplicate this shape layer by going to “Layer” > “Duplicate layer.” Now, make a rectangle using the rectangle tool covering the top 90% of the previous shape, as shown in the image below. Select both the duplicated shape layer and the new rectangle layer, and go to “Layer” > “Combine shapes” > “Subtract front shape” to form the bottom part of the bus. Change bottom layer color to #187c05.
Step 16
Now, we’ll make tires for the bus. Select the ellipse tool to make two ellipses: a larger ellipse of color #0e0e0e and a smaller ellipse of color #cdcdcd. Position the smaller ellipse in the center of the larger one.
Then, double-click on smaller ellipse layer (the tire’s hubcap) and apply the following layer style settings.


Step 17
Now, draw a crescent shape using the pen tool (tool mode: shape) in color #dedede.

Apply the following drop shadow settings to this new crescent shape.
Now, collect all the tire and crescent shape layers into a single group, duplicate the group, and arrange this group to form the other tire for the bus.

Step 18
Next, we’ll draw few shapes over the bus to form its windows and door using the pen tool (tool mode: shape).

Now, select all the windows and doors and go to “Layer” > “Combine shapes” > “Unite shapes.” After that, draw a rectangle in pure white just above this united glass layer covering upper half of it, as shown below.
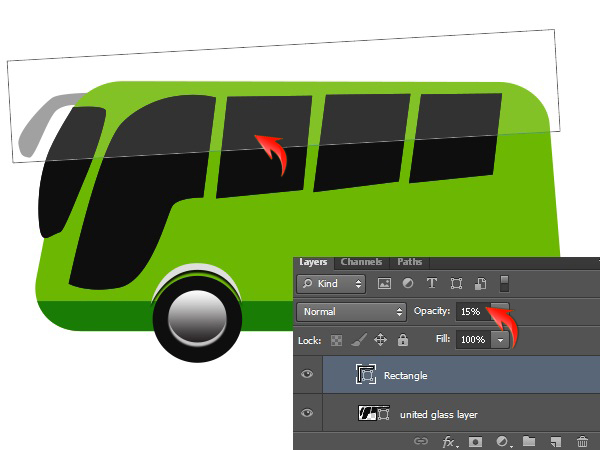
Now click on this rectangle layer, then press Ctrl + <click on the united glass layer> to make selection around it. Then press the “Add layer mask” icon, which is found at the bottom of the layers panel.

Step 19
Next, make few lights and two horizontal lines using the rounded rectangle tool with a 20px radius.

Apply the following settings for “Bevel and Emboss” on these horizontal lines.


Step 20
You can add the tires on the far side of the bus to complete the bus vector. However, we can use this vector as it is now for this tutorial. Collect all the layers forming the bus in a group, adjust its size, and position it as shown below using the free transform tool (Ctrl+ “T”).
You can add more vectors to the canvas if you like.
Step 21
Now, load the clouds brushes into Photoshop and apply them in color #e6fffc on a layer just above the background and on a layer at the very top of rest of the layers to cover everything. Reduce the opacity of clouds layers to 30-40%. I’ve also used a cloud brush to make steam coming out from the ship.

Step 22
We are almost done. To enhance the overall effect, click on the icon to “Create new fill or adjustment layer,” which is present at the bottom of the layers panel, and select the option of “Gradient.” Place it at top of rest of the layers.

Step 23
Create new adjustment layer of “Curves” at top of rest of the layers. Adjust the curve as shown below.


That’s it guys. I hope you enjoyed the tutorial and learned something useful. Share your thoughts.
Frequently Asked Questions about Creating a Travel Agency Advertisement in Photoshop
What are some creative ideas for designing a travel agency advertisement in Photoshop?
There are numerous creative ideas you can incorporate into your travel agency advertisement design in Photoshop. You can use vibrant and high-quality images of popular travel destinations, include testimonials from satisfied customers, or use catchy taglines. You can also play around with different fonts and color schemes to make your advertisement more visually appealing. Remember, the goal is to make your advertisement stand out and attract potential customers.
How can I make my travel agency advertisement more engaging?
To make your travel agency advertisement more engaging, consider incorporating interactive elements such as clickable links or buttons. You can also use compelling visuals and storytelling to draw in your audience. Additionally, make sure your advertisement is clear and concise, with a strong call to action.
What are the best practices for using images in a travel agency advertisement?
When using images in your travel agency advertisement, make sure they are high-quality and relevant to your message. Avoid using stock photos as much as possible, as they can make your advertisement look generic. Instead, opt for original photos that showcase the unique experiences your travel agency offers. Also, ensure that the images are properly optimized for web use to prevent slow loading times.
How can I optimize my travel agency advertisement for mobile devices?
To optimize your travel agency advertisement for mobile devices, ensure that your design is responsive and can adapt to different screen sizes. Avoid using small text or tiny buttons that may be difficult to interact with on a small screen. Also, make sure your images are optimized for mobile use to prevent slow loading times.
What are some common mistakes to avoid when designing a travel agency advertisement in Photoshop?
Some common mistakes to avoid when designing a travel agency advertisement in Photoshop include using too many fonts or colors, overcrowding your design with too much information, and not including a clear call to action. Also, avoid using low-quality images or generic stock photos, as they can make your advertisement look unprofessional.
How can I use Photoshop to create a travel agency advertisement that stands out?
Photoshop offers a variety of tools and features that can help you create a standout travel agency advertisement. You can use layers to create complex designs, apply filters to enhance your images, and use the text tool to add compelling copy. Additionally, you can use the color adjustment tools to create a consistent color scheme that aligns with your brand.
What are some effective strategies for promoting my travel agency advertisement?
Some effective strategies for promoting your travel agency advertisement include sharing it on social media, incorporating it into your email marketing campaigns, and using SEO techniques to increase its visibility online. You can also consider paid advertising options such as Google AdWords or Facebook Ads to reach a wider audience.
How can I measure the success of my travel agency advertisement?
You can measure the success of your travel agency advertisement by tracking key metrics such as click-through rates, conversion rates, and the number of new leads or bookings generated. You can also use tools like Google Analytics to gain insights into how users are interacting with your advertisement.
Can I use Photoshop to create animated travel agency advertisements?
Yes, you can use Photoshop to create animated travel agency advertisements. Photoshop’s timeline feature allows you to create frame-by-frame animations, which can add a dynamic element to your advertisement. However, keep in mind that creating animations in Photoshop can be complex and may require some advanced skills.
What are some resources for learning more about creating travel agency advertisements in Photoshop?
There are many resources available online for learning more about creating travel agency advertisements in Photoshop. Adobe’s official website offers tutorials and guides on using Photoshop, and there are numerous online courses and YouTube tutorials that cover the basics of graphic design and advertisement creation. Additionally, websites like SitePoint offer articles and guides on specific topics like creating a travel agency advertisement in Photoshop.
Anum is Web and Graphic designer. Addicted to Photoshop and crazy for pixel perfection. She is also an active blogger, sharing her passions, skills and creative details on her blog Websoulz. She loves to connect with the community, sharing the latest design gossips and rolling her eyes on boring trends.