Originally published at: https://www.sitepoint.com/the-ultimate-beginners-guide-to-setting-up-running-a-wordpress-site/
So you’ve decided to run a WordPress site but have no idea where to start? This tutorial is aimed at absolute beginners. Some IT knowledge will help but I presume you want to learn the essentials within a few hours. Let’s get started.
Step 1: What Do You Want to Achieve?
A little planning goes a long way. Be honest with yourself: why are you considering WordPress? Do you want to:
- create a business website?
- document your life, hobby or interests?
- start an amazing web design agency?
- learn to write code?
- do something else?
WordPress is flexible and runs almost a third of the web — but it's not ideal for every situation. A website or article library is perfect. Creating a social network or online shop is possible but there may be better options. Using WordPress to learn PHP could be a frustrating experience.
Presuming WordPress is appropriate, are you interested in the technicalities or would you simply prefer to write content? If it's the latter, a managed WordPress plan from SiteGround or an account at WordPress.com will get you running without the hassles of installation and server management.
The moral: define the problem before choosing a solution!
Step 2: Plan Your Content
Ideally, you should have all your content written before building a site. It's the best way to plan a structure and will influence your design. No one ever does that, but at least plan a few general concepts so you have somewhere to start.
Step 3: Purchase a Domain Name
A domain name is your primary web address, e.g. www.mysite.com. Keep it short and use keywords appropriate to your content. This can be tougher than it sounds; most good names were registered years ago.
Use a reputable domain registrar. Prices vary across countries and top-level-domain types (.com, .net, .org, .ninja etc), but expect to pay around $25 for a new domain for a couple of years. Buying a decent pre-registered domain from someone else can be considerably more expensive.
- How to Choose a Domain Name for Your Business
- How to Choose, Register and Make the Most of Your Domain Name
- 12 Tools to Help You Buy the Perfect Domain Name
- Your Domain Name: Do You www or Not?
Step 4: Purchase a Hosting Plan
Your site needs to be hosted somewhere. Its files must be placed on a device which understands how to deal with web requests: a web server. You could serve everything from your desktop PC but it quickly becomes impractical.
Buy a suitable plan from a respected host such as SiteGround. A WordPress-compatible shared hosting plan costs a few dollars a month and you can upgrade disk space and bandwidth as traffic grows.
You will then need to 'point' your domain at your new web space. This is normally done by logging into your domain registrar's control panel then either:
- Setting the host as the DNS nameserver, or
- Changing the domain's DNS A records to point at the host's IP address.
All hosts and domain registrars provide guidance but you may need to seek expert assistance. Domain changes can take up to 48 hours to propagate so you may need to wait before moving to the next step.
- Web Hosting & Domains
- The Ultimate Guide to Choosing a Hosting Provider
- What Sort of Hosting Should I Choose for My Website?
- What Do I Need to Know About Hosting?
Step 5: Set Up SSL
Secure Socket Layer (SSL) certificates enable cryptographic protocols on your website so it is served over an https:// address rather than http://. All communication between your server and the user's browser is encrypted so it cannot be (easily) intercepted by a third party.
Configuring SSL is an optional step but highly recommended:
- Browsers warn when a site is not secure especially when completing forms or sending data.
- Search engines rank secure sites higher than non-secure equivalents.
- SSL is essential if you eventually want a Progressive Web App which allows your site to be "installed" and work offline.
- Adding SSL later is considerably more difficult. You may need to reinstall WordPress and search engine indexing can be affected.
- There are no disadvantages. HTTPS can be added for free and is negligibly slower than unencrypted HTTP (it can be considerably faster when used with HTTP/2).
Hosts often allow you to install a certificate purchased elsewhere, but it's easier to use their own service. For example, SiteGround provides a free Let's Encrypt option in the security section of your site's cPanel. Click that, hit Install and SSL is enabled.

Step 6: Install WordPress
WordPress is a complex application which requires:
- A back-end MySQL database where your configuration, posts, comments and other information is retained. This must be installed and configured first. A database user ID and password must be defined so applications can store and retrieve data.
- A large set of PHP files which form the WordPress application. These must be copied to the server prior to running a set-up procedure. This requests the database credentials before creating the database tables and initial data.
- After installation, WordPress communicates with the database using the ID and password to enable editing and presentation of pages.
The majority of hosts provide cPanel - a popular website management facility. You can create your database, upload WordPress and install manually. For full instructions, refer to How to Create WordPress MySQL Databases on cPanel.
Fortunately, there is an easier option. Search or browse for the WordPress options in cPanel:

Click the WordPress Installer to open the installation panel:

Define the following settings:
- https:// for the protocol if you enabled SSL in step 5. (You can also choose whether the domain uses the initial 'www' or not).
- Your primary domain. (There will only be one choice unless you have multiple domains pointed at the hosting plan).
- The directory should be left blank to install WordPress in the root folder. Only change this if you want to run it from another folder, e.g. https://mysite.com/blog/
- The name and description of your new site.
- Keep Multisite unchecked unless you're intending to run more than one WordPress site on the same space.
- Enter an Admin Username and Password. You will use these to log into WordPress so ensure they're strong (NOT 'admin' and 'password'!) and you keep them in a safe place.
- Enter your Email. WordPress uses this to send you notifications when necessary.
The other options can normally be left as the default settings. Hit Install and wait a few minutes for the installation process to complete. You will be given a link to the main site (https://mysite.com/) and the WordPress control panel (https://mysite.com/wp-admin) where you can log in with your administrative username and password.
Step 7: Initial WordPress Configuration
Don't be tempted to start publishing content just yet! It's best to configure WordPress from the Settings menu before going further:
The following sections describe the basic WordPress settings but note that installed themes and plugins can override these options.
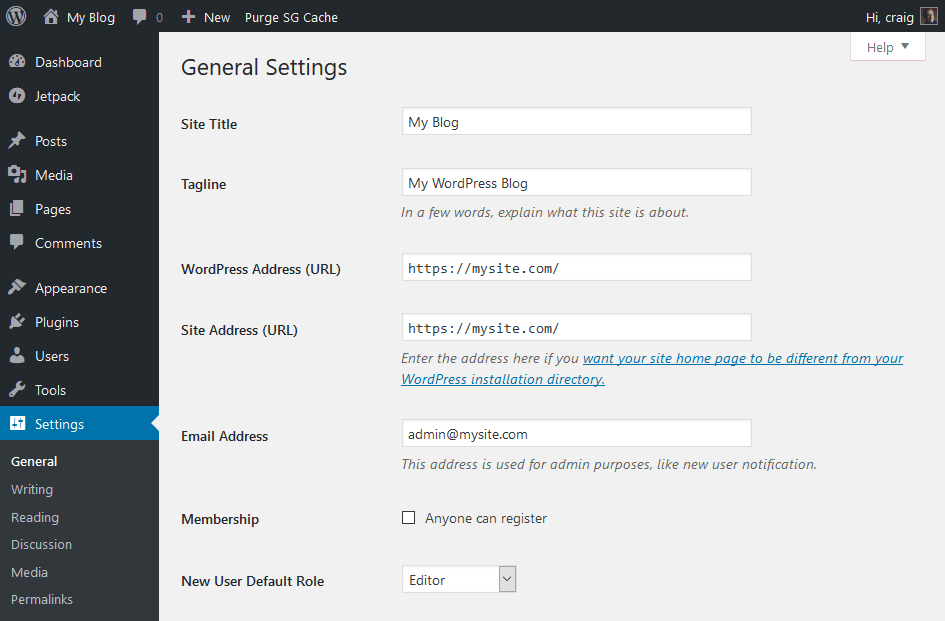
General
This pane allows you to change various aspects about your installation. The primary settings to change include:
- The Timezone. This may default to UTC so choose an appropriate city instead.
- The Date Format. Choose an appropriate option or enter a custom string using PHP's date format
- The Time Format. Similarly, choose an option or enter your own.
Remember to hit Save Changes once finished.
Writing
The main settings to change in this pane are:
- The Default Post Category. Post categories are defined in Posts > Categories.
- The Default Post Format. WordPress themes often provide different post types such as standard articles, galleries and video pages. Choose whichever you will use most often.
Reading
The Front page displays setting allows you to set whether your latest posts or a static page is presented on the home page.
The other default settings are normally fine, although you may want to temporarily disable Search Engine Visibility during the initial stages of building your site. Don't forget to enable it before going live!
Discussion
This pane controls commenting. The main setting is Allow people to post comments on new articles which you may want to disable if you don't require comments.