Hi
Not sure if this is the right place to put this post.
I was wondering if anyone knows how to take good pictures for your shopping cart, to make them look more professional.
Or know of any good tutorials?
Thanks!!
Hi
Not sure if this is the right place to put this post.
I was wondering if anyone knows how to take good pictures for your shopping cart, to make them look more professional.
Or know of any good tutorials?
Thanks!!
Take high resolution photos, and then resize with photoshop or Gimp. (gimp is free)
Thats about it. ![]()
There are some script online that will resize them for you. But by hand may be the easiest.
What about lighting and background. I have tried taking some photos just like that and found that it looked very amateur. Maybe I am doing something wrong or maybe camera sucks though.
Remove all background put it on a white or black sheet.
Get a good camera… that makes a world of difference. ![]()
Taking professional photos requires having the right equipment/setup and the right eye. The equipment can be as simple as a basic DSLR (or even a point and shoot although that’s going to give you less flexibility) and a white backdrop. A more powerful DSLR, external flash and proper background [white sheets are difficult to pull tight enough not to have lines] are ideal for getting really sharp photos but if you set it up right, you can avoid these.
As far as getting the right shot, there are a lot of tips and tricks to setting up size, playing with shadows (or removing them) and angles to make the photo pop. Here’s a few articles on the subject:
http://www.digicamreview.com/2006/02/taking-great-product-photographs.html
A table-top ‘light tent’ and some spotlights fitted with special 5000K daylight fluorescent bulbs (they run cool, but shine bright) can be a big help. It’s very quick to set this all up, and it allows you to produce consistent and repeatable results.
Type ‘light tent’ into eBay if you don’t know what I mean.
Paul
The most important thing when photographing is the lighting. Some other things can be fixed up later, but lighting can’t. This includes what angle the light is coming from and what quality it has - it is sharp (creating crisp shadows), or diffused (soft shadows). Probably the worst lighting is either an on-camera flash or direct sunlight, because these are only single points of very sharp light. They will create a very defined shadow in the background which is distracting and will make it look like you didn’t go to any effort to illuminate the subject. In addition to this, using an on-camera ‘direct’ flash (where the flash is on the camera pointing at your subject) will create that ‘amateur’ look, despite how much money you spent on the camera or the flash unit if any. You need to bounce the flash off something or diffuse it somehow. Try to bounce the flash off something like a white wall or cardboard. Professionals use a variety of stuff for bouncing or diffusing flash.
If using natural light instead of flash, make sure what you are photographing is not in direct sunlight but that there is plenty of light coming in to the room and bouncing off the walls onto the subject.
If what you are photographing is translucent, like plastic or food, then adding some light coming from below or behind is often pretty interesting.
Getting a better camera will not improve the lighting in a shot. Don’t get a better camera, get a flash that you can bounce or you can use remotely so it is not coming from directly on the camera.
I agree that lighting is the main issue. You want plenty of light so that the shot (especially for digital cameras) isn’t “noisy”.
Using a tripod may also be helpful.
Thanks guys for all your input.
I will take some test shots this weekend and see how it comes out.
Thanks again!!
As others have said lighting makes the most difference, I wait to take mine all at a certain point of the day when my studio has the most natural light come in.
For the website I also found it best to take photos on a black sheet and cut out the background in photoshop as shown in our girls clothing range.
same could work for white too i just go for whatever gives the best contrast
Hey, erm steel from google hehe,
It’ll be worth your while to hire a professional photographer too. If your budget doesn’t permit that then try to get a friend of a friend who’s an amateur photographer. Most amateur’s are pretty good at what they do.
Interesting topic.
This goes along way, esp if you’re just starting out and use auction sites as your webcart. As for me, the image is equally as important as the professionalism of the site and the description used the describe the product.
I agree with not spending out on an expensive camera until you’ve explored lighting options.
Certainly try and disable your cameras flash and use an external flash along with difused lighting…
One point I might add is that I can’t take an image… when ever I’m on holiday, I hand the camera to the Mrs as she tends to capture the picture better.
Eqipument can be limiting, but I also think it’s important to know your limits as a photographer - it can sometimes be more of a problem between the seat and monitor ![]()
You can buy a set up that’s made for exactly for this type of thing.
It’s a box with professional lighting, backgroud, etc.
I don’t own one myself, but I see them all the time in those Sky Mall magazines that they have on Airplanes.
Ryan
Ryan,
Interesting, could you provide a link to an example product? What’s the prices like?
Thanks
A lot of people have been suggesting a white sheet, but I actually recommend getting a green or blue screen (like they use for movies), and then removing those back drops with Photoshop (or After Effects is even a little better).
Also, try to get a really strong ambient light, but set it far away from the object you are shooting, so it is bright without having any light points. Something like a lamp with an 80+ watt bulb standing behind you and off to one side is a good start. You need to be more careful with the lighting if what you are taking a picture of is overly reflective.
Also, take LOTS of pictures, especially if you are using a digital camera. Take them at the highest resolution and take lots of them. Then you can go through them and pick the best one(s). Then remove the back drop with image-editing software, then crop it down to the size you require.
EDIT. I didn’t realise Sky Mall was online - here’s a link incase anyone else was interested in what it was.
Quite cheap too http://www.skymall.com/shopping/detail.htm?pid=102215550&c=10280
We starting doing this a little while back, and here’s what we ended up doing with good results.
First, you need a decent camera and a tripod. Nothing super, but good. 4MP is sufficient with a high quality lens. Most Nikon or Canon 4MP cameras are sufficient. You don’t need a SLR for product photos, but you do need a tripod.
Now the hardest part is the lighting and back-drop. Go to ebay and find a light tent that is big enough for what you are wanting to photograph. Usually they come with several background colors. Personally, I like white the best, but black is very good as well. Blue, green, and red photograph well, but just don’t look professional in my opinion.
As for the lighting, you need a lot. For a 24 - 26" light tent, I would suggest a minimum of 4 super-bright compact fluorescent spot lamps. 6 is better but 4 works. If you are really good with photoshop, you may be able to get away with 2, but I highly recommend 4 or 6. I would consider myself very proficient in photoshop, and 2 lights was nearly impossible to get professional results with. You can also purchase these lights on ebay, usually in the photography section. Make sure you get compact fluorescent bulbs that are around 5300K color temp. Higher is too blue and lower is too red. Normal fluorescent or incandescent lights will make everything look yellow and nasty.
Basically you now just need to setup the light tent and back-drop. Iron the back drop sheets so there are absolutely no wrinkles. These will make shadows that are a pain to digitally remove. Put the camera on a tripod, turn the lights on and experiment until you get what you are looking for. Try with and without the camera flash. It shouldn’t take long before you get exactly what you’re looking for.
You may need to adjust the levels,brightness, and contrast in photoshop, because the images are initially washed out and overexposed.
This setup will get you professional looking photos.
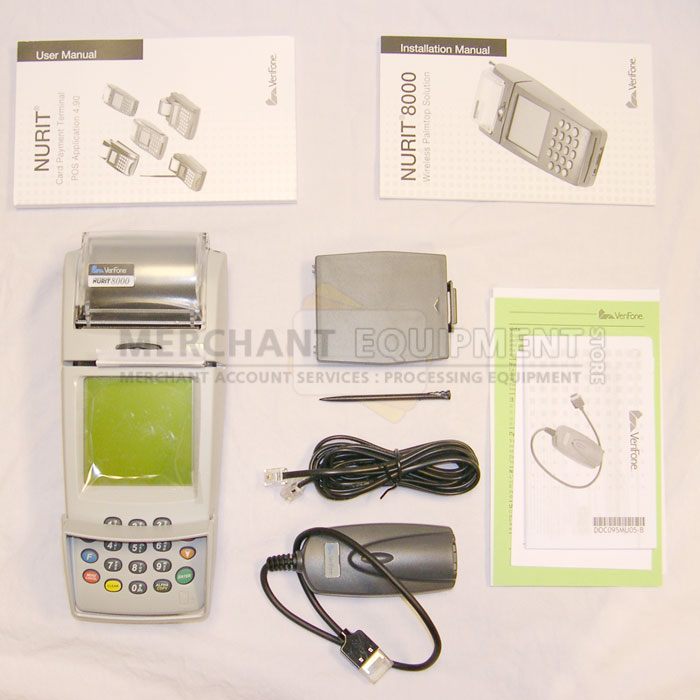
Example (excuse the watermark):
Before: http://www.merchantequip.com/images/products/supers/nurit-8000-2.jpg
After: http://www.merchantequip.com/images/products/supers/vx-570-5.jpg
download adobe photoshop trial version and learn how to make pictures look good, lots of tutorials are online.
I would recommend against this, as you tend to get the green or blue light bouncing back on to the subject, so the green or blue tinge will remain visible after the background is removed. If you photograph in front of a white (or light grey) surface you only get neutral light tones reflected onto the subject. The benefit to green screen is in video where it would be time consuming to trace around a moving subject on every individual frame, but with a still image you can get a better result by tracing around objects manually. For most purposes you probably want the background white anyway.
Also, try to get a really strong ambient light, but set it far away from the object you are shooting, so it is bright without having any light points. Something like a lamp with an 80+ watt bulb standing behind you and off to one side is a good start. You need to be more careful with the lighting if what you are taking a picture of is overly reflective.
‘Ambient’ light is light which exists already in the room. So there is no such thing as an ‘ambient’ light bulb that you can install. Ambient is light that is already there, and you didn’t put it there. In addition to this, moving a light further away decreases its intensity a bit but doesn’t really change its quality. Spreading it out (diffusing it) or bouncing it does change its quality. For product shots you want there not to be a single source of light such as a bulb, as this will create a harsh ‘low key’ (horror movie like) result. You want as much light as possible, spread out as much as possible, that is unless you are going for a particular unusual effect and you know what you are doing.
Also, take LOTS of pictures, especially if you are using a digital camera. Take them at the highest resolution and take lots of them. Then you can go through them and pick the best one(s).
I agree with this. Film for a digital camera is so cheap, it’s free ![]()