Hi Guys,
Let’s create a Wordpress site and configure it in few clicks only using the great CloudService ‘Simple Application Server’.
Simple Application Server, is a service that you can use to provision a server with specific image (Operating system instance with pre-insalled tools, in our example: web server & PHP & DB & Wordpress), so you don’t have to worry about starting from scratch with configuring the server and installing the stack.
It is perfect choice for following cases:
- If you don’t have the required experience to provision a server and do all the required configuration then install the stack you need.
- You need a website in few clicks and you don’t care about the underline setup.
I am assuming that you’ve already an account in AlibabCloud Services or you can create a new one and put your payment information so you can follow the tutorial steps (go to www.alibabacloud.com and click on ‘Free Account’).
First Lets Start a new Server instance with Wordpress image in few Clicks Only - WOW
- Go to www.alibabacloud.com and click on ‘login’
- Then click on ‘Console’ which is on the top right of the page next to the account icon.
- Now, lets go to the ‘Simple Application Server’ by clicking first on ‘Products’ from the left-hand-side menu as shown below(where red arrow is pointing to) and then click on ‘Simple Application Server’:
- Great, let’s create a new server by clicking on ‘Create Server’:
- If you haven’t entered the payment information yet, you will be asked to do so, otherwise you will be able to choose the server specs:
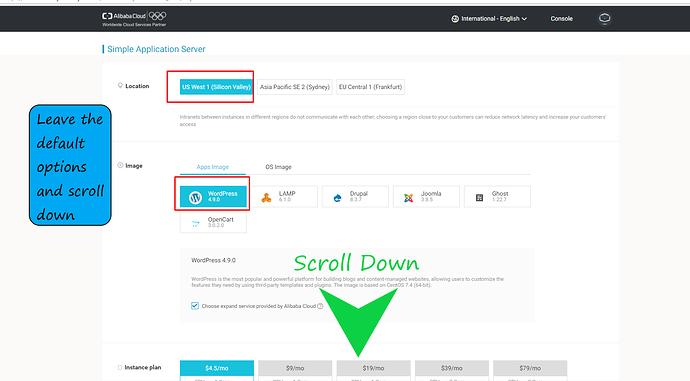
→ Location: the data center location where the server will be provisioned at (choose the nearest to you)
→ Image: choose Wordpress image
→ Instance Plan: you can start with the basic setup
→ Subscription: up to you, I will go with the monthly payment
→ Click ‘Buy Now’, see below:
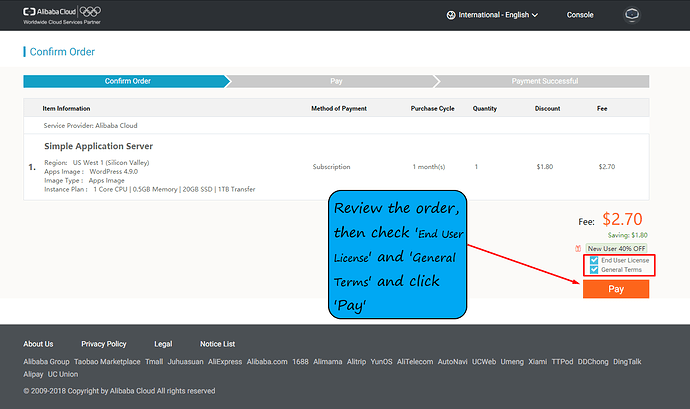
- In the upcoming two pages you will need just to review and confirm then pay, follow the images:
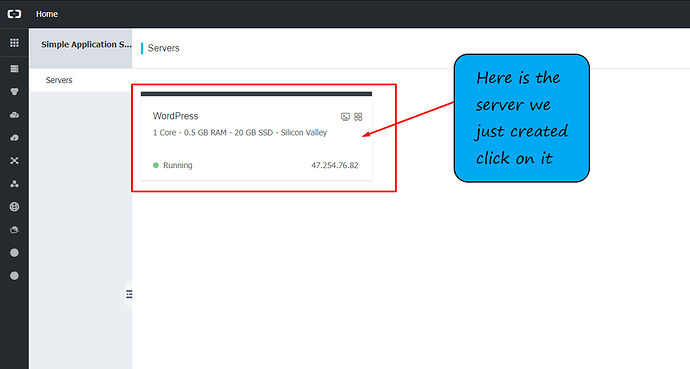
- Congrats! we are done, lick now on ‘Console’ to go back to the console, and lets click again on Products from left-hand-side menu and click on ‘Simple Application Server’ to go to the server we just created, follow the screenshots:
- We should see the server we created, click on it to go to the server control panel:
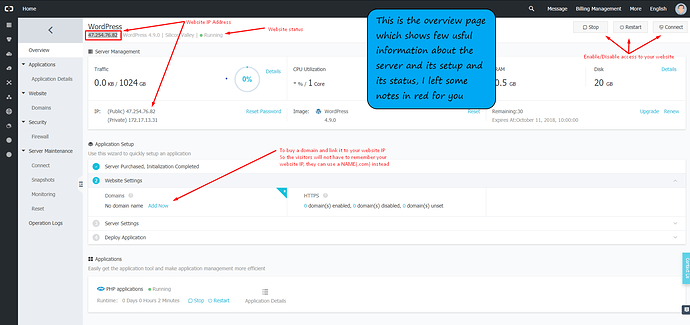
- Please read the notes in red font in the screenshot above which explain most important things in the overview page:
- IP address, copy it and but it in the address bar in the browser to view your Wordpress which is live already! see below:
We are done for this section! in the next section we will go through how to access admin page of the Wordpress.
Second Lets Login to the Wordpress admin dashboard and change the Admin password - IMPORTANT
- While we are on the server control panel page for the ‘Simple Application Server’, from left-hand-side menu click on Application Details:
→ We need to get the Wordpress admin password which is stored in a file on the server, lets first copy the command that will fetch the password for us via SSH to the server to copy it as the following:
→ Click on ‘Copy command’
→ Click on ‘Connect to server’
→ In the CMD ‘Black Screen’ paste (right click in the mouse and paste’ or Ctrl + V in the keyboard and click Enter
→ Copy the password then close the CMD
- Now, we have the admin password, the admin user is ‘admin’, therefore we can login to the Wordpress admin page by clicking on ‘Open admin portal’ from the ‘Application Details’ page as below:
- Enter the user ‘admin’, and paste the password we got from CMD and click ‘login’:
- We should now change the admin password for security:
→ Click on Users from the left-hand-side menu in the Wordpress Admin Dashboard and then click on the ‘admin’ username:
- Enter the email address then click on generate password, then put whatever password you want to use and finally click on ‘Update profile’:
Perfect! By changing the admin password we are done for this section, next section we will learn how to make the our site a bit different by changing the theme.
Third Lets Change the Wordpress home page theme - COOL
- Click on Appearance from left-hand-side menu
- Hover on a theme and click on ‘Activate’ (note: you can always download for free or buy new themes from this page by clicking on ‘Add New Theme’ next to the themes)
- Click now on the site IP Address which is on the top left of the screen next to the Wordpress logo to see your new theme:
Great! you know now how to download new themes and activate them to change your site layout. Next section we will learn more about the tools the ‘Simple Application Server’ provide to help us manage our server in a very easy way.
Last Lets visit quickly few awesome tools that Simple Application Server offer to help you manage your server
- Back to the Simple Application Server Control Panel (go to Alibabacloude then click on 'console → products → Simple Application Server → click on the existing server)
- In the following screenshots we will walk through each tool and how it can help us manage the server.
Wrap up
I hope you guys have enjoyed this and learned how to use this great cloud service, please let me know if you have any question.
Thanks!


