

Key Takeaways
- Statamic is a flat-file CMS, built in PHP, that doesn’t require a database to function. It combines static and dynamic functionality, and doesn’t require any knowledge of PHP to use. It stores content in text files, making it faster, more secure, and easier to manage.
- Statamic offers a control panel for adding and editing content, which is fully responsive, and provides a clean and easy-to-use interface. It is a viable CMS to hand off to clients, unlike some other flat-file CMS options.
- The CMS allows for version control of the entire site, as all content is based on simple text files. This eliminates many of the issues that traditional database-driven websites can present when syncing content from staging to production.
- Statamic is suitable for a wide range of website builds, including blogs and company sites. However, very large, content-heavy sites with complex relationships may be better suited to a database-driven site. The CMS is a commercial product, with a personal license costing $29 and a pro license costing $99.
A content management system (CMS) is a package of code around which you build a dynamic website—with components that change, adapt and update automatically, in contrast to a hard-coded, static site.
In this article, Gareth Redfern presents a relatively new type of CMS that’s challenging the more established database-driven model.
Statamic is a flat-file CMS that has been in the wild since 2012.
It’s built in PHP, and cleverly combines static and dynamic functionality. While some coding skills (HTML and CSS) are required to create a Statamic site, it’s very simple to work with—having its own, intuitive templating language, and not requiring any knowledge of PHP.
All you need to get going is a code editor and an FTP program to connect with your server, and you can have your own site up and running quickly.
There’s a handy 38 second video on the Statamic site that shows the CMS in action.
Statamic is a commercial product—$29 for a personal license and $99 for a pro license. That may be off-putting people used to free options like WordPress, but benefits come with this modest price—not least prompt and direct support from the development team.
Version 1 of Statamic doesn’t have a free demo, but version 2—due for beta release and built on top of Laravel—will offer this option.
Terminology
A flat-file CMS stores all your content in text files, rather than in a database—allowing you the freedom to write content directly in files using Markdown. (This is where the “static” part of the Statamic name comes from.)
Statamic is sometimes compared with static site generators such as Jekyll, which run your site through a converter that then produces HTML files for you to upload to your server. Although Statamic does have a static site generator, it requires PHP to run on your server, and is much more dynamic than the likes of Jekyll.
The Control Panel
Because Statamic is dynamic, it offers a control panel for adding and editing your content—which means it’s a viable CMS to hand off to clients, unlike Jekyll.
The control panel is fully responsive, and offers a very clean, easy-to-use interface which both clients and fellow developers love.
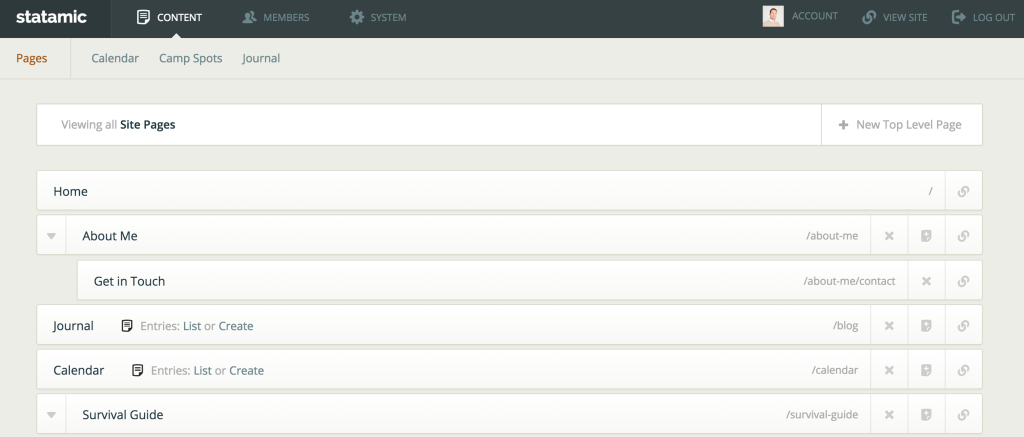 The Statamic Control Panel
Although the control panel is available, you don’t have to use it, as you can also work directly with text files and upload them as needed.
Version Control Your Complete Site
Having your whole site based on simple text files—including the content—carries the great advantage that everything can be version controlled, and even stored and edited in your favorite Git hosting service.
This removes a lot of the headaches that traditional database-driven websites can give you when it comes to keeping content in sync from staging to production.
Types of Sites That Suit Statamic
Statamic lends itself well to the majority of website builds, with some popular blogs and company sites running it as their preferred CMS.
Of course, if you have a very large, content-heavy site with complex relationships, then a database-driven site may be more appropriate—though personally, I haven’t come across a site that Statamic can’t handle yet.
Getting Started
Installing Statamic is very simple.
You can run it locally on a server environment like MAMP or WampServer. You can then transfer everything to your server as needed.
First you should run a quick server check to make sure your host meets the minimum requirements.
After running the checks, just drop your files into the root of your site and enter some basic config settings in the settings.yaml file, enable the sample.htaccess by renaming it to .htaccess, and you’re all set.
Updating is even easier: you just need to swap out two folders, _app and admin.
The Folder Structure

The standard install comes with two example themes, and content which can be used as a starting point for creating your own theme.
All your written content is stored in the _content folder. In that folder, you have two “types”: pages and entries.
Pages are for your more static content, which can still be edited via the control panel, but which tend to be single pages like an “about” page. Entries are more dynamic, being added or updated on a regular basis. Blog or news articles are a good example of this type of content.
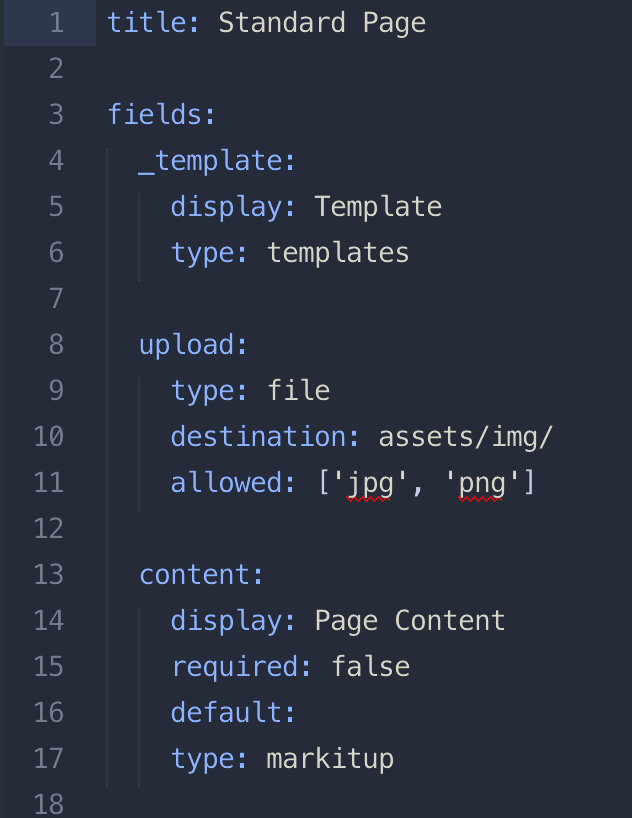
Each content page will have a YAML header—which is basically your template variables and content stored between 3 dashes.
If you haven’t heard of YAML before, it’s a very human readable language used for storing data. One important point to remember when you’re first starting is that YAML is very specific about indentation (use 2 spaces). Here’s an example of a YAML file:
Theming
The _themes folder is where you can drop your theme. Statamic is very flexible in how you build it, but by following some conventions you can create themes that are easy to swap out on a site-by-site basis.
I’ve created a simple theme on GitHub for you to refer to as an example following this convention.
Basic Anatomy of a Theme
The folder structure example can be explained as follows:
- Layouts are the main structure of your page. Here you’ll include partials and templates.
- Partials are small reusable chunks of reusable code.
- Templates are content-specific, and usually house the logic for displaying your page content.
Statamic comes with its own templating language that’s very straightforward to learn. As an example, I’ll run through how you would list your blog entries on a page, linking through to the detailed post.
Open up the _content folder and navigate to the blog folder. You should see the following structure:
 Blog Folder Contents
The articles, which all start with the date 2015-01-01 etc., will be what we’re going to list using the entries tag.
Listing Entries
Go to the default.html template in the theme’s template folder and have a look at the {{ entries:listing }} tag pair, which is wrapping the article HTML tags.
Here we’ve told the entries tag to fetch the listings from the blog folder by using the folder="blog" parameter. We’ve also set a limit of 2 articles to be listed by using the limit="2" parameter. The entries tag is a tag pair, so you’ll see that there has to be a closing tag {{ /entries:listing }} which closes the loop.
The complete listing code looks like below, and inside there are two variables used—{{ url }} and {{ title }}:
{{ entries:listing folder="blog" limit="2" }}
<article>
  <h3><a href="{{ url }}">{{ title }}</a></h3>
</article>
{{ /entries:listing }}
The first tag will render the URL to the single article, and the second tag will render the title of the article. This is the simple listings page all set up: we have two articles listed, which link through to their post pages.
Pagination
The pagination tag is used in conjunction with the {{ entries:listing }} tag to render pagination when there are more articles than you have set within the limit parameter. There are two important points when using the pagination tag.
1. Matching parameters
The folder and limit parameters must match what you’ve set on the {{ entries:listing }} tag. So, for example, the folder is set to blog on both tags, and the limit is set to 2 on both tags.
2. Setting variables
Next, we need to set the variables inside the pagination tag pair, which will render the required links depending on what page you’re on. You’ll see in the default.html template there’s a couple of conditional statements used to set the page links. If you’re unfamiliar with conditional statements, don’t worry too much about what this code is doing. Just know that it’ll render the correct links for your pagination to work.
{{ entries:pagination folder="blog" limit="2" }}
<div class="pagination">
  {{ if previous_page }}
    <a href="{{ previous_page }}">« Previous</a>
  {{ endif }}

  {{ if next_page }}
    <a href="{{ next_page }}">Next »</a>
  {{ endif }}
</div><!-- END .pagination -->
{{ /entries:pagination }}
The Post Template
We now have our main listing page rendering all our blog articles. When you click on a article listing link, you’re taken through to a post page, and by default this will use the post.html template to render the content.
Open up the post.html template in your code editor, and you’ll see that this page only has two template tags title and content. The {{ title }} tag displays the title for the post and the {{ content }} tag will render all the text in your entry file below the YAML header (three dashes at the top of your file).
How does Statamic know what content to render and which template to use? The secret is in the {{ entries:listing }} tag used in the previous template. With the URL variable set on the link in the default.html template, it dynamically links to the correct page and will always use the following required templates:
- if present:
post.html - otherwise, if present:
default.html - otherwise:
404.html.
You can override this by setting a _template: my_template variable in your YAML header, but as we haven’t, the post.html template is chosen to render the content. For more information on this, have a look at the documentation.
Community and Resources
One of the great things about Statamic is the amazing community that surrounds it. Asking a question on Twitter using the #statamic hash tag, or on the recent Slack channel, usually gets you an answer straight away.
The main support area—called the Lodge—has a wealth of searchable questions and answers. It’s also a great place to ask questions—and again, either a member of the community or one of the Statamic Gentlemen is always on hand to help you.
There are lots of other resources for learning more about building Statamic sites. There’s the add-on stash, featuring a range of add-ons for extending Statamic in all sorts of ways, and builtwithstatamic.com, a showcase of sites built on Statamic. There are also some great videos on Vimeo that show Statamic in action and explain how to do certain things with it. If you’re looking for a starter theme, check out my Statarkers Theme. And finally, you can keep up with the latest news on the Statamic blog, and keep tabs on the next version on the version 2 blog.
Wrap-up
Statamic provides a great platform for building a range of websites. Once you pick up the basics of how to put a theme together, you’ll soon fall in love with its flexibility. The control panel is simple and a joy to use for content editing, but the flexibility is such that you can keep content up to date in simple Markdown files. There’s a great flow when developing Statamic sites, as you quickly move from content modeling to content editing easily.
I hope you’ve enjoyed this introduction to Statamic. There are lots of CMSs available these days, but this one has emerged as one of the leaders in recent years, and is definitely worth considering on your next project. For many, its flat-file focus is a real winner in terms of version control, updating and ease of use.
If you have any questions, let me know in the comments. I’m keen to know if you’ve tried Statamic and how you found it.
Frequently Asked Questions about Building Database-Free Websites with Statamic CMS
What is Statamic CMS and how does it differ from other CMS platforms?
Statamic CMS is a flat-file content management system (CMS) that does not require a database to function. Unlike traditional CMS platforms like WordPress or Drupal that rely on databases to store and retrieve content, Statamic CMS stores content in files. This makes it faster, more secure, and easier to manage. It’s built on Laravel, a popular PHP framework, which provides a robust and flexible foundation for developers.
How does Statamic CMS improve website performance?
Statamic CMS improves website performance by eliminating the need for database queries. In traditional CMS platforms, every page request involves multiple database queries, which can slow down your website. With Statamic, content is stored in files and served directly, resulting in faster page load times.
Is Statamic CMS secure?
Yes, Statamic CMS is highly secure. Since it doesn’t rely on a database, it’s less vulnerable to common security threats like SQL injection attacks. Moreover, it’s built on Laravel, which has robust security features built-in, including protection against cross-site scripting (XSS), cross-site request forgery (CSRF), and more.
How easy is it to manage content with Statamic CMS?
Managing content with Statamic CMS is straightforward. It features a user-friendly control panel that makes it easy to create, edit, and manage content. Moreover, since content is stored in files, you can also manage it directly through your code editor or version control system.
Can I use Statamic CMS if I’m not a developer?
Yes, you can use Statamic CMS even if you’re not a developer. While having some knowledge of HTML and Markdown can be helpful, it’s not necessary. The control panel is intuitive and easy to use, and there are plenty of resources available to help you get started.
What kind of websites can I build with Statamic CMS?
You can build a wide variety of websites with Statamic CMS, from simple blogs and portfolios to complex e-commerce sites and web applications. Its flexibility and scalability make it suitable for projects of all sizes.
How does Statamic CMS handle data storage and retrieval?
Statamic CMS stores data in flat files in a structured format, typically Markdown or YAML. This data can be easily retrieved and displayed using Statamic’s templating system, which allows you to create dynamic, database-free websites.
Can I migrate my existing website to Statamic CMS?
Yes, you can migrate your existing website to Statamic CMS. The process will vary depending on your current platform, but there are tools and resources available to help you with the migration.
Does Statamic CMS support multi-language websites?
Yes, Statamic CMS supports multi-language websites. You can easily create and manage content in multiple languages, and the control panel is also fully translatable.
Is there a community or support available for Statamic CMS?
Yes, there is a vibrant community of developers and users who are actively contributing to the Statamic CMS ecosystem. There are also official documentation, tutorials, and a support forum available to help you get the most out of Statamic CMS.