PHPFog is a relatively new cloud hosting provider specifically designed for PHP applications. Their mission statement is “less management, more code” and the entire platform is centered around the most used and reliable PHP tools. As an example I tried to start a brand new WordPress blog on a free plan and it took just 3 minutes! Also, the process of installing and updating plugins and themes is instantaneous!
In this tutorial I’ll build a simple subcription form application using two of PHPFog supported frameworks: Slim for the PHP part and Twitter Bootstrap for the CSS part. As a bonus the app will take advantage of the new responsive features of the Bootstrap 2 framework and will be usable out of the box from desktop PCs, tablets and smartphones.
Platform key features
How PHFog is different from other providers?
Firstly, the PHPFog platform is built upon well known and reliable open source technologies. HTTP requests are first filtered by a Varnish cache proxy server, then passed through an Nginx load balancer that distributes the workload between several application servers. These servers are dedicated Linux machines running Apache with mod_php and the APC (Advanced PHP Cache) extension. The database storage is managed by MySQL using a master-slave scalable setup.
Secondly, the platform is designed for both developers and non-developers alike. During the application setup you can choose to start with a blank customizable PHP application, with one of the suggested PHP Frameworks (which include CakePHP, CodeIgniter, Zend Framework, etc) or, for non-developers, you can choose to deploy a ready application from a list that includes WordPress, Drupal, Joomla, Media Wiki and other more.
You also get free SSL if you use the .phpfogapp.com domain.
Setting up your account
Even the signup process is very fast at PHPFog, you just need to provide an email address, choose a password and you’re in. No credit card is required initially, because each account starts with a free plan that uses a shared cloud with 3 applications, 100MB of disk storage and 20MB of MySQL storage. If you decide to upgrade to a premium plan you will have a private cloud with dedicated resources (CPU, RAM, disk and database storage). Premium plans also allow you to scale the number of database and application servers used, even for one or two days, paying only for what you use, with a minimum unit of 24 hours.
The most “complicated” thing you’ll have to do during your account setup is setting your SSH keys, but PHPFog staff provides you with this step-by-step guide. And that’all, you’re in! Your account page should look like this:
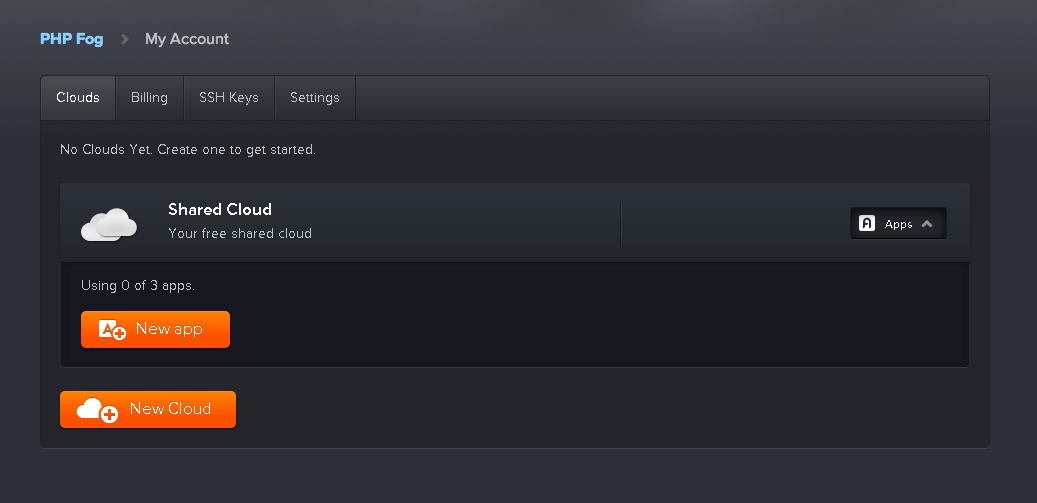
Create your application
From you account page you should see the shared cloud box. Create a new application using the “New App” button. Your screen should look similar to this:
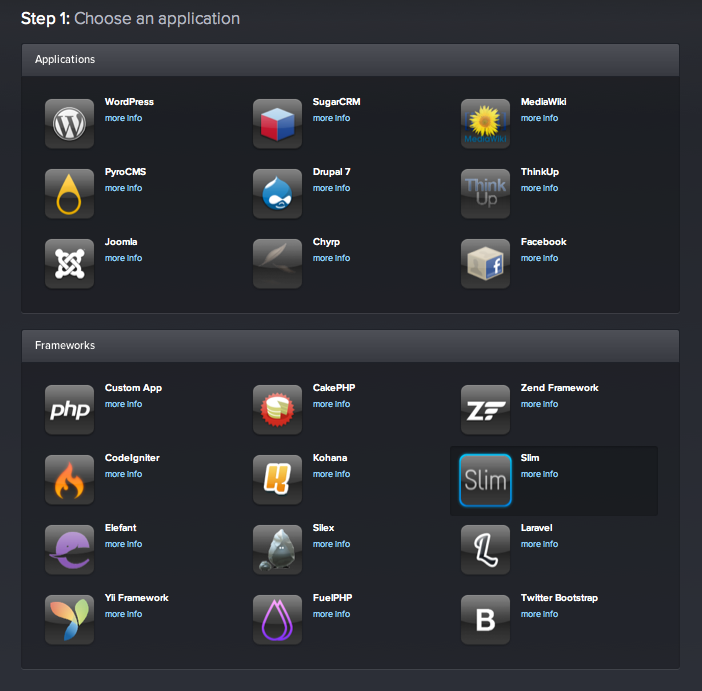
From there you can choose to deploy any of the pre-made applications (above) or a framework based application (below), where the first choice is a blank PHP app. We need to select Slim because the version of this framework provided by PHPFog includes some modifications in order to perform better, we’ll get the Bootstrap stuff later. In the next step we are prompted to choose our application details: the app domain name and MySQL password.
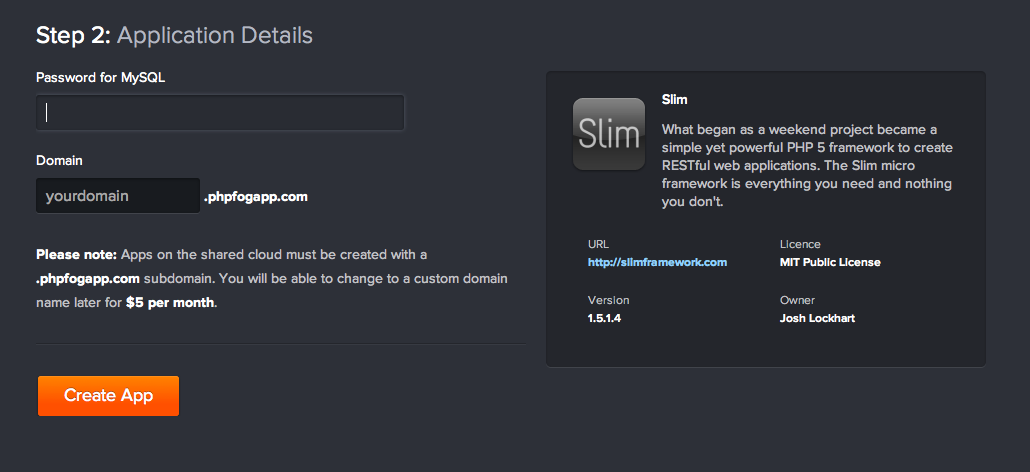
Your app will be reachable with the URL http://myappname.phpfogapp.com, I chose http://subscribers.phpfogapp.com for my application.
For the next 2 or 3 minutes the PHPFog platform will work for you, creating the environment for your app and will give you full access to the application’s console:
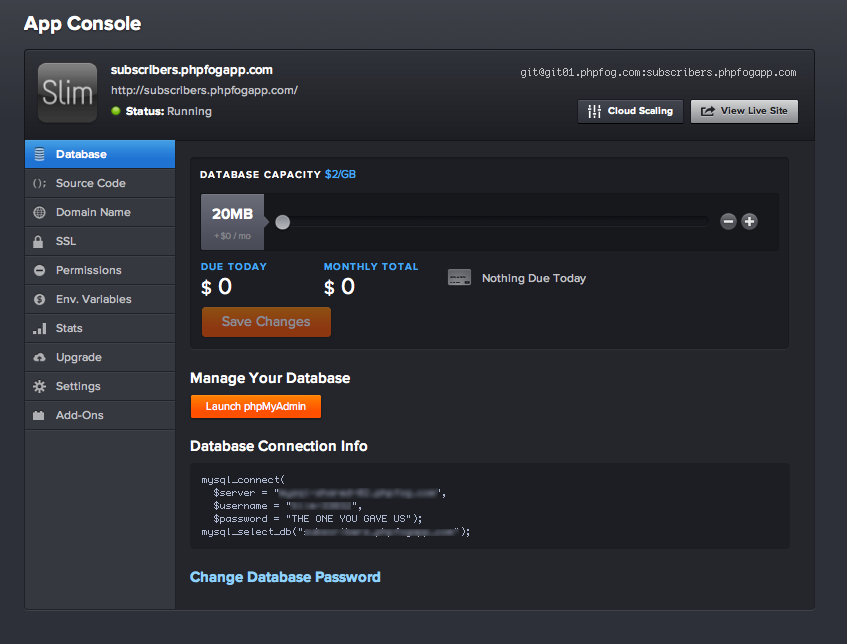
At this point you can clone the application’s repository to your local machine using your favorite Git tool:
[sourcecode]$ git clone git@git01.phpfog.com:subscribers.phpfogapp.com ./SlimSubscribers
Cloning into ‘./SlimSubscribers’…
Identity added: /Users/ragman/.ssh/id_rsa (/Users/ragman/.ssh/id_rsa)
remote: Counting objects: 82, done.
remote: Compressing objects: 100% (74/74), done.
remote: Total 82 (delta 35), reused 0 (delta 0)
Receiving objects: 100% (82/82), 75.79 KiB, done.
Resolving deltas: 100% (35/35), done.
[/sourcecode]
I simply cloned the application directory inside the DocumentRoot of my local Apache, so that my developement URL is http://localhost/SlimSubscribers/.
Build the application locally
Now you have a local copy of a Slim Framework “hello world” application. What we need in the first place is to add the other components and organize our project.
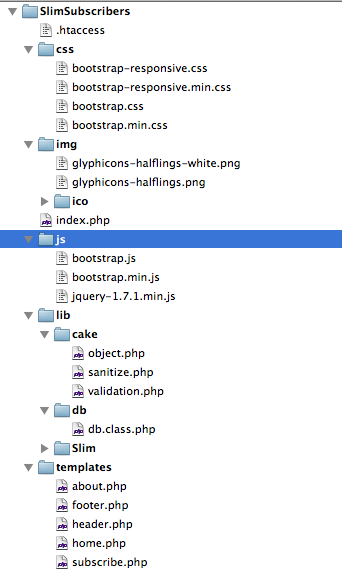
As you can see from the screenshot above, the application root contains only two files: the .htaccess which is left “as is” and the index.php file that will be our main application controller.
I’ve created a lib directory where I moved the full Slim package, then I’ve added two more libraries. The db library is a simple PHP class that wraps around PDO. The cake directory contains two classes extraced from the CakePHP framework, used here to sanitize and validate user input. Both classes are available with this article’s code package.
At this point you can download the official Twitter Bootstrap package along with the latest version of jQuery and fill the other directories with its css, js and image files.
Then create an empty database on you local MySQL server and name it slim_subscribers, and use the following query to create the subscribers table:
[sourcecode]CREATE TABLE subscribers (
id INT(11) NOT NULL AUTO_INCREMENT PRIMARY KEY,
firstname VARCHAR(128) NOT NULL,
lastname VARCHAR(128) NOT NULL,
email VARCHAR(128) NOT NULL UNIQUE,
created TIMESTAMP
);
[/sourcecode]
With all the main components in place we’ll concentrate our work on the main controller index.php and the templates directory where the frontend files will be stored. The application will have two static descriptive pages, home.php and about.php and the subscribe.php page that contains the subscription form. All these pages will include the common header and footer, which I’ve put together starting with the sample files provided by Bootstrap on its website.
This is the header:
<!DOCTYPE html>
<html lang="en">
  <head>
    <meta charset="utf-8">
    <title><?php echo (!empty($pageTitle))? $pageTitle . ' | ' : ''; ?>Slim Subscribe</title>
    <meta name="viewport" content="width=device-width, initial-scale=1.0">
    <meta name="description" content="Sample application with Slim Framework and Twitter Bootstrap">
    <meta name="author" content="Your Name">

    <!-- Le styles -->
    <link href="css/bootstrap.min.css" rel="stylesheet">
    <style>
      body {
        padding-top: 60px; /* 60px to make the container go all the way to the bottom of the topbar */
      }
    .form-actions {
        background-color: transparent;
        border: none;
    }
    </style>
    <link href="css/bootstrap-responsive.min.css" rel="stylesheet">

    <!-- Le HTML5 shim, for IE6-8 support of HTML5 elements -->
    <!--[if lt IE 9]>
      <script src="http://html5shim.googlecode.com/svn/trunk/html5.js"></script>
    <![endif]-->

    <!-- Le fav and touch icons -->
    <link rel="shortcut icon" href="https://www.sitepoint.com/wp-content/uploads/2012/04/ico/favicon.ico">
    <link rel="apple-touch-icon-precomposed" sizes="114x114" href="https://www.sitepoint.com/wp-content/uploads/2012/04/ico/apple-touch-icon-114-precomposed.png">
    <link rel="apple-touch-icon-precomposed" sizes="72x72" href="https://www.sitepoint.com/wp-content/uploads/2012/04/ico/apple-touch-icon-72-precomposed.png">
    <link rel="apple-touch-icon-precomposed" href="https://www.sitepoint.com/wp-content/uploads/2012/04/ico/apple-touch-icon-57-precomposed.png">
  </head>

  <body>

    <div class="navbar navbar-fixed-top">
      <div class="navbar-inner">
        <div class="container">
          <a class="btn btn-navbar" data-toggle="collapse" data-target=".nav-collapse">
            <span class="icon-bar"></span>
            <span class="icon-bar"></span>
            <span class="icon-bar"></span>
          </a>
          <a class="brand" href="<?php echo $baseurl ?>/">Slim Subscribe</a>
          <div class="nav-collapse">
            <ul class="nav">
              <li<?php if ('home' == $action) echo ' class="active"'; ?>><a href="<?php echo $baseurl ?>/">Home</a></li>
              <li<?php if ('subscribe' == $action) echo ' class="active"'; ?>><a href="<?php echo $baseurl ?>/subscribe">Subscribe</a></li>
              <li<?php if ('about' == $action) echo ' class="active"'; ?>><a href="<?php echo $baseurl ?>/about">About</a></li>
            </ul>
          </div><!--/.nav-collapse -->
        </div>
      </div>
    </div>

    <div class="container">
The first thing I added is a dynamic title tag, the $pageTitle variable will be passed by the controller file so we can have a different title for each page or fallback to a default one. The viewport meta tag is provided by default with this version of Bootstrap to support mobile devices and tablets. Then come the styles, first the main bootstrap.css, then some embedded customizations, and last the bootstrap-responsive.css that uses @media queries to adapt the layout for smaller screens.
Another default Bootstrap component is the HTML5 shim javascript, loaded from Google, that injects HTML5 tags support for IE 8 and older. At the end of the header section I placed the favicon and touch icon links, leaving the default Bootstrap icons found on Github.
The common body starts with a responsive Navbar component. I copied the base code from Bootstrap documentation and added the $action variables, injected by Slim controller, to trigget the link active states. The default javascript “collapse” plugin inside the bootstrap.js will take care of transforming the navigation to a dropdown for small screens.
The footer code is:
<footer>
<p>(cc) 2012 Your Name &bull; Some rights reserved.</p>
</footer>
</div> <!-- /container -->
<!-- Grab Google CDN's jQuery, with a protocol relative URL; fall back to local if offline -->
<script src="//ajax.googleapis.com/ajax/libs/jquery/1.7.1/jquery.min.js"></script>
<script>window.jQuery || document.write('<script src="js/jquery-1.7.1.min.js"></script>')</script>
<script src="js/bootstrap.min.js"></script>
</body>
</html>The footer file simply closes the application container and inserts the jQuery library and the bootstrap.js file.
We can start working on the index file now. This file processes all URLs passed by the .htaccess which don’t map to actual files on the server.
/**
 * Simple Configuration
 */
if ('localhost' == $_SERVER['SERVER_NAME']) {

    $config['app']['home'] = '/SlimSubscribers';

    $config['db'] = array(
        'host' => 'localhost',
        'user' => 'myuser',
        'pass' => 'mypass',
        'name' => 'slim_subscribers',
    );

} else {

    $config['app']['home'] = '';

    $config['db'] = array(
        'host' => 'mysql-shared-xx.phpfog.com',
        'user' => 'Slim-xxxxx',
        'pass' => 'THE ONE YOU CHOSE',
        'name' => 'yourdb_phpfogapp_com',
    );
} // end if

/**
 * Step 1: Require the Slim PHP 5 Framework
 */
require 'lib/Slim/Slim.php';

// ...add other accessory libraries
require_once 'lib/db/db.class.php';
require_once 'lib/cake/sanitize.php';
require_once 'lib/cake/validation.php';

/**
 * Step 2: Instantiate the Slim application
 */
$app = new Slim();
In the first lines I’m doing a quick config, placing the database details and the base path which will be prepended to all links. I need this bacause my local version is running in a sub path of localhost. Then the Slim framework and the other libraries are loaded and a new Slim application object in created with the default settings (see Slim docs for more info on this).
Once the $app object is created we can use it. Slim allows us to map the URLs we want to process to our custom functions, and all the unprocessed URLs are treated by default as 404 errors. The simplest mapping are the two static pages:
// Map the Home route
$app->get('/', function () use($app, $config) {

    $pageTitle = 'Welcome to Slim Subscribe';

    $action = 'home';

    $app->render('home.php', array(
        'pageTitle' => $pageTitle,
        'action' => $action,
        'baseurl' => $config['app']['home'],
        ));

});

// Map the About route
$app->get('/about', function () use($app, $config) {

    $pageTitle = 'About Slim Subscribe';

    $action = 'about';

    $app->render('about.php', array(
        'pageTitle' => $pageTitle,
        'action' => $action,
        'baseurl' => $config['app']['home'],
        ));

});
The $app->get() method takes the given URI path (/ and /about) as first parameter and maps the HTTP method GET for this URL to a function passed as a second parameter. In this example I use two anonymous functions (PHP 5.3 or above is required) to which I pass the $app and $config variables that will be seen as local in scope.
First I’m setting the current $pageTitle and $action values, then with the method $app->render() I tell the application object to load the home.php template file (first parameter) from the default templates directory and to inject the give variables using the the array provided as second parameter. The same is done for the /about URI. The home.php template file looks like:
<?php require_once 'header.php';?>
<div class="hero-unit">
<h1>Hello, world!</h1>
<p>This is a simple subscription form application built with Slim Framework, styled with Bootstrap and hosted on PHPFog.</p>
<p>
<a class="btn btn-primary btn-large" href="<?php echo $baseurl ?>/subscribe">Subscribe now</a> or
<a class="btn" rel="external" href="http://phpfog.com/">Learn more about PHPFog &raquo;</a>
</p>
</div>
<?php require_once 'footer.php'; ?>And the about.php template file is:
<?php require_once 'header.php';?>

<div class="page-header">
    <h1>About Slim Subscribe</h1>
</div>

<div class="row content">

    <div class="span12">

        <p>Slim Subscribe is a demo application written to test the PHPFog cloud platform.</p>
        <ul>
            <li>Built using <a href="http://www.slimframework.com/">Slim Framework</a></li>
            <li>Styled with <a href=">Twitter Bootstrap</a></li>
        </ul>

    </div>
</div>

<hr/>

<?php require_once 'footer.php'; ?>
Both files include the common header and footer. The home template uses a component called hero-unit, which is intended to showcase content, and some well styled buttons. The about page uses a standard page-header component and a one-column container for its content.
The /subscribe URL is the application’s core functionality, it has a structure similar to the other two pages but it also has to handle the form interface and the data posted by the user. The controller code for subcribe is:
// Map the Subscribe route
$app->map('/subscribe', function () use($app, $config) {

    $pageTitle = 'Join Slim Subscribe';

    $action = 'subscribe';

    $data = array();
    $errors = array();

    if ($app->request()->isPost()) {

        // Sanitize
        $data = $app->request()->post();
        $data = Sanitize::clean($data, array('escape' => FALSE));

        // Validate
        $valid = Validation::getInstance();

        if (!$valid->email($data['email'])) {
            $errors['email'] = 'Invalid email address';
        } // end if

        if (!$valid->notEmpty($data['firstname'])) {
            $errors['firstname'] = 'Please insert your name';
        } // end if

        if (!$valid->notEmpty($data['lastname'])) {
            $errors['lastname'] = 'Please insert your last name';
        } // end if

        // Check/Insert subscriber
        if (empty($errors)) {

            if ($db = Db::getConnection()) {

                try {

                    // First check
                    $query = "SELECT COUNT(id) AS count FROM subscribers WHERE email = :email";

                    $stmt = $db->prepare($query);
                    $stmt->bindParam(':email', $data['email'], PDO::PARAM_STR);

                    $stmt->execute();

                    $row = $stmt->fetch(PDO::FETCH_ASSOC);

                    if ((int) $row['count'] > 0) {
                        throw new PDOException("This email address is already subscribed!");
                    } // end if

                    // Then Insert
                    $query = "INSERT INTO subscribers (firstname, lastname, email) VALUES(:firstname, :lastname, :email)";

                    $stmt = $db->prepare($query);

                    $stmt->bindParam(':firstname', $data['firstname']);
                    $stmt->bindParam(':lastname',  $data['lastname']);
                    $stmt->bindParam(':email',     $data['email']);

                    $stmt->execute();
                    $app->flashNow('success', "Subscription completed successfully!");

                } catch (PDOException $e) {
                    $app->flashNow('error', "Unable to process your request: " . $e->getMessage());
                } // end try

            } else {
                $app->flashNow('error', "Unable to access access database");
            } // end if

        } // end if

    } // end if

    $app->render('subscribe.php', array(
        'pageTitle' => $pageTitle,
        'action' => $action,
        'data' => $data,
        'errors' => $errors,
        'baseurl' => $config['app']['home'],
        ));

})->via('GET', 'POST');
First of all you can notice that the method used to map the URI is different. I’m using the $app->map() method which allows to specify more than one HTTP method. In this case the GET method displays the form and the POST method deals with the submitted data. The first and last part of the function is similar to the other pages: at the beginning we set some variables and at the end they are passed to the view file. This function uses two additional variables, $errors that contains the input validation errors and $data that stores the data submitted by the user.
The method $app->request()->isPost() checks for posted data, if there is something posted it’s then copied into the $data array with $app->request()->post(). The posted data is first sanitized in order to remove invalid characters and then validated and any error found is stored into the $errors array. If there are no data validation errors the script tries to connect to the database, the $app->flashNow() method is used to store an error message into the current session. The template will have access to an associative array called $flash containing all the messages.
The database logic takes place inside the try/catch statement. First we check if the email address submitted is already registered, if so an exception is thrown. Then we try to insert the posted data into the subscribers table, the $app->flashNow() is used in both success and error cases. This lead us directly to the subscribe frontend.
<?php require_once 'header.php';?>
<div class="page-header">
<h1>Join Subscribe</h1>
</div>
<?php if (!empty($flash['error'])): ?>
<div class="alert alert-error">
<a class="close" data-dismiss="alert">×</a>
<?php echo $flash['error'] ?>
</div>
<?php endif; ?>
<?php if (!empty($flash['success'])): ?>
<div class="alert alert-success">
<?php echo $flash['success'] ?>
<a href="<?php echo $baseurl ?>/subscribe">Do it again &raquo;</a>
</div>
<?php else: ?>
<div class="row content">
<div class="span12">
<form class="form-horizontal" action="" method="post">
<div class="control-group<?php if (!empty($errors['email'])) echo ' error' ?>">
<label for="email" class="control-label">Your email address</label>
<div class="controls">
<input name="email" id="email" class="input-xlarge" type="email" placeholder="john@example.com" value="<?php echo (!empty($data['email'])) ? $data['email'] : ''; ?>">
<?php $field = 'email'; if (!empty($errors[$field])):?><span class="help-inline"><?php echo $errors[$field] ?></span><?php endif; ?>
</div>
</div>
<div class="control-group<?php if (!empty($errors['firstname'])) echo ' error' ?>">
<label for="firstname" class="control-label">Name</label>
<div class="controls">
<input name="firstname" id="firstname" class="input-xlarge" type="text" placeholder="John" value="<?php echo (!empty($data['firstname'])) ? $data['firstname'] : ''; ?>">
<?php $field = 'firstname'; if (!empty($errors[$field])):?><span class="help-inline"><?php echo $errors[$field] ?></span><?php endif; ?>
</div>
</div>
<div class="control-group<?php if (!empty($errors['lastname'])) echo ' error' ?>">
<label for="lastname" class="control-label">Last Name</label>
<div class="controls">
<input name="lastname" id="lastname" class="input-xlarge" type="text" placeholder="Smith" value="<?php echo (!empty($data['lastname'])) ? $data['lastname'] : ''; ?>">
<?php $field = 'lastname'; if (!empty($errors[$field])):?><span class="help-inline"><?php echo $errors[$field] ?></span><?php endif; ?>
</div>
</div>
<div class="form-actions">
<button class="btn btn-primary btn-large" type="submit">Subscribe</button>
</div>
</form>
</div>
</div>
<?php endif; ?>
<hr/>
<?php require_once 'footer.php'; ?>The common header and footer templates are included and a page-header component is used for the title. Just after the page title the script checks the $flash session variable for global application errors. The error message is displayed using the alert classes provided by Bootstrap. The “x” anchor is hooked automatically by the Javascript and used to close the message box.
A similar check is performed for success messages, displayed using the “alert-success” class. If we don’t have any success messages either there were some errors or there weren’t data posted, so the form is displayed. The subscription form is built using the component provided by Bootstrap. I chose the “form-horizontal” form type and each control is wrapped around a “control-group” div. For each control group I check to see if the related data triggered any validation error and if it’s the case a class of “error” is added to the group and the corresponding message is displayed near the input field.
The last line of the index.php controller file is $app->run(); and it’s responsible for executing the Slim application.
Test and deploy
We should have our application working perfectly from our localhost machine at this point. All we have to do in order to publish it is:
- create the subscribers table into our remote database using the phpMyAdmin provided by PHPFog,
- do a
git pushcommand from our favorite git interface.
Your application is up and running at http://theappname.phpfogapp.com and it’s perfectly usable from desktop machines, tablets and smartphones.
Summary
Undoubtely PHPFog is another great tool at your disposal to publish you applications quickly. Is has still some limitations, most of them due to the fact that it’s still a young platform. Nontheless reading the documentation you see that the staff behind the scenes is working really hard to fill the gaps and in the meantime they provide you with tips and tricks to work around the current limits.
Then there is the Bootstrap interface framework, that coupled with Slim or any other of your favorite PHP library, is a great starting point to build awesome user interfaces and let you concentrate on programming. In fact it took me more time to write this article than to build the sample application from scratch. :)
I hope this tutorial has boost your couriosity to explore the other platform features. Happy Coding!
 Vito Tardia
Vito Tardia (a.k.a. Ragman), is a web designer and full stack developer with 20+ years experience. He builds websites and applications in London, UK. Vito is also a skilled guitarist and music composer and enjoys writing music and jamming with local (hard) rock bands. In 2019 he started the BlueMelt instrumental guitar rock project.