
Key Takeaways
- Setting up PHP behind Nginx with FastCGI is becoming a popular alternative to the traditional method of running PHP with Apache HTTP Server using mod_php, due to its high performance and scalability.
- FastCGI is an enhanced version of CGI, reducing time/CPU-overhead by using a persistent process to execute scripts. This leads to more scalable service architectures and increased server efficiency.
- The process of configuring PHP and Nginx involves installing PHP and Nginx via Apt, configuring Nginx to proxy PHP requests to the FastCGI service, and testing the configuration. Additional steps include adjusting web root permissions and adding a try_files directive for security.
- When porting an existing PHP application previously served by Apache, it’s important to translate Apache directives to Nginx and double check the converter’s output to ensure everything is in order.
The traditional way of running PHP is with Apache HTTP Server using mod_php. In fact, mod_php was the most popular Apache module up until 2009 when that claim went to mod_ssl. But as the Internet grew and the technologies that power it evolved, other ways of serving PHP sites and applications became available. nginx, a server written to solve the C10k problem, is eating into Apache’s marketshare, and running PHP behind nginx with FastCGI is becoming an increasingly commonplace alternative.
Configuring a PHP and nginx setup is a bit more involved than the traditional Apache one, although it has become easier in the recent past with better packaging and default configurations. This article will guide you through the process of configuring PHP and nginx for serving up your own high performance website. I assume you’re working on Ubuntu Server (I’m using Ubuntu 13.04, 64-bit), and we’ll install the core applications using Apt.
FastCGI in a Nutshell
In the early days of the web, developers needed a way to run scripts on the server to generate page content and spawn other processes, and so the CGI (Common Gateway Interface) protocol was devised as a means to facilitate this.
CGI defines the environment (environment variables, request-specific variables, etc.) a script will execute in, and how data is passed between the script and the web server. For each request, CGI sets up the environment, spawns a running instance of the script and passes any incoming data to it, and captures and sends the script’s output to the server.
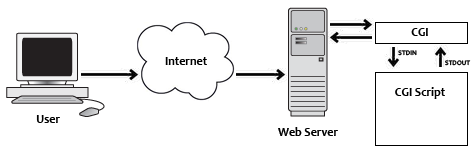
Of course, CGI has its pros and cons. On the pro side, CGI is language-independent, meaning scripts can be written in any programming language the developer is comfortable with (for example: Perl, C, bash, etc.), and each execution runs in isolation from the web server which prevents bugs in a script from potentially crashing the entire web stack. On the con side, a new process is created for each request which can be CPU-intensive and time-consuming.
FastCGI is essentially CGI with some enhancements that addresses CGI’s shortcomings. It reduces time/CPU-overhead by using a persistent process to execute scripts, and data between the web server and FastCGI is passed using sockets which encourages more-scalable service architectures (server farms and load balancing, asynchronous communication between web server and FastCGI, etc.).
For more information on FastCGI, check out the white paper on the FastCGI website, and for PHP’s implementation specifically check out the PHP manual.
Basic Installation and Configuration
To install PHP via Apt, execute the following at the command-line:
sudo apt-get install php5-cli php5-fpm
Then, to install nginx, execute:
sudo apt-get install nginx
Apt will identify the required dependencies in each case and prompt for confirmation to continue. Once granted, Apt will download and install the requested packages and their dependencies.
Ubuntu places nginx’s configuration files in /etc/nginx and its sub-directories. Shared configuration fragments are kept in that root, and specific server setups reside in sites-available with symlinks in sites-enabled to make them active.
It’s a good idea to avoid editing the original configuration files, so I suggest using copies and keeping the originals pristine. This way, you can configure nginx to your liking and not worry about your efforts being over-written by Apt during future upgrades. You also have the original default configuration to refer back to if you never need to.
Delete the symlink in sites-enabled, duplicate the default file in sites-available, and create a new symlink.
cd /etc/nginx
sudo rm sites-enabled/default
sudo cp sites-available/default sites-available/my-default
sudo ln -s /etc/nginx/sites-available/my-default sites-enabled/default
To have nginx proxy PHP requests to the FastCGI service, open the freshly duplicated configuration file and locate the section that starts with:
# pass the PHP scripts to FastCGI server listening on 127.0.0.1:9000
#
#location ~ \.php$ {
Uncomment the location line and it’s matching close brace, the fastcgi_split_path_info line, and the lines that pertain to running with php5-fpm. When you’re done, the section should look like this:
# pass the PHP scripts to FastCGI server listening on 127.0.0.1:9000
#
location ~ \.php$ {
    fastcgi_split_path_info ^(.+\.php)(/.+)$;
#   # NOTE: You should have "cgi.fix_pathinfo = 0;" in php.ini
#
#   # With php5-cgi alone:
#   fastcgi_pass 127.0.0.1:9000;
#   # With php5-fpm:
    fastcgi_pass unix:/var/run/php5-fpm.sock;
    fastcgi_index index.php;
    include fastcgi_params;
}
Save your changes, and then start nginx.
sudo service nginx start
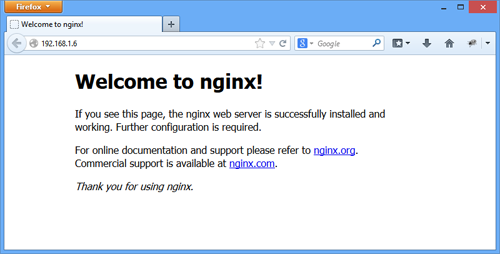
Connect to the server with your browser and you should see nginx’s welcome screen.
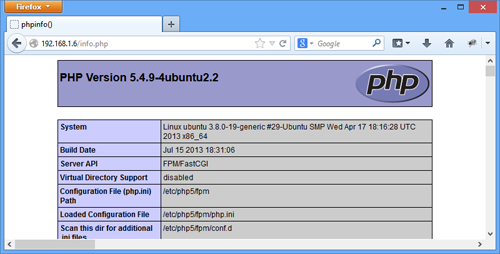
The default configuration specifies /usr/share/nginx/html as the web root. In that directory, create a file named info.php with a call to phpinfo() and then load it in your web browser to verify nginx can communicate with PHP. In the output, you should see the Server API listed as “FPM/FastCGI”.
Additional Configuration
Congratulations! You have a basic nginx and PHP install set up and serving files! But there are a few additional configuration steps that I recommend.
Web Root Permissions
A quick check of the web root’s permissions shows that it’s not writable by anyone other than root. Constant sudo-ing grows tiresome, and tinkering around as root is generally a bad idea, so I recommend executing the following:
sudo adduser <username> www-data
sudo chgrp -R www-data /usr/share/nginx/html
sudo chmod -R g+rw /usr/share/nginx/html
sudo chmod g+s /usr/share/nginx/html
adduser adds your username (replace <username> with your own login) to the www-data group, the same group that nginx runs under in the default Ubuntu install. chgrp recursively updates the html directory and its children to belong to the www-data group.
The first chmod command then grants read and write group privileges recursively to html and its children, and the second sets the SGID bit so that any files or directories created in html will take on the www-data group as its group owner. Note that the second chmod is not run recursively.
After the four commands have been run, you’ll need to reload your shell for the group association on your user account to take effect. Log out and then back in again. Once you’re in, you’ll be able to create, edit, and delete files in the web root to your heart’s content under your standard login without any escalated privileges.
Non-existent Scripts
I also recommend adding a try_files directive somewhere in the location block you uncommented earlier in the configuration, like this:
location ~ \.php$ {
    fastcgi_split_path_info ^(.+\.php)(/.+)$;
    try_files $uri $uri/ =404;
...
This protects you from a known vulnerability that results from an incorrectly configured system where nginx tries various patterns to satisfy a request. You may want to tweak the exact list of values after reading the documentation for try_files and take into consideration the needs of your application, but the above should provide a minimum level of protection.
Porting .htaccess Files
At some point you’ll want to serve an existing PHP application that was previously served by Apache, and most likely it will have some configuration details for the server either in an .htaccess file or in Apache’s static configuration files (mod_rewrite directives, for example). There are a couple online converters that “translate” Apache directives to nginx, and these are a good starting point in porting your configuration. But be careful not to rely on them entirely. As the saying goes, “Pasting code from the Internet into production is like chewing gum found in the street.” Familiarize yourself with nginx’s documentation and double check the converter’s output to make sure everything is in order.
Conclusion
The traditional way of running PHP (Apache and mod_php) is stable and mature, and for the majority of applications is an excellent platform. But the landscape is changing, and more performant solutions like nginx are gaining widespread acceptance, even eating into Apache’s market share. In this article you saw how to configure PHP to run behind nginx with FastCGI. And with your shiny new installations ready to server your own high performance website to the masses, I wish you success!
Frequently Asked Questions on Setting Up PHP Behind Nginx with FastCGI
What is the role of FastCGI in setting up PHP behind Nginx?
FastCGI is a protocol that allows a web server to communicate with scripts and programs, such as PHP. It plays a crucial role in setting up PHP behind Nginx as it helps to maintain the performance of the server. FastCGI keeps the PHP interpreter running in the background, which eliminates the overhead of starting and stopping it for every request. This results in faster response times and improved server efficiency.
How does PHP-FPM enhance the performance of PHP applications?
PHP-FPM (FastCGI Process Manager) is an alternative PHP FastCGI implementation that is highly efficient for sites with high traffic. It has several advanced features not available in the traditional PHP FastCGI, such as adaptive process spawning, which can significantly enhance the performance of PHP applications. It also allows for more granular control over resource allocation, which can help optimize server usage.
Why should I use Nginx instead of other web servers for PHP?
Nginx is known for its high performance, stability, rich feature set, simple configuration, and low resource consumption. It’s particularly effective at serving static content quickly and can handle more simultaneous connections than many other web servers. When used with PHP and FastCGI, it can deliver dynamic content with high efficiency, making it an excellent choice for PHP applications.
How can I troubleshoot issues when setting up PHP behind Nginx with FastCGI?
Troubleshooting issues when setting up PHP behind Nginx with FastCGI can involve checking several areas. First, ensure that your Nginx and PHP configurations are correct. Check the error logs for both Nginx and PHP for any error messages. If you’re experiencing performance issues, consider tuning your FastCGI and PHP-FPM settings. Remember to restart the services after making any changes to the configuration files.
What are the security considerations when setting up PHP behind Nginx with FastCGI?
When setting up PHP behind Nginx with FastCGI, it’s important to consider security. Ensure that your server is up-to-date and that you’re using the latest versions of PHP and Nginx. Configure Nginx to serve only the necessary files and directories, and restrict access to sensitive areas. Use secure permissions for your files and directories, and consider using a security module like ModSecurity with Nginx.
How can I optimize the performance of PHP behind Nginx with FastCGI?
Optimizing the performance of PHP behind Nginx with FastCGI can involve several strategies. These include tuning your FastCGI and PHP-FPM settings, optimizing your PHP code, using caching where appropriate, and ensuring your server has sufficient resources. It’s also important to monitor your server’s performance regularly to identify any potential issues.
Can I use FastCGI with other web servers besides Nginx?
Yes, FastCGI is a universal protocol and can be used with many different web servers, including Apache, Lighttpd, and Microsoft’s IIS. However, the configuration process may vary depending on the web server you’re using.
What are the benefits of using PHP-FPM with Nginx?
Using PHP-FPM with Nginx offers several benefits. PHP-FPM is a robust and feature-rich FastCGI process manager for PHP, which can significantly enhance the performance of your PHP applications. It also provides more control over resource allocation, which can help optimize server usage.
How do I configure Nginx to work with FastCGI?
Configuring Nginx to work with FastCGI involves editing the Nginx configuration file. You’ll need to specify the FastCGI parameters, including the FastCGI server and the script filename. Remember to restart Nginx after making any changes to the configuration file.
Can I use FastCGI with languages other than PHP?
Yes, FastCGI is a language-agnostic protocol and can be used with many different programming languages, including Python, Ruby, and Perl. However, the configuration process may vary depending on the language you’re using.