If you’ve ever read any beginner’s articles about Ruby on Rails, you’ll know that quite a bit of thought has been put into the code base that makes up the Rails framework. Over time, many of the internals have been rewritten, which has improved their speed and efficiency and allowed the implementation of additional features, but the original architecture remains largely unchanged.
In this article, I’ll help beginners take that next step by examining the inner workings of Rails. If you’re yet to experiment with Rails, I’d recommend you download a free preview of my new book, Simply Rails 2, from which this information is excerpted. The chapter presented here gives a surface-level tour of the Ruby on Rails framework, and prepares the reader for building a digg-clone, which we’ve named (somewhat cheekily) Shovell. If you need installation and other setup instructions, download the sample PDF, which contains chapters 1 to 4.
Three Environments
Rails encourages the use of a different environment for each of the stages in an application’s life cycle — development, testing, and production. If you’ve been developing web applications for a while, this is probably how you operate anyway; Rails just formalizes these environments.
development
In the development environment, changes to an application’s source code are immediately visible; all we need to do is reload the corresponding page in a web browser. Speed is not a critical factor in this environment. Instead, the focus is on providing the developer with as much insight as possible into the components responsible for displaying each page. When an error occurs in the development environment, we are able to tell at a glance which line of code is responsible for the error, and how that particular line was invoked. This capability is provided by the stack trace (a comprehensive list of all the method calls leading up to the error), which is displayed when an unexpected error occurs.
test
In testing, we usually refresh the database with a baseline of dummy data each time a test is repeated: this step ensures that the results of the tests are consistent, and that behavior is reproducible. Unit and functional testing procedures are fully automated in Rails.
When we test a Rails application, we don’t view it using a traditional web browser. Instead, tests are invoked from the command line, and can be run as background processes. The testing environment provides a dedicated space in which these processes can operate.
production
By the time your application finally goes live, it should be sufficiently tested that all — or at least most — of the bugs have been eliminated. As a result, updates to the code base should be infrequent, which means that the production environments can be optimized to focus on performance. Tasks such as writing extensive logs for debugging purposes should be unnecessary at this stage. Besides, if an error does occur, you don’t want to scare your visitors away with a cryptic stack trace; that’s best kept for the development environment.
As the requirements of each of the three environments are quite different, Rails stores the data for each environment in entirely separate databases. So at any given time, you might have:
- live data with which real users are interacting in the production environment
- a partial copy of this live data that you’re using to debug an error or develop new features in the development environment
- a set of testing data that’s constantly being reloaded into the testing environment
Let’s look at how we can configure our database for each of these environments.
Database Configuration
Configuring the database for a Rails application is incredibly easy. All of the critical information is contained in just one file. We’ll take a close look at this database configuration file, then create some databases for our application to use.
The Database Configuration File
The separation of environments is reflected in the Rails database configuration file database.yml. We saw a sample of this file back in Chapter 1, and in fact we created our very own configuration file in Chapter 2, when we used the rails command. Go take a look — it lives in the config subdirectory of our Shovell application.
With the comments removed, the file should look like this:
Example 4.1. 01-database.yml
development:
adapter: sqlite3
database: db/development.sqlite3
timeout: 5000
test:
adapter: sqlite3
database: db/test.sqlite3
timeout: 5000
production:
adapter: sqlite3
database: db/production.sqlite3
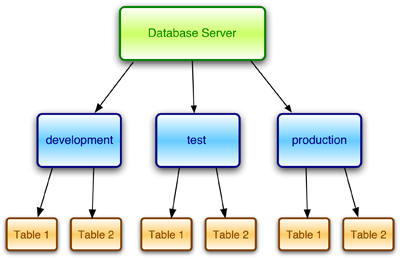
timeout: 5000This file lists the minimum amount of information we need in order to connect to the database server for each of our environments (development, test, and production). With the default setup of SQLite that we installed in Chapter 2, every environment is allocated its own physically separate database file, which calls the db subdirectory home.
The parameter database sets the name of the database that is to be used in each environment. As the configuration file suggests, Rails can support multiple databases (and even different types of database engines, such as MySQL for production and SQLite for development) in parallel. Note that we’re actually talking about different databases here, not just different tables — each database can host an arbitrary number of different tables in parallel.
Figure 1 shows a graphical representation of this architecture.
However, there’s one startling aspect missing from our current configuration: looking at the db subdirectory, the databases referenced in our configuration file don’t exist yet! Fear not, Rails will auto-create them as soon as they’re needed. There’s nothing we need to do as far as they are concerned.
The Model-View-Controller Architecture
The model-view-controller (MVC) architecture that we first encountered in Chapter 1 is not unique to Rails. In fact, it predates both Rails and the Ruby language by many years. However, Rails really takes the idea of separating an application’s data, user interface, and control logic to a whole new level.
Let’s take a look at the concepts behind building an application using the MVC architecture. Once we have the theory in place, we’ll see how it translates to our Rails code.
MVC in Theory
MVC is a pattern for the architecture of a software application. It separates an application into the following three components:
- models:
for handling data and business logic - controllers
for handling the user interface and application logic - views
for handling graphical user interface objects and presentation logic
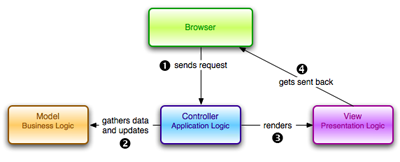
This separation results in user requests being processed as follows:
- The browser, on the client, sends a request for a page to the controller on the server.
- The controller retrieves the data it needs from the model in order to respond to the request.
- The controller hands the retrieved data to the view.
- The view is rendered and sent back to the client for the browser to display.
This process is illustrated in Figure 2.
Separating a software application into these three distinct components is a good idea for a number of reasons, including the following:
It improves scalability (the ability for an application to grow).
For example, if your application begins experiencing performance issues because database access is slow, you can upgrade the hardware running the database without other components being affected.
It makes maintenance easier.
As the components have a low dependency on each other, making changes to one (to fix bugs or change functionality) does not affect another.
It promotes reuse.
A model may be reused by multiple views, and vice versa.
If you haven’t quite got your head around the concept of MVC yet, don’t worry. For now, the important thing is to remember that your Rails application is separated into three distinct components. Jump back to Figure 2 if you need to refer to it later on.
MVC the Rails Way
Rails promotes the concept that models, views, and controllers should be kept quite separate by storing the code for each of these elements as separate files in separate directories.
This is where the Rails directory structure that we created back in Chapter 2 comes into play. The time has come for us to poke around a bit within that structure. If you take a look inside the app directory, which is depicted in Figure 3, you’ll see some folders whose names might be starting to sound familiar.
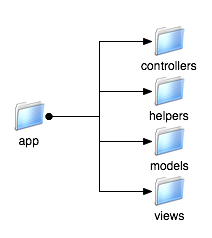
As you can see, each component of the model-view-controller architecture has its place within the app subdirectory — the models, views, and controllers subdirectories, respectively. (We’ll talk about that helpers directory in Chapter 6.)
This separation continues within the code that comprises the framework itself. The classes that form the core functionality of Rails reside within the following modules:
ActiveRecord
ActiveRecord is the module for handling business logic and database communication. It plays the role of model in our MVC architecture.
(While it might seem odd that ActiveRecord doesn’t have the word “model” in its name, there is a reason for this: Active Record is also the name of a famous design pattern — one that this component implements in order to perform its role in the MVC world. Besides, if it had been called ActionModel then it would have sounded more like an overpaid Hollywood star than a software component …)
ActionController is the component that handles browser requests and facilitates communication between the model and the view. Your controllers will inherit from this class. It forms part of the ActionPack library, a collection of Rails components that we’ll explore in depth in Chapter 5.
ActionView
ActionView is the component that handles the presentation of pages returned to the client. Views inherit from this class, which is also part of the ActionPack library.
Let’s take a closer look at each of these components in turn.
ActiveRecord (the Model)
ActiveRecord is designed to handle all of an application’s tasks that relate to the database, including:
- establishing a connection to the database server
- retrieving data from a table
- storing new data in the database
ActiveRecord also has a few other neat tricks up its sleeve. Let’s look at some of them now.
Database Abstraction
ActiveRecord ships with database adapters to connect to SQLite, MySQL, and PostgreSQL. A large number of adapters are also available for other popular database server packages, such as Oracle, DB2, and Microsoft SQL Server, via the RubyGems system.
The ActiveRecord module is based on the concept of database abstraction. As we mentioned in Chapter 1, database abstraction is a way of coding an application so that it isn’t dependent upon any one database. Code that’s specific to a particular database server is hidden safely in ActiveRecord, and invoked as needed. The result is that a Rails application is not bound to any specific database server software. Should you need to change the underlying database server at a later time, no changes to your application code should be required.
Examples of code that differs greatly between vendors, and which ActiveRecord abstracts, include:
- the process of logging into the database server
- date calculations
- handling of boolean (
true/false) data - evolution of your database structure
Before I can show you the magic of ActiveRecord in action, though, we need to do a little housekeeping.
Database Tables
Tables are the containers within a database that store our data in a structured manner, and they’re made up of rows and columns. The rows map to individual objects, and the columns map to the attributes of those objects. The collection of all the tables in a database, and the relationships between those tables, is called the database schema.
An example of a table is shown in Figure 4.
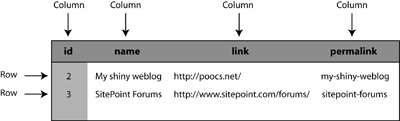
In Rails, the naming of Ruby classes and database tables follows an intuitive pattern: if we have a table called stories which consists of five rows, this table will store the data for five Story objects. The nicest thing about the mapping between classes and tables is that you don’t need to write code to achieve it — the mapping just happens, because ActiveRecord infers the name of the table from the name of the class.
Note that the name of our class in Ruby is a singular noun (Story), but the name of the table is plural (stories). This relationship makes sense if you think about it: when we refer to a Story object in Ruby, we’re dealing with a single story. But the SQL table holds a multitude of stories, so its name should be plural. While you can override these conventions — as is sometimes necessary when dealing with legacy databases — it’s much easier to adhere to them.
The close relationship between tables and objects extends even further: if our stories table were to have a link column, as our example in Figure 4 does, the data in this column would automatically be mapped to the link attribute in a Story object. And adding a new column to a table would cause an attribute of the same name to become available in all of that table’s corresponding objects.
So, let’s create some tables to hold the stories we create.
For the time being, we’ll create a table using the old-fashioned approach of entering SQL into the SQLite console. You could type out the following SQL commands, although typing out SQL isn’t much fun. Instead, I encourage you to download the following script from the code archive, and copy and paste it straight into your SQLite console that you invoked via the following command in the application directory:
$ sqlite3 db/development.sqlite3Once your SQLite console is up, paste in the following:
Example 4.2. 02-create-stories-table.sql
CREATE TABLE stories (
 "id" INTEGER PRIMARY KEY AUTOINCREMENT NOT NULL,
 "name" varchar(255) DEFAULT NULL,
 "link" varchar(255) DEFAULT NULL,
 "created_at" datetime DEFAULT NULL,
 "updated_at" datetime DEFAULT NULL
);
You needn’t worry about remembering these SQL commands to use in your own projects; instead, take heart in knowing that in Chapter 5 we’ll look at migrations. Migrations are special Ruby classes that we can write to create database tables for our application without using any SQL at all.
Using the Rails Console
Now that we have our stories table in place, let’s exit the SQLite console (simply type .quit) and open up a Rails console. A Rails console is just like the interactive Ruby console (irb) that we used in Chapter 3, but with one key difference. In a Rails console, you have access to all the environment variables and classes that are available to your application while it’s running. These are not available from within a standard irb console.
To enter a Rails console, change to your shovell folder, and enter the command ruby script/console, as shown below. The >> prompt is ready to accept your commands:
$ cd shovell
$ ruby script/console
Loading development environment (Rails 2.0.2)
>>
Saving an Object
To start using ActiveRecord, simply define a class that inherits from the ActiveRecord::Base class. (We touched on the :: operator very briefly in Chapter 3, where we mentioned that it was a way to invoke class methods on an object. It can also be used to refer to classes that exist within a module, which is what we’re doing here.) Flip back to the section on object oriented programming (OOP) in Chapter 3 if you need a refresher on inheritance.
Consider the following code snippet:
class Story < ActiveRecord::Base
end
These two lines of code define a seemingly empty class called Story. However, this class is far from empty, as we’ll soon see.
From the Rails console, let’s create this Story class, and an instance of the class called story, by entering these commands:
>> class Story < ActiveRecord::Base; end

=> nil

>> story = Story.new

=> #<Story id: nil, name: nil, url: nil, created_at: nil,

       updated_at: nil>

>> story.class

=> Story(id: integer, name: string, link: string,

       created_at: datetime, updated_at: datetime)
As you can see, the syntax for creating a new ActiveRecord object is identical to the syntax we used to create other Ruby objects in Chapter 3. At this point, we’ve created a new Story object. However, this object exists in memory only — we haven’t stored it in our database yet.
We can confirm the fact that our Story object hasn’t been saved yet by checking the return value of the new_record? method:
>> story.new_record?

=> true
Since the object has not been saved yet, it will be lost when we exit the Rails console. To save it to the database, we need to invoke the object’s save method:
>> story.save

=> true
Now that we’ve saved our object (a return value of true indicates that the save method was successful) our story is no longer a new record. It’s even been assigned a unique ID, as shown below:
>> story.new_record?

=> false

>> story.id

=> 1
Defining Relationships Between Objects
As well as the basic functionality that we’ve just seen, ActiveRecord makes the process of defining relationships (or associations) between objects as easy as it can be. Of course, it’s possible with some database servers to define such relationships entirely within the database schema. However, in order to put ActiveRecord through its paces, let’s look at the way it defines these relationships within Rails.
Object relationships can be defined in a variety of ways; the main difference between these relationships is the number of records that are specified in the relationship. The primary types of database associations are:
- one-to-one associations
- one-to-many associations
- many-to-many associations
Let’s look at some examples of each of these associations. Feel free to type them into the Rails console if you like, for the sake of practice. Remember that your class definitions won’t be saved, though — I’ll show you how to define associations in a file later.
Suppose our application has the following associations:
An Author can have one Weblog:
class Author < ActiveRecord::Base
  has_one :weblog
end
An Author can submit many Stories:
class Author < ActiveRecord::Base
  has_many :stories
end
A Story belongs to an Author:
class Story < ActiveRecord::Base
  belongs_to :author
end
A Story has, and belongs to, many different Topics:
class Story < ActiveRecord::Base
  has_and_belongs_to_many :topics
end
class Topic < ActiveRecord::Base
  has_and_belongs_to_many :stories
end
You’re no doubt growing tired of typing class definitions into a console, only to have them disappear the moment you exit the console. For this reason, we won’t go any further with the associations between our objects — we’ll delve into the Rails ActiveRecord module in more detail in Chapter 5.
The ActionPack Module
ActionPack is the name of the library that contains the view and controller parts of the MVC architecture. Unlike the ActiveRecord module, these modules are a little more intuitively named: ActionController and ActionView.
Exploring application logic and presentation logic on the command line doesn’t make a whole lot of sense; views and controllers are designed to interact with a web browser, after all! Instead, I’ll just give you a brief overview of the ActionPack components, and we’ll cover the hands-on stuff in Chapter 5.
ActionController (the Controller)
The controller handles the application logic of your program, acting as glue between the application’s data, the presentation layer, and the web browser. In this role, a controller performs a number of tasks, including:
- deciding how to handle a particular request (for example, whether to render a full page or just one part of it)
- retrieving data from the model to be passed to the view
- gathering information from a browser request, and using it to create or update data in the model
When we introduced the MVC diagram in Figure 2 earlier in this chapter, it might not have occurred to you that a Rails application can consist of a number of different controllers. Well, it can! Each controller is responsible for a specific part of the application.
For our Shovell application, we’ll create:
- one controller for displaying story links, which we’ll name StoriesController
- another controller for handling user authentication, called SessionsController
- a controller to display user pages, named UsersController
- and finally a fourth controller to handle story voting, called VotesController
All controllers will inherit from the ActionController::Base class, but they’ll have different functionality, implemented as instance methods. (There will actually be an intermediate class between this class and the ActionController::Base class; we’ll cover the creation of the StoriesController class in more detail in Chapter 5. However, this doesn’t change the fact that ActionController::Base is the base class from which every controller inherits.)
Here’s a sample class definition for the StoriesController class:
class StoriesController < ActionController::Base

  def index

  end


  def show

  end

end
This simple class definition sets up our StoriesController with two empty methods: the index method, and the show method. We’ll expand upon both of these methods in later chapters.
Each controller resides in its own Ruby file (with a .rb extension), which lives within the app/controllers directory. The StoriesController class that we just defined, for example, would inhabit the file app/controllers/stories_controller.rb.
Naming Classes and Files
You’ll have noticed by now that the names of classes and files follow different conventions:
- Class names are written in CamelCase (each word beginning with a capital letter, with no spaces between words). There are actually two variations of CamelCase: one with an uppercase first letter (also known as PascalCase), and one with a lowercase first letter. The Ruby convention for class names requires an uppercase first letter.
- Filenames are written in lowercase, with underscores separating each word.
This is an important detail! If this convention is not followed, Rails will have a hard time locating your files. Luckily, you won’t need to name your files manually very often, if ever, as you’ll see when we look at generated code in Chapter 5.
ActionView (the View)
As we discussed earlier, one of the principles of MVC is that a view should contain presentation logic only. This principle holds that the code in a view should only perform actions that relate to displaying pages in the application — none of the code in a view should perform any complicated application logic, nor should it store or retrieve any data from the database. In Rails, everything that is sent to the web browser is handled by a view.
Predictably, views are stored in the app/views folder of our application.
A view need not actually contain any Ruby code at all — it may be the case that one of your views is a simple HTML file. However, it’s more likely that your views will contain a combination of HTML and Ruby code, making the page more dynamic. The Ruby code is embedded in HTML using embedded Ruby (ERb) syntax.
ERb is similar to PHP or JSP in that it allows server-side code to be scattered throughout an HTML file by wrapping that code in special tags. For example, in PHP you may write code like this:
<strong><?php echo 'Hello World from PHP!' ?></strong>The equivalent code in ERb would be the following:
<strong><%= 'Hello World from Ruby!' %></strong>There are two forms of the ERb tag pair: one that includes the equal sign, and one that doesn’t:
<%= ... %>
This tag pair is for regular output. The output of a Ruby expression between these tags will be displayed in the browser.
<% ... %>
This tag pair is for code that is not intended to be displayed, such as calculations, loops, or variable assignments.
An example of each ERb tag is shown below:
<%= 'This line is displayed in the browser' %>

<% 'This line executes silently, without displaying any output' %>
You can place any Ruby code — be it simple or complex — between these tags.
Creating an instance of a view is a little different to that of a model or a controller. While ActionView::Base (the parent class for all views) is one of the base classes for views in Rails, the instantiation of a view is handled completely by the ActionView module. The only file a Rails developer needs to modify is the template, which is the file that contains the presentation code for the view. As you might have guessed, these templates are stored in the app/views folder.
As with everything else Rails, a strict convention applies to the naming and storage of template files:
- A template has a one-to-one mapping to the action (method) of a controller. The name of the template file matches the name of the action to which it maps.
- The folder that stores the template is named after the controller.
- The extension of the template file is twofold and varies depending on the template’s type and the actual language in which a template is written. By default there are three types of extensions in Rails:
html.erbThis is the extension for standard HTML templates that are sprinkled with ERb tags.
xml.builderThis extension is used for templates that output XML (for example, to generate RSS feeds for your application).
js.rjsThis extension is used for templates that return JavaScript instructions. This type of template might be used, for example, to modify an existing page (via Ajax) to update the contents of a
<div>tag.
This convention may sound complicated, but it’s actually quite intuitive. For example, consider the StoriesController class defined earlier. Invoking the show method for this controller would, by default, attempt to display the ActionView template that lived in the app/views/stories directory. Assuming the page was a standard HTML page (containing some ERb code), the name of this template would be show.html.erb.
Rails also comes with special templates such as layouts and partials. Layouts are templates that control the global layout of an application, such as structures that remain unchanged between pages (the primary navigation menu, for instance). Partials are special subtemplates (the result of a template being split into separate files, such as a secondary navigation menu or a form) that can be used multiple times within the application. We’ll cover both layouts and partials in Chapter 7.
Communication between controllers and views occurs via instance variables that are populated from within the controller’s action. Let’s expand upon our sample StoriesController class to illustrate this point (there’s no need to type any of this out just yet):
class StoriesController < ActionController::Base

  def index

    @variable = 'Value being passed to a view'

  end

end
As you can see, the instance variable @variable is being assigned a string value within the controller’s action. Through the magic of ActionView, this variable can now be referenced directly from the corresponding view, as shown in the code below:
<p>The instance variable @variable contains: <%= @variable %></p>This approach allows more complex computations to be performed outside the view — remember, it should only contain presentational logic — and allow the view to display just the end result of the computation.
Rails also provides access to special containers, such as the params and session hashes. These contain such information as the current page request and the user’s session. We’ll make use of these hashes in the chapters that follow.
The REST
When I introduced Rails in Chapter 1, I mentioned quite a few common development principles and best practices that the Rails team advises you to adopt in your own projects. One that I kept under my hat until now was RESTful-style development, or resource-centric development. REST will make much more sense with your fresh knowledge about models and controllers as the principal building blocks of a Rails application.
In Theory
REST stands for Representational State Transfer and originates from the doctoral dissertation of Roy Fielding, one of the co-founders of The Apache Software Foundation and one of the authors of the HTTP specification.
REST, according to the theory, is not restricted to the World Wide Web. The basis of the resource-centric approach is derived from the fact that most of the time spent using network-based applications can be characterized as a client or user interacting with distinct resources. For example, in an ecommerce application, a book and a shopping cart are separate resources with which the customer interacts.
Every resource in an application needs to be addressed by a unique and uniform identifier. In the world of web applications, the unique identifier would be the URL by which a resource can be accessed. In our Shovell application, each submitted story will be able to be viewed at a unique URL.
The potential interactions within an application are defined as a set of operations (or verbs) that can be performed with a given resource. The most common verbs are create, read, update, and delete, which are often collectively referred to as “CRUD operations.” If you relate this to our Shovell application you’ll see that it covers most of the interactions possible with the Shovell stories: a user will create a story, another user will read the story, the story can also be updated or deleted.
The client and server have to communicate via the same language (or protocol) in order to implement the REST architecture style successfully. This protocol is also required to be stateless, cacheable, and layered.
Here, stateless means that each request for information from the client to the server needs to be completely independent of prior or future requests. Each request needs to contain everything necessary for the server to understand the request and provide an appropriate answer.
Cacheable and layered are architectural attributes that improve the communication between client and server without affecting the communication protocol.
REST and the Web
As mentioned in the previous section, REST as a design pattern can be used in any application domain. But the Web is probably the domain that implements REST most often. Since this is a book that deals with building web applications, we’d better take a look at the implementation details of RESTful style development in web applications in particular.
HTTP (Hypertext Transfer Protocol: the communication protocol used on the Web), as the astute reader will know, also makes heavy use of verbs in its day-to-day operations. When your browser requests a web page from any given web server, it will issue a so-called GET-request. If you submit a web page form, your browser will do so using a POST-request (not always, to be honest, but 99% of the time).
In addition to GET and POST, HTTP defines two additional verbs that are less commonly used by web browsers. (In fact, none of the browsers in widespread use actually implement them.) These verbs are PUT and DELETE. If you compare the list of HTTP verbs with the verbs of CRUD from the previous section, they line up fairly nicely, as you can see in Table 1.
Table 1. HTTP Verbs Versus CRUD Verbs
| CRUD | HTTP |
|---|---|
| CREATE | POST |
| READ | GET |
| UPDATE | PUT |
| DELETE | DELETE |
The language in which client (the browser) and server (the web server) talk to each other is obviously HTTP. HTTP is, by definition, stateless. This means that as soon as a browser has downloaded all of the information the server offered as a reply to the browser’s request, the connection is closed and the two might never ever talk again. Or the browser could send another request just milliseconds later, asking for additional information. Each request contains all the necessary information for the server to respond appropriately, including potential cookies, the format, and the language in which the browser expects the server to reply.
HTTP is also layered and cacheable, both of which are attributes the REST definition expects of the spoken protocol. Routers, proxy servers, and firewalls are only three (very common) examples of architectural components that implement layering and caching on top of HTTP.
REST in Rails
REST and Rails not only both start with the letter R, they have a fairly deep relationship. Rails comes with a generator for resources (see the section called “Code Generation” for a primer on this topic) and provides all sorts of assistance for easy construction of the uniform addresses by which resources can be accessed.
Rails’s focus on the MVC architecture (which we’ll be getting our hands on in Chapter 5) is also a perfect companion for RESTful style development. Models resemble the resources themselves, while controllers provide access to the resource and allow interaction based on the interaction verbs listed above.
I mentioned in the previous section that two verbs aren’t implemented in the majority of browsers on the market. To support the verbs PUT and DELETE, Rails uses POST requests with a little tacked-on magic to simulate the PUT and DELETE verbs transparently for both the user and the Rails application developer. Nifty, isn’t it?
We will gradually start implementing and interacting with resources for our Shovell application over the course of the next hands-on chapters, so let’s now move on and talk about yet another batch of components that make up the Rails framework.
Code Generation
Rather than having us create all of our application code from scratch, Rails gives us the facility to generate an application’s basic structure with considerable ease. In the same way that we created our application’s entire directory structure, we can create new models, controllers, and views using a single command.
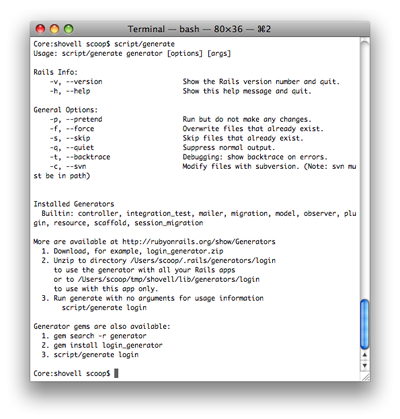
To generate code in Rails, we use the generate script, which lives in the script folder. Give it a try now: type ruby script/generate without any command parameters. Rails displays an overview of the available parameters for the command, and lists the generators from which we can choose, as Figure 5 illustrates.
Rails can generate code of varying complexity. At its simplest, creating a new controller causes a template file to be placed in the appropriate subdirectory of your application. The template itself consists of a mainly empty class definition, similar to the Story and Author classes that we looked at earlier in this chapter.
However, code generation can also be a very powerful tool for automating complex, repetitive tasks; for instance, you might generate a foundation for handling user authentication. We’ll launch straight into generating code in Chapter 5, when we begin to generate our models and controllers.
Another example is the generation of a basic web-based interface to a model, referred to as scaffolding. We’ll also look at scaffolding in Chapter 5, as we make a start on building our views.
ActionMailer
While not strictly part of the Web, email is a big part of our online experience, and Rails’s integrated support for email is worth a mention. Web applications frequently make use of email for tasks like sending sign-up confirmations to new users and resetting a user’s password.
ActionMailer is the Rails component that makes it easy to incorporate the sending and receiving of email into your application. ActionMailer is structured in a similar way to ActionPack in that it consists of controllers and actions with templates.
While the creation of emails, and the processing of incoming email, are complex tasks, ActionMailer hides these complexities and handles the tasks for you. This means that creating an outgoing email is simply a matter of supplying the subject, body, and recipients of the email using templates and a little Ruby code. Likewise, ActionMailer processes incoming email for you, providing you with a Ruby object that encapsulates the entire message in a way that’s easy to access.
Adding email functionality to a web application is beyond the scope of this book, but you can read more about ActionMailer on the Ruby on Rails wiki.
Testing and Debugging
As mentioned in Chapter 1, an automated testing framework is already built into Ruby on Rails. It also, rather helpfully, supplies a full stack trace for errors to assist with debugging.
Testing
A number of different types of testing are supported by Rails, including automated and integration testing.
Automated Testing
The concept of automated testing isn’t new to the world of traditional software development, but it’s fairly uncommon in web application development. While most Java-based web applications make use of comprehensive testing facilities, a large number of PHP and Perl web applications go live after only some manual tests have been performed (and sometimes without any testing at all!). Although performing automated tests is optional, developers may decide against this option for reasons ranging from the complexity of the task to time constraints.
We touched on this briefly in Chapter 1, but it’s worth stressing again: the fact that comprehensive automated testing is built into Rails, and is dead easy to implement, means there’s no longer a question about whether or not you should test your apps. Just do it!
The generate command that we introduced a moment ago can automatically create testing templates that you can use with your controllers, views, and models. (Note that Rails just assists you in doing your job, it’s not replacing you — yet!)
The extent to which you want to implement automated testing is up to you. It may suit your needs to wait until something breaks, then write a test that proves the problem exists. Once you’ve fixed the problem so that the test no longer fails, you’ll never again get a bug report for that particular problem.
If, on the other hand, you’d like to embrace automated testing completely, you can even write tests to ensure that a specific HTML tag exists at a precise position within a page’s hierarchy Document Object Model (DOM). Yes, automated tests can be that exact.
Integration Testing
Rails’s testing capabilities also include integration testing.
Integration testing refers to the testing of several web site components in succession — typically, the order of the components resembles the path that a user would follow when using the application. You could, for example, construct an integration test that reconstructs the actions of a user clicking on a link, registering for a user account, confirming the registration email you send, and visiting a page that’s restricted to registered users.
We’ll look at both automated testing and integration testing in more detail as we progress through the development of our application.
Debugging
When you’re fixing problems, the first step is to identify the source of the problem. Like many languages, Rails assists this process by providing the developer (that’s you!) with a full stack trace of the code. We mentioned earlier in the section called “Three Environments” that a stack trace is a list of all of the methods that were called up to the point at which an exception was raised. The list includes not only the name of each method, but also the classes those methods belong to, and the names of the files they reside within.
Using the information contained in the stack trace, you can go back to your code to determine the problem. There are several ways to tackle this, depending on the nature of the problem itself:
- If you have a rough idea of what the problem may be, and are able to isolate it to your application’s model (either a particular class or aspect of your data), your best bet is to use the Rails console that we looked at earlier in this chapter. Type
consolefrom thescriptdirectory to launch the console. Once inside, you can load the particular model that you’re interested in, and poke at it to reproduce and fix the problem. - If the problem leans more towards something related to the user’s browser or session, you can add a
debuggerstatement around the spot at which the problem occurs. With this in place, you can reload the browser and step through your application’s code using the ruby-debug tool to explore variable content or to execute Ruby statements manually.
We’ll be covering all the gory details of debugging in Chapter 11.
Summary
In this chapter, we peeled back some of the layers that comprise the Ruby on Rails framework. By now you should have a good understanding of which parts of Rails perform particular roles in the context of an MVC architecture. We also discussed how a request that’s made by a web browser is processed by a Rails application.
We looked at the different environments that Rails provides to address the different stages in the life cycle of an application, and we configured databases to support these environments. We also provided Rails with the necessary details to connect to our database.
We also had our first contact with real code, as we looked at the ActiveRecord models, ActionController controllers, and ActionView templates for our Shovell application. We explored the topics of the REST style of application architecture, code generation, testing, as well as debugging.
In the next chapter, we’ll build on all this knowledge as we use the code generation tools to create actual models, controllers, and views for our Shovell application. It’s going to be a big one!
That’s it for this excerpt of Simply Rails 2 — but don’t forget that the downloadable PDF contains three more chapters than are included here. See the complete Table of Contents for the full details of what’s covered in this book.
 Patrick Lenz
Patrick has been developing web applications for ten years. Founder and lead developer of the freshmeat.net software portal, he and his Rails consultancy and application development company, limited overload were responsible for a major relaunch of Germany's biggest infotainment community. Patrick lives in Wiesbaden, Germany. His weblog can be found at poocs.net.