In the first two parts of this introductory series on JavaScript, we explored the general elements that make up the language, and put them to some practical, if simple uses. The unfortunate reality of these examples, however, has been that they could all have been accomplished with straight HTML. Alternating table row colors can be created by hand, monthly revenue figures can be tallied in a spreadsheet and transcribed into HTML manually, and while JavaScript pop-up windows are nice in theory, they are by no means a necessity.
In this final instalment of this three-part series, we’ll put all of the concepts we’ve looked at so far to use towards a more realistic application of JavaScript: client-side form validation. In the process, we’ll explore a useful subset of the Document Object Model (DOM) related to forms and form elements, and learn about a new event handler. By the end of this article, you should have a well-rounded knowledge of the basics of JavaScript, and be prepared to apply the techniques presented here to your next Web design project, or to tackle more advanced topics such as Dynamic HTML (DHTML).
Client-Side Form Validation
A common adage among experience programmers is “always assume the user will type in nonsense.” Basically what this means is that, while your program (or Web page) might be intended to take in some reasonable user input and produce a reasonable output, you should also allow for the fact that the user input may be nothing more than random characters, and that your program should still produce reasonable output! How frustrated would you be, for instance, if every time you typed in an incorrect URL, your Web browser crashed? I think very!
Fortunately for Web programmers like you and I, most user interaction comes in the form of clicked links, and since it’s pretty difficult for someone to click a link ‘wrong,’ incorrect user input is not something we have to deal with much. Pretty much the only place where this is an issue is when we ask a user to fill in a form. For instance, if you were to create a page where users of some software product could register for technical support, you might have form fields for their name, address, phone number, email address, and other pertinent details. Instead of typing his or her name, however, a user could just as easily leave the field blank. Instead of his or her phone number, the user might type “none of your business.” And instead of a valid email address the user could type any number of things. This last value is especially problematic, because you might have an automated process that sends technical support announcements to registered users, and if an invalid email address makes it onto that list, it could interfere with the process of sending these announcements to other users who filled in the form properly!
The easiest solution to all of these problems is to check if the user has typed sensible values into the form fields before accepting the submission for processing. There are two places where this validation can happen: on the client or on the server.
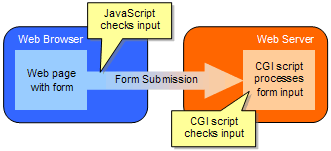
In the old days, whichever program on the Web server (e.g. a CGI Script) received and processed the form submission would first have to check the submitted data to make sure that it was valid. If it was found to be incorrect in some way, the program wouldn’t process the submission, and instead would send a Web page back to the browser that explained the problem (e.g. “Sorry. One or more required fields were not filled in.”). Since the validation occurs on the Web server in this case, this set-up is generally referred to as server-side form validation. While it has the advantages of being simple and reliable, server-side validation can be annoyingly slow, because the user must wait for the form submission to make its way to the server and for the response page to return only to discover that (say) he mistyped his phone number.
Instead, some JavaScript can be included in the Web page with the form, which instantly verifies the data entered into the form, and prevents the form submission from going forward if there is something wrong with the information to be submitted. As we’ll see, JavaScript also allows for the added flexibility of pointing out exactly where the mistake occurred by moving the user’s cursor to the problem field so that it can be fixed immediately. Since JavaScript runs on the Web browser (the client), this type of validation is called client-side form validation. It is this type of validation that will be the focus of this article.
One final note before we get into the details: since JavaScript can easily be disabled on all Web browsers in current service, and since some older Web browsers don’t even support JavaScript, client-side form validation is best used as a complement to server-side validation – not a replacement. JavaScript validation is, essentially, a ‘first line of defence’ against incorrect form submissions. If somehow an incorrect submission makes it to your server-side program, it should still be able to handle the submission gracefully.
The onSubmit Event Handler
The first step in verifying form submissions with JavaScript is to be able to respond to the user submitting a form. Fortunately, there is an event handler that makes this very easy.
<form action="blah.cgi" method="post" onSubmit="return false;">

Your name: <input type="text" name="name">

<input type="submit" name="submit" value="Go!">

</form>
Here is a form that can never be submitted! The trick is in the onSubmit attribute of the form tag. Like the onClick, onMouseOver, and onMouseOut attributes we saw in Part 2, this is a JavaScript event handler. It specifies JavaScript code to be run in response to the form being submitted. Like those other event handlers, the value returned by this event handler lets you control whether the browser handles the event itself after it has finished executing your JavaScript code. In the above example, all the event handler does is return a value of false, which instructs the browser not to proceed with submitting the form! Thus, if you ever need a form that’s “just for show”, or which will be entirely handled by JavaScript, then simply returning false from the onSubmit event handler will be enough to block form submissions on browsers that support JavaScript.
Now, the onSubmit event handler really gets interesting when the value it returns depends on some condition. Here’s an example:
<script language="JavaScript" type="text/javascript">

<!--

function confirmSubmit() {

  if (confirm("Really submit this form?")) return true;

  else return false;

}

//-->

</script>

<form action="blah.cgi" method="post"

      onSubmit="return confirmSubmit();">

Your name: <input type="text" name="username">

<input type="submit" name="submit" value="Go!">

</form>
In this example, the onSubmit event handler returns whatever value is returned by the confirmSubmit() function. confirmSubmit() uses the built-in JavaScript function confirm(), which is similar to alert() in that it displays a message box to the user. But instead of just an OK button, the message box will have OK and Cancel buttons. If the user clicks OK, confirm() returns true; if the user clicks Cancel or closes the message box, it returns false. This returned value acts as the condition in an if statement, which in turn determines whether confirmSubmit() returns true or false.
So in brief, the above example intercepts the form submission and displays a message box asking the user to confirm the submission. If the user clicks OK, the submission goes forward; otherwise, the form submission is cancelled.
In fact, since the confirm() function so conveniently returns true or false itself, we could write the above example more efficiently by using confirm() directly in the event handler:
<form action="blah.cgi" method="post"

      onSubmit="return confirm('Really submit this form?');">

Your name: <input type="text" name="username">

<input type="submit" name="submit" value="Go!">

</form>
The use of a custom function for determining whether a form submission goes forward is an important technique for form validation, however, as we’ll see in the next section. For now, you can use the above code on any form to require confirmation from the user before a submission occurs.
Required Fields
The simplest and most common form of form validation is required fields. You can indicate to the user that certain fields in the form must be filled in, and use JavaScript to prevent any submissions where those fields are empty from going through.
Here’s the basic code for a form with a single field that must be filled in before the submission will be allowed:
<script language="JavaScript" type="text/javascript">

<!--

function validateForm() {

  var name = document.myForm.username.value;

  if (name == "") {

    alert("Required field not filled in!");

    return false;

  } else return true;

}

//-->

</script>

<form action="blah.cgi" name="myForm" method="post"

      onSubmit="return validateForm();">

Your name: <input type="text" name="username"> *

<input type="submit" name="submit" value="Go!">

</form>

<p>(* indicates a required field)</p>
Once again, we are using a custom function (validateForm()) that returns either true or false to indicate whether a form submission should be allowed or not. In this case, however, the function must check if the required form field has been filled in or not. Let me explain how this function works, beginning with the first line:
var name = document.myForm.username.value;No doubt you recognize that this line creates a variable called name, but the value that it assigns to it is likely a little confusing. What this line actually does is fetch the value in the required field and store it in the new name variable. To access this value, it makes use of a series of Document Object Model (DOM) objects. document represents the HTML document itself. The dot following this indicates that we want to access something ‘inside’ or ‘belonging to’ the document – our form, in this case.
Looking at the form tag, you’ll notice that I’ve added an attribute: name="myForm". This assigns a name to our form, which the line of JavaScript above then uses to access our form (document.myForm). Having accessed the form, we can then access the required field itself in the same way (document.myForm.username).
This DOM object, which represents a text field in our form, has a number of properties and methods, as we learned in Part 2. The most important of these for our purposes is the value property, which contains the value that is currently displayed in the form field. Thus, document.myForm.username.value will yield the value that was typed into the form field.
The rest of the validateForm() function is very straightforward. It checks if this value is an empty string (which would indicate that the form field was not filled in), and if so displays a message to the user before returning false, cancelling the form submission. Otherwise, it returns true and the form submission proceeds as usual.
Multiple required fields are just as easy to implement. Here’s an example with two required fields and one optional one:
<script language="JavaScript" type="text/javascript">

<!--

function validateForm() {

  var name = document.myForm.username.value;

  var email = document.myForm.email.value;

  if (name == "") {

    alert("Please fill in your name.");

    return false;

  }

  if (email == "") {

    alert("Please fill in your email address.");

    return false;

  }

  return true;

}

//-->

</script>

<form action="blah.cgi" name="myForm" method="post"

      onSubmit="return validateForm();">

Your name: <input type="text" name="username"> *<br>

Email address: <input type="text" name="email"> *<br>

Phone Number: <input type="text" name="phone"><br>

<input type="submit" name="submit" value="Submit">

</form>

<p>(* indicates a required field)</p>
Improved Required Fields
There are a couple of improvements we can make to the code we developed above. First of all, instead of assigning a name to our form for the validateForm() function to use to access the values of its elements, we can save ourselves a little typing by sending the function a reference to the form in a parameter:
<script language="JavaScript" type="text/javascript">

<!--

function validateForm(theForm) {

  var name = theForm.username.value;

  var email = theForm.email.value;

  if (name == "") {

    alert("Please fill in your name.");

    return false;

  }

  if (email == "") {

    alert("Please fill in your email address.");

    return false;

  }

  return true;

}

//-->

</script>

<form action="blah.cgi" method="post"

      onSubmit="return validateForm(this);">

Your name: <input type="text" name="username"> *<br>

Email address: <input type="text" name="email"> *<br>

Phone Number: <input type="text" name="phone"><br>

<input type="submit" name="submit" value="Submit">

</form>

<p>(* indicates a required field)</p>
In the above, I have modified the validateForm() function to take a single parameter and store its value in the variable theForm. This variable is then used as the basis for accessing elements in the form to be validated (e.g. theForm.email.value). In the form tag’s event handler, we pass a reference to the form itself by using the keyword this as a parameter. This special variable always contains a reference to the ‘current’ object, which in the case of an onSubmit event handler is the form being submitted.
This technique of passing a reference to the form to be validated opens the door to writing more complex validation functions that can be used by more than one form. Such complex types of form validation are beyond the scope of this article, however.
Another improvement that can be made to the above code is to automatically place the text cursor into a required field that was not filled in, so that the user can simply type the value and then resubmit the form. As we have already seen, form text fields have a value property, but they also have a number of methods. One of these is the focus() method, which gives the field in question ‘focus’ (i.e. moves the text cursor to it). Here’s an updated version of the above example that uses the focus() method to assign focus to any required field that is not filled in:
<script language="JavaScript" type="text/javascript">

<!--

function validateForm(theForm) {

  var name = theForm.username.value;

  var email = theForm.email.value;

  if (name == "") {

    alert("Please fill in your name.");

    theForm.username.focus();

    return false;

  }

  if (email == "") {

    alert("Please fill in your email address.");

    theForm.email.focus();

    return false;

  }

  return true;

}

//-->

</script>

<form action="blah.cgi" method="post"

      onSubmit="return validateForm(this);">

Your name: <input type="text" name="username"> *<br>

Email address: <input type="text" name="email"> *<br>

Phone Number: <input type="text" name="phone"><br>

<input type="submit" name="submit" value="Submit">

</form>

<p>(* indicates a required field)</p>
Validating Other Form Elements
Checking that required text fields are filled in is all well and good, but there is more to your average form than a few text fields and a submit button. In this section, we’ll see ways to validate checkboxes, radio buttons, lists, and text areas.
A checkbox is created with an input tag like this:
<input type="checkbox" name="myCheckbox" value="someValue">A checkbox’s value is accessible as its value property, just like that of a text field. An additional property called checked, however, lets you determine if a given checkbox is checked. Thus, if you had a group of checkboxes (say they were named myCheckbox1, myCheckbox2, and so on) and required that at least one be checked for the form to be submitted. The JavaScript code to check this would look like this:
if (!theForm.myCheckbox1.checked && !theForm.myCheckbox2.checked &&

    !theForm.myCheckbox3.checked && !theForm.myCheckbox4.checked ) {

  alert("Please select at least one checkbox.");

  return false;

}
The && operator in the above is the logical AND operator. It lets you combine two conditions to form a single compound condition that will be true if and only if both of the basic conditions are true. We have also used !, the logical NOT operator, which makes a condition true if it is false and vice versa. Thus, the above code may be read as follows:
If
myCheckbox1 is NOT checked AND myCheckbox2 is NOT checked AND myCheckBox3 is NOT checked AND myCheckBox4 is NOT checked, then display a message and return false.
Another way of doing this is to use the logical OR operator (||) instead:
if (!(theForm.myCheckbox1.checked || theForm.myCheckbox2.checked ||

    theForm.myCheckbox3.checked || theForm.myCheckbox4.checked)) {

  alert("Please select at least one checkbox.");

  return false;

}
The logical OR operator lets you combine two conditions to form a single compound condition that will be true if any of the basic conditions are true. Note also that we’ve surrounded the condition formed with four || operators with parentheses and inverted it using the ! operator. Thus, the above code may be read as follows:
If the following is NOT true, display a message and return false:
myCheckbox1 is checked OR myCheckbox2 is checked OR myCheckbox3 is checked OR myCheckbox4 is checked.
If you think about this for a little while, you should be able to see that this paragraph is equivalent to the one above. Use whichever you prefer – they will both work.
Radio buttons are very similar to checkboxes:
<input type="radio" name="myRadio" value="someValue">The difference is that radio buttons are normally specified in groups that share the same name attribute, and only one of each group of radio buttons can be selected. You can force the user to select one of a group of radio buttons by adding the checked attribute to one of the input tags as follows:
<input type="radio" name="myRadio" value="someValue" checked>That radio button will be selected by default when the page loads, and there is no way for the user to deselect it without selecting another. Thus, in cases where it makes sense to have a default choice for the user, no validation is necessary for radio buttons.
At times, however, no default choice makes sense (e.g. two radio buttons that let the user specify if he or she is male or female), and none of your radio buttons will be selected by default. In such cases, validation can be done in a similar fashion to checkboxes, checking the checked property of each in turn to see if it has been selected. Since radio buttons in a group share the same name, however, the myForm.myRadio reference will actually be an array of the radio buttons in that group. The code to check that one is selected, then, is as follows:
if (!theForm.myRadio[0].checked && !theForm.myRadio[1].checked &&

    !theForm.myRadio[2].checked && !theForm.myRadio[3].checked ) {

  alert("Please select a radio button.");

  return false;

}
Or alternatively:
if (!(theForm.myRadio[0].checked || theForm.myRadio[1].checked ||

    theForm.myRadio[2].checked || theForm.myRadio[3].checked)) {

  alert("Please select a radio button.");

  return false;

}
Since we’re dealing with an array, a for loop can also be used:
var radioSelected = false;

for (var i=0; i<theForm.myRadio.length; i++) {

  if (theForm.myRadio[i].checked) radioSelected = true;

}

if (!radioSelected) {

  alert("Please select a radio button.");

  return false;

}
This last option may look longer at first glance, but if you’ve got many radio buttons in your group, you’ll find it can save quite a bit of typing.
Lists are created in HTML with a select tag containing a number of option tags:
<select size="1" name="myList">

  <option value="" selected>Please choose an option</option>

  <option value="1">One</option>

  <option value="2">Two</option>

  <option value="3">Three</option>

</select>
As for radio buttons, you can specify a default selection (selected), which will often relieve any need for validation to force the user to choose an option. In the case of drop-down lists, however, (where size="1" as in the above example), the first item in the list is often used (again, as in the example above) to display some sort of prompt for the user, and you want to ensure that they have chosen one of the other options.
The trick here is to notice that you can specify a value for each element in the list. By setting the value of the first item (and any other non-acceptable choices) in the list to an empty string as above, your JavaScript verification code can then check if the value of the selected item is an empty string or not! Here’s the JavaScript code involved:
if (theForm.myList[theForm.myList.selectedIndex].value == "") {

  alert("Please make a valid selection from the list.");

  return false;

}
You’ll notice that, as in the case of radio buttons, the DOM object representing the list is actually an array of the elements contained therein. To gain access to the currently selected element, you retrieve its index from the selectedIndex property of the list. Thus, if the third element in the list was selected, theForm.myList.selectedIndex would equal 2 (remember, the first item in an array has index 0). Then theForm.myList[2].value would give the value of the currently selected list item! Checking if this is "" (the empty string) lets us determine if an invalid item is currently selected.
By and large, text areas can be validated in the same way as regular text fields, which we treated at length at the beginning of this article. One question I am frequently asked, however, is how to limit the number of characters that can be entered into a text area, in order to enforce stated limitations such as “up to 255 characters”. As it turns out, this is quite easy to do. Simply retrieve the value property of the text area, which contains the string of text that has been entered, and then check its length property (which all strings have):
if (theForm.myTextArea.value.length > 255) {

  alert("You are over the limit of 255 characters! You typed " +

        theForm.myTextArea.value.length + " characters.");

  return false;

}
Note that on Windows computers, typing Enter to start a new line in a text area actually inserts two invisible characters (a carriage return and a new line), which count towards the character limit.
Summary and Further Reading
In this article I have described the basic techniques for client-side validation of form submissions with JavaScript. I showed how to enforce required fields, checkboxes, and radio buttons. I also discussed how to ensure that a valid item is selected from an HTML selection list, and how to enforce a limit on the maximum number of characters in a text area.
More complex forms of validation (e.g. checking that a valid email address or phone number were entered into a text field) are also possible using an advanced feature of JavaScript called regular expressions. If you’re interested in learning about regular expressions in JavaScript, I would suggest reading my article by the same name.
This article also concludes the JavaScript 101 series, which means that you are now equipped with an understanding of the basics of JavaScript and how it can be used on the Web. There’s still plenty to learn, however, and one of the best ways to take the next step is to have a look at the JavaScript code used on other sites to achieve the effects you’re interested in. And of course, I invite you to continue learning with us by checking out some of the other JavaScript articles on this site.
 Kevin Yank
Kevin Yank is an accomplished web developer, speaker, trainer and author of Build Your Own Database Driven Website Using PHP & MySQL and Co-Author of Simply JavaScript and Everything You Know About CSS is Wrong! Kevin loves to share his wealth of knowledge and it didn't stop at books, he's also the course instructor to 3 online courses in web development. Currently Kevin is the Director of Front End Engineering at Culture Amp.


