I don’t know about you, but I’m not a big fan of the tools that Flash provides for creating vector graphics. It’s not that the tools are no good — they’re fine; but I’m simply more comfortable using Illustrator.
So you can imagine my excitement when I was shown how to export my Illustrator graphics as SWFs that I could import and use in Flash! Then I learned that you can take Flash and import it into Director, and was accordingly ecstatic!
So, today, I’m going to share the joy! Here, I’ll illustrate how to create slick vector graphics that we’ll draw in Illustrator, build in Flash, and then import and use in Director. Let’s get started!
Mouseover
In the image below, I’ve created a rectangle in Illustrator, copied it and reversed the colours for a mouseover effect.

Now, one thing we have to do before we export our button is ‘create outlines’ on our text. We can do this in Flash with the ‘Break Apart’ function, but I always do it in Illustrator.
To do this, select the text on both buttons: click on one of the text fields, hold down the ‘Shift’ key, then click the second text field. When you’ve got your selections done, your graphic should look like this:

Excellent! Now click on the Type menu, where, a little less than half way down, you should see ‘Create Outlines’. Select this option, then zoom in on your graphics a bit (leaving them selected). They should look something like this:
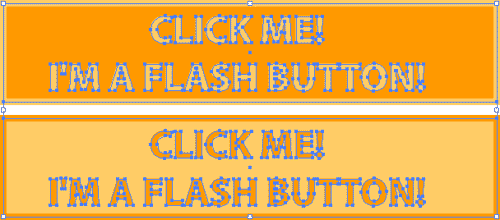
We’ve just converted your text from a text element into a graphic element. The benefit of this lies in the eventual Flash output. If the end user of your Flash file doesn’t have the specific font you used on their system, it won’t matter: the file will display the way you want it to, as the text is now a graphic, not a font.
Now we have to export our button so that we can bring it into Flash and start using it. To do this we click the File menu in Illustrator then look for ‘Export’. Once you’ve clicked that, you should see something (system, OS and settings provided) like the window below.
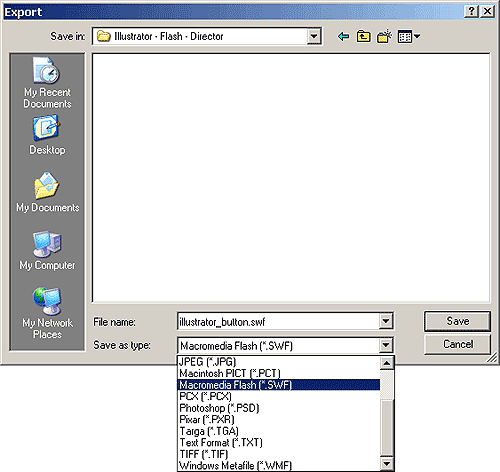
Here, Illustrator asks what format we’d like to export our vector graphic as. As you can see, there are a lot of different formats to choose from. Highlighted in dark blue is the one we want: Macromedia Flash (*.SWF). The good people at Adobe have graciously given us the ability to export right out of Illustrator and into a Flash file.
So let’s do that! Choose the area of your hard drive you want to save the file to, name it, click Macromedia Flash (*.SWF) from the drop down, and finally hit ‘Save’. You’ll end up with this:
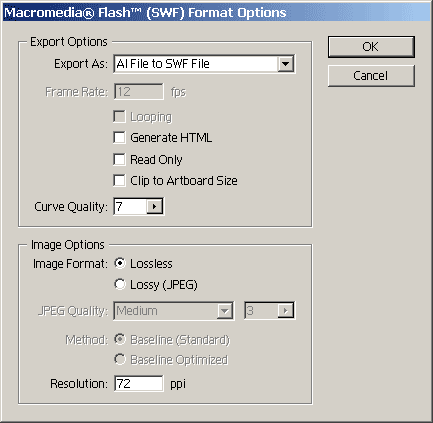
This is our SWF Format Option box. This is where we tell Illustrator how we want our Flash file to be built. Let’s start at the top.
The ‘Export As’ drop down consists of three options (AI being the Adobe Illustrator extension):
- AI File to SWF File
This option will simply export the file and do nothing fancy with it. You’ll get a single layer file that contains all the different elements of your graphic. - AI Layers to SWF Frames
This option will create a Flash file that separates your Illustrator layers (if you’ve got any) into a series of frames. Each frame will hold each individual layer’s graphic. 10 layers will get you 10 frames. - AI Layers to SWF Files
The option will also separate your layers, but instead of creating a series of frames, it generates a series of separate Flash files. So if you’ve got 10 layers and you select this option, you’ll end up with 10 Flash files.
Here’s what the drop down looks like:

Next: Frame Rate: Flash defaults for 12 Frames per Second (FPS), thus, so does Illustrator (as you can see above). This option would be useful if you chose AI Layers to SWF Frames. Why? Because, by exporting your layers as Flash frames, you are (in essence) creating a Flash animation. This option will allow you to specify the frame rate of that animation.
Next: Looping: Again, this choice is handy if you convert layers to frames.
Next: Generate HTML: This option would be appropriate if you wanted to produce an HTML file that contained all the EMBED and other necessary tags to export your Flash movie into a Webpage (the same thing as Publishing within Flash). As we’re exporting our graphics to Flash so that we can work with them in that environment, we don’t need to use this option.
Next: Read Only: Again, this is not an option we need to use. If you chose this option, you’d be unable to import the SWF into Flash to use for our button. Basically, it locks your SWF.
Next: Clip to Artboard Size: We’d choose this option if we’d overlapped the artboard a bit, for example, if we wanted our movie to be 550px X 400px, and we had an oval that overlapped those dimensions slightly. Instead of messing about shaping the oval to our artboard, we would choose this option to have Illustrator cut it off at that point.
Next: Curve Quality: This option is just like optimizing: the higher the quality, the higher the file size. I don’t think I’ve ever changed this value before, but if you’re smarter than I am, you’ll experiment and see what you can come up with.
Next: Image Options: This one option we don’t want to mess with. Why? This function creates optimized JPEGs of your vector graphics, undermining the reason why we used vector graphics in the first place.
Okay! That’s it. From here on in, it’s normal Flash authoring!
Now that we’ve got our graphics exported as a Flash movie, save the Illustrator file and close up.
Working in Flash
We now need to open up Flash, to put our graphics together into a button. We start this by doing a normal Flash, File>Import of our Illustrator-created SWF file. Once you’ve done that, your graphic will show up on the stage and, if you select it and zoom, it should look something like this:
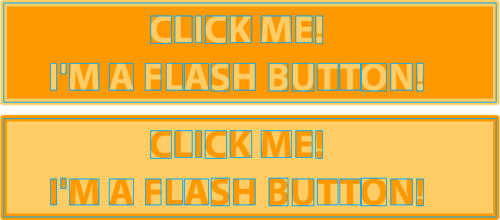
I’ve zoomed in on this to show you the text. It looks just like Flash text after the ‘Break Apart’ function has been applied, doesn’t it?
So now we have our exported button graphics sitting on the main stage. It’s time to start to build our button!
Select the top button graphic (top graphic only) and copy it by selecting Edit > Copy. Then click Insert > New Symbol. This will bring up the New Symbol Properties box. You will see a name box (that will be set to the default ‘Symbol 1’) that you can leave or rename. It’s best to give this button a name other than Symbol 1 – preferably something that you’ll remember. I used flashButton.
Now, look below the name field: you’ll find the area where you tell Flash what sort of symbol you want to create. In our case, we want to create a button symbol. By default, Flash will have it set on Movie, but you want to select Button. Once you’ve done that, click OK!
No you’ll find yourself in edit mode for your new button. Choose Edit > Paste to drop the top button graphic you copied onto the canvas. Once you’ve pasted it in, it should look something like this:
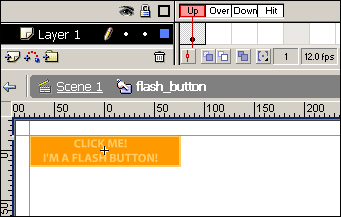
I put the guides in there to ensure that I’ll be able to line up the second button graphic once I bring it in. You can set up guides for yourself by clicking View > Rulers. Once the rulers are visible, you can drag and drop your guides onto the stage in the same way you would in Illustrator or Photoshop.
Creating the Mouseover Effect
Our next step(s) will involve creating the actual mouseover steps. We need to get our keyframes built and insert the appropriate graphics. This is where we’ll use our second button graphic. First, let’s select the entire graphic we have right no, and hit the F6 key 3 times. This will create the remaining 3 keyframes needed for the button, and place the graphic into those keyframes.
Once you’ve done that, you should have something like the screenshot below:
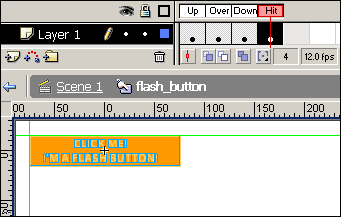
We’re going to keep this button pretty simple — we’ve come to the point where we need our second button graphic. First we have to prepare the keyframe in which it will reside. Look for the second keyframe (labeled ‘Over’) and click on it, to select the frame that we want to put our second button graphic in. As you’ll see, we’ve already got our first (top) button graphic in the keyframe. Don’t worry — that’s easy to remedy. The graphic should be selected. If it is not, select it and hit ‘Delete’ on your keyboard. Done!
You should now have a keyframe that looks like this:

Your stage is blank and the second keyframe is white, which signifies that it’s empty. This is good – it’s exactly what we want. Now, above the stage you’ll see the word “Scene 1”, with flash_button displayed to the right of it. That’s a crumb trail of our location: flash_button is bold and appears at the end, to represent the fact that we’re in that button’s editing area. This feature allows easy navigation through your Flash movie. Click the words “Scene 1”, and you’re back at the initial (main) stage of our movie, where the original button graphics are located.
Next, we need to select and copy the second (bottom) button graphic. Once that is done, we’re going to have to open the Library to find our button: hitting the F11 key will do just that. Once you’ve opened your library, you’ll see your button appear. Double click on your button (in the library window) to open up its editing area again. Viola! We’re right back to the above screenshot.
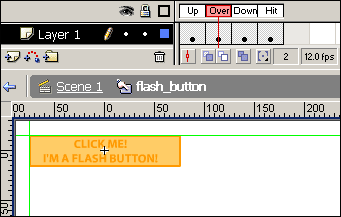
As for the first button graphic, we now need to place our second (bottom) button graphic on the stage. Select that graphic and, using your guides, place it in the proper location. It should look like this:
In Review
Our button is now complete, and ready for use! For those that are unsure of what they’ve just created, you’ve built a button symbol that will have a mouseover effect. Here’s the keyframe run down:
- Up: This is the normal (unchanged) state of the button
- Over: This is what the button will change into once the mouse is hovered over it
- Down: The graphic to be displayed when the button is clicked
- Hit: This is a very important keyframe, which tells Flash were the ‘hot-spot’ of our button is. We can make the hot spot bigger or small — or even a different shape than the button itself. We need not worry about this state for this particular example. When we first set up our keyframes, we put the first (top) button graphic in that area, hence our Hit Zone is the same size and shape as our button.
Okay… so now we need to head back to our initial (main) stage. Remember how to do that? That’s right! Click the Scene 1 link.
We still have our original graphics here and we now no longer need them. So highlight and delete them both from the stage.
Do you still have the Library open? If not, hit F11 to open it up. Now drag and drop your button onto the stage. Once you’ve done that, you can use the Align tool (Window > Align) to center the button, and Window > Properties to resize the window. I resized my window to be just slightly bigger than my button (I’ll explain why I did this in a moment). This is what I ended up with:

Cool! Now we need to export our Flash button. We can do that by clicking on File > Export Movie. Find a place where you want to save the movie, and hit ‘save’. This will bring up an options window. At this point, we don’t want to change the details here, so just hit OK.
Once the export has run its course (which should be very quick) you can save your Flash movie and shut down Flash. Then, find your exported Flash movie (SWF) and double click it. If everything went right, you should see a button that displays a mouseover effect. When you click it, though, it will do nothing, as it’s not yet linked to any action.
That is how you us Illustrator to create graphics for your Flash movies, though this was, of course, a very simple example. You very well could have made this button with the tools that the Flash drawing environment supplies, but if you’re familiar with Illustrator, this process will have been much easier.
Now it’s time to take this a step further! Let’s bring that button of ours into Director!
Importing into Director
You can import Flash into Director in the same way that you’d import any other element you’d like to use. First, start a Director movie that has the same dimensions as your Flash button: 200px X 50px.
Once you’ve done this, import the Flash button and place it on our stage. You’ll end up with this:
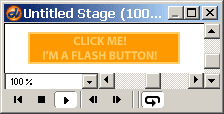
One thing I forgot to mention above was that I made my movie background black to illustrate Director’s awesome Ink feature. This is why I gave some extra space around the Flash button with a white background. We can get rid of that every easy with Director.
In the screenshot above, the flash button is not selected. Select it by clicking it. Then open the Cast Member Properties box. Once in there, change the Ink option to ‘Background Transparent’. You’ll end up with what I’ve got in the screenshot below.
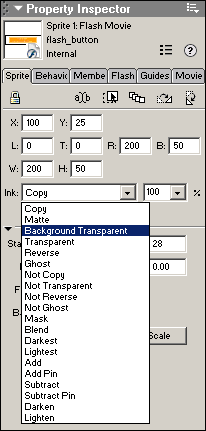
Once you set the Ink to Background Transparent, your button will look like this:
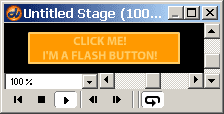
That’s all there it to it! If you publish the movie now, you’ll end up with a nice Shockwave movie that contains your Flash movie! The best thing is, you don’t have to write any Lingo, or have any other images to make the button output the mouseover!
I’ve also made a Shockwave movie where I used Photoshop PSDs to make a mouseover button in Director. I did this as I wanted to illustrate the difference is file sizes. Another very important benefit to using vector graphics is the scalability… but that is a whole other tutorial!
Download this file to see all these buttons in action!
Lawrence is freelance Web developer residing in Calgary, Alberta, Canada, who works as a Continuing Education Instructor at the Southern Alberta Institute of Technology in the New Media Production & Design program. Lawrence also works as the Technical Services Director for a successful business solutions company in Calgary.

