ASP.NET Form Processing Basics
In my first article, Getting Started with ASP.NET (which you should read first if you haven’t already), I introduced you to the Microsoft .NET platform, walked you through the installation of the .NET Framework, and showed you how to create a very basic ASP.NET Web page.
In this article, we’ll take the next step on your road to ASP.NET expertise. I’ll demonstrate with an example how ASP.NET can be used to process a simple form submission. As before, all examples will be presented both in C# and in VB.NET.
Key Takeaways
- ASP.NET forms can process submissions directly on the same page, eliminating the need for a separate page to handle the form submission, due to the use of the `IsPostBack` property which checks if the page is being loaded as a result of a form submission.
- Server-side controls like `
` and ` - Personalized interactions are simplified through server-side scripting in ASP.NET, where user input can be dynamically inserted into the webpage, as demonstrated with personalized greetings using the user’s name.
- The visibility and style of ASP.NET controls can be programmatically managed in response to form submissions, allowing for dynamic user interface adjustments such as hiding forms and emphasizing specific text.
A Personalized Greeting
Here’s the finished example (hellothere-cs.aspx) from the previous article in this series:
<%@ Page Language="C#" %>

<html>

<head>

<title>My First ASP.NET Page</title>

<script runat="server">

  protected void Page_Load(Object Source, EventArgs E)

  {

    TimeLabel.Text = DateTime.Now.ToString();

  }

</script>

</head>

<body>


<p>Hello there!</p>


<p>The time is now: <asp:label runat="server" id="TimeLabel" /></p>


</body>

</html>
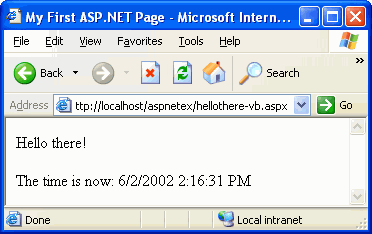
As you’ll recall, this simple page displayed the current time according to the server on which it was running:

While effective, you must admit that the greeting on this page is a little impersonal. Wouldn’t it be nice if the page greeted each user by name?

Of course, for this to happen we need to prompt each user for his or her name. To do that, we’ll need a form…
ASP.NET Server Controls
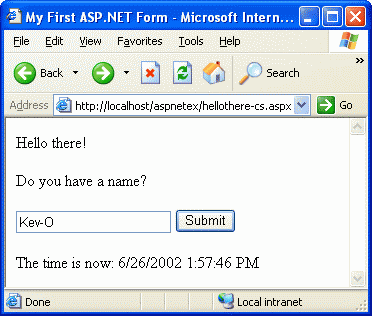
Here’s what we’d like our page to look like as it prompts the user for his or her name:

As you can see, this page contains a text field and a submit button. If you were to create this page with standard HTML, the code for the form would look something like this:
<form action="hellothere-cs.aspx">

  <p>Do you have a name?</p>

  <p><input type="text" name="NameBox" />

     <input type="submit" value="Submit" /></p>

</form>
Now, ASP.NET provides a set of special tags called Server Controls. We saw a simple sever control in the previous article in this line of code:
<p>The time is now: <asp:label runat="server" id="TimeLabel" /></p>The <asp:label> tag here is an example of an ASP.NET Server Control. Server Controls are elements of ASP.NET Web pages (or as Microsoft calls them, Web Forms) that you can access with server-side code. In this case, our Page_Load script set the text of the <asp:label> tag to show the current time.
While some simple Server Controls such as <asp:label> exist for general use, the majority of Server Controls are for use in forms. The <asp:textbox> control, for example, is one of the most commonly used controls in ASP.NET. Here’s how our form looks once it has been modified to use an <asp:textbox> Server Control:
<form runat="server" id="NameForm">

  <p>Do you have a name?</p>

  <p><asp:textbox runat="server" id="NameBox" />

     <input type="submit" value="Submit" /></p>

</form>
You’ll notice that I’ve replaced the <input type="text"> tag with an <asp:textbox> tag. The runat="server" attribute tells ASP.NET that it’s responsible for turning the tag into something that Web browsers will understand. We’ve also changed the name attribute of the <input type="text"> tag into an id attribute, since ASP.NET Server Controls expect to be identified by their id.
You’ll also notice that I’ve changed the <form> tag slightly. Any form that contains ASP.NET Server Controls must have a runat="server" attribute, because ASP.NET needs to know not only about the Server Controls but also about the forms that they belong to. I’ve also assigned an id to the form so we can refer to it elsewhere in our code if we need to. The action attribute of the <form> tag has been removed entirely; ASP.NET takes care of adding it for us when it processes the <form> tag.
Let’s concentrate on the <asp:textbox> tag for now. By setting various attributes of <asp:textbox>, it can act as a server-side substitute for the HTML <input type="text"> and <textarea> tags. So basically any time you want users to type in text, <asp:textbox> is the tag to use. In this case, it acts just like an <input type="text"> tag, except that it has all the features of an ASP.NET Server Control (most importantly for our purposes, it can be accessed conveniently from our ASP.NET code).
Let’s slot this form code into our hellothere-cs.aspx file:
<%@ Page Language="C#" %>

<html>

<head>

<title>My First ASP.NET Page</title>

<script runat="server">

  protected void Page_Load(Object Source, EventArgs E)

  {

    TimeLabel.Text = DateTime.Now.ToString();

  }

</script>

</head>

<body>


<p>Hello there!</p>


<form runat="server" id="NameForm">

  <p>Do you have a name?</p>

  <p><asp:textbox runat="server" id="NameBox" />

     <input type="submit" value="Submit" /></p>

</form>


<p>The time is now: <asp:label runat="server" id="TimeLabel" /></p>


</body>

</html>
We’ll make one more change to the HTML of this page before we move on to processing the form submission. The greeting on the page is currently produced by this simple HTML code:
<p>Hello there!</p>When the user provides a name, we want to replace the word ‘there’ with his or her name. We’ll make this possible by surrounding the word with an <asp:label> tag:
<p>Hello <asp:label runat="server" id="NameLabel">there

</asp:label>!</p>
Previously, we used a self-closing <asp:label> tag (i.e. <asp:label ... />) for the TimeLabel to create a spot in the document where we could insert the current time. In this case, we’ve surrounded a segment of text (the word ‘there’) with an <asp:label> tag to mark a piece of the document that we can change.
You can think of ‘there’ as the default text to be displayed by the <asp:label> Server Control. In fact, if you prefer using a self-closing tag, you can specify the text (‘there’) as an attribute instead:
<p>Hello <asp:label runat="server" id="NameLabel" text="there" />!</p>With our HTML code in place, let’s move on to the server-side script.
Processing a Simple Form
Form submissions in ASP.NET work a little differently than you might be used to. Rather than submitting to a different page, specified in the action attribute of the <form> tag, ASP.NET forms submit back to the same page. While you have the option of sending the browser to a different page in response to the form submission, the page with the form does need to handle the submission somehow.
Here is the code of our page so far:
<%@ Page Language="C#" %>

<html>

<head>

<title>My First ASP.NET Form</title>

<script runat="server">

  protected void Page_Load(Object Source, EventArgs E)

  {

    TimeLabel.Text = DateTime.Now.ToString();

  }

</script>

</head>

<body>


<p>Hello <asp:label runat="server" id="NameLabel">

there</asp:label>!</p>


<form runat="server" id="NameForm">

  <p>Do you have a name?</p>

  <p><asp:textbox runat="server" id="NameBox" />

     <input type="submit" value="Submit" /></p>

</form>


<p>The time is now: <asp:label runat="server" id="TimeLabel" /></p>


</body>

</html>
Right now, our server-side script (highlighted in bold above) simply sets the TimeLabel <asp:label> tag to display the current time whenever the page is loaded. We need to expand this script so that when the user submits the form, three things happen:
- The form is hidden, since it is no longer needed.
- The
NameLabel <asp:label>tag’s text is set to the name provided by the user - The user’s name is displayed in bold.
In the Page_Load script, we can find out if the page was loaded as a result of a form submission by checking the IsPostBack property of the page. You see, when a form is posted (submitted) back to the same page that contains it, it’s called a post back. ASP.NET automatically supplies a property called IsPostBack that is true when the page is being loaded as a result of a post back, and is false otherwise.
So our expanded Page_Load script will take the following form if we use C# as the ASP.NET language for the page:
<script runat="server">

  protected void Page_Load(Object Source, EventArgs E)

  {

    if (IsPostBack)

    {

      // Form processing code here ...

    }


    TimeLabel.Text = DateTime.Now.ToString();

  }

</script>
The section in bold is an if statement. The code that appears between the curly braces will only be executed if the condition between the parentheses is true. So the form processing code will only be executed if the page is loading as a result of a post back. Note that since the code for setting the text of TimeLabel is outside the if statement, it will occur every time the page is loaded – not just for post backs.
Incidentally, in C#, lines that start with // are ignored. These are called comments, and let you write little notes to remind yourself of how the code works. In these articles, I’ll use comments to help you understand the code as I have above.
If you prefer VB.NET, it has an if statement as well, though the syntax is somewhat different:
<script runat="server">

  Sub Page_Load(Source As Object, E As EventArgs)

    If IsPostBack Then

      ' Form processing code here ...

    End If


    TimeLabel.Text = DateTime.Now.ToString()

  End Sub

</script>
You’ll also note that comments in VB.NET begin with an apostrophe (‘).
Okay, so we can now write code that happens when the page is the result of a post back. As your knowledge of ASP.NET improves you’ll be able to do things like store submitted values into a database, send an email containing the values from the form, or check if the user is allowed to access your site. For now, however, let’s add the code for the three simple things we want our example to do.
First, we need to hide the form. Since we assigned the form an id of NameForm in the HTML code of the page, we can do this very easily:
NameForm.Visible = false;Next, we need to set the <asp:label> tag with id="NameLabel" to display the name submitted by the user. We already know how to set the text of an <asp:label> tag, but how do we get the name submitted by the user? Well, since the user typed the value into the <asp:textbox> with id="NameBox", the name can be accessed as NameBox.Text. So the to display the user’s name we just write:
NameLabel.Text = NameBox.Text;Finally, we want to make the user’s name appear in bold to make him or her feel more important, and to highlight just how smart our page is! To do this, we will assign a Cascading Style Sheet (CSS) attribute to the NameLabel element that displays the user’s name. Here’s how it’s done:
NameLabel.Style.Add( "font-weight", "bold" );The code for these three lines in VB.NET is actually identical to the C# versions we’ve just seen; just remove the semicolon from the end of each line.
Our finished page in C# is as follows:
<%@ Page Language="C#" %>

<html>

<head>

<title>My First ASP.NET Form</title>

<script runat="server">

  protected void Page_Load(Object Source, EventArgs E)

  {

    if (IsPostBack)

    {

      NameForm.Visible = false;

      NameLabel.Text = NameBox.Text;

      NameLabel.Style.Add( "font-weight", "bold" );

    }


    TimeLabel.Text = DateTime.Now.ToString();

  }

</script>

</head>

<body>


<p>Hello <asp:label runat="server" id="NameLabel">there

</asp:label>!</p>


<form runat="server" id="NameForm">

  <p>Do you have a name?</p>

  <p><asp:textbox runat="server" id="NameBox" />

     <input type="submit" value="Submit" /></p>

</form>


<p>The time is now: <asp:label runat="server" id="TimeLabel" /></p>


</body>

</html>
And here’s the VB.NET version:
<%@ Page Language="VB" %>

<html>

<head>

<title>My First ASP.NET Form</title>

<script runat="server">

  Sub Page_Load(Source As Object, E As EventArgs)

    If IsPostBack Then

      NameForm.Visible = false

      NameLabel.Text = NameBox.Text

      NameLabel.Style.Add( "font-weight", "bold" )

    End If


    TimeLabel.Text = DateTime.Now.ToString()

  End Sub

</script>

</head>

<body>


<p>Hello <asp:label runat="server" id="NameLabel">there

</asp:label>!</p>


<form runat="server" id="NameForm">

  <p>Do you have a name?</p>

  <p><asp:textbox runat="server" id="NameBox" />

     <input type="submit" value="Submit" /></p>

</form>


<p>The time is now: <asp:label runat="server" id="TimeLabel" /></p>


</body>

</html>
Save either of these and place it on your Web server. Load the page in your browser, and you’ll see the form as expected:

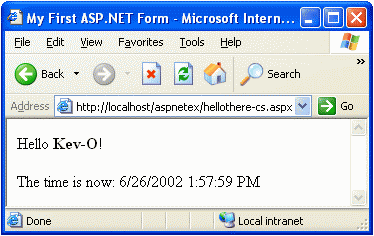
Type in your name and submit the form, and you’ll receive your personalized greeting!

Be sure to take a minute to use the View Source feature of your browser to inspect the HTML code of each version of the page. Notice how the <asp:textbox> element in the form is actually sent to the browser as an ordinary <input type="text"> tag. Also notice that the form completely disappears once the name is submitted, and observe the style attribute that is generated to make the name bold.
The one part of the code you might not understand is the hidden __VIEWSTATE field that ASP.NET adds to the form. This is actually a pretty exciting ASP.NET feature, but it takes some explaining to understand, so you’ll have to wait until a later article in this series to find out about it.
Stay Tuned…
In my next article, I’ll demystify some of the object oriented programming concepts you need to understand to take full advantage of the .NET platform, including ASP.NET. I’ll teach you about classes, objects, properties, and methods, and then explain the concept of inheritance. Finally, we’ll use this concept to create an ASP.NET page where all the C# or VB.NET code is placed in a separate file, called a Code-Behind file.
Be sure to rate this article to let me know what you think!
Frequently Asked Questions (FAQs) about .NET Form Processing Basics
What is the importance of form processing in .NET?
Form processing is a crucial aspect of .NET as it allows for the collection and management of user data. This data can be used for various purposes such as user registration, feedback collection, or even order placement in e-commerce websites. The ability to effectively process forms can greatly enhance the user experience, making your website more interactive and user-friendly.
How does .NET handle form validation?
.NET provides robust form validation capabilities. It uses validation controls to check the data entered by the user. These controls can check for required fields, compare values, check for a valid format, and more. If the entered data does not meet the validation criteria, an error message is displayed, and the form is not submitted until the errors are corrected.
What are the different types of form processing methods in .NET?
.NET primarily uses two methods for form processing – GET and POST. The GET method appends form data into the URL in name/value pairs, and is best used for small amounts of data. The POST method, on the other hand, transfers data within the body of the HTTP request, and is more secure and suitable for large amounts of data.
How can I prevent Cross-Site Scripting (XSS) attacks in .NET form processing?
.NET provides several ways to prevent XSS attacks. One of the most effective ways is by using the AntiXSS library, which encodes potentially harmful characters or strings in user input. Additionally, .NET’s built-in validation controls can also help prevent XSS attacks by ensuring that the input data meets certain criteria.
How can I handle file uploads in .NET form processing?
.NET provides the FileUpload control for handling file uploads. This control allows users to browse their file system and select files to upload. The uploaded files can then be saved to a server or database. It’s important to validate the file type and size to ensure security and performance.
How can I handle multiple form submissions in .NET?
.NET provides various ways to handle multiple form submissions. One common method is using the ViewState, which stores the state of the form across postbacks. Another method is using Session variables, which can store user data across multiple pages.
How can I handle form data in .NET?
.NET provides various controls to handle form data. These include TextBox for single-line text input, CheckBox for boolean input, DropDownList for single selection from a list, RadioButton for one choice among many, and more. These controls can be used to collect, validate, and process user input.
How can I handle errors in .NET form processing?
.NET provides robust error handling capabilities. You can use try-catch blocks to catch exceptions and handle them appropriately. Additionally, .NET’s validation controls can display error messages when the user input does not meet the validation criteria.
How can I improve the performance of .NET form processing?
There are several ways to improve the performance of .NET form processing. These include optimizing your code, using caching to reduce server load, using AJAX for partial page updates, and more. Additionally, using efficient data structures and algorithms can also greatly improve performance.
How can I secure form data in .NET?
.NET provides several ways to secure form data. These include using HTTPS for secure data transmission, encrypting sensitive data, using CAPTCHA to prevent automated submissions, and more. Additionally, always validate user input to prevent SQL injection and XSS attacks.
Kevin Yank is an accomplished web developer, speaker, trainer and author of Build Your Own Database Driven Website Using PHP & MySQL and Co-Author of Simply JavaScript and Everything You Know About CSS is Wrong! Kevin loves to share his wealth of knowledge and it didn't stop at books, he's also the course instructor to 3 online courses in web development. Currently Kevin is the Director of Front End Engineering at Culture Amp.


