

Virtual trophy cases are a great way to display your products, books, awards, and much more. Prominently showing off your firm’s (or your personal) achievements can quickly and concisely establish credibility without having to bore anyone with your resume, career history, or curriculum vitae.
Today, I’ll guide you through the process of creating a wooden trophy case in Photoshop. You’ll learn how to make an amazing wood texture and practice many handy techniques. So, let’s get started!
Resources:
Final result: (Download the completed, layered Photoshop file here.)

Step 1
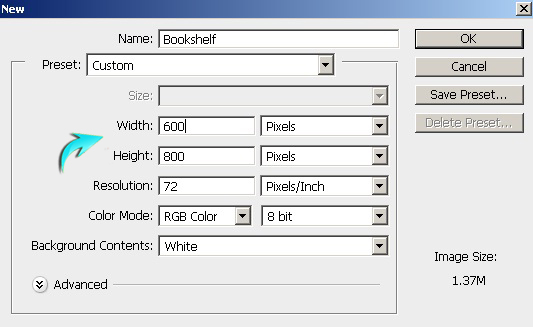
Create a new document in Photoshop with a 600px width and an 800px height.
Step 2
First of all, we’ll make a nice wood texture from scratch. Create a new layer by selecting “Layer” > “New Layer.” Fill it with any color using the paint bucket tool. Set #ab540f as your foreground and #dc8a24 as the background color. Now go to “Filter” > “Render” > “Fibers.” Use the following values.

Step 3
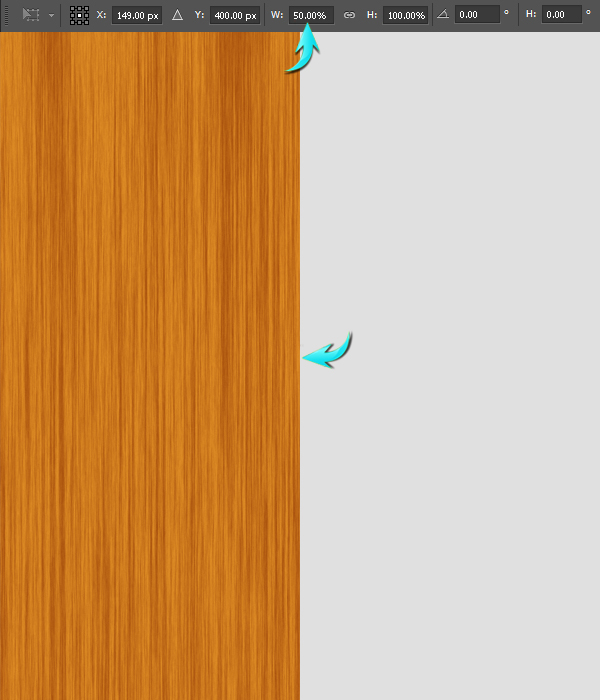
Now, press Ctrl + “T” to activate the free transform tool. Put the value of 50% for the width in the top properties bar and drag the texture towards the left half of the canvas.
Duplicate the texture layer, position it towards the right half of canvas, and flip it vertically to get a variety. To achieve this, click on the duplicated layer and go to “Edit” > “Transform” > “Flip Vertical.”
Select both texture layers, right-click on the layers and choose the option of merge layers. Label this newly-merged layer as “wood texture.”
Step 4
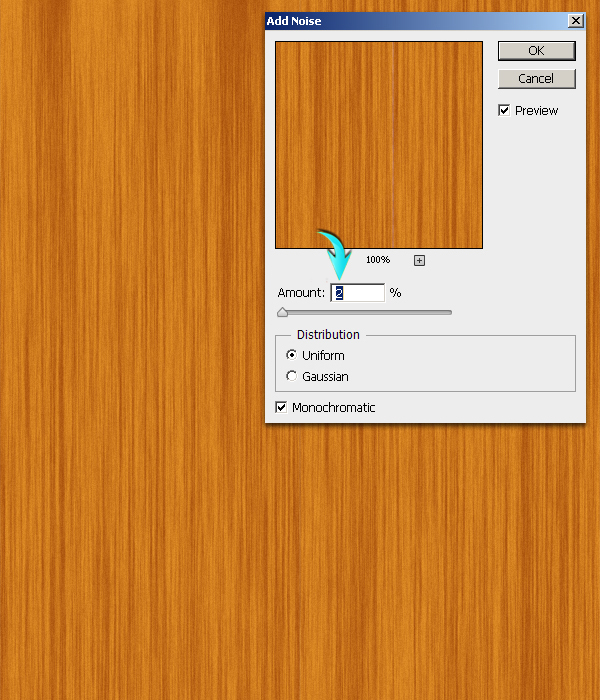
Next, to add noise to the texture, go to “Filter” > “Noise” > “Add Noise.” Use the following values here.
Step 5
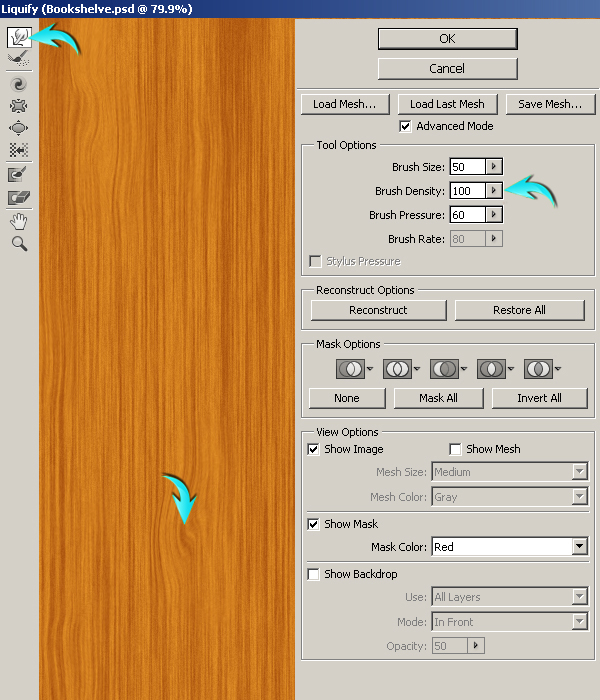
Now, go to “Filter” > “Liquify.” Use the forward warp tool with the settings shown below and apply it randomly at different spots over the texture.
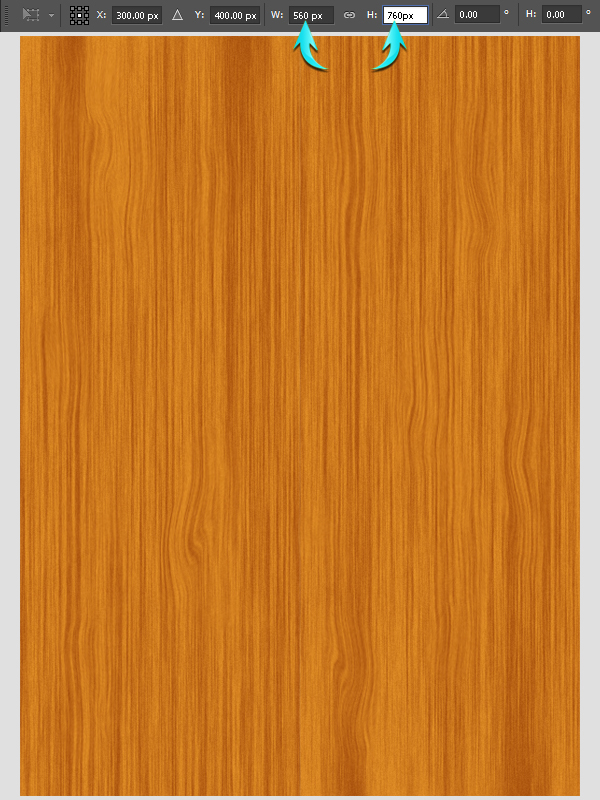
Step 6
We are done with the wood texture. Now, resize it using the free transform tool (Ctrl+ “T”), and use the values of 560px for the width and 760px for the height.
Step 7
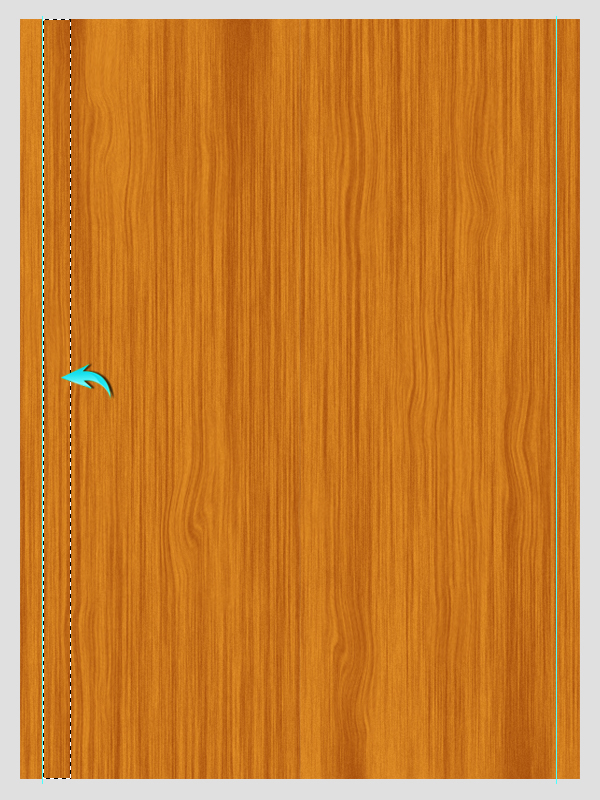
Next, we’ll make the shelf sides. First, we have to position few guides for that, press Ctrl + “R” to make the rulers visible. Select the rectangle tool to draw a rectangle like the one below. Place this rectangle over the left side of texture, drag a vertical guide, and position it beside the rectangle. Now, take the rectangle to the right side of texture and place another guide along its border.

Step 8
Next, to make the inner part of the shelf side; place the rectangle along the inner side of the guide line. Now, slightly increase the width of the rectangle.

Now, press Ctrl+ <click on the rectangle layer> to make a selection around it, click on the wood texture layer, press Ctrl + “C” to copy the selection on the texture, and paste it onto a new layer by pressing Ctrl + “V”. Label this layer as “Left Border Inside.”
Step 9
Double-click on the “Left Border Inside” layer to open the layer style window and use the following settings for color overlay.

Step 10
Next, to form its shadow press Ctrl + <click on the “Left Border Inside” layer> to make a selection around it, create a new layer below, and fill the selection with pure black color. Now press Ctrl + “D” to deselect it and go to “Filter” > “Blur” > “Gaussian Blur.” Use a value of 2px here and drag this layer a bit outward to make it visible.

Step 11
Collect the “Left Border Inside” layer and its shadow in a single group, duplicate the group, and flip it horizontally. Position it inside the right sided guide to create the opposite shelf.

Step 12
Draw a rectangle as shown below.
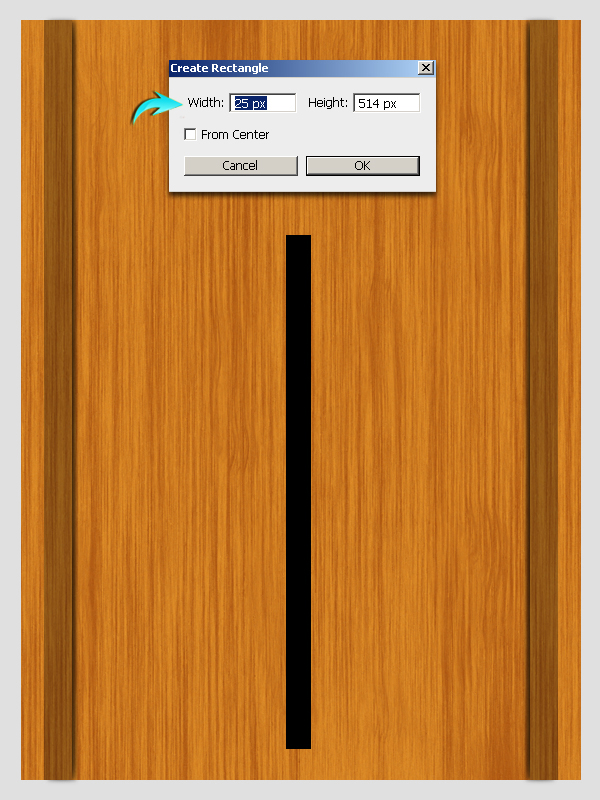
Now, press Ctrl + <click on the rectangle layer>. Now, click on the wooden texture, press Ctrl + “C” to copy, and press Ctrl + “V” to paste the selected texture onto a new layer. After that, go to “Edit” > “Transform” > “Rotate 90⁰CW.” Position it at the bottom of the texture as shown below. Label this layer as “Shelf front.” Then, hide or delete the rectangle.
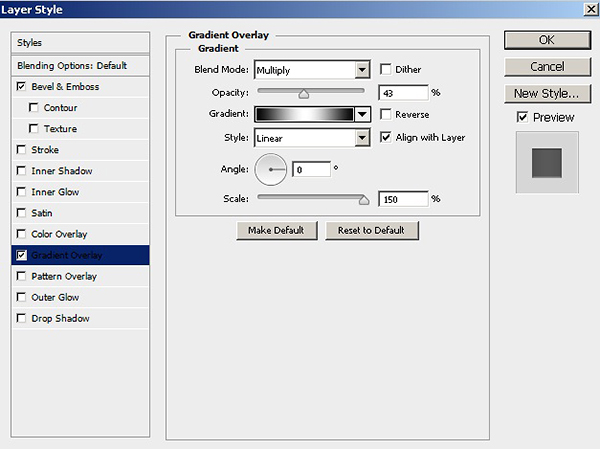
Step 13
Apply the following gradient overlay settings on the “Shelf front” layer.

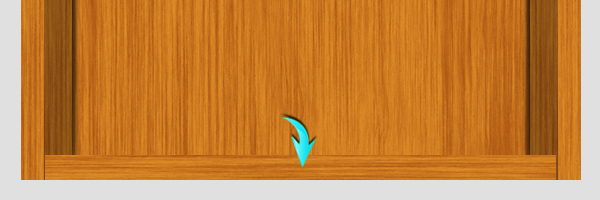
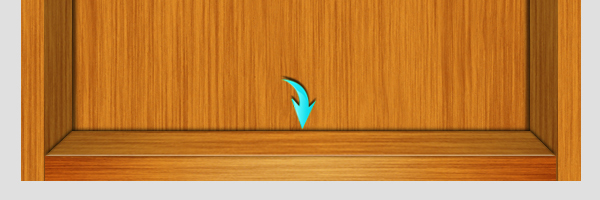
Step 14
Duplicate the “Shelf front” layer, label it as “Shelf top,” position it at the top of the original layer, and go to “Edit” > “Transform” > “Distort.” Use this tool to bring its corner inside as shown below.
Step 15
Apply the following layer style settings on the “Shelf top” layer.


Step 16
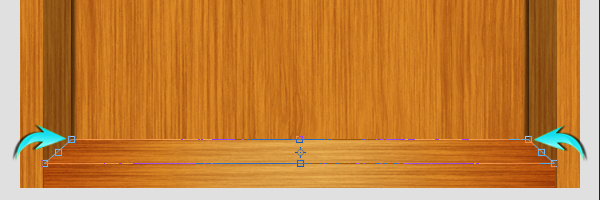
Make the shadow of “Shelf top” layer in the same way as explained in step 10.
Collect all of the layers forming the bottom shelf into a single group and label it as “Bottom shelf.”
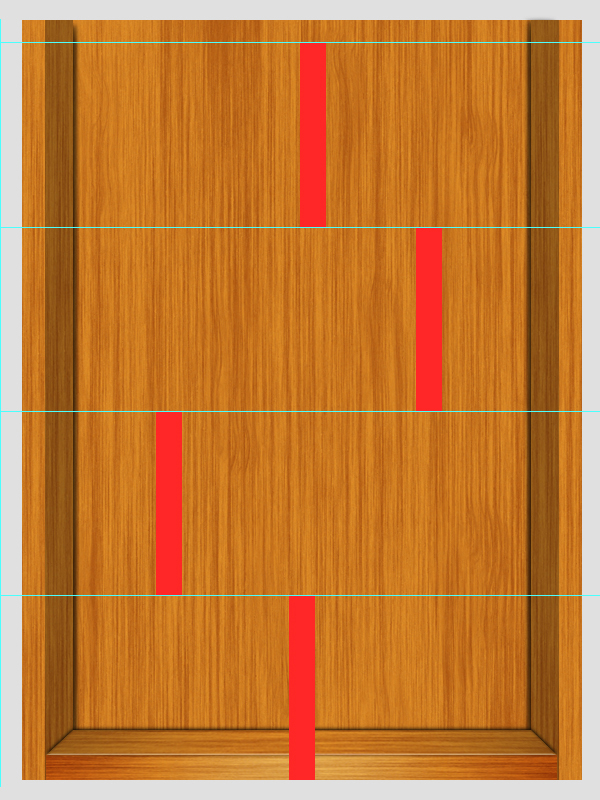
Step 17
Now, we’ll use some more guides to define the position of middle shelves. Draw a rectangle as shown below.

Drag the guides to form even horizontal shelves, as shown below.
Step 18
Duplicate the “Bottom shelf” layer and position it as shown below.

To make its shadow, draw a rectangle as below and apply a 7px Gaussian Blur filter.

Step 19
Now, use the polygonal lasso tool to select a triangular area on the shadow layer.
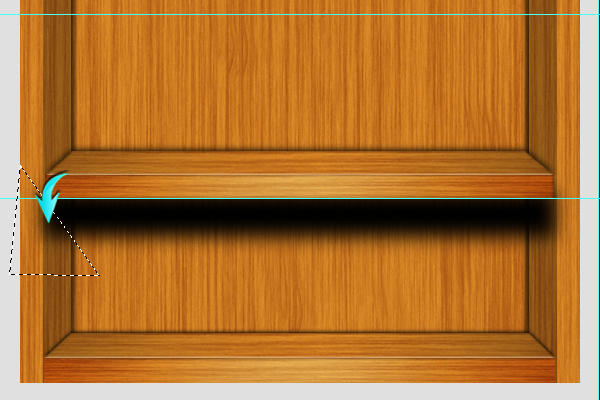
After that, go to “Edit” > “Clear.” Do the same for the right side of shadow and reduce the opacity of the shadow layer to 50%.
Step 20
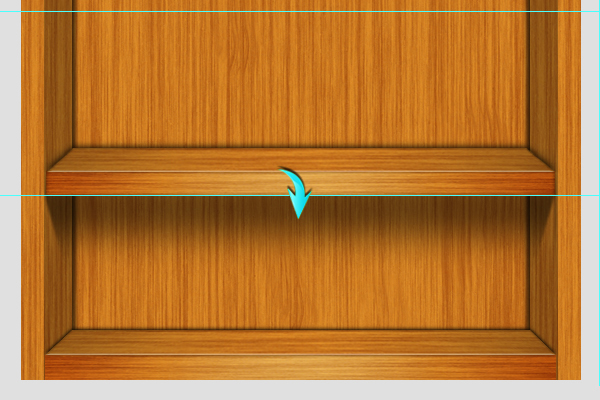
Label this group as “Middle shelf,” duplicate it few times, and position the shelves as shown below over each horizontal guide.
Step 21
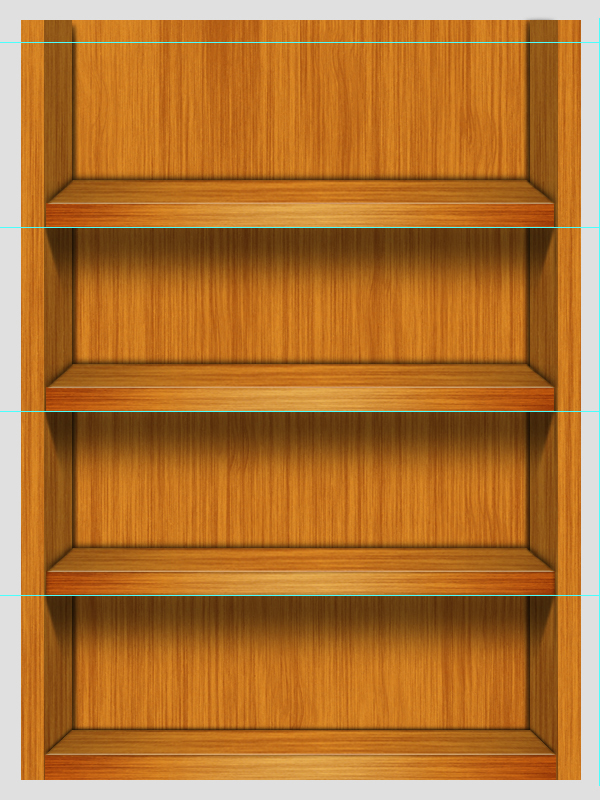
To make the top border, place a copy of middle shelf over the top guide and erase the shelf top layer, including its shadow, from this group.

Step 22
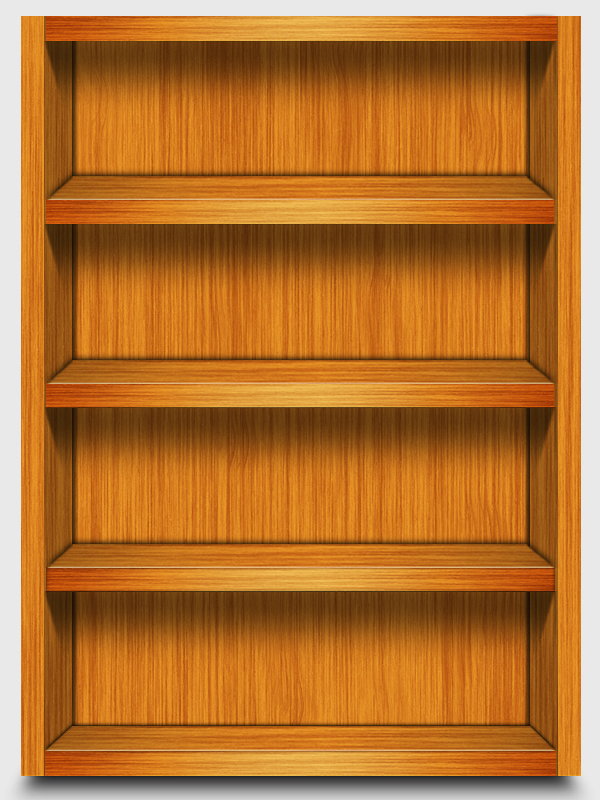
Our wooden trophy case is almost ready. You can make its shadow using the same techniques used to create the middle shelf shadow. However, make a thinner rectangle this time.
Here is how it looks after displaying books.

That’s it. I hope you guys enjoyed the tutorial and learned something new. Do share your thoughts!
Frequently Asked Questions about Building a Wooden Trophy Case
What type of wood is best for building a trophy case?
The type of wood you choose for your trophy case can greatly impact its durability and appearance. Hardwoods like oak, maple, and cherry are often recommended due to their strength and beautiful grain patterns. However, these can be more expensive and harder to work with than softwoods. Pine is a popular softwood choice due to its affordability and ease of use. Ultimately, the best wood for your trophy case will depend on your budget, woodworking skills, and personal aesthetic preferences.
How can I ensure my trophy case is sturdy and durable?
Ensuring the sturdiness and durability of your trophy case involves careful planning and construction. Use high-quality materials, including strong wood and heavy-duty hardware. Joinery techniques like dovetail or mortise and tenon joints can add strength to the case. Additionally, applying a finish such as varnish or polyurethane can protect the wood from damage and wear over time.
How can I customize my trophy case to fit my space and display needs?
Customizing your trophy case involves careful measurement and planning. Consider the size and number of items you wish to display, as well as the space where you plan to place the case. You can adjust the dimensions of the case, the number and spacing of shelves, and the design of the door to suit your needs. Adding lighting or a mirrored back can also enhance the display.
How can I add a professional finish to my trophy case?
Adding a professional finish to your trophy case can enhance its appearance and durability. Sand the wood thoroughly before applying any finish. Stain can be used to enhance the color and grain of the wood, while varnish or polyurethane can add a protective, glossy finish. Always follow the manufacturer’s instructions when applying finishes.
What tools do I need to build a trophy case?
The tools needed to build a trophy case can vary depending on the complexity of the design. However, common tools include a saw, drill, screwdriver, clamps, and sandpaper. More advanced projects may require tools like a router or table saw. Always use tools safely and according to the manufacturer’s instructions.
How can I design a trophy case that fits my decor style?
Designing a trophy case to fit your decor style involves considering elements like the wood type and finish, the design of the case, and any additional features like lighting or hardware. Look for inspiration in home decor magazines, websites, or stores that match your style.
Can I build a trophy case if I’m new to woodworking?
Yes, even beginners can build a trophy case with some patience and practice. Start with a simple design and work your way up to more complex projects as you gain confidence and skills. There are many resources available online and in books to help you learn woodworking techniques.
How can I maintain my trophy case over time?
Maintaining your trophy case involves regular cleaning and occasional touch-ups to the finish. Dust the case regularly with a soft cloth to prevent buildup. If the finish becomes scratched or worn, it can be sanded and reapplied following the manufacturer’s instructions.
How can I safely install my trophy case?
Safely installing your trophy case involves securing it to the wall to prevent tipping. Use heavy-duty brackets and screws, and ensure they are anchored into the wall studs. Always follow the manufacturer’s instructions for any hardware used.
Can I add doors to my trophy case?
Yes, doors can be added to your trophy case to protect your trophies from dust and damage. The doors can be made from wood or glass, depending on your preference. Adding doors involves additional steps and hardware, so be sure to plan accordingly.

