Developing for the iOS platform can be a lot of fun. You have a comprehensive set of APIs for doing all sorts of neat stuff—from geolocation to audio output and 3D graphics—and a great platform to run your code on. If you’re lucky, you might even make a wad of money on the App Store (though there’s some debate about how much!).There are a few drawbacks, of course. Objective-C (the C-derived language used to write iOS applications) has a syntax that’s a little weird and scary, and it takes awhile to understand. The platform itself has some extra requirements you might be unfamiliar with if you come from a server-side environment. (These are mostly to do with resources and avoiding their overuse, and responding to events like incoming phone calls).There’s also an up-front cost associated with making your dev tools run to their full potential: Apple charges $99 per year to grant you the power to test your code on your device—talk about tough love.Hey, chin up! Writing iOS apps is a lot of fun. It can be tough coming to grips with Xcode and to actually start developing, but this article is here to try and ease the burden. I’ll jump you through some of those hoops, so you can be up and running in no time.
- Mac OS X 10.6+
- Xcode can only be run on Mac OS X. Sorry non-Mac users, I don’t make the rules!
- At least a beginner grounding in C or comparable language
- If you’re unfamiliar with C, C#, Java, or C++, I’d strongly encourage you to write at least a few simple command-line applications in one of these languages; this will enable you to grow used to the idea of headers and implementation files, compiling, linking, and static-typed languages.
- iOS hardware to test on—that is to say, an iPhone or iPad
- Strictly speaking, it’s not a necessity, as you can use the built-in simulator to test your apps; however, there are differences between the software environment the simulator runs in and the real-deal iPad or iPhone hardware, so you may wish to test your apps on the actual hardware it’s intended to run on.
The first items we’re going to need are Xcode and the iOS Software Development Kit (SDK). These are the basic tools you’ll need to write your app.Apple maintains a degree (well, several degrees) of control over their developer tools, so you’ll need to sign up for the Apple Developer Program. Don’t worry, it’s free to start with; there’s no fee until you want to test your app on Apple hardware (the first hit is always free).You’ll have to create an Apple ID if you’ve yet to do so. You can use an existing iTunes, Apple Online Store, or MobileMe account if you have any of those, which will save you a bit of typing.A confirmation email should arrive fairly quickly. When you receive it, sign in to the Apple Developer Member Center. You’ll be greeted by the Member Center dashboard, your one-stop point for downloading tools, development kits, and documentation. Once you have a fully paid iOS Developer Program Account, this dashboard also lets you provision devices for testing and development purposes. It’s also where you’ll prepare your App for distribution, and eventually launch it to the App Store.For now, we’ll just download Xcode and the iOS SDK. Click under Dev Centers.Next, choose Downloads, and finally Xcode 3.2.4 and iOS SDK 4.1 (or similar—by the time you read this, the version numbers may well have increased). Be warned: it’s a hefty download, weighing in at 2.3GB.The installation is standard for a Mac OS X app. Note, also, that you’ll have to quit iTunes towards the end of the install process.
Now the fun begins!There are a few ways to develop an iOS application. Apple provides a set of pre-built application templates to get you started. Most of them use Interface Builder, Apple’s WYSIWYG iPhone and iPad interface creator. At present, it’s a separate application that works alongside Xcode, linking visual elements to code elements via special XML files that iOS can parse.In the next version of Xcode, Xcode 4, Interface Builder will become an integral part of the development environment. It will be more like the Forms interface of Microsoft Visual Studio, if you’re familiar with that environment.Using Interface Builder has some clear advantages:
- no guessing at sizes, layouts, or orientation with the WYSIWYG interface construction; what you design is what appears
- easier and faster iteration of your app
- pre-built interface elements that need only minimal code to get running
- abstraction of view-switching and other complex code-juggling
There are a number of cases where there’s no benefit in using Interface Builder. If you’re making games or highly interactive interfaces, the standard tools won’t cut it. If your view is going to contain a number of dynamically generated elements, Interface Builder will also fall short of what you need.I’d also argue that you should know what’s going on “under the hood” as much as possible before you let the tools generate code for you. You’re less likely to feel lost later on as a result.Addressing the specifics of Interface Builder goes a bit beyond this article. For now, we’re just going to write a very simple “Hello, World!” application to prove that everything works. In a later article, we’ll look at using Interface Builder and Xcode together to build applications that are more exciting.Start Xcode, and you’ll come upon the welcome screen; the left side will look like Figure 1, “Xcode’s welcome screen”.

Click . You’ll see the New Project dialog, shown in Figure 2, “Xcode’s New Project dialog”. You can reach this dialog at any time by selecting >.

You’ll see a few options for the different types of Application you can create. The options are:
- Navigation-based Application
- Used for apps like Notes, the Address Book, or Mail, this application usually consists of a main view with a list of items. Each subview (accessed by clicking an item in the list) has a back button to return to the previous view.
- OpenGL ES Application
- This will create a 3D application or game, typically. A word of advice, though: this is not for the faint of heart.
- Split View-based Application
- This app is solely for the iPad. A menu at the top gives you control over a spacious central area for displaying information and controls.
- Tab Bar Application
- The dialler, iTunes, and Tweetie are examples of Apps built on this model. A set of navigation controls at the bottom of the screen give you access to several views that you can flick between at will.
- Utility Application
- Used for apps like Weather, this is only for the iPhone—you can’t make them for the iPad. One screen gives you information, and a press of a button flips the information screen over to present controls. (This is the most typical scenario; you could actually put anything you wanted on either side.)
- View-based Application
- A relatively bare-bones app, this just gives you a View (which you can modify to your heart’s content) and a controller for that view. We’ll be starting out with one of these.
- Window-based Application
- About as basic as you can get, this is just a window and an App Delegate (the essential code that receives events from iOS and responds to them). You’ll need to implement your own Views.
Note that the above are just templates, starting points for you to develop your apps. Many apps include elements from several of these templates; Tweetie, for example, has both a Navigation Bar and a Tab Bar. It’s even possible to include an OpenGL ES 3D view within another view—you’re positively spoiled for choice.For now, select Window-based Application. We’ll start with the bare bones and work up from there. Name your project as you see fit and click to proceed.
Here we are, in Xcode. There’s a lot going on here.Up top we have the toolbar, shown in Figure 3, “The Xcode toolbar”. From here, using the dropdown on the far left, you can select your target Architecture, Executable, and Target (if your project includes more than one), Configuration (Debug or Release) and Device (a hardware device, or the software Simulator).

Initially you’re going to want to stick to a Debug Configuration. These builds include a lot of code specifically intended to help you track down problems in your code; however, they run a lot slower than a Release build. There’s also a special class of bugs that can creep into your code, which only show up in a Release build, so it’s worth testing your app in Release configuration now and then.For now, we’ll gloss over the rest of the toolbar—save for the most important button: . This compiles your app, and sets it to run on your selected device (or the simulator). Feel free to click it now; all you’ll see is a blank screen. You can safely quit the Simulator once you’re done.On the left we have the Groups & Files pane. This shows the structure of your app, including the raw stuff on the file system, and some more virtual information; for instance, under Targets, you can unfurl your project and see the how the build process will occur.
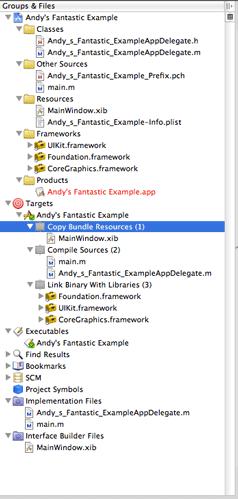
The important bits in the Groups & Files pane, for now, are under Classes, Other Sources, and Resources. We can ignore the rest for the moment.The Editor, shown in Figure 5, “The Editor window”, is where you’ll be doing most of your coding. If you hit Shift+Command+E, it’ll zoom up and take over the space occupied by the file browser. If you’re in a header file, you can switch to the implementation file (or vice versa) with Option+Command+Up.

You can pop individual files out into windows of their own by double-clicking them in the Groups & Files pane. Personally, I don’t care for lots of windows flying around, so I was gratified to hear rumors of tabs coming in Xcode 4.
iPhone apps all have a fairly common structure. Each app will typically have a main.m file (under Other Sources in the File Browser) that instantiates the AppController (more on this in a bit).The Resources directory is where all your non-code files should live. Once you start developing more intricate apps, you’ll want to put images, text files, and other miscellanea here.The AppController is the first entry point for OS messages into your application. It’s worth taking a look through ApplicationNameAppDelegate.mapplicationWillResignActive and applicationDidBecomeActive. These methods allow you to respond to changes in your application’s life cycle, such as when it’s about to terminate.An AppDelegate on its own doesn’t do much. We need to add a View. And because iOS apps follow the Model-View-Controller pattern, we’ll also need a ViewController.Create a new file: > (or Command+N). One of the options Xcode gives us is a UIViewController subclass. Neat! Select that, and give it an appropriate name. Xcode will automatically generate a header file for us, too.

You’ll have two new files, as expected. These comprise your ViewController, which is in charge of receiving input events and responding to them by manipulating the View. Typically, one ViewController should be responsible for one View. That’s not a hard rule, though; it’s up to you if you want to organize your application differently.If you take a look at your ViewController’s implementation file (that’s the .m file) you’ll see Apple has provided us with a bunch of pre-built functions, commented out. We can implement the ones we need—but which ones will they be? We have a ViewController, but we need a View. Let’s go ahead and create a View in our ViewController. Uncomment loadView, and make it look like the following:
- (void)loadView { self.view = [[UIView alloc] initWithFrame:CGRectMake(0, 0, 320, 480)]; self.view.backgroundColor = [UIColor greenColor];}
If you hit now … you’ll be disappointed. We’ve built our view, but we still need to tell our AppDelegate about the existence of the ViewController we created, and ask the AppDelegate to instantiate the view.Switch to ApplicationNameAppDelegate.h
#import <UIKit/UIKit.h>#import "AndysExampleApplicationViewController.h"@interface AndysExampleApplicationAppDelegate : NSObject <UIApplicationDelegate> { UIWindow *window; AndysExampleApplicationViewController *viewController;}@property (nonatomic, retain) IBOutlet UIWindow *window;@property (nonatomic, retain) AndysExampleApplicationViewController *viewController;@end
You’ll notice we added the ViewController as a property of the AppDelegate in the @interface definition. Later, we use @property, which is a bit of syntactic sugar to automatically declare getters and setters for that property.Switch over to your AppDelegate implementation file now (ApplicationNameAppDelegate.m@synthesize:
#import "AndysExampleApplicationAppDelegate.h"@implementation AndysExampleApplicationAppDelegate@synthesize window;@synthesize viewController;#pragma mark -#pragma mark Application lifecycle
@synthesize calls should, by convention, always follow your @implementation declaration and precede any method definitions.We’ve declared that we want to use our new class in the AppDelegate, and created accessor methods to get and set it on our AppController. Now we need to tell the AppController to instantiate the class. We’ll modify the method applicationDidFinishLaunchingWithOptions to do so:
- (BOOL)application:(UIApplication *)application didFinishLaunchingWithOptions:(NSDictionary *)launchOptions { // Override point for customization after application launch. [window makeKeyAndVisible]; self.viewController = [AndysExampleApplicationViewController alloc]; [window addSubview:self.viewController.view]; return YES;}
We added one line to allocate (alloc) the ViewController, and one to add the ViewController’s view to the window. This is critical—the window needs to know about views that it contains, and views need to know about any other views or UI elements they contain.Hit now. You should see an eye-shatteringly bright-green screen. Well done! You’ve created a view. It’s quite boring here, though … let’s spice it up a little.Let’s add a label. This is a simple visual element that contains some text. In your ViewController’s loadView method, add the highlighted code below:
- (void)loadView { self.view = [[UIView alloc] initWithFrame:CGRectMake(0, 0, 320, 480)]; self.view.backgroundColor = [UIColor greenColor]; UILabel *label = [[UILabel alloc] initWithFrame:CGRectMake(50, 200, 200, 80)]; label.text = @"Hello, World!"; label.textAlignment = UITextAlignmentCenter; label.shadowOffset = CGSizeMake(1,1); label.backgroundColor = [UIColor greenColor]; [self.view addSubview:label]; [label release];}
We’ve allocated memory for a UILabel element. We’ve initialized it with a width of 50 units and a height of 200 units, offset at X 200 (up and down the screen) and Y 80 (across the screen). Hit and you should see the label appear in your view, as shown in Figure 7, “Our bright-green “Hello, World!” app”.

What happens if it fails to work, or it doesn’t behave as you expect?Xcode ships with a full-featured debugger. You can set breakpoints within the Editor at specific lines of your code. A breakpoint tells your application to halt execution at a particular line of code, and report to the debugger. You can, from there, inspect the variables and objects your application has instantiated and set to gain a clear idea of what’s happening.Set a breakpoint in your ViewController’s loadView method by clicking on the large gray bar next to your code, as shown in Figure 8, “Setting a breakpoint”.

Now fire up your application again by clicking . Wait, what’s that? By adding a breakpoint we’ve indicated that we want to run the debugger, so the button has changed to read . Your code will execute to the breakpoint, and stop. Press the button at the top of your Project window (it looks like a spray can of insecticide).Lo, the debugger. On the left, you can inspect the sequence of functions your code has run through to reach this point; on the right, you can see the contents of your app’s memory (including local and global variables). You can even change their values from here.This gives you the power to diagnose changes your app is making in a step-by-step, methodical manner.When you’re ready to continue, hit the button at the top of the debugger.
We’ve learned how to set up Xcode and create a very basic application. We’ve also looked briefly at the simulator and the debugger, both essential tools in app creation.Apple has a wealth of documentation available via the Apple Developer Center. There’s everything from tutorials to API documentation in there, and it’s a must-read if you want to continue developing apps. Here’s some of the key reading I’ve found:
- Cocoa Fundamentals Guide covers Cocoa and Objective-C, and is a good language primer for those wishing to work on iOS or Mac OS X apps.
- iOS Application Programming Guide provides the essentials of iOS Apps; the section on Implementing Standard Application Behaviors is a must-read.
- The iPhone Human Interface Guidelines is a good first step to learning how to make great user interfaces for the iPhone.
If you want to go further in app development, I’d recommend taking this example application and adding a button or two that a user could interact with. Learn the UIKit and how to implement responsive controls, and then move on to using Interface Builder to create your UI and hook it into your Controllers in Xcode.Last year, Stanford University ran an iPhone Application Programming course, the videos of which are available through iTunes U. These videos are very informative and well worth watching.
We’ve run you through your first steps as an iOS app developer. From here, you can access a wealth of resources that will teach you how to produce increasingly complex functionality and create an application that people will really enjoy using.A subsequent article will look at creating a more involved application, including the use of the Interface Builder to create a UI, and accessing information from the Web via HTTP. Stay tuned!
 Andy White
Andy is a software developer who regularly uses PHP, Ruby, and Objective-C to build for the Web and mobile web. His passions are teaching and enabling people, and building new things. In addition to holding down a secretive day job, he runs OiOi Studios by night.