AIR 101
So, what is this Adobe AIR? At its most basic, AIR is a platform that provides a bridge between web technologies and desktop APIs. Where web developers once needed to use workarounds and talk back to the server to build client-focused applications, AIR provides a means for building building web applications that run from the desktop. AIR applications gives a user the best of both worlds – the rich interface and local resources of a desktop application, and the networked benefits of the Web. It also provides access to the client system, a feature sorely lacking in rich internet applications. With AIR, web applications can now:- work with the local file system
- integrate with the window manager (to allow modification of OS X dock icons and Windows system tray icons, for example)
- provide native menus
- store data securely on the local machine
- the runtime, which lets you (and your users) run AIR applications
- the Software Development Kit (SDK), which lets you test and package AIR applications
C:airsdk, but you can place it in another folder if you prefer.
From here on, if you’ve got the tools to build web applications, you have everything you need. I’m working with Windows and nothing but a text editor (Notepad2 does the job), but if you use Aptana or Dreamweaver CS3 on any platform, there are some handy plugins for your IDE that you may like to try.
At this stage you’ll need to be on either a Windows or a Mac; AIR for Linux is in alpha but available. Feel free to give it a go, but since it’s alpha software, I can’t guarantee it will run these samples.
Your First AIR Application
Let’s cut to the chase and build our first AIR application! We’ll start by putting together a simple “Hello World” to demonstrate the basics, and move on to a simple to-do list application. While not the first time that such an application has been created in AIR, it’s perfect for an introductory level project. First, create a new folder for the project, to help organize all the bits and pieces that make up your AIR application – I’ve usedC:airprojectshello_world.
The Application Descriptor File
An AIR application in its simplest form is just a collection of HTML files. An XML configuration file informs the runtime of the application entry point – usually an HTML file or a Flash/Flex file. This configuration file is called the application descriptor file, and includes some basic metadata like the name of the application, a unique ID, and the current version of the application.
Let’s make one now. Type the following into a text file:
<?xml version="1.0" encoding="UTF-8"?> <application xmlns="http://ns.adobe.com/air/application/1.0"> <id>examples.sp.helloworld</id> <filename>HelloWorld</filename> <initialWindow> <content>index.html</content> <visible>true</visible> </initialWindow> </application>application.xml in the project folder that we created earlier. At the moment, this application descriptor file is quite minimal; our final application will specify a few more parameters. For now, we’ve got ourselves an application ID, a package filename, and some details about our initial window.
The application ID is simply a unique string that identifies our application; it’s recommended that this be specified using reverse-domain dot syntax. For example, if I was building sitepoint.com’s Test application, I’d specify an ID of com.sitepoint.Test. Here, we’ve used examples.sp.helloworld, which should avoid clashes with any other AIR samples you may try out. This refers to the final application executable filename, as well as the name of the install directory and a few references to the application. Finally, the initialWindow section defines how our application will start – in this case, with the index.html page visible.
The Application Front End
Next, we have to put together the HTML file that will serve as the front end. We’ll start with a basic “Hello world” in HTML:
<html>
<head>
<title>Hello World</title>
</head>
<body>
<h1>Hello World</h1>
</body>
</html>
Copy the above markup into your text editor and save it as index.html, in the same folder as application.xml.
Once we’ve got our application descriptor file and initial HTML page ready, we’re all set. Run your first AIR application by typing the following at the command line:
/path/to/adl /path/to/application.xml
Because I’m on Windows, I would type this:
C:airsdkbinadl C:airprojectshello_worldapplication.xmladl binary and the application.xml file). And if you’re working in Windows, you can even just drag your application.xml file onto the adl executable to achieve the same thing.
This results in a console window opening, with our “Hello World” web application displayed in a basic window, as shown here.
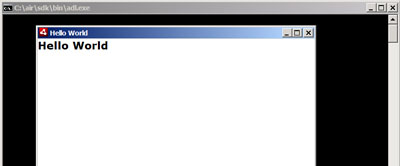 Congratulations – your first AIR application is complete!
This mysterious
Congratulations – your first AIR application is complete!
This mysterious adl executable is the AIR Debug Launcher (ADL). The black console window that opens with it allows the ADL to provide you with debug information – for example, most JavaScript errors will produce one or two ADL console messages. You can also generate your own debug messages for the ADL.
Working with AIR
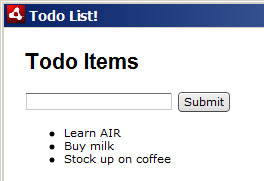
As we’ve just seen, getting started with AIR is easy. However, the fun really begins once you’ve found your way around the runtime. Let’s build a simple to-do list application, using a sampling of HTML, CSS, and JavaScript. Interface Niceties We’ll need our application to look a little more glamorous than our “Hello World” page. I won’t worry much about CSS styling in this tutorial, as that’s something you can easily add to your application later. We’ll just put together a bare-bones interface to demonstrate the basics. If you’re retro-fitting a web page into an AIR application, chances are your existing web page styles will render just fine. Be wary of copying your web site design entirely, though – desktop applications have rather different user interface needs. Keep in mind that a desktop application will probably be run in a window, whereas a web browser window is often maximized to fill the entire screen. Another point of difference is that, on the desktop, users scroll smaller elements and input fields, whereas on the Web users (generally) scroll the entire page. Open up the index.html file from earlier, and update it with our new to-do list layout code, shown below:<html> <head> <title>Todo List!</title> <style type="text/css"> body { margin: 20px; } h1 { font-family: sans-serif; } </style> </head> <body> <h1>Todo Items</h1> <p><input type="text" id="new_text" /> <input type="submit" id="add_item" /></p> <ul id="todo_items"> <li>Learn AIR</li> <li>Buy milk</li> <li>Stock up on coffee</li> </ul> </body> </html>application.xml onto adl.exe) and your application should look like this figure.
 Now hover over the input box and the Submit button – you’ll notice the AIR runtime has applied some styles to both, including a nice hover effect. If you want to, you can override these styles just as you would override any web browser’s default styles, but we’ll stick with this effect.
JavaScript: AIR Gone Wild!
Next, we need to add our actual list management functionality. By allowing us to code in JavaScript, AIR provides us with immense power; just take a look at the size of the JavaScript Language Reference for AIR. From working with the file system to checking the contents of the clipboard and even interfacing with attached cameras and microphones, it’s all there. There’s just so much available to you, courtesy of AIR!
For now, we’ll perform some basic interface bindings to create our to-do list functionality. We’ll create a simple list of items, and allow the user to remove each item from the list by clicking on it. The JavaScript is fairly straightforward; here’s the interface code:
Now hover over the input box and the Submit button – you’ll notice the AIR runtime has applied some styles to both, including a nice hover effect. If you want to, you can override these styles just as you would override any web browser’s default styles, but we’ll stick with this effect.
JavaScript: AIR Gone Wild!
Next, we need to add our actual list management functionality. By allowing us to code in JavaScript, AIR provides us with immense power; just take a look at the size of the JavaScript Language Reference for AIR. From working with the file system to checking the contents of the clipboard and even interfacing with attached cameras and microphones, it’s all there. There’s just so much available to you, courtesy of AIR!
For now, we’ll perform some basic interface bindings to create our to-do list functionality. We’ll create a simple list of items, and allow the user to remove each item from the list by clicking on it. The JavaScript is fairly straightforward; here’s the interface code:
function remove_todo(element) { element.parentNode.removeChild(element); } window.onload = function() { document.getElementById('add_item').onmousedown = function() { item_text = document.getElementById('new_text').value; new_item = document.createElement('li'); new_a = document.createElement('a'); new_a.onmousedown = function() { remove_todo(this.parentNode); } new_a.innerHTML = item_text; new_item.appendChild(new_a); document.getElementById('todo_items').appendChild(new_item); } }<script> tag in the head section of your index.html.
Putting it All Together
Here’s our final UI code:
<html> <head> <title>Todo List!</title> <style type="text/css"> body { margin: 20px; } h1 { font-family: sans-serif; } </style> <script type="text/javascript"> function remove_todo(element) { element.parentNode.removeChild(element); } window.onload = function() { document.getElementById('add_item').onmousedown = function() { item_text = document.getElementById('new_text').value; new_item = document.createElement('li'); new_a = document.createElement('a'); new_a.onmousedown = function() { remove_todo(this.parentNode); } new_a.innerHTML = item_text; new_item.appendChild(new_a); document.getElementById('todo_items').appendChild(new_item); } } </script> </head> <body> <h1>Todo Items</h1> <p><input type="text" id="new_text" /><input type="submit" id="add_item" /></p> <ul id="todo_items"> </ul> </body> </html>index.html file with this code, run it through ADL – and voila! Our application is fully functional! It should look something like this.
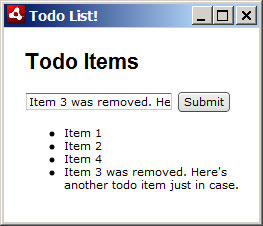 If the user inserts items, they are added to the list, and clicking on them causes them to disappear from the list, as expected. Our interface could certainly do with some improvements, but overall the application was quick and easy to build, and we have a reasonable Adobe AIR application ready.
But wait – what do we do now?
If the user inserts items, they are added to the list, and clicking on them causes them to disappear from the list, as expected. Our interface could certainly do with some improvements, but overall the application was quick and easy to build, and we have a reasonable Adobe AIR application ready.
But wait – what do we do now?
Finishing Touches
With our to-do application almost ready, we can now add the finishing touches and package it up into an.air file for distribution.
Tweaking Our Application Descriptor File
Here’s our current application.xml:
<?xml version="1.0" encoding="UTF-8"?> <application xmlns="http://ns.adobe.com/air/application/1.0"> <id>examples.sp.helloworld</id> <filename>hello_World</filename> <initialWindow> <content>index.html</content> <visible>true</visible> </initialWindow> </application><name> and <description> tags with some useful info.
Also, our to-do list window is designed to be very narrow. We can restrict the width to, say, 200 pixels, via the <width> property node inside <initialWindow>. <height> works for restricting the window height as well; both tags are optional.
The manual page contains thorough documentation on all the available options. Here’s our updated configuration file:
<?xml version="1.0" encoding="UTF-8"?> <application xmlns="http://ns.adobe.com/air/application/1.0"> <id>examples.sp.todo</id> <filename>TodoList</filename> <version>1</version> <name>SitePoint.com AIR Example: Todo List</name> <description>This application helps you manage your pending tasks.</description> <initialWindow> <content>index.html</content> <visible>true</visible> <width>200</width> </initialWindow> </application>adt -certificate -cn SelfSigned 1024-RSA testCert.pfx some_password some_password” with a password of your choice. After a few seconds, ADT should complete its certificate generation process and you should have a new testCert.pfx file in your application directory.
Next, use ADT to package the application into an .airfile:
adt -package -storetype pkcs12 -keystore testCert.pfx TodoList.air application.xml index.htmltestCert.pfx. In the line above, we’re instructing the ADT to package our entire application into a file named TodoList.air, and to include the files application.xml and index.html. Any other files you may need to include in your application (such as JavaScript, CSS, or the like) can be added to the end of this command.
As part of this process, you’ll be prompted for the password that we set for your new certificate file. Enter it, wait a moment, and a TodoList.air file should appear in the same directory as your project files.
The only task remaining is to test out your new AIR application! Double-click on the TodoList.air file to launch the AIR installer. The application will take a moment to install, and display the name of our application (as defined in application.xml) during the process. Finally, once the installation is complete, the application will launch. Ta da! Your first real AIR application is complete!
Further Reading
Adobe has prepared some invaluable resources on getting started with AIR. If you’re interested in exploring the area further, head over to their developer center, where they’ve got AIR HTML tutorials, a JavaScript Language Reference for the AIR APIs, and a complete manual on building AIR applications with HTML and AJAX. You should also get set up with an IDE; Aptana provides great AIR support, and even has a screencast on building applications using Aptana and AIR. While this is a very simple application, I hope you can see the potential that Adobe AIR brings to the table. The grey area between web applications and desktop applications just got a whole lot greyer; I look forward to seeing what amazing creations you can fill it with!Frequently Asked Questions (FAQs) about Adobe AIR
What is Adobe AIR and how does it work?
Adobe AIR is a cross-operating system runtime that allows developers to package the same code into native apps for various platforms like Windows, Mac, Android, and iOS. It provides a consistent and flexible environment for the delivery of applications across devices and platforms. Developers can use HTML, JavaScript, Adobe Flash, and ActionScript to build web applications that run as standalone client applications without the constraints of a browser.
How can I install Adobe AIR?
To install Adobe AIR, you need to download the AIR installer from the official Adobe website. Once downloaded, you can run the installer. The installation process is straightforward and similar to other software installations. After successful installation, you can run AIR applications.
How can I develop an application using Adobe AIR?
Developing an application using Adobe AIR involves writing your code using languages like HTML, JavaScript, Adobe Flash, and ActionScript. You then use the AIR SDK to package your code into an AIR application. The SDK provides command-line tools that allow you to test the application and prepare it for distribution.
What are the system requirements for Adobe AIR?
Adobe AIR is compatible with most operating systems including Windows, Mac, Android, and iOS. However, the specific system requirements may vary depending on the version of Adobe AIR you are using. It’s always recommended to check the official Adobe website for the most accurate and up-to-date information.
Can I use Adobe AIR for mobile application development?
Yes, Adobe AIR allows you to develop applications for various mobile platforms including Android and iOS. You can write your code once and package it into native apps for different mobile platforms.
Is Adobe AIR free to use?
Adobe AIR itself is free to use. However, some applications developed with Adobe AIR might be commercial and require purchase or subscription.
How can I update Adobe AIR?
Adobe AIR can be updated by downloading the latest version from the official Adobe website and running the installer. The installer will automatically update your current version of Adobe AIR to the latest version.
What is the future of Adobe AIR?
Adobe has announced that it will no longer provide support for Adobe AIR. However, HARMAN, a subsidiary of Samsung, has taken over the future development and support of Adobe AIR for enterprise organizations.
Can I uninstall Adobe AIR?
Yes, you can uninstall Adobe AIR just like any other software. However, doing so will prevent any AIR applications from running on your device.
Are there any alternatives to Adobe AIR?
Yes, there are several alternatives to Adobe AIR for developing cross-platform applications. These include platforms like Xamarin, React Native, and Flutter. Each of these platforms has its own strengths and weaknesses, and the best choice depends on your specific needs and requirements.
 Akash Mehta
Akash Mehta is a web developer and freelance writer specializing in web application development.