

In this article, we will tackle the basics of Composer, and what makes it such a powerful and useful tool.
Before we go into detail, there are two things that we need to have in mind:
- What Composer is:
As we can see on their website: “Composer is a tool for dependency management in PHP. It allows you to declare the libraries your project depends on and it will manage (install/update) them for you.”
- What Composer is not:
Composer is not a package manager. It deals with packages but in a “per project” way. While it provides a global installation option, it does not install anything globally by default.
Essentially, Composer allows you to declare and manage every dependency of your PHP projects.
Let’s now install Composer so we can see it in action.

Key Takeaways
- Composer is a powerful tool for dependency management in PHP, allowing developers to declare and manage every dependency of their PHP projects. It is not a package manager and doesn’t install anything globally by default.
- Composer uses a json file to manage dependencies in a project. It provides commands such as composer init, composer create-project, and composer require to manage these dependencies. The composer require
approach is a recommended best practice. - Composer provides autoloading to access the project’s dependencies. It can also be used to access application’s code by registering the code in the composer.json file using the autoload key.
- Packagist is Composer’s main repository, aggregating all Composer packages. It also encourages PHP developers to submit their own packages, thereby strengthening the community.
Installation
There are two ways of installing Composer: locally and globally. Because Composer is such a useful and widespread tool, I always recommend installing it globally, as you’ll probably be working on more than one project at once.
Note that if you use an environment like Homestead Improved, it’s installed globally by default. If you’re unfamiliar with Vagrant and Homestead, this post will clear things up, and if you’d like to dive deeper, this book will reveal some wild mysteries to you.
To install Composer, follow the instructions for your operating system.
If you’re on a Unix system, after installing it you can run the command:
mv composer.phar /usr/local/bin/composer
This moves the composer.phar file to a directory that’s on your path (the location of your filesystem where the OS looks for executable files by default). This way, you can use just the composer command instead of composer.phar.
Running the composer command shows the information page:
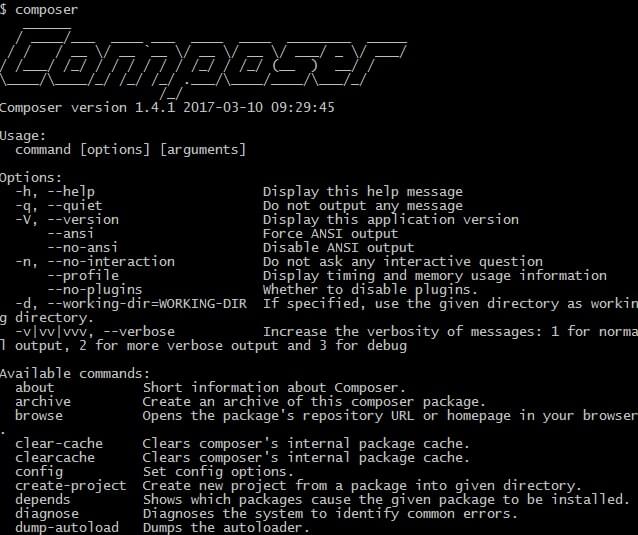
Some of Composer’s more useful commands are:
composer help <command>– will show the help page for a given command.composer self update– Updates composer to the latest available version.composer search– Searches for packages.composer status– Shows a list of dependencies that have been modified locally. If we install something from the source (using the--prefer-sourceoption), we will end up with a clone of that package in the/vendorfolder. If we make some changes to that package, thecomposer statuscommand will show us a git status for those changes.composer diagnose– Diagnoses the system for common errors. This is especially useful for debugging, as it checks for things like connectivity to Packagist, free disk space, and git settings.
We will focus our attention on composer init, composer create-project and composer require.
Using Composer
To manage dependencies in a project, Composer uses a json file. This file describes all the dependencies, and holds some metadata as well.
In this example we will create a new PHP project in which we will need PHPUnit for our unit testing. There are several ways to use Composer to manage this dependency.
composer initwill launch the wizard. The wizard will guide us through the generation of ourcomposer.jsonfile.composer search phpunitwill search for all packages available that have the keywordphpunit. After we choose the package we want, we can then usecomposer require <package>. This command will not only create thecomposer.jsonfile, it will also download all the dependencies specified.- Manually write the
composer.jsonfile (not recommended – easy to slip up with syntax and brings no apparent benefits). Here’s an example:
{
    "require": {
        "phpunit/phpunit": "^4.8"
    }
}
- The
requirekey takes objects that map package names (e.g.phpunit/phpunit) to version constraints (e.g.4.8). Composer uses this information to search for the right set of files in package “repositories” that you register using therepositorieskey (more info here) or on Packagist, the default package repository which we’ll discuss a little later.
If you used composer init or the manual method, you need to run composer install. This will download all the dependencies needed for the packages described in the composer.json file.
Note that writing the file manually and then running composer install is the same as running composer require <package>.
Using the
composer require <package>approach is a recommended best practice.
The first time you run the composer install command, the dependencies are downloaded and their installed versions are registered in the composer.lock file. The next time someone runs composer install on the project, it will not get the latest available package versions, but the ones that are registered in the composer.lock file. This way, Composer ensures that your project doesn’t break due to unexpected code changes in newer versions of the packages.
Updating Your Packages
The composer.lock file ensures that everyone in the project uses the same version of the packages by not allowing newer versions to be downloaded.
If for any reason we want to stick to a particular version, than we should mention the appropriate version in the composer.json file. For example:
  {
      "require": {
          "phpunit/phpunit": "4.8"
      }
  }
But what if we want to update our dependencies to the latest versions?
To update dependencies, Composer provides the composer update command. This command will not only download the latest versions of our dependencies, it will also update the composer.lock file to the new versions. Running composer update is actually the same as deleting composer.lock and then re-running composer install.
It is generally recommended to commit the
composer.lockfile into the version control system when working on a project (app) and to ignore it when working on a package. A package should always strive to use the latest version of its dependencies, while an app is generally more fragile. More discussion about this and alternative approaches here.
The Vendor Folder
Composer downloads all dependencies into the /vendor folder, which it creates if it doesn’t exist. It also creates a vendor/autoload.php file which looks something like this:
<?php

// autoload.php @generated by Composer

require_once __DIR__ . '/composer/autoload_real.php';

return ComposerAutoloaderInit7a731d2067108a4739c3dd65be722f17::getLoader();
Once you include or require this file in your code, you can use all the functionality provided by your dependencies. This is as simple as adding the following snippet to your code:
require __DIR__ . '/vendor/autoload.php';
Autoloading
The autoloading provided by Composer to access the project’s dependencies is very useful, and can also be used to access our own application’s code. To do this, we need to register our code in the composer.json file using the autoload key.
{
    "autoload": {
        "psr-4": {"Foo\\": "src/"}
    }
}
First, Composer will register a PSR-4 autoloader for the Foo namespace.
Then, we map the Foo namespace to the /src folder. The /src folder should be at the same level as the /vendor folder (root of the project). After this, we need to re-generate the vendor/autoload.php file. Composer provides a command for this: composer dump-autoload.
Pro-tip: composer du would also work, because composer runs any command which is uniquely identified by its first few letters. In dump-autoload‘s case, there’s no other command in the Composer namespace that starts with du, so Composer knows that’s the one we want. This works with all Composer commands.
This way we are adding our own code to the autoloader. In addition to PSR-4 autoloading, Composer also supports PSR-0, classmap, and files autoloading. Check out the documentation for more information on autoloading with Composer.
Configuration Values and Minimum Stability
Sometimes, your project will depend on packages that don’t have a stable version released. Composer defaults to preventing unstable packages from being installed.
In those cases, it’s easy to add the minimum-stability flag into the composer.json file, and Composer will allow their installation.
composer config minimum-stability dev
Almost all configuration values can be edited from the command line, as explained in this section of the docs.
Global Packages
Some packages can come in handy if installed globally. Case in point, tools like Spress and Laravel can have command line tools for generating new projects, re-running some common commands, etc. Likewise, a test suite like PHPUnit can benefit from being runnable from any part of the system, and makes the project it’s testing much lighter.
In general, packages can be installed globally with the global option, like so:
composer global require phpunit/phpunit
However, according to some, this is considered harmful. Your mileage may vary – we’ve generally found that when a professional and modern approach of developing in an isolated environment is followed, global require is 100% safe to use.
Packagist

Packagist is Composer’s main repository. This is where all the Composer packages are aggregated, which means that when we execute composer search <package> we are actually searching Packagist. The Packagist website also has information on all the packages and a useful search and sort engine. This way, PHP developers don’t have to spend days searching for packages on Github.
Not only does Packagist aggregate PHP packages, it also encourages PHP developers to submit their own packages, strengthening the community.
Submitting a Package to Packagist
Let’s create a simple PHP package so we can see how easy it is to submit it to Packagist. We are going to create a simple class that converts inches to centimetres and centimetres to inches. Let’s create a /src/Converter/Converter.php file. Inside this file, we are going to have the following code:
<?php

namespace Converter;

class Converter
{
    public function convertToCm($value)
    {
        return $value * 0.3937;
    }

    public function convertToInch($value)
    {
        return $value * 2.54;
    }
}
As you can see, a very simple class. The second step is to navigate to the root of our project and run the composer init command to run the wizard and generate the composer.json file.
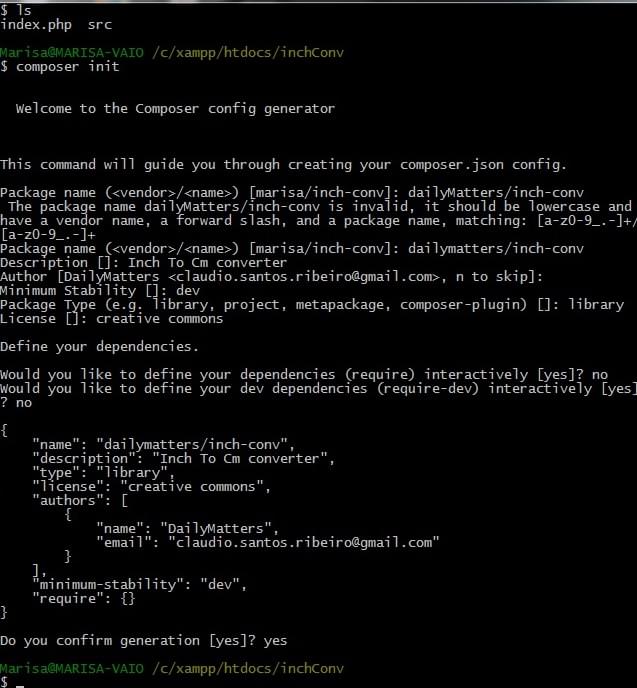
The last thing we need to do is add the autoload key to our composer.json file. The final file should look like this:
{
    "name": "dailymatters/inch-conv",
    "description": "Inch To Cm converter",
    "type": "library",
    "license": "creative commons",
    "authors": [
        {
            "name": "DailyMatters",
            "email": "email@gmail.com"
        }
    ],
    "minimum-stability": "dev",
    "require": {},
    "autoload": {
        "psr-0": {
            "Converter": "src/"
        }
    }
}
Let’s now run composer install so that our autoloader can be created. Then, let’s test our package. In the root of our project, let’s create an index.php file.
<?php

require_once '/vendor/autoload.php';

use Converter\Converter;

$conv = new Converter;

$result = $conv->convertToCm(1);
echo $result;

$result = $conv->convertToInch(1);
echo $result;
As you can see, we are using the require_once '/vendor/autoload.php'; line to autoload our class and then using it to do some conversions.
Testing it on the command line with php index.php should produce the desired result.
To submit this package to Packagist, we need to push it to a Github repo. Then, we sign in to Packagist using our Github account, hit Submit, and point to our newly created Github repo.
Remember to update Packagist whenever you update your repo in Github! You can either configure Packagist to do it automatically, or you can access your package on Packagist and click the
Updatebutton. This way, your package in Packagist will always mirror your package’s Github state.
Conclusion
Composer has revolutionized the way PHP developers work, and promises to continue doing so. It’s a powerful and essential tool for any PHP developer’s tool belt, and the cornerstone of many modern PHP applications.
Are you using Composer? Is anything about it unclear? Let us know in the comments below.
Frequently Asked Questions about Composer
What is the main purpose of Composer in PHP development?
Composer is a dependency management tool for PHP. It allows you to declare the libraries your project depends on and it will manage (install/update) them for you. It simplifies the process of managing your project’s dependencies. Instead of manually downloading and including libraries, Composer allows you to declare a JSON file called composer.json that lists your project’s dependencies. When you run the composer install command, it reads this file and downloads the appropriate packages and their dependencies.
How does Composer differ from other package managers?
Unlike other package managers, Composer is not a package manager in the traditional sense. It deals with “packages” or libraries, but it manages them on a per-project basis, installing them in a directory (e.g., vendor) inside your project. It also allows you to specify the version of the library your project depends on, ensuring compatibility across different environments.
How do I install Composer on my system?
The installation process of Composer is straightforward. You can download it from the official website, and then follow the instructions for your specific operating system. For most systems, it involves downloading a Composer.phar file and moving it to a directory in your PATH so that it can be run from anywhere.
What is Packagist and how does it relate to Composer?
Packagist is the main Composer repository. It aggregates all sorts of PHP packages that are installable with Composer. When you specify dependencies in your composer.json file, Composer looks for the corresponding packages on Packagist.
How do I update the packages managed by Composer?
To update the packages managed by Composer, you can use the composer update command. This command will update all packages to their latest version, according to the specified version constraints in the composer.json file.
Can I use Composer for applications not written in PHP?
Composer is specifically designed for PHP, so it’s not suitable for managing dependencies for applications written in other languages. However, it can be used to manage dependencies for PHP components within a larger project that may include other languages.
How do I specify dependencies with Composer?
Dependencies are specified in a composer.json file in your project root. Each dependency is listed with its package name and version constraint. The version constraint can be a specific version number, a range of versions, or a pattern that matches certain versions.
What is the role of the composer.lock file?
The composer.lock file is automatically generated by Composer. It records the exact versions of the dependencies that your project is currently using. This ensures that when you share your project with others, they can install the exact same versions of the dependencies, ensuring compatibility.
Can I use Composer with version control systems like Git?
Yes, Composer works well with version control systems like Git. You can include the composer.json and composer.lock files in your Git repository, allowing other developers to easily install the correct versions of the dependencies.
How can I contribute to the Composer project?
Composer is an open-source project, and contributions are welcome. You can contribute by reporting bugs, suggesting features, writing documentation, or submitting pull requests with code changes. You can find more information on the official Composer GitHub page.