


Views is in Drupal 8 core. We all know that by now. Twig is the new templating engine in Drupal 8. This we also know. But do we know how to interact programmatically with the first in order to theme a View using the second? Aside from overriding View templates like with any other subsystem, we have available a more powerful alternative in the form of Views plugins (Display, Style, Row and Field).
In this article, we are going to look at how we can create a custom Style plugin for Views in Drupal 8. We will use the Bootstrap tab markup as a goal and implement a tabbed output for our View results. In the View configuration, the Style settings will allow us to specify which field will be used as the tab navigation copy, leaving the rest of the fields shown in the respective tab panes. Basically, each View result will represent a tab – so this example is not suited for Views which have more than a few results. The main goal is to illustrate how we can create our own Views Style plugins in Drupal 8.
We will not cover the details on how you can use Bootstrap in your project. However, you can check out the documentation page on assets or even this article on how to make sure anonymous users can benefit from jQuery being loaded on the page. And if you want to see the code we write ahead of time, you can find it in this repository within the Demo module.
Key Takeaways
- Drupal 8 core now includes Views, and Twig is the new templating engine. Views plugins (Display, Style, Row and Field) offer a powerful alternative to overriding View templates, and this guide explains how to create a custom Style plugin for Views in Drupal 8. This will be used to implement a tabbed output for View results using Bootstrap tab markup.
- The creation of a custom Style plugin involves building a plugin class within the Plugin/views/style folder of a module. This class extends from the StylePluginBase class and includes a @ViewsStyle annotation, which defines the id, title, help text, theme and display types for the plugin. The Style plugin is responsible for rendering the listing and can be used by most Display types.
- The final part of creating a custom Style plugin involves defining a theme function and creating a Twig template file. The theme function, defined inside the .module file, passes the $view object and the resulting $rows by default to the template. The Twig template file controls how the output of the plugin is rendered. Once the custom Style plugin is created, it can be enabled through the Drupal admin interface and used with a View by selecting it from the Format setting.
What Is the Style Plugin?
The Views Style plugin is the one responsible for rendering the listing. Notable examples of core Style plugins are Unformatted List, HTML List, Table or Grid. They are used by the Display plugin and they in turn use Row plugins that represent one item in the listing.
In Drupal 8, all Views plugin types are built using the new Plugin system and share some common functionality (they always extend from the same Views PluginBase).
Let’s now create our own such Style plugin that can be used by most Display types (Page, Block, etc) and which uses the Field row plugin.
The Bootstrap Tabs Style Plugin
The first step is to create our plugin class located in the Plugin/views/style folder of our module:
namespace Drupal\demo\Plugin\views\style;
use Drupal\Core\Form\FormStateInterface;
use Drupal\views\Plugin\views\style\StylePluginBase;
/**
* A Views style that renders markup for Bootstrap tabs.
*
* @ingroup views_style_plugins
*
* @ViewsStyle(
* id = "bootstrap_tabs",
* title = @Translation("Bootstrap Tabs"),
* help = @Translation("Uses the Bootstrap Tabs component."),
* theme = "demo_bootstrap_tabs",
* display_types = {"normal"}
* )
*/
class BootstrapTabs extends StylePluginBase {
/**
* Does this Style plugin allow Row plugins?
*
* @var bool
*/
protected $usesRowPlugin = TRUE;
/**
* Does the Style plugin support grouping of rows?
*
* @var bool
*/
protected $usesGrouping = FALSE;
/**
* {@inheritdoc}
*/
protected function defineOptions() {
$options = parent::defineOptions();
$options['tab_nav_field'] = array('default' => '');
return $options;
}
/**
* {@inheritdoc}
*/
public function buildOptionsForm(&$form, FormStateInterface $form_state) {
parent::buildOptionsForm($form, $form_state);
$options = $this->displayHandler->getFieldLabels(TRUE);
$form['tab_nav_field'] = array(
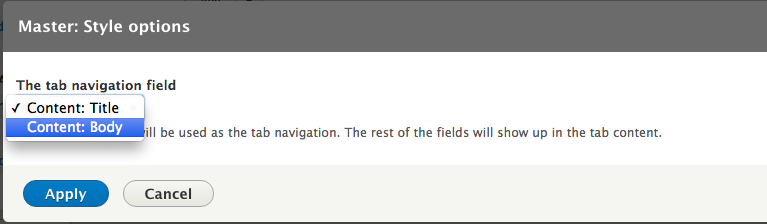
'#title' => $this->t('The tab navigation field'),
'#description' => $this->t('Select the field that will be used as the tab navigation. The rest of the fields will show up in the tab content.'),
'#type' => 'select',
'#default_value' => $this->options['tab_nav_field'],
'#options' => $options,
);
}
}
The Drupal plugin type we are creating an instance of is ViewsStyle with some basic configuration passed in the annotation. Leaving aside the obvious ones, we have the theme and display_types keys that are worth mentioning. The first declares which theme function this Style plugin will use to render its data while the second declares which kinds of Display plugins this Style can be used by (in our case all Display types which don’t otherwise specify a custom type: normal). For more information on all the available annotation configuration for this plugin type, check out the Drupal\views\Annotation\ViewsStyle annotation class.
Using the two class properties, we declare that our Style uses row plugins but does not allow grouping. Make sure you check out the parent classes to learn more about what other options can be specified like this. For example, the class we are extending already declares that Views fields can be used with the Style plugin.
As mentioned before, using the two methods we create a plugin option and form element to be able to specify which field should act as the tab navigation. Using the current display handler ($this->displayHandler) we can load up all the available View fields the site builder has added to it. And this new form element will be available on the Style settings form:
Since we are extending from the StylePluginBase class, there is nothing more we need to do. For the markup output we can rely on the demo_bootstrap_tabs theme which receives the relevant variables from the executed View. If we want, we can override any of the render methods and add more variables, change the theme, or whatever we need. We are good with the defaults, especially since we will implement a preprocessor to handle the variables that the template receives.
The Theme
It’s time to define the demo_bootstrap_tabs theme as we normally do (inside our .module file):
/**
 * Implements hook_theme().
 */
function demo_theme($existing, $type, $theme, $path) {
  return array(
    'demo_bootstrap_tabs' => array(
      'variables' => array('view' => NULL, 'rows' => NULL),
      'path' => drupal_get_path('module', 'demo') . '/templates',
    ),
  );
}
The Style plugin passes the $view object and the resulting $rows by default to the template. It is up to the preprocessor to do a bit of handling of these variables (if needed) before they are sent to the template:
/**
 * Prepares variables for views demo_bootstrap_tabs template.
 *
 * Template: demo-bootstrap-tabs.html.twig.
 *
 * @param array $variables
 *   An associative array containing:
 *   - view: The view object.
 *   - rows: An array of row items. Each row is an array of content.
 */
function template_preprocess_demo_bootstrap_tabs(&$variables) {
  $view = $variables['view'];
  $rows = $variables['rows'];
  $variables['nav'] = array();

  // Prepare the tab navigation.
  $field = $view->style_plugin->options['tab_nav_field'];
  if (!$field || !isset($view->field[$field])) {
    template_preprocess_views_view_unformatted($variables);
    return;
  }

  $nav = array();
  foreach ($rows as $id => $row) {
    $nav[$id] = array(
      '#theme' => 'views_view_field',
      '#view' => $view,
      '#field' => $view->field[$field],
      '#row' => $row['#row'],
    );
  }

  template_preprocess_views_view_unformatted($variables);
  $variables['nav'] = $nav;
}
So what’s happening here? First, we check the Style plugin options for the field name to be used (the one that was selected when configuring the View). If one is not there, we return, but not before doing a bit of default preprocessing that the template_preprocess_views_view_unformatted function already does well. So we delegate to it. Then, we loop through the Views results and build an array of content for our tab navigation. For this, we use the default Views views_view_field theme function to render the selected field. Finally, we pass this array to the template and also run the default preprocessor of the unformatted list style.
The Template
In Drupal 8 there are no more theme functions, everything is now handled in Twig templates. So let’s see how the demo-bootstrap-tabs.html.twig file looks like in our module’s templates folder:
<div>
    <!-- Nav tabs -->
    <ul class="nav nav-tabs" role="tablist">
        {% for tab in nav %}
            {% set active = '' %}
            {% if loop.index0 == 0 %}
                {% set active = 'active' %}
            {% endif %}
            <li role="presentation" class="{{ active }}"><a href="#tab-{{ loop.index0 }}" aria-controls="profile" role="tab" data-toggle="tab">{{ tab }}</a></li>
        {% endfor %}
    </ul>

    <!-- Tab panes -->
    <div class="tab-content">
        {% for row in rows %}
            {% set active = '' %}
            {% if loop.index0 == 0 %}
                {% set active = 'active' %}
            {% endif %}
            <div role="tabpanel" class="tab-pane {{ active }}" id="tab-{{ loop.index0 }}">{{ row.content }}</div>
        {% endfor %}
    </div>
</div>
As you can see, this is the necessary markup for the Bootstrap tabs. It won’t work, of course, without making sure the relevant Bootstrap styles and script are loaded in your theme first.
The first thing we render are the tab navigation items (from our nav variable). While looping through this array, we also make use of the loop index value in order to default the first item as active and be able to target the tab content panes below using unique IDs. For the actual value of the items, we just print the render array we created in our preprocessor and Drupal takes care of rendering that. That being said, it is probably a good idea to make sure that the field you use here is relatively short, without a link and plain markup. Titles would probably work just fine. But this is a matter of configuring the View accordingly.
Below the navigation, we print the actual view rows, using the same loop index to default the first row as the active tab pane and identify them uniquely so the navigation above can control their visibility. As for the content, we print the entire row.content variable (which is prepared inside template_preprocess_views_view_unformatted) and which contains all the fields in our View. And if we want to not include the field we used for the navigation, we can just exclude that one from display in the View configuration. It will still appear in the navigation (because we explicitly print it there) but not in the main tab pane.
Conclusion
And there we have it. A Views Style plugin to output the View results as Bootstrap tabs. All we need now is to make sure the Bootstrap assets are loaded and simply configure our View to use the new Style plugin. Do keep in mind that this is not meant for Views with lots of results and it only serves as an example to demonstrate how to create Style plugins.
If you have questions, comments, or suggestions, please leave them below!
Frequently Asked Questions on Theming Views in Drupal 8
How can I create a custom style plugin in Drupal 8?
Creating a custom style plugin in Drupal 8 involves several steps. First, you need to create a new module if you don’t have one already. Then, in your module’s src/Plugin/views/style directory, create a PHP file for your custom style plugin. The file should contain a class that extends the StylePluginBase class and includes a @ViewsStyle annotation. The annotation defines the id, title, and help text for your plugin. After defining the necessary methods in your class, you can enable your new style plugin through the Drupal admin interface.
What are the key components of a custom style plugin?
A custom style plugin in Drupal 8 typically consists of three key components: the plugin definition, the plugin class, and the template file. The plugin definition is provided through the @ViewsStyle annotation and includes the id, title, and help text for the plugin. The plugin class extends the StylePluginBase class and defines the methods that control how the plugin behaves. The template file is a Twig file that controls how the output of the plugin is rendered.
How can I override the default views template in Drupal 8?
To override the default views template in Drupal 8, you need to create a new Twig file in your theme’s templates directory. The name of the file should follow the pattern views-view–[view-name]–[display-id].html.twig. In this file, you can define the HTML markup and Twig code that should be used to render the view. After creating the file, clear the Drupal cache to see your changes.
How can I add variables to a views template in Drupal 8?
Adding variables to a views template in Drupal 8 can be done through a preprocess function in your theme’s .theme file. The function should follow the pattern THEME_NAME_preprocess_views_view__VIEW_NAME__DISPLAY_ID, and it should take a single argument, which is an array of variables. You can add new variables to this array, and they will be available in your Twig template.
How can I use a custom style plugin with a view in Drupal 8?
Once you’ve created a custom style plugin in Drupal 8, you can use it with a view through the Drupal admin interface. Edit the view and go to the Format section. Click on the Format setting and select your custom style plugin from the list. After saving the view, it will be rendered using your custom style plugin.
What is the purpose of the render() method in a custom style plugin?
The render() method in a custom style plugin in Drupal 8 is responsible for rendering the view. It takes an array of rows as input and returns a render array. The render array should include the #theme key, which specifies the Twig template to use, and any variables that should be passed to the template.
How can I debug a views template in Drupal 8?
Debugging a views template in Drupal 8 can be done using the Twig debug feature. Enable Twig debugging in your services.yml file by setting the debug option to true. Then, when you view a page that uses the template, you’ll see comments in the HTML source code that show which template files are being used and suggest template file names you can use to override them.
How can I use conditional logic in a views template in Drupal 8?
Conditional logic in a views template in Drupal 8 can be implemented using Twig’s if statement. In your Twig code, you can use the if keyword to test a condition, and then include different markup or code depending on whether the condition is true or false.
How can I customize the pager in a view in Drupal 8?
Customizing the pager in a view in Drupal 8 can be done through the Drupal admin interface. Edit the view and go to the Pager section. Here, you can choose the type of pager to use, set the number of items to display per page, and configure other pager settings.
How can I create a responsive view in Drupal 8?
Creating a responsive view in Drupal 8 involves using responsive design techniques in your views template. This could include using CSS media queries to adjust the layout and appearance of the view at different screen sizes, and using flexible units like percentages for widths and heights instead of fixed units like pixels.

