In a previous article, you’ve been introduced to CouchDB. This time, you’re going to create a full-fledged app where you can apply the things you learned. You’re also going to learn how to secure your database at the end of the tutorial.
Overview of the Project
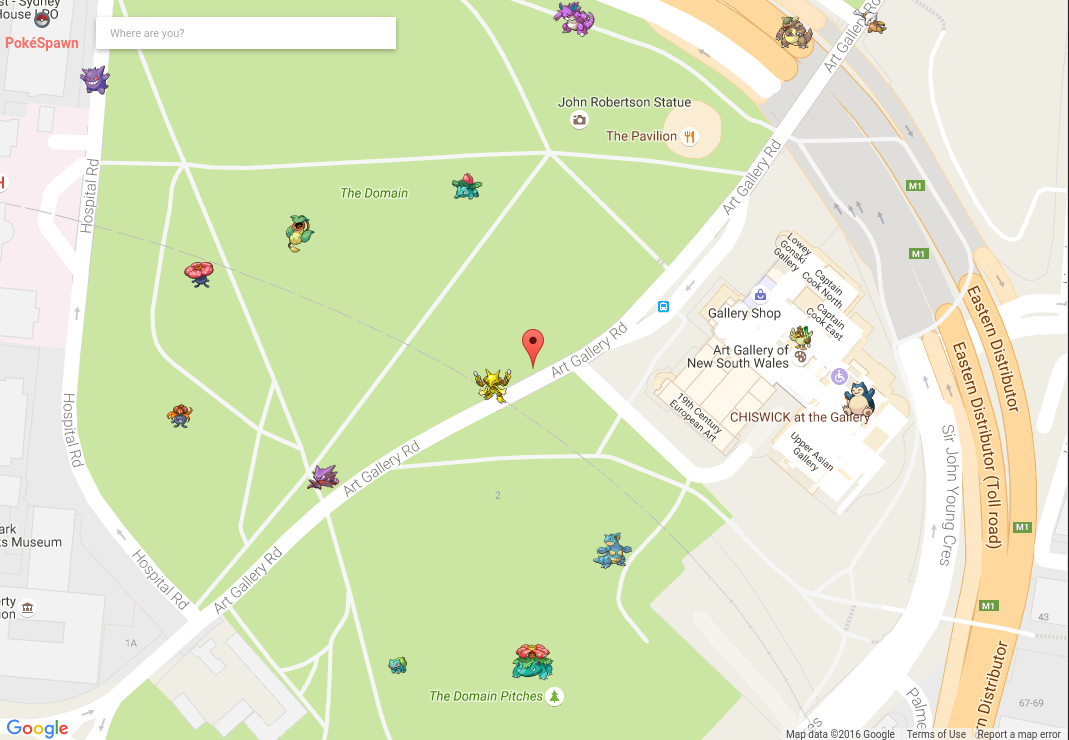
You’re going to build a Pokemon spawn locations recorder.
This will allow users to save the locations of the monsters they encounter on Pokemon Go. Google Maps will be used to search for locations and a marker placed to pinpoint the exact location. Once the user is satisfied with the location, the marker can be interacted with, when it will show a modal box which allows the user to enter the name of the Pokemon and save the location. When the next user comes along and searches the same location, the values added by previous users will be plotted in the map as markers. Here’s what the app will look like:
The full source code for the project is available on Github.
Setting Up the Development Environment
If you don’t have a good, isolated dev environment set up, it’s recommended you use Homestead Improved.
The box doesn’t come with CouchDB installed, so you’ll need to do that manually; but not just plain CouchDB. The app needs to work with geo data (latitudes and longitudes): you’ll supply CouchDB with the bounding box information from Google Maps. The bounding box represents the area currently being shown in the map, and all the previous coordinates users have added to that area would be shown on the map as well. CouchDB cannot do that by default, which is why you need to install a plugin called GeoCouch in order to give CouchDB some spatial superpowers.
The simplest way to do that is by means of the GeoCouch docker container. You can also try to install GeoCouch manually but it requires you to install CouchDB from source and configure it all by hand. I don’t really recommend this method unless you have a unix beard.
Go ahead and install Docker into the VM you’re using, and come back here once you’re done.
Installing GeoCouch
First, clone the repo and navigate inside the created directory.
git clone git@github.com:elecnix/docker-geocouch.git
cd docker-geocouch
Next, open the Dockerfile and replace the script for getting CouchDB with the following:
# Get the CouchDB source
RUN cd /opt; wget http://www-eu.apache.org/dist/couchdb/source/${COUCH_VERSION}/a$
    tar xzf /opt/apache-couchdb-${COUCH_VERSION}.tar.gz
You need to do this because the download URL that’s currently being used is already failing.
Build the docker image:
docker build -t elecnix/docker-geocouch:1.6.1 .
This will take a while depending on your internet connection so go grab a snack. Once it’s done, create the container and start it:
docker create -ti -p 5984:5984 elecnix/docker-geocouch:1.6.1
docker start <container id>
Once it has started, you can test to see if it’s running by executing the following command:
curl localhost:5984
Outside the VM, if you forwarded ports properly, that’ll be:
curl 192.168.33.10:5984
It should return the following:
{"couchdb":"Welcome","uuid":"2f0b5e00e9ce08996ace6e66ffc1dfa3","version":"1.6.1","vendor":{"version":"1.6.1","name":"The Apache Software Foundation"}}
Note that I’ll constantly refer to 192.168.33.10 throughout the article. This is the IP assigned to Scotchbox, which is the Vagrant box I used. If you’re using Homestead Improved, the IP is 192.168.10.10. You can use this IP to access the app. If you’re using something else entirely, adapt as needed.
Setting Up the Project
You’re going to use the Slim framework to speed up the development of the app. Create a new project using Composer:
php composer create-project slim/slim-skeleton pokespawn
pokespawn is the name of the project, so go ahead and navigate to that directory once Composer is done installing. Then, install the following extra packages:
composer require danrovito/pokephp guzzlehttp/guzzle gregwar/image vlucas/phpdotenv
Here’s a brief overview on each one:
danrovito/pokephp– for easily talking to the Pokemon API.guzzlehttp/guzzle– for making requests to the CouchDB server.gregwar/image– for resizing the Pokemon sprites returned by the Pokemon API.vlucas/phpdotenv– for storing configuration values.
Setting Up the Database
Access Futon from the browser and create a new database called pokespawn. Once created, go inside the database and create a new view. You can do that by clicking on the view dropdown and selecting temporary view. Add the following inside the textarea for the Map Function:
function(doc){
  if(doc.doc_type == 'pokemon'){
    emit(doc.name, null);
  }
}
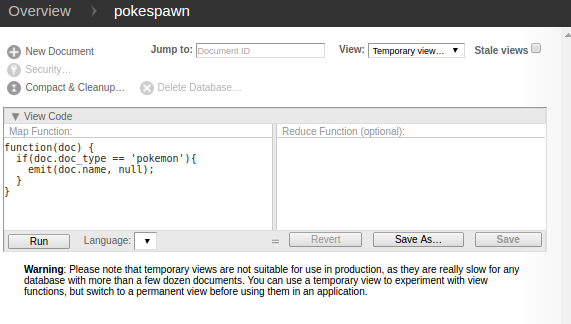
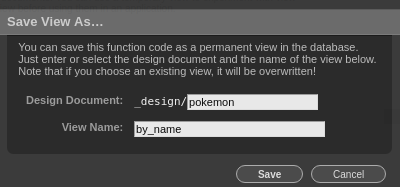
Once that’s done, click on the save as button, add pokemon as the name of the design document, and by_name as the view name. Press on save to save the view. Later on, you’ll be using this view to suggest Pokemon names based on what the user has entered.
Next, create a design document for responding to spatial searches. You can do that by selecting Design documents in the view dropdown then click on new document. Once in the page for creating a design document, click on the add field button and add spatial as the field name, and the following as the value:
{
   "points": "function(doc) {\n    if (doc.loc) {\n        emit([{\n            type: \"Point\",\n            coordinates: [doc.loc[0], doc.loc[1]]\n        }], [doc.name, doc.sprite]);\n    }};"
}
This design document utilizes the spatial functions provided by GeoCouch. The first thing it does is check whether the document has a loc field in it. The loc field is an array containing the coordinates of a specific location, with the first item containing the latitude and the second item containing the longitude. If the document meets this criteria, it uses the emit() function just like a normal view. The key is a GeoJSON geometry and the value is an array containing the name of the Pokemon and the sprite.
When you make a request to the design document, you need to specify the start_range and the end_range which has the format of a JSON array. Each item can either be a number or a null. null is used if you want an open range. Here’s an example request:
curl -X GET --globoff 'http://192.168.33.10:5984/pokespawn/_design/location/_spatial/points?start_range=[-33.87049924568689,151.2149563379288]&end_range=[33.86709181198735,151.22298150730137]'
And its output:
{
  "update_seq": 289,
  "rows":[{
     "id":"c8cc500c68f679a6949a7ff981005729",
     "key":[
        [
           -33.869107336588,
           -33.869107336588
        ],
        [
           151.21772705984,
           151.21772705984
        ]
     ],
     "bbox":[
        -33.869107336588,
        151.21772705984,
        -33.869107336588,
        151.21772705984
     ],
     "geometry":{
        "type":"Point",
        "coordinates":[
           -33.869107336588,
           151.21772705984
        ]
     },
     "value":[
        "snorlax",
        "143.png"
     ]
  }]
}
If you want to learn more about what specific operations you can do with GeoCouch, be sure to read the documentation or the Wiki.
Creating the Project
Now you’re ready to write some code. First you’re going to take a look at the code for the back-end then move on to the front-end code.
Poke Importer
The app requires some Pokemon data to be already in the database before it can be used, thus the need for a script that’s only executed locally. Create a poke-importer.php file at the root of your project directory and add the following:
<?php
require 'vendor/autoload.php';

set_time_limit(0);

use PokePHP\PokeApi;
use Gregwar\Image\Image;

$api = new PokeApi;

$client = new GuzzleHttp\Client(['base_uri' => 'http://192.168.33.10:5984']); //create a client for talking to CouchDB

$pokemons = $api->pokedex(2); //make a request to the API
$pokemon_data = json_decode($pokemons); //convert the json response to array

foreach ($pokemon_data->pokemon_entries as $row) {
    $pokemon = [
        'id' => $row->entry_number,
        'name' => $row->pokemon_species->name,
        'sprite' => "{$row->entry_number}.png",
        'doc_type' => "pokemon"
    ];
    //get image from source, save it then resize.
    Image::open("https://raw.githubusercontent.com/PokeAPI/sprites/master/sprites/pokemon/{$row->entry_number}.png")
         ->resize(50, 50)
         ->save('public/img/' . $row->entry_number . '.png');
    //save the pokemon data to the database
    $client->request('POST', "/pokespawn", [
        'headers' => [
                'Content-Type' => 'application/json'
        ],
        'body' => json_encode($pokemon)
    ]);

    echo $row->pokemon_species->name . "\n";
}
echo "done!";
This script makes a request to the Pokedex endpoint of the Pokemon API. This endpoint requires the ID of the Pokedex version that you want it to return. Since Pokemon Go only currently allows players to catch Pokemon from the first generation, supply 2 as the ID. This returns all the Pokemon from the Kanto region of the original Pokemon game. Then loop through the data, extract all the necessary information, save the sprite, and make a new document using the extracted data.
Routes
Open the src/routes.php file and add the following routes:
<?php
$app->get('/', 'HomeController:index');
$app->get('/search', 'HomeController:search');
$app->post('/save-location', 'HomeController:saveLocation');
$app->post('/fetch', 'HomeController:fetch');
Each of the routes will respond to the actions that can be performed throughout the app. The root route returns the home page, the search route returns the Pokemon name suggestions, the save-location route saves the location and the fetch route returns the Pokemon in a specific location.
Home Controller
Under the src directory, create an app/Controllers folder and inside create a HomeController.php file. This will perform all the actions needed for each of the routes. Here is the code:
<?php
namespace App\Controllers;

class HomeController
{
  protected $renderer;

  public function __construct($renderer)
  {
    $this->renderer = $renderer; //the twig renderer
    $this->db = new \App\Utils\DB; //custom class for talking to couchdb
  }

  public function index($request, $response, $args)
  {
    //render the home page
    return $this->renderer->render($response, 'index.html', $args);
  }

  public function search()
  {
    $name = $_GET['name']; //name of the pokemon being searched
    return $this->db->searchPokemon($name); //returns an array of suggestions based on the user input
  }

  public function saveLocation()
  {
    $id = $_POST['pokemon_id']; //the ID assigned by CouchDB to the Pokemon
    return $this->db->savePokemonLocation($id, $_POST['pokemon_lat'], $_POST['pokemon_lng']); //saves the pokemon location to CouchDB and returns the data needed to plot the pokemon in the map
  }

  public function fetch()
  {
    return json_encode($this->db->fetchPokemons($_POST['north_east'], $_POST['south_west'])); //returns the pokemon's within the bounding box of Google map.
  }
}
The Home Controller uses the $renderer which is passed in via the constructor to render the home page of the app. It also uses the DB class which you’ll be creating shortly.
Talking to CouchDB
Create a Utils/DB.php file under the app directory. Open the file and create a class:
<?php
namespace App\Utils;

class DB
{

}
Inside the class, create a new Guzzle client. You’re using Guzzle instead of some of the PHP clients for CouchDB because you can do anything you want with it.
private $client;

public function __construct()
{
    $this->client = new \GuzzleHttp\Client([
        'base_uri' => getenv('BASE_URI')
    ]);
}
The config is from the .env file at the root of the project. This contains the base URL of CouchDB.
BASE_URI="http://192.168.33.10:5984"
searchPokemon is responsible for returning the data used by the auto-suggest functionality. Since CouchDB doesn’t actually support the LIKE condition that you’re used to in SQL, you’re using a little hack to mimic it. The trick here is using start_key and end_key instead of just key which only returns exact matches. fff0 is one of the special unicode characters allocated at the very end of the basic multilingual plane. This makes it a good candidate for appending at the end of the actual string being searched, which makes the rest of the characters become optional because of its high value. Note that this hack only works for short words so it’s more than enough for searching for Pokemon names.
public function searchPokemon($name)
{
  $unicode_char = '\ufff0';
  $data = [
    'include_docs' => 'true',
    'start_key' => '"' . $name . '"',
    'end_key' => '"' . $name . json_decode('"' . $unicode_char .'"') . '"'
  ];
  //make a request to the view you created earlier
  $doc = $this->makeGetRequest('/pokespawn/_design/pokemon/_view/by_name', $data);
  if (count($doc->rows) > 0) {
    $data = [];
    foreach ($doc->rows as $row) {
      $data[] = [
        $row->key,
        $row->id
      ];
    }
    return json_encode($data);
  }
  $result = ['no_result' => true];
  return json_encode($result);
}
makeGetRequest is used for performing the read requests to CouchDB and makePostRequest for write.
public function makeGetRequest($endpoint, $data = [])
{
  if (!empty($data)) {
    //make a GET request to the endpoint specified, with the $data passed in as a query parameter
    $response = $this->client->request('GET', $endpoint, [
      'query' => $data
    ]);
  } else {
    $response = $this->client->request('GET', $endpoint);
  }
  return $this->handleResponse($response);
}

private function makePostRequest($endpoint, $data)
{
  //make a POST request to the endpoint specified, passing in the $data for the request body
  $response = $this->client->request('POST', $endpoint, [
    'headers' => [
        'Content-Type' => 'application/json'
    ],
    'body' => json_encode($data)
  ]);
  return $this->handleResponse($response);
}
savePokemonLocation saves the coordinates to which the Google map marker is currently pointing, along with the name and the sprite. A doc_type field is also added for easy retrieval of all the documents related to locations.
public function savePokemonLocation($id, $lat, $lng)
{
  $pokemon = $this->makeGetRequest("/pokespawn/{$id}"); //get pokemon details based on ID

  //check if supplied data are valid
  if (!empty($pokemon->name) && $this->isValidCoordinates($lat, $lng)) {
    $lat = (double) $lat;
    $lng = (double) $lng;
    //construct the data to be saved to the database
    $data = [
      'name' => $pokemon->name,
      'sprite' => $pokemon->sprite,
      'loc' => [$lat, $lng],
      'doc_type' => 'pokemon_location'
    ];

    $this->makePostRequest('/pokespawn', $data); //save the location data
    $pokemon_data = [
      'type' => 'ok',
      'lat' => $lat,
      'lng' => $lng,
      'name' => $pokemon->name,
      'sprite' => $pokemon->sprite
    ];
    return json_encode($pokemon_data); //return the data needed by the pokemon marker
  }
  return json_encode(['type' => 'fail']); //invalid data
}
isValidCoordinates checks if the latitude and longitude values have a valid format.
private function isValidCoordinates($lat = '', $lng = '')
{
  $coords_pattern = '/^[+\-]?[0-9]{1,3}\.[0-9]{3,}\z/';
  if (preg_match($coords_pattern, $lat) && preg_match($coords_pattern, $lng)) {
    return true;
  }
  return false;
}
fetchPokemons is the function that makes the request to the design document for spatial search that you created earlier. Here, you specify the southwest coordinates as the value for the start_range and the northeast coordinates as the value for the end_range. The response is also limited to the first 100 rows to prevent requesting too much data. Earlier, you’ve also seen that there are some data returned by CouchDB that aren’t really needed. It would be useful to extract and then return only the data needed on the front-end. I chose to leave that as an optimization for another day.
public function fetchPokemons($north_east, $south_west)
{
  $north_east = array_map('doubleval', $north_east); //convert all array items to double
  $south_west = array_map('doubleval', $south_west);
  $data = [
    'start_range' => json_encode($south_west),
    'end_range' => json_encode($north_east),
    'limit' => 100
  ];
  $pokemons = $this->makeGetRequest('/pokespawn/_design/location/_spatial/points', $data); //fetch all pokemon's that are in the current area
  return $pokemons;
}
handleResponse converts the JSON string returned by CouchDB into an array.
private function handleResponse($response)
{
  $doc = json_decode($response->getBody()->getContents());
  return $doc;
}
Open composer.json at the root directory and add the following right below the require property, then execute composer dump-autoload. This allows you to autoload all the files inside the src/app directory and make it available inside the App namespace:
"autoload": {
    "psr-4": {
        "App\\": "src/app"
    }
}
Lastly, inject the Home Controller into the container. You can do that by opening the src/dependencies.php file and add the following to the bottom:
$container['HomeController'] = function ($c) {
    return new App\Controllers\HomeController($c->renderer);
};
This allows you to pass the Twig renderer to the Home Controller and makes HomeController accessible from the router.
Home Page Template
Now you’re ready to proceed with the front-end. First, create a templates/index.html file at the root of the project directory and add the following:
<!DOCTYPE html>
<html lang="en">
<head>
    <meta charset="UTF-8">
    <meta name="viewport" content="width=device-width, initial-scale=1">
    <title>PokéSpawn</title>
    <link rel="stylesheet" href="lib/picnic/picnic.min.css">
    <link rel="stylesheet" href="lib/remodal/dist/remodal.css">
    <link rel="stylesheet" href="lib/remodal/dist/remodal-default-theme.css">
    <link rel="stylesheet" href="lib/javascript-auto-complete/auto-complete.css">
    <link rel="stylesheet" href="css/style.css">
    <link rel="icon" href="favicon.ico"><!-- by Maicol Torti https://www.iconfinder.com/Maicol-Torti -->
</head>
<body>
  <div id="header">
    <div id="title">
      <img src="img/logo.png" alt="logo" class="header-item" />
      <h1 class="header-item">PokéSpawn</h1>
    </div>
    <input type="text" id="place" class="controls" placeholder="Where are you?"><!-- text field for typing the location -->
  </div>


  <div id="map"></div>
  <!-- modal for saving pokemon location -->
  <div id="add-pokemon" class="remodal" data-remodal-id="modal">
    <h3>Plot Pokémon Location</h3>
    <form method="POST" id="add-pokemon-form">
      <div>
        <input type="hidden" name="pokemon_id" id="pokemon_id"><!-- id of the pokemon in CouchDB-->
        <input type="hidden" name="pokemon_lat" id="pokemon_lat"><!--latitude of the red marker -->
        <input type="hidden" name="pokemon_lng" id="pokemon_lng"><!--longitude of the red marker -->
        <input type="text" name="pokemon_name" id="pokemon_name" placeholder="Pokémon name"><!--name of the pokemon whose location is being added -->
      </div>
      <div>
        <button type="button" id="save-location">Save Location</button><!-- trigger the submission of location to CouchDB -->
      </div>
    </form>
  </div>

  <script src="lib/zepto.js/dist/zepto.min.js"></script><!-- event listening, ajax -->
  <script src="lib/remodal/dist/remodal.min.js"></script><!-- for modal box -->
  <script src="lib/javascript-auto-complete/auto-complete.min.js"></script><!-- for autocomplete text field -->
  <script src="js/main.js"></script>

  <script src="https://maps.googleapis.com/maps/api/js?key=YOUR_GOOGLEMAP_APIKEY&callback=initMap&libraries=places" defer></script><!-- for showing a map-->
</body>
</html>
In the <head> are the styles from the various libraries that the app uses, as well as the styles for the app. In the <body> are the text field for searching locations, the map container, and the modal for saving a new location. Below those are the scripts used in the app. Don’t forget to replace YOUR_GOOGLEMAP_APIKEY in the Google Maps script with your own API key.
JavaScript
For the main JavaScript file (public/js/main.js), first create variables for storing values that you will be needing throughout the whole file.
var modal = $('#add-pokemon').remodal(); //initialize modal
var map; //the google map

var markers = []; //an array for storing all the pokemon markers currently plotted in the map
Next, create the function for initializing the map. A min_zoomlevel is specified to prevent users from zooming out until they can see the entirety of the world map. You’ve already added a limit to the results that can be returned by CouchDB, but this is also a nice addition to prevent the users from expecting that they can select data from the whole world.
function initMap() {
  var min_zoomlevel = 18;
  map = new google.maps.Map(document.getElementById('map'), {
    center: {lat: -33.8688, lng: 151.2195}, //set
    disableDefaultUI: true, //hide default UI controls
    zoom: min_zoomlevel, //set default zoom level
    mapTypeId: 'roadmap' //set type of map
  });

  //continue here...
}
Create the marker for pin-pointing locations that users want to add. Then, add an event listener for opening the modal for adding locations when the marker is pressed:
marker = new google.maps.Marker({
  map: map,
  position: map.getCenter(),
  draggable: true
});

marker.addListener('click', function(){
  var position = marker.getPosition();
  $('#pokemon_lat').val(position.lat());
  $('#pokemon_lng').val(position.lng());
  modal.open();
});
Initialize the search box:
var header = document.getElementById('header');
var input = document.getElementById('place');
var searchBox = new google.maps.places.SearchBox(input); //create a google map search box
map.controls[google.maps.ControlPosition.TOP_LEFT].push(header); //position the header at the top left side of the screen
Add various map listeners:
map.addListener('bounds_changed', function() { //executes when user drags the map
  searchBox.setBounds(map.getBounds()); //make places inside the current area a priority when searching
});

map.addListener('zoom_changed', function() { //executes when user zooms in or out of the map
  //immediately set the zoom to the minimum zoom level if the current zoom goes over the minimum
  if (map.getZoom() < min_zoomlevel) map.setZoom(min_zoomlevel);
});

map.addListener('dragend', function() { //executes the moment after the map has been dragged
  //loop through all the pokemon markers and remove them from the map
  markers.forEach(function(marker) {
    marker.setMap(null);
  });
  markers = [];

  marker.setPosition(map.getCenter()); //always place the marker at the center of the map
  fetchPokemon(); //fetch some pokemon in the current viewable area
});
Add an event listener for when the place in the search box changes.
searchBox.addListener('places_changed', function() { //executes when the place in the searchbox changes
  var places = searchBox.getPlaces();

  if (places.length == 0) {
    return;
  }

  var bounds = new google.maps.LatLngBounds();
  var place = places[0]; //only get the first place
  if (!place.geometry) {
    return;
  }

  marker.setPosition(place.geometry.location); //put the marker at the location being searched
  if (place.geometry.viewport) {
    // only geocodes have viewport
    bounds.union(place.geometry.viewport);
  } else {
    bounds.extend(place.geometry.location);
  }

  map.fitBounds(bounds); //adjust the current map bounds to that of the place being searched
  fetchPokemon(); //fetch some Pokemon in the current viewable area

});
The fetchPokemon function is responsible for fetching the Pokemon that were previously plotted in the currently viewable area of the map.
function fetchPokemon(){

  //get the northeast and southwest coordinates of the viewable area of the map
  var bounds = map.getBounds();
  var north_east = [bounds.getNorthEast().lat(), bounds.getNorthEast().lng()];
  var south_west = [bounds.getSouthWest().lat(), bounds.getSouthWest().lng()];

  $.post(
    '/fetch',
    {
      north_east: north_east,
      south_west: south_west
    },
    function(response){
      var response = JSON.parse(response);
      response.rows.forEach(function(row){ //loop through all the results returned
        var position = new google.maps.LatLng(row.geometry.coordinates[0], row.geometry.coordinates[1]); //create a new google map position
        //create a new marker using the position created above
        var poke_marker = new google.maps.Marker({
          map: map,
          title: row.value[0], //name of the pokemon
          position: position,
          icon: 'img/' + row.value[1] //pokemon image that was saved locally
        });

        //create an infowindow for the marker
        var infowindow = new google.maps.InfoWindow({
          content: "<strong>" + row.value[0] + "</strong>"
        });
        //when clicked it will show the name of the pokemon
        poke_marker.addListener('click', function() {
          infowindow.open(map, poke_marker);
        });
        markers.push(poke_marker);
      });
    }
  );
}
This is the code for adding the auto-suggest functionality of the text field for entering the name of a Pokemon. A renderItem function is specified to customize the HTML used for rendering each suggestion. This allows you to add the ID of the Pokemon as a data attribute which you then use to set the value of the pokemon_id field once a suggestion is selected.
new autoComplete({
  selector: '#pokemon_name', //the text field to add the auto-complete
  source: function(term, response){
    //use the results returned by the search route as a data source
    $.getJSON('/search?name=' + term, function(data){
      response(data);
    });
  },
  renderItem: function (item, search){ //the code for rendering each suggestions.
      search = search.replace(/[-\/\\^$*+?.()|[\]{}]/g, '\\$&');
      var re = new RegExp("(" + search.split(' ').join('|') + ")", "gi");
      return '<div class="autocomplete-suggestion" data-id="' + item[1] + '" data-val="' + item[0] + '">' + item[0].replace(re, "<b>$1</b>")+'</div>';
  },
  onSelect: function(e, term, item){ //executed when a suggestion is selected
    $('#pokemon_id').val(item.getAttribute('data-id'));
  }
});
When the Save Location button is pressed, a request is made to the server to add the Pokemon location to CouchDB.
$('#save-location').click(function(e){
  $.post('/save-location', $('#add-pokemon-form').serialize(), function(response){
    var data = JSON.parse(response);
    if(data.type == 'ok'){
      var position = new google.maps.LatLng(data.lat, data.lng); //create a location
      //create a new marker and use the location
      var poke_marker = new google.maps.Marker({
        map: map,
        title: data.name, //name of the pokemon
        position: position,
        icon: 'img/' + data.sprite //pokemon image
      });
      //create an infowindow for showing the name of the pokemon
      var infowindow = new google.maps.InfoWindow({
        content: "<strong>" + data.name + "</strong>"
      });
      //show name of pokemon when marker is clicked
      poke_marker.addListener('click', function() {
        infowindow.open(map, poke_marker);
      });

      markers.push(poke_marker);
    }
    modal.close();
    $('#pokemon_id, #pokemon_lat, #pokemon_lng, #pokemon_name').val(''); //reset the form
  });

});

$('#add-pokemon-form').submit(function(e){
  e.preventDefault(); //prevent the form from being submited on enter
})
Styles
Create a public/css/styles.css file and add the following styles:
html, body {
    height: 100%;
    margin: 0;
    padding: 0;
}

#header {
    text-align: center;
}

#title {
    float: left;
    padding: 5px;
    color: #f5716a;
}

.header-item {
    padding-top: 10px;
}

h1.header-item {
    font-size: 14px;
    margin: 0;
    padding: 0;
}

#map {
    height: 100%;
}

.controls {
    margin-top: 10px;
    border: 1px solid transparent;
    border-radius: 2px 0 0 2px;
    box-sizing: border-box;
    -moz-box-sizing: border-box;
    height: 32px;
    outline: none;
    box-shadow: 0 2px 6px rgba(0, 0, 0, 0.3);
}

#place {
    background-color: #fff;
    margin-left: 12px;
    padding: 0 11px 0 13px;
    text-overflow: ellipsis;
    width: 300px;
    margin-top: 20px;
}

#place:focus {
    border-color: #4d90fe;
}

#type-selector {
    color: #fff;
    background-color: #4d90fe;
    padding: 5px 11px 0px 11px;
}

#type-selector label {
    font-family: Roboto;
    font-size: 13px;
    font-weight: 300;
}

#target {
    width: 345px;
}

.remodal-wrapper {
    z-index: 100;
}

.remodal-overlay {
    z-index: 100;
}
Securing CouchDB
By default CouchDB is open to all. This means that once you expose it to the internet, anyone can wreak havoc in your database. Anyone can do any database operation by simply using Curl, Postman or any other tool for making HTTP requests. In fact, this temporary state even has a name: the “admin party”. You’ve seen this in action in the previous tutorial and even when you created a new database, a view and a design document earlier. All of these actions can only be performed by the server admin but you’ve gone ahead and done it without logging in or anything. Still not convinced? Try executing this on your local machine:
curl -X PUT http://192.168.33.10:5984/my_newdatabase
You’ll get the following as a response if you don’t already have a server admin on your CouchDB installation:
{"ok":true}
Yikes, right? The good news is there’s an easy fix. All you have to do is create a server admin. You can do so with the following command:
curl -X PUT http://192.168.33.10:5984/_config/admins/kami -d '"mysupersecurepassword"'
The command above creates a new server admin named “kami” with the password “mysupersecurepassword”.
By default, CouchDB doesn’t have any server admin so once you create one, the admin party is over. Note that server admins have god-like powers so you’re probably better off creating only one or two. Then create a handful of database admins who can only perform CRUD operations. You can do so by executing the following command:
curl -HContent-Type:application/json -vXPUT http://kami:mysupersecurepassword@192.168.33.10:5984/_users/org.couchdb.user:plebian --data-binary '{"_id": "org.couchdb.user:plebian","name": "plebian","roles": [],"type": "user","password": "mypass"}'
If successful, it will return a response similar to the following:
*   Trying 192.168.33.10...
* Connected to 192.168.33.10 (192.168.33.10) port 5984 (#0)
* Server auth using Basic with user 'root'
> PUT /_users/org.couchdb.user:plebian HTTP/1.1
> Host: 192.168.33.10:5984
> Authorization: Basic cm9vdDpteXN1cGVyc2VjdXJlcGFzc3dvcmQ=
> User-Agent: curl/7.47.0
> Accept: */*
> Content-Type:application/json
> Content-Length: 101
>
* upload completely sent off: 101 out of 101 bytes
< HTTP/1.1 201 Created
< Server: CouchDB/1.6.1 (Erlang OTP/R16B03)
< Location: http://192.168.33.10:5984/_users/org.couchdb.user:plebian
< ETag: "1-9c4abdc905ecdc9f0f56921d7de915b9"
< Date: Thu, 18 Aug 2016 07:57:20 GMT
< Content-Type: text/plain; charset=utf-8
< Content-Length: 87
< Cache-Control: must-revalidate
<
{"ok":true,"id":"org.couchdb.user:plebian","rev":"1-9c4abdc905ecdc9f0f56921d7de915b9"}
* Connection #0 to host 192.168.33.10 left intact
Now you can try the same command from earlier with a different database name:
curl -X PUT http://192.168.33.10:5984/my_awesomedatabase
And CouchDB will shout at you:
{"error":"unauthorized","reason":"You are not a server admin."}
For this to work, you now have to supply your username and password in the URL like so:
curl -X PUT http://{your_username}:{your_password}@192.168.33.10:5984/my_awesomedatabase
Ok, so that’s it? Well, not really because the only thing you’ve done is limit database operations that can only be done by server admins. This includes things like creating a new database, deleting a database, managing users, full-admin access to all databases (including system tables), CRUD operations to all documents. This leaves you with unauthenticated users still having the power to do CRUD stuff on any database. You can give this a try by logging out of Futon, pick any database you want to mess around with and do CRUD stuff in it. CouchDB will still happily perform those operations for you.
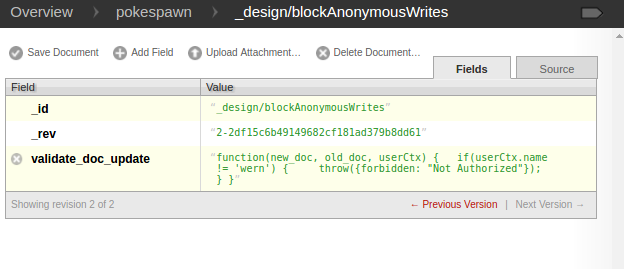
So, how do you patch up the remaining holes? You can do that by creating a design document that will check if the username of the user who is trying to perform a write operation (insert or update) is the same as the name of the user that’s allowed to do it. In Futon, log in using a server admin or database admin account, select the database you want to work with, and create a new design document. Set the ID as _design/blockAnonymousWrites, add a field named validate_doc_update, and set the value to the following:
function(new_doc, old_doc, userCtx){
  if(userCtx.name != 'kami'){
    throw({forbidden: "Not Authorized"});
  }
}
The new version of the document, the existing document, and the user context are passed in as an argument to this function. The only thing you need to check is the userCtx which contains the name of the database, the name of the user who’s doing the operation, and an array of roles assigned to the user.
A secObj is also passed as the fourth argument, but you don’t really need to work on it; that’s why it’s omitted. Basically, the secObj describes what admin privileges have been set on the database.
Once you’ve added the value, save the design document, log out, and try to create a new document or update an existing one and watch CouchDB complain at you.
Since you’re only checking for the username, you might be thinking that attackers can simply guess the username and supply any value to the password and it would work. Well, not really, because CouchDB first checks if the username and password are correct before the design document even gets executed.
Alternatively, if you have many users in a single database, you can also check for the role. The function below will throw an error at any user who doesn’t have the role of “pokemon_master”.
function(new_doc, old_doc, userCtx) {
  if(userCtx.roles.indexOf('pokemon_master') == -1){
    throw({forbidden: "Not Authorized"});
  }
}
If you want to learn more about how to secure CouchDB, be sure to check out the following resources:
- CouchDB The Definitive Guide – Security
- The Definitive Guide to CouchDB Authentication and Security
- Security Features Overview
- Document Update Validation
Securing the App
Let’s wrap up by updating the app to use the security measures that you’ve applied to the database. First update the .env file: change the BASE_URI with just the IP address and the port, and then add the username and password of the CouchDB user that you’ve created.
BASE_URI="192.168.33.10:5984"
COUCH_USER="plebian"
COUCH_PASS="mypass"
Then, update the constructor of the DB class to use the new details:
public function __construct()
{
  $this->client = new \GuzzleHttp\Client([
    'base_uri' => 'http://' . getenv('COUCH_USER') . ':' . getenv('COUCH_PASS') . '@' . getenv('BASE_URI')
    ]);
}
Conclusion
That’s it! In this tutorial, you learned how to create a Pokemon spawn locations recorder app with CouchDB. With the help of the GeoCouch plugin, you were able to perform spatial queries, and you learned how to secure your CouchDB database.
Do you use CouchDB in your projects? What for? Any suggestions / features to add into this little project of ours? Let us know in the comments!
Frequently Asked Questions about Pokemon Spawn Locations
How can I find Pokemon spawn locations in Pokemon Go?
Pokemon spawn locations in Pokemon Go are typically found in areas with high cellular activity. These areas can include parks, shopping centers, and other public places. The Pokemon Go app uses GPS to track your location and spawns Pokemon based on your surroundings. You can also use third-party apps or websites like Pokemap.net to find spawn locations. However, be aware that using third-party services can violate the terms of service of Pokemon Go and may result in a ban.
What is a biome in Pokemon Go and how does it affect spawn locations?
A biome in Pokemon Go is a specific geographic area that influences what types of Pokemon spawn there. For example, water-type Pokemon are more likely to spawn near bodies of water, while grass-type Pokemon are more likely to spawn in parks or forests. Understanding the different biomes can help you predict where certain types of Pokemon are likely to spawn.
How can I record Pokemon spawn locations?
You can record Pokemon spawn locations using a variety of methods. One method is to use a database like CouchDB to store the locations of Pokemon spawns. This involves using the Pokemon Go API to retrieve spawn data and then storing this data in CouchDB. You can then use this data to analyze spawn patterns and predict future spawn locations.
Can I use Pokemon spawn location data to predict future spawns?
Yes, you can use Pokemon spawn location data to predict future spawns. By analyzing the data, you can identify patterns in the spawn locations and times. This can help you predict where and when certain types of Pokemon are likely to spawn in the future.
Are there any risks associated with using third-party apps or websites to find Pokemon spawn locations?
Yes, there are risks associated with using third-party apps or websites to find Pokemon spawn locations. These services can violate the terms of service of Pokemon Go and may result in a ban. Additionally, these services may not always provide accurate or up-to-date information.
How can I use the Pixelmon mod to find spawn locations?
The Pixelmon mod for Minecraft allows you to find Pokemon spawn locations within the game. The mod includes a feature that shows the spawn locations of Pokemon on a map. You can use this feature to find and catch Pokemon within the game.
What is the Tenorshare Pokemon Go map and how does it work?
The Tenorshare Pokemon Go map is a third-party service that provides a map of Pokemon spawn locations. The map is updated in real-time and includes information on the types of Pokemon that are spawning and their exact locations. However, be aware that using this service can violate the terms of service of Pokemon Go and may result in a ban.
How can I use the PogoMap website to find Pokemon spawn locations?
The PogoMap website provides a map of Pokemon spawn locations. The map is updated in real-time and includes information on the types of Pokemon that are spawning and their exact locations. You can use this website to find and catch Pokemon in your area.
Can I contribute to the PogoMap website?
Yes, you can contribute to the PogoMap website by reporting Pokemon spawn locations. This helps to keep the map up-to-date and accurate. However, be aware that reporting false information can result in a ban from the website.
Are there any other methods for finding Pokemon spawn locations?
Yes, there are other methods for finding Pokemon spawn locations. For example, you can join local Pokemon Go communities or forums where players share information about spawn locations. You can also use the in-game Nearby feature to find Pokemon that are close to your current location.
 Wern Ancheta
Wern is a web developer from the Philippines. He loves building things for the web and sharing the things he has learned by writing in his blog. When he's not coding or learning something new, he enjoys watching anime and playing video games.