Bootstrapping a Laravel CRUD Project

In this tutorial, we’re going to build and run a simple CRUD application from scratch using Laravel 5.
![]()
Key Takeaways
- To bootstrap a Laravel CRUD application, start by installing Laravel 5 using Composer, then configure the database, in this case, SQLite, as it requires zero configuration for test applications.
- In Laravel, Artisan is the built-in command line interface that allows developers to interact with their app during development, including creating models, controllers, database migrations, and performing manual CRUD operations.
- Laravel uses resourceful routing to create multiple routes to handle a variety of RESTful actions on the resource, making it easy to run CRUD operations on a simple task list.
- Laravel’s Eloquent ORM provides a simple ActiveRecord implementation for working with the database, where each database table has a corresponding “Model” used to interact with that table, making it easy to perform database operations.
- Laravel also makes table creation and maintenance easy through migrations, a type of version control for the database that allows a team to modify the database schema and stay up to date on the current schema state.
Installation and Setup
If you’re already deep in PHP, then some of the stuff in this section will be common knowledge to you. In any case, let’s go over it. We create a fresh install of Laravel 5 using Composer. First, cd into your directory of choice. Now, run the following command:
composer create-project laravel/laravel MYPROJECTIf you don’t have Composer installed, you’ll naturally need to do that first, but I recommend using an environment such as Homestead Improved for kickstarting your development flow anyway – it comes with Composer globally preinstalled.
The name “MYPROJECT” will be the name of your application directory. For this tutorial, I just called mine “crud”.
First Launch and Database Configuration
Let’s sort out the database.
If you’re unfamiliar with environment files, I suggest you give them a read here. It’ll help you in the future when you’re ready to push out a production-level application that warrants a more powerful database. For now though, we’ll just use SQLite – a file-based, zero-configuration database engine. Out of the box, there’s nothing to configure which makes it easy for test applications like this one.
Navigate to the config directory, and open up the database.php file. Change the default database connection setting to sqlite, and we’re almost ready to rock and roll. Scroll down a bit further in that file, and you’ll see the actual database connections. You’ll notice that SQLite leverages a database.sqlite file that’s kept in the storage directory in the root (accessible by storage_path()). We don’t have this file yet, so let’s create it quickly in the command line:
touch storage/database.sqliteMake sure the storage folder is writable by the web server. If you’re using our Homestead Improved box, this is taken care of for you.
Our database is now set up, and we’re ready to run some CRUD operations. But first, let’s take a look at routing in Laravel, as well as some Blade syntax and setting up a basic template.
A Quick Note On The Artisan CLI
Artisan is Laravel’s built-in command line interface. It allows us to interact very nicely with our app during development. It ships with a host of commands that lets us create models, controllers, database migrations, and even perform manual CRUD operations. To see a list of commands, run php artisan in the command line. I’ll be using the artisan command quite a bit from here on, so read up on the docs to familiarize yourself with it.
Resourceful Routing
Inside the app/Http directory, you’ll find a file there called routes.php. The routes file defines the majority of the routes in your application. By default, there’s some routes already defined. Let’s delete all of them though, and start from scratch. For this tutorial, let’s run our CRUD operations on a simple task list. We’re going to need two main routes for our app:
- A home page route – one that just displays a generic home page
- Our task route, which will be the basis for the RESTful structure for the CRUD operations to be performed.
At this point, I suggest you read up on routing in Laravel 5. I’ll be using named routes, as well as controller actions to govern the output. For our home page, we’ll just use a basic GET route:
Route::get('/', [
    'as' => 'home',
    'uses' => 'PagesController@home'
]);
Notice I’m using a PagesController which we don’t have yet. Don’t worry, we’ll create that soon using artisan. Before we jump ahead though, it’s time to read up on RESTful resource controllers, and their painless generation via the artisan command line interface. We can register a resourceful route to a controller like this:
Route::resource('tasks', 'TasksController');According to Laravel:
This single route declaration creates multiple routes to handle a variety of RESTful actions on the resource.
With all that in mind, we can now create our two controllers via the command line:
php artisan make:controller PagesController
php artisan make:controller TasksController
Let’s first open up the PagesController. Navigate to app/Http/Controllers/PagesController, and take a look at the file. You’ll notice that artisan generated a bunch of methods for us that would be useful for RESTful actions. We’ll keep these for our TasksController, but for our PagesController, we’ll just want one method for now – home. Delete all the methods, and create the home method:
public function home()
{
    return 'Welcome home!';
}
Refresh the home page in your browser, and we’re home! By now, you’re probably excited to get into the good stuff, but let’s first talk about views, pull in a couple of assets, and make a basic template so our app looks pretty.
Just as a quick aside, if you want to create a controller using the artisan CLI, and you want it to have no methods be default, you can add the --plain flag to the command like this:
php artisan make:controller YourController --plainAlright, moving on.
Views & Basic Templating With Blade
So far, we’ve set up some routes and returned a meaningless string to the screen. It’s not much, but it’s a start. Instead of returning a string though, let’s return a view. Views serve up the front-end of your application. Think of them as purely presentational. We want our views to only ever serve up data that’s already been passed to them, and we’ll see how to pass data to a view a bit later. Inside the /resources directory, you’ll see a directory called “views”. Here’s where we keep our views, and here’s also where we’re able to reference them from. Let’s do a couple of things here:
- Let’s create a sub-directory called
pages, and in it, create a new file calledhome.blade.php. - Let’s create another sub-directory called
layouts, and in it, create a new file calledmaster.blade.php.
As you’d expect, we’ll want to have some kind of master layout so that we don’t have to repeat big chunks of HTML. Different pages in our app will then reference the master layout view, and inject content into dedicated sections. We’ll pull in bootstrap for CSS convenience, and draw up a basic HTML file:
<!doctype html>
<html lang="en">
<head>
<meta charset="UTF-8">
<meta name="viewport" content="width=device-width, initial-scale=1">
<title>Tasks</title>
<link rel="stylesheet" href="https://maxcdn.bootstrapcdn.com/bootstrap/3.3.2/css/bootstrap.min.css">
</head>
<body>
<nav class="navbar navbar-default">
<div class="container-fluid">
<div class="navbar-header">
<a class="navbar-brand" href="#">Tasks</a>
</div>
<div class="nav navbar-nav navbar-right">
<li><a href="#">Home</a></li>
<li><a href="#">Tasks</a></li>
</div>
</div>
</nav>
<main>
<div class="container">
@yield('content')
</div>
</main>
</body>
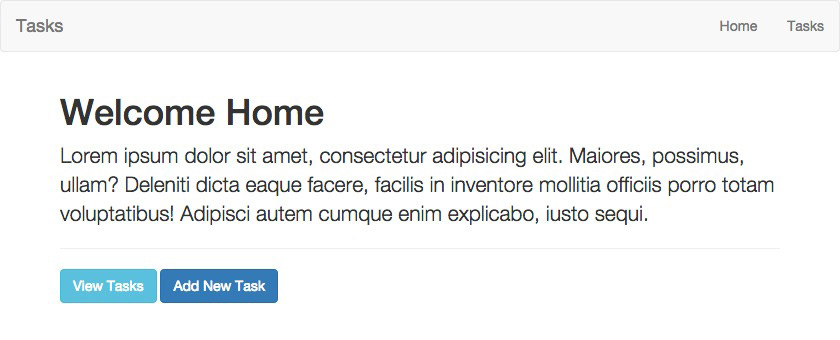
</html>In particular, notice the @yield('content') part of this file. This will allow us to reference a content section in any template pages, and inject whatever content you want in there. In our home.blade.php file, we can now have something like this:
@extends('layouts.master')
@section('content')
<h1>Welcome Home</h1>
<p class="lead">Lorem ipsum dolor sit amet, consectetur adipisicing elit. Maiores, possimus, ullam? Deleniti dicta eaque facere, facilis in inventore mollitia officiis porro totam voluptatibus! Adipisci autem cumque enim explicabo, iusto sequi.</p>
<hr>
<a href="{{ route('tasks.index') }}" class="btn btn-info">View Tasks</a>
<a href="{{ route('tasks.create') }}" class="btn btn-primary">Add New Task</a>
@stop
We’re extending the master layout, and inserting into the content section. As you can see, blade syntax makes this stuff a breeze. We’re going to move on a bit, but you can read up more on blade syntax and templating here.
Back in our PagesController, we can now return a view to the home page. If you read the documentation on views, you’ll know it’s as easy as this:
public function home()
{
    return view('pages.home');
}
Refresh your browser, and there you go!
Let’s head over to our TasksController now. This time, we’ll keep the methods that were automatically generated via the artisan command line, and here’s why:
- They are already named in a RESTful way for us.
- The routes are already connected to the respective methods because of Laravel’s resourceful routing.
If we navigate to /tasks, we’ll see a blank page. That’s because our app is using the index method, and we have nothing in it yet. Just by simple logical deduction, we can figure out what each of the other methods should be responsible for to fit in line with a RESTful structure:
createwill be the method we use to generate a page where we can create new tasksstorewill be the method we use to handle POST data from the task creation, and store it in the databaseshowwill be the method used to show a single taskeditwill be the method used to allow us to edit an existing taskupdatewill be the method that gets called for updating an existing taskdestroywill be the method used to destroy – or delete – a task
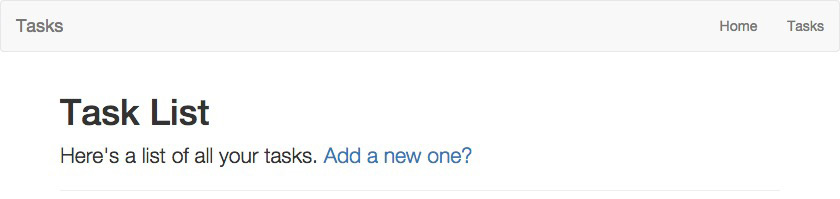
For now, let’s just focus on our index method. In the views directory, I’m going to create a new file under tasks/index.blade.php, and pull in the layout like last time. Here’s the template I have:
@extends('layouts.master')
@section('content')
<h1>Task List</h1>
<p class="lead">Here's a list of all your tasks. <a href="/tasks/create">Add a new one?</a></p>
<hr>
@stop
Here’s a screenshot of the progress.
At this point, I want you to notice that I’ve hard-coded the link to create a task. If you’ve been reading the documentation links I mentioned earlier, you’ll be familiar with named routes by now. Resourceful routing automatically names our routes for us, and you can see them all in the artisan command line:
php artisan route:listNow, we can link to the create route in our blade templates like this:
<a href="{{ route('tasks.create') }}">Add a new one?</a>Let’s update our navigation also, so we can easily click through:
<nav class="navbar navbar-default">
  <div class="container-fluid">
    <div class="navbar-header">
      <a class="navbar-brand" href="{{ route('home') }}">Tasks</a>
    </div>
    <div class="nav navbar-nav navbar-right">
        <li><a href="{{ route('home') }}">Home</a></li>
        <li><a href="{{ route('tasks.index') }}">Tasks</a></li>
    </div>
  </div>
</nav>
Alright, our app is coming together. We’re ready to start adding tasks and building up our create method and view, but we’re not quite there yet. We want our tasks to store to the database, but we haven’t set up a table yet. Luckily, Laravel makes table creation and maintenance a breeze. Let’s dig in.
Database Migrations
Let’s head over to the migrations documentation and give it a read.
Migrations are a type of version control for your database. They allow a team to modify the database schema and stay up to date on the current schema state.
Creating a migration is easy with artisan. Here’s what we’ll do to create our tasks table migration:
php artisan make:migration create_tasks_tableThere are two additional options that we can use in our migration command:
--create– lets artisan know that we want our migration to actually create the table--table– lets artisan know which table we want our migration to reference
In our case, we’re creating the table for the first time, so our artisan command should look like this:
php artisan make:migration create_tasks_table --create=tasksNavigate to the newly generated migration – it will be in the /database/migrations directory. Running a migrate command will instruct Laravel to look inside this directory, and follow any database migrations that haven’t happened yet. Each migration has two functions:
up– this is run when the migrate command is calleddown– this is run when a migration is rolled back
In our case, our up function will create the tasks table with the necessary fields, and the down command will drop it. We’ll probably want our tasks to have a title and description too, so let’s add those in. Here’s what our up function should look like now:
public function up()
{
    Schema::create('tasks', function(Blueprint $table)
    {
        $table->increments('id');
        $table->string('title');
        $table->text('description');
        $table->timestamps();
    });
}
Now, let’s run our migration to get our database set up:
php artisan migrateNow we have our tasks table. We’re using SQLite, so let’s make sure of that via the command line. Run the following two commands:
sqlite3 storage/database.sqlite
.tables
The first launches an SQLite command line interface, and the second outputs our tables. If your migration was successful, you should see tasks listed. We’re now ready to perform our CRUD operations.
Models & Eloquent ORM
Now that our database is set up, it’s time to talk about Eloquent Models and Laravel’s Eloquent ORM. Head over to the documentation, and in particular, take note of this:
The Eloquent ORM included with Laravel provides a beautiful, simple ActiveRecord implementation for working with your database. Each database table has a corresponding “Model” which is used to interact with that table.
Basically, think of a model as a representation of a database table, via which we can perform database operations. Let’s create our Task model:
php artisan make:model TaskBy default, we don’t need to specify which table we want to interact with. Laravel will read Task and automatically fetch the tasks table. To use a custom table, just specify it like this in the Model class:
protected $table = 'custom_tasks';Now, by referencing the model from inside our controller, we can use Eloquent to interact with the database.
Conclusion
In this part, we’ve bootstrapped our Laravel CRUD application by creating the database, some controllers, basic routes and simple views. In the second part, we’ll implement all the CRUD functionality we prepared the foundations for in this post.
Frequently Asked Questions about Bootstrapping Laravel CRUD Project
What is the Laravel CRUD project and why is it important?
Laravel CRUD project is a fundamental concept in web development that stands for Create, Read, Update, and Delete. These are the four basic operations that can be performed on any data. Laravel, being a popular PHP framework, provides an easy and convenient way to build CRUD applications. Understanding and implementing CRUD operations in Laravel is crucial as it forms the backbone of most web applications, allowing users to manage their data effectively.
How can I install Laravel for my CRUD project?
To install Laravel, you need to have Composer installed on your system. Composer is a tool for dependency management in PHP. Once you have Composer, you can install Laravel by running the command composer global require laravel/installer in your terminal. This will install Laravel installer globally on your system.
How can I create a new Laravel project?
After installing Laravel, you can create a new Laravel project by running the command laravel new project-name in your terminal. Replace ‘project-name’ with the name you want to give to your project. This will create a new directory with the specified name and install a fresh Laravel installation in that directory.
How can I create a database for my Laravel CRUD project?
Laravel supports a variety of databases. You can create a database using any database management system like MySQL, PostgreSQL, SQLite, etc. After creating the database, you need to configure your database connection in the .env file in your Laravel project.
How can I create a model in Laravel?
In Laravel, you can create a model using the Artisan command-line tool. Run the command php artisan make:model ModelName -m in your terminal. Replace ‘ModelName’ with the name of your model. The -m option will also create a migration file for the model.
How can I create a controller in Laravel?
You can create a controller in Laravel using the Artisan command-line tool. Run the command php artisan make:controller ControllerName in your terminal. Replace ‘ControllerName’ with the name of your controller.
How can I create views in Laravel?
In Laravel, views are typically created in the resources/views directory. You can create a view by creating a new file in this directory. The file should have the .blade.php extension.
How can I implement CRUD operations in Laravel?
CRUD operations in Laravel can be implemented by defining routes for each operation, creating a controller to handle the business logic, and creating views to display the data. Laravel provides various methods like get(), post(), put(), delete(), etc. to define routes for CRUD operations.
How can I validate data in Laravel?
Laravel provides a variety of ways to validate data. You can use the validate() method provided by Laravel, or you can create a form request by running the command php artisan make:request RequestName in your terminal.
How can I handle errors in Laravel?
Laravel provides a robust error handling mechanism. All exceptions are handled by the App\Exceptions\Handler class. You can customize this class to handle different types of exceptions in different ways.
I'm a web designer & developer from Trinidad & Tobago, with a degree in Mechanical Engineering. I love the logical side of the web, and I'm an artist/painter at heart. I endorse progressive web techniques, and try to learn something every day. I try to impart my knowledge as much as possible on my personal blog, callmenick.com. I love food, I surf every weekend, and I have an amazing creative partnership with fellow mischief maker Elena. Together, we run SAYSM.

Published in
·APIs·CMS & Frameworks·Database·Frameworks·Laravel·Libraries·PHP·Web Services·February 29, 2016
Published in
·Animation·Content strategy·Copywriting·Design�·Design & UX·Usability·UX·January 28, 2016