


One of the most important features of creating ecommerce websites with Magento 2 is the ability to add multiple languages to your store. In this tutorial, we’ll cover the following Magento 2 translation topics:
- what internationalization is, and why it’s important
- how we can add more languages in Magento 2
- how to translate CMS content, including pages
- how to internationalize modules and themes including adding translations, changing assets and making changes to the styles of the module or theme
Magento 2 is one of the most popular ecommerce platforms currently available. It offers tons of out-of-the-box features and tight security. Other than the built-in modules, with Magento 2 you can create your own modules and themes to create custom functionalities and design that fits your or your client’s needs.
This tutorial assumes you already have Magento 2 installed and working. If not, please follow the guideline from Magento 2’s official documentation.
Key Takeaways
- Magento 2’s internationalization feature not only translates content but also adapts website styles based on the selected language, enhancing global user engagement.
- Adding a new language in Magento 2 requires creating a new store view with specific language settings, which can be managed easily through the Magento Admin panel.
- Magento 2 supports the translation of CMS content, allowing different store views to display content in various languages, which is crucial for localized user experiences.
- Language packs available on Magento’s Marketplace, like those from Mageplaza, simplify the process of adding translations to a Magento 2 website.
- Custom modules and themes can be internationalized in Magento 2 by using translation functions and dictionaries, ensuring consistency across different languages.
- Best practices include creating separate themes for right-to-left (RTL) and left-to-right (LTR) script directions to maintain style integrity across different languages.
Why Internationalization
Internationalization (often abbreviated as i18n) includes both translating your website and changing the design or style of the website based on the language chosen. Depending on your project and the programming language or framework you work with, it can be done in various ways, but there are always tools to make it easier.
Internationalization attracts more users to your website, as adding different languages caters to users of different nationalities or different parts of the world.
This is especially important with ecommerce. One way to make sure your store understands its users and is able to convert them to customers is to provide more languages, making the store available globally.
Magento 2 Website Structure
Before we get into how we can add a language in Magento 2, let’s go over how a Magento 2 website is structured first.
In Magento 2, you need at least one website. In that website, you can create several stores but you also need at least one. Then, inside each store you need at least one store view.
By default, every Magento 2 installation will have a website, a store in the website, and a store view in that store.
The website is only used to organize multiple stores under the same website. Think of it as a group.
The store is used to specify which categories are sold in the store, which ultimately means which products are sold in the store. For example, you can have one website split into two stores — one for men’s clothes and one for women’s clothes.
And finally, we have the store view which belongs to a store. Store views are what a user actually sees. Store views can have their own theme, pages, products, and more.
With this structure, you are able to separate your ecommerce website into different sections or even different websites. For example, you can have all your products in the same Magento instance, but split these products into different websites, or different stores inside the website.
This separation also allows you to set different settings for different websites, stores or store views in your Magento instance. You can change settings for an entire website, which will affect all of the stores in it and subsequently all store views in these stores.
You can also change settings for a store inside a website, which will change the settings for only this store and its store views, without affecting other stores or the main website.
Alternatively, you can change settings for store views, which would not affect their parent store or parent website.
Adding Languages in Magento 2
Languages are dependent on store views. Each store view can have its own language. So, when you want to add a new language, you actually need to add a new store view having a different language.
The store view can have the same settings as its parent store or website. So there’s no need for extra configuration unless you need to have different settings for that language.
Adding a Store View
In this section, we’ll see how to add a new store view in Magento 2 using the Admin panel, and how we can choose the language of that store view.
Add a New Store View
First, go to your Magento 2 admin portal. The URL path should start with /admin_. However, it will probably have a different suffix which you’ve set during installation.
Once you’ve gone to the admin panel and logged in, choose Stores from the sidebar, then All Stores.
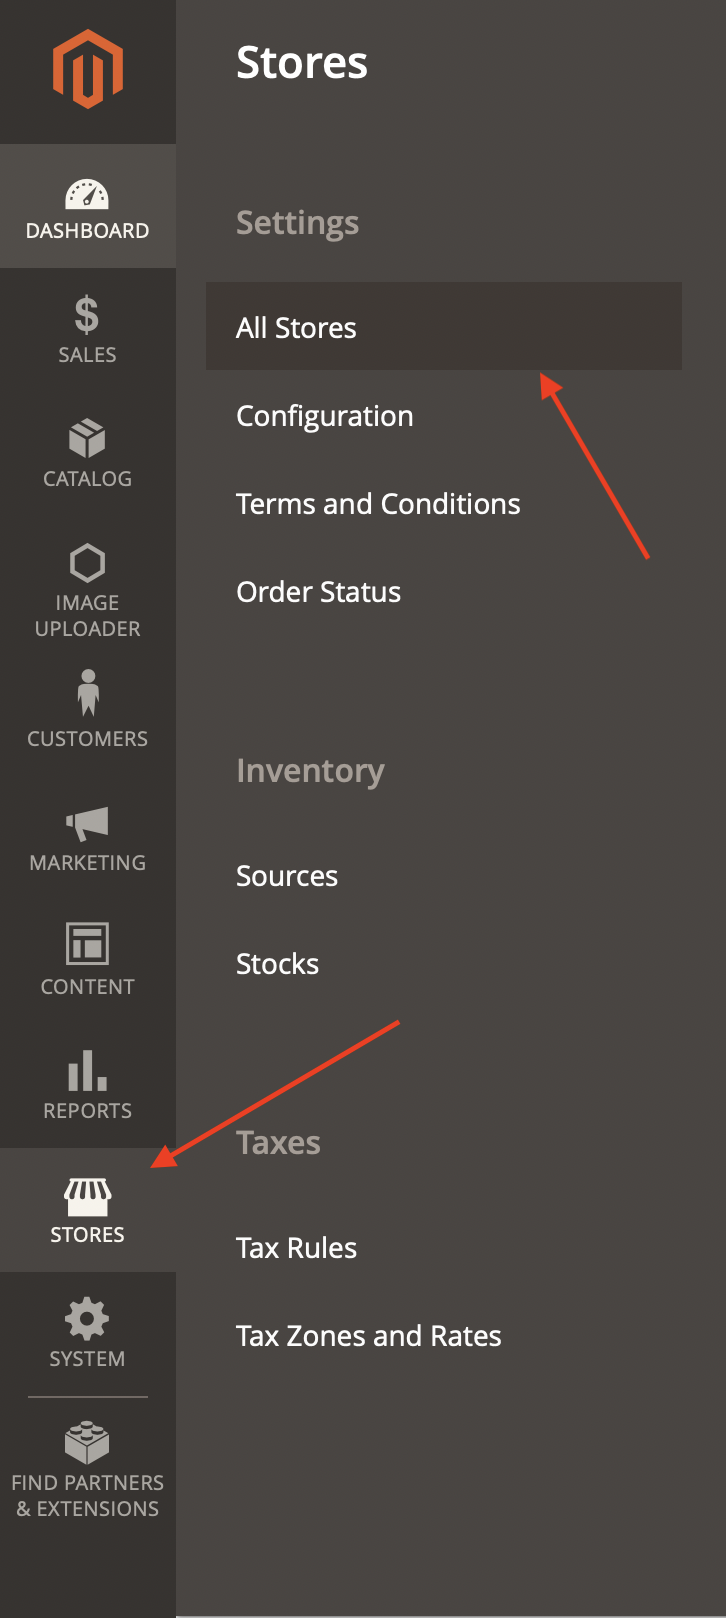
In this page, click on Create Store View.
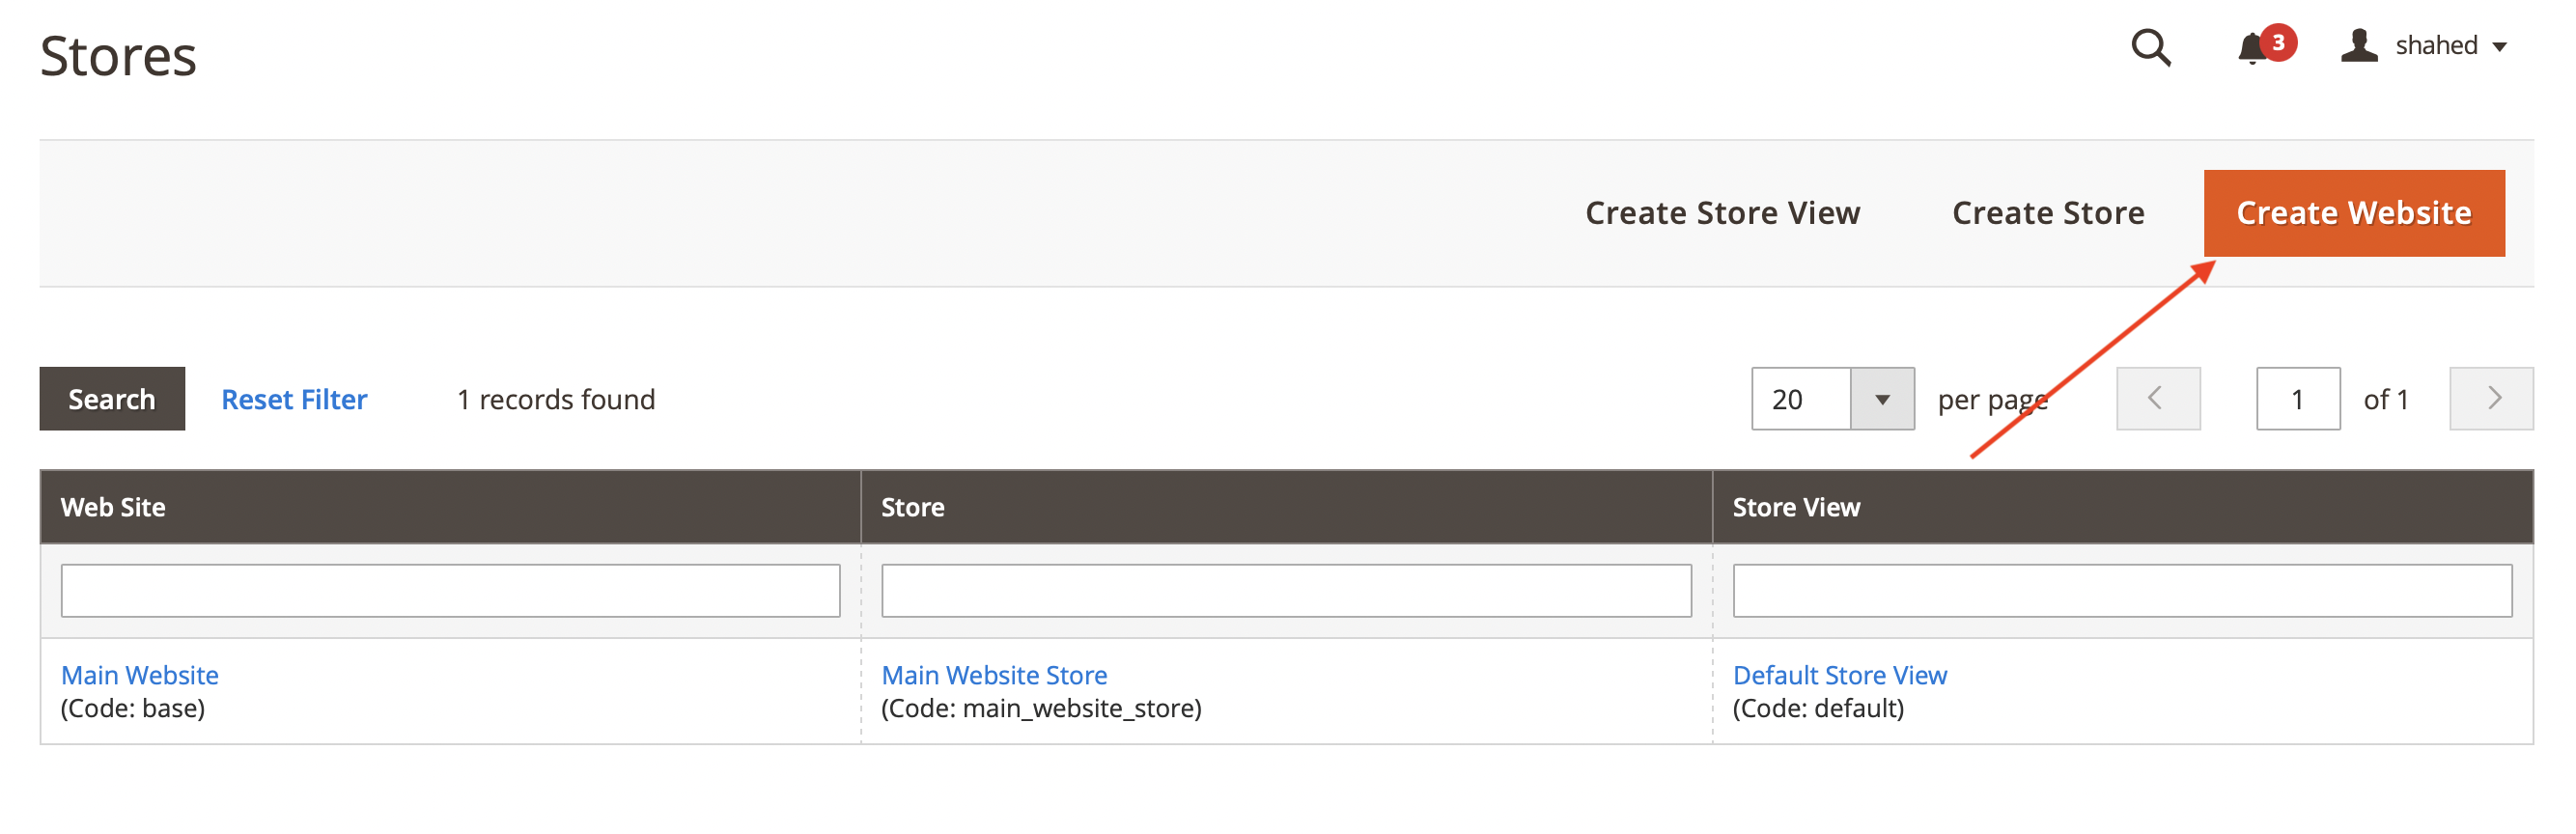
You’ll then see a form to fill in. You’ll first have to choose the store this store view belongs to if you have multiple stores.
Then, you need to enter the name of the store. Please note that the name is what the user will see on the front end of your website when choosing between stores. So, you can name it based on the language you’re adding.
You also need to add the code for the new store. You can choose any code you want, but it would be helpful to set the code based on the language. For example, en for English.
Finally, you’ll need to change the Status to Enabled to make sure the users see the store view.
You can also choose the sort order. This is helpful if you’re adding a new language, but you want that language to be the default language a user sees when they go to your website. If so, you can change the sort order here by setting a number, with the lowest (meaning the highest in order) being 0.
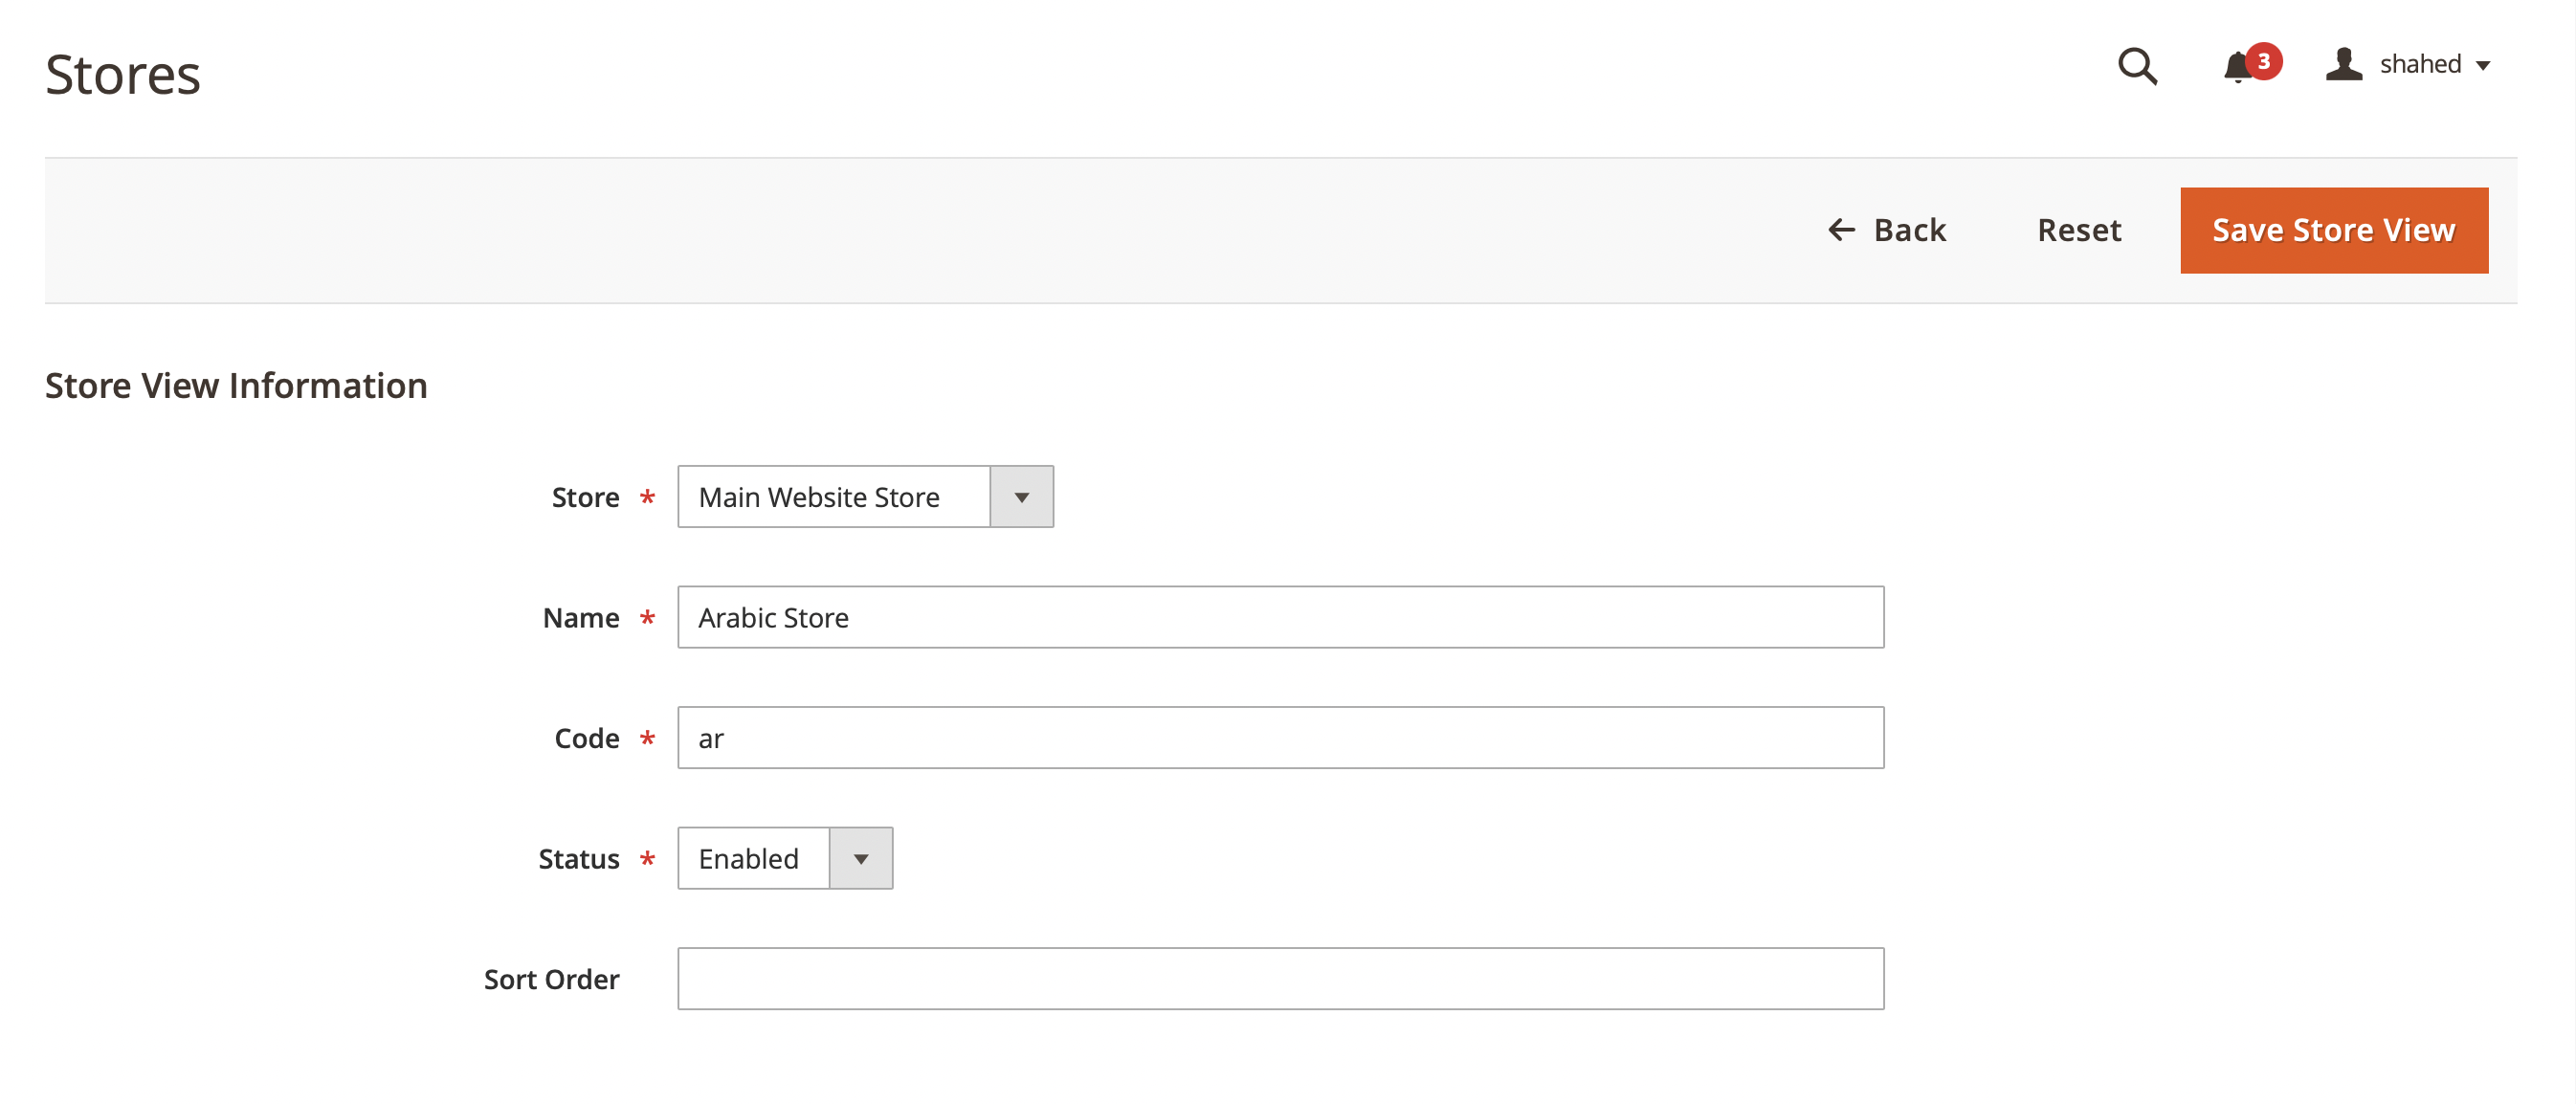
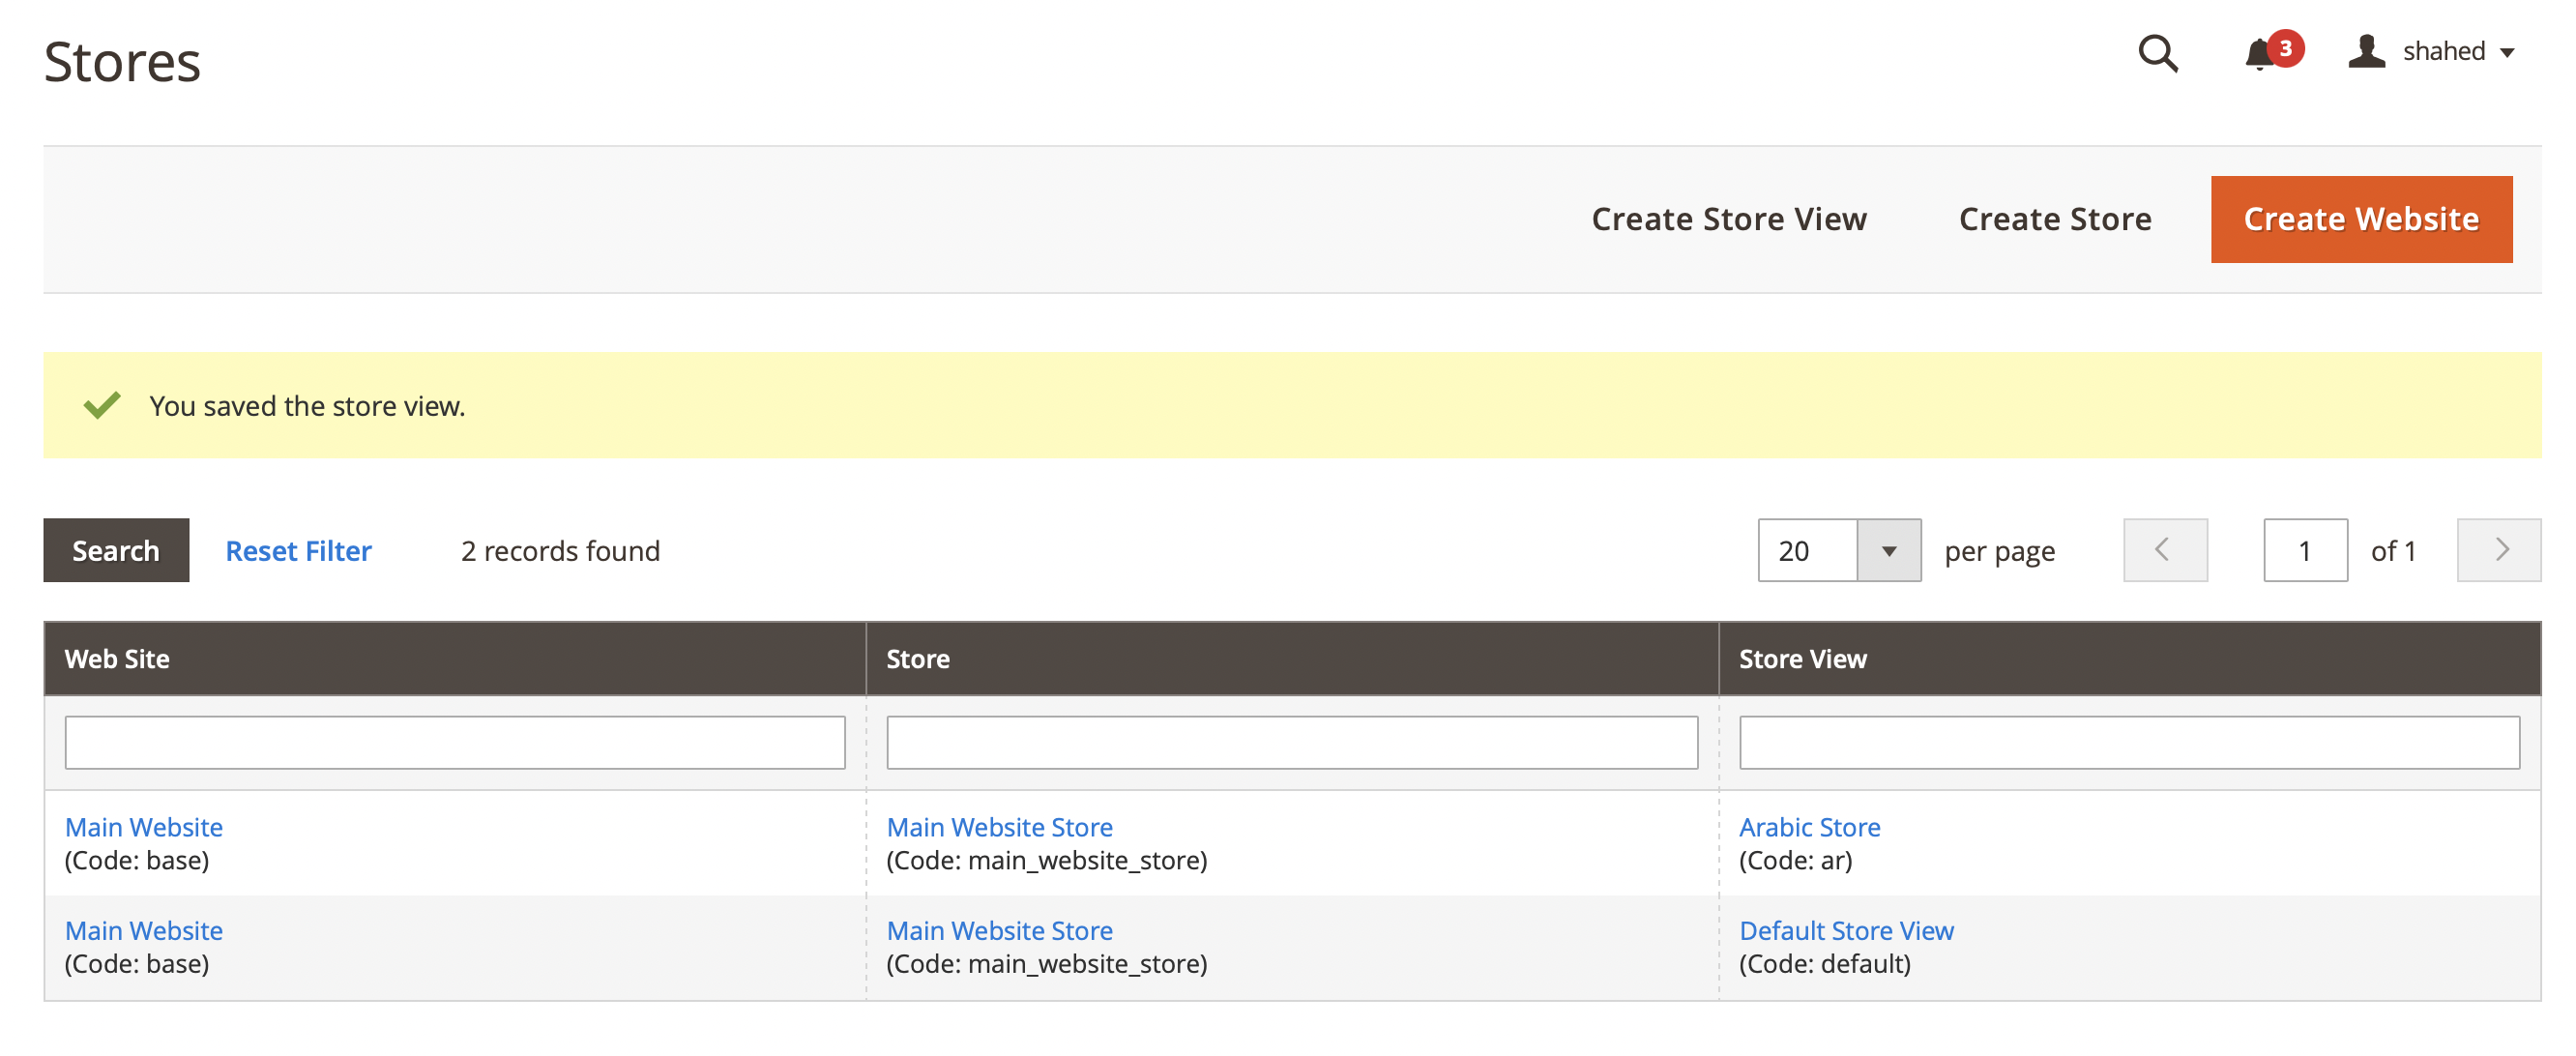
Once you’re done, click on Save Store View, and your store view will be added.
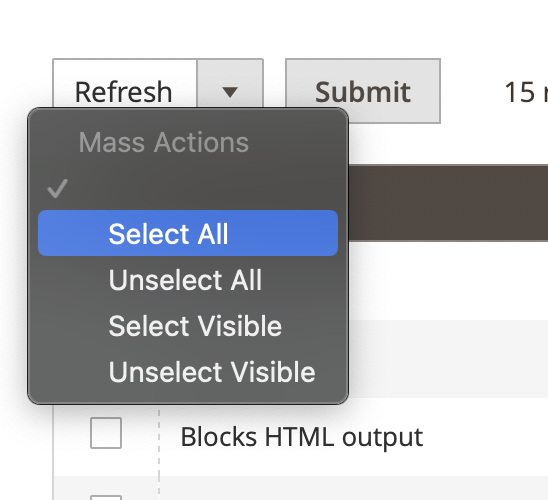
You might need to clear the cache at this point. You can do that by clicking on Stores in the sidebar, then Cache Management.
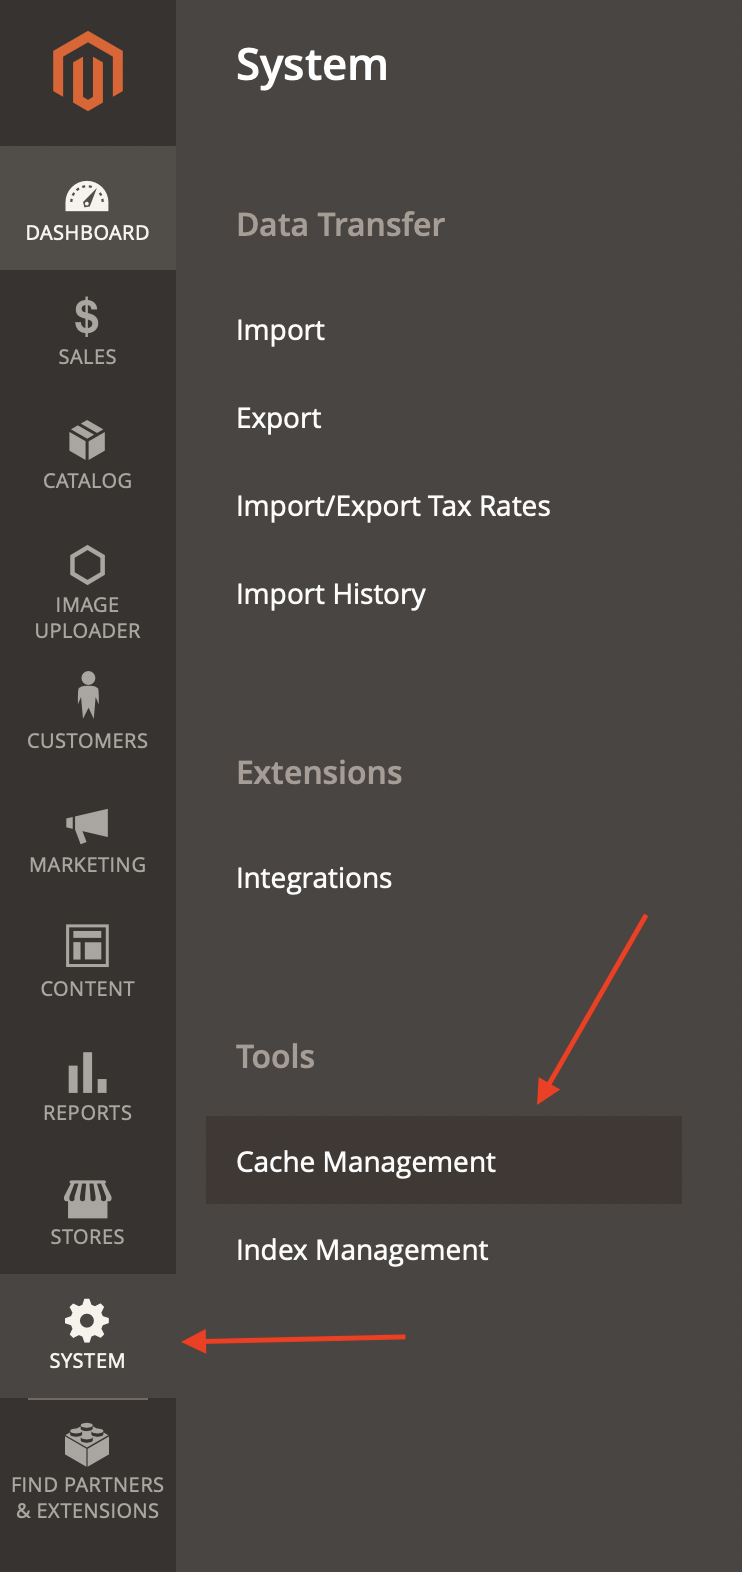
Then, choose Select All from the dropdown and click on Submit. This will clear the cache.
Now, go to your website. Depending on your theme, you should see a dropdown in the header of the website allowing you to switch between store views.
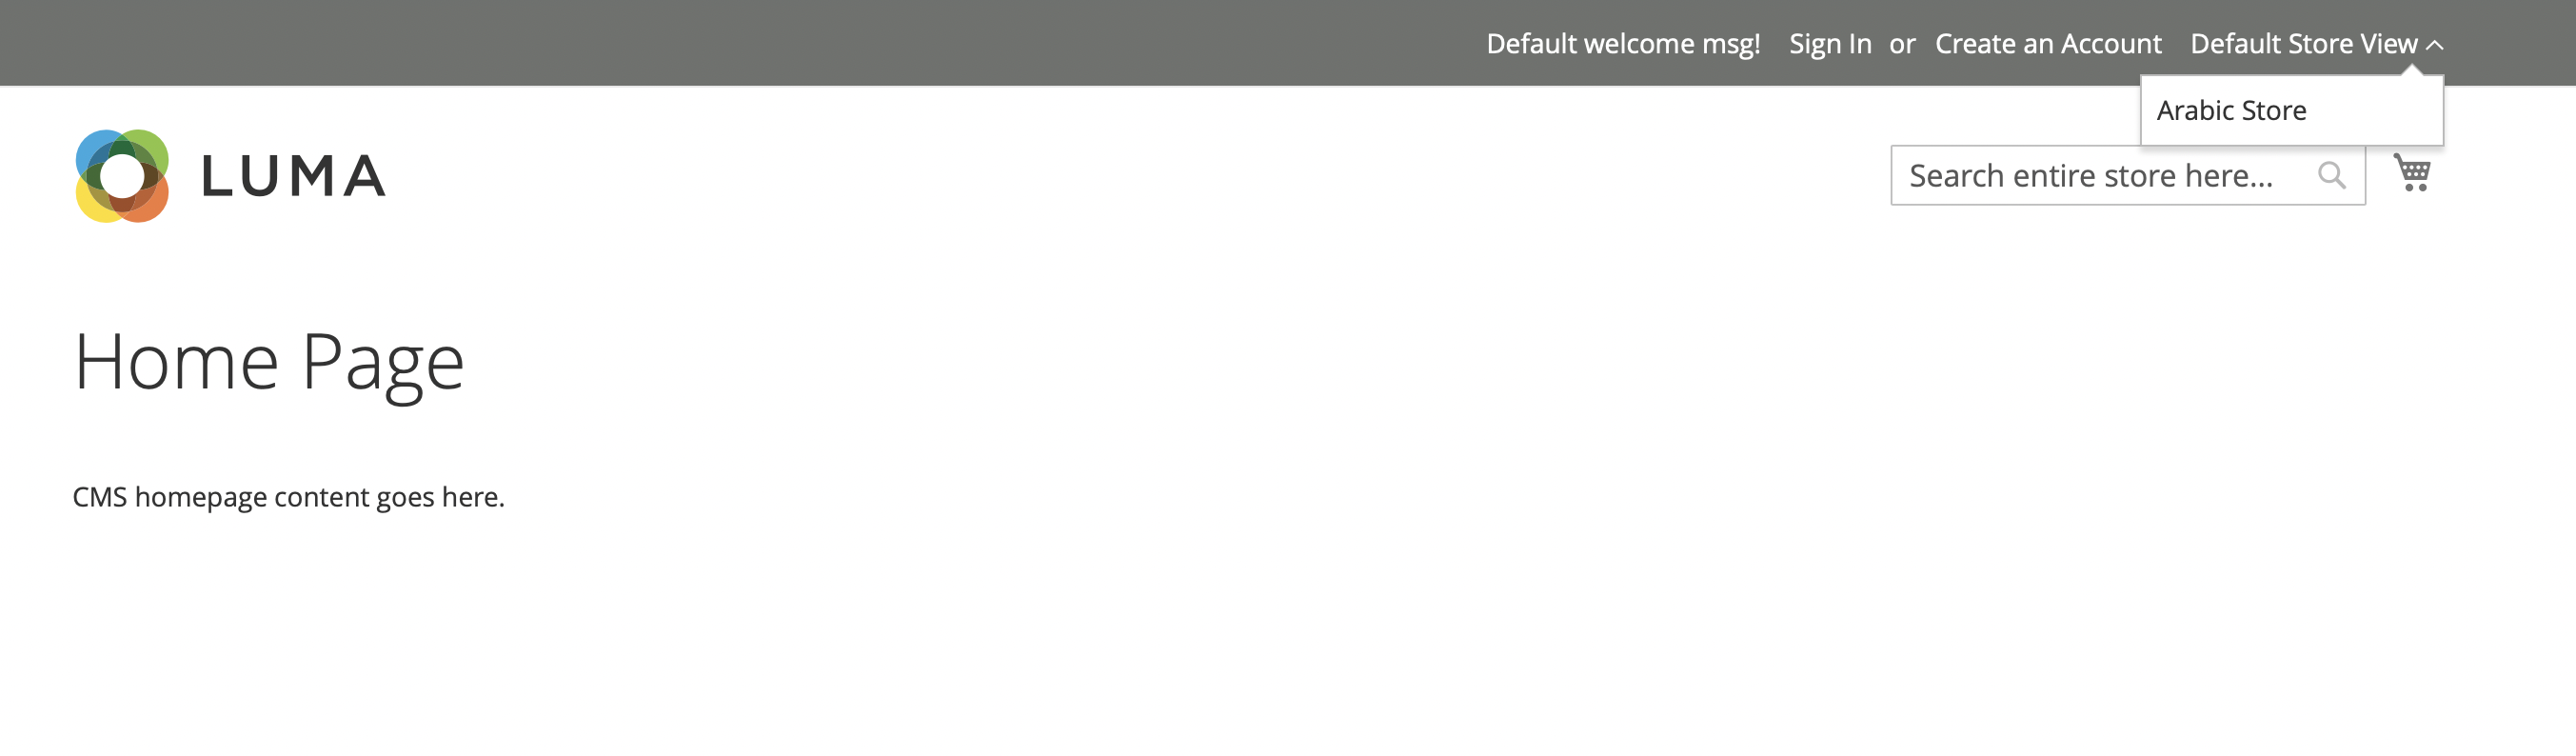
Please note that this will look different based on your theme. The theme in the screenshot in Magento’s Luma theme, which comes installed by default in Magento 2.
Choose a language for the store view
Next, we’ll choose the language of the store view. To do that, on the admin panel click on Stores in the sidebar, then Configuration.
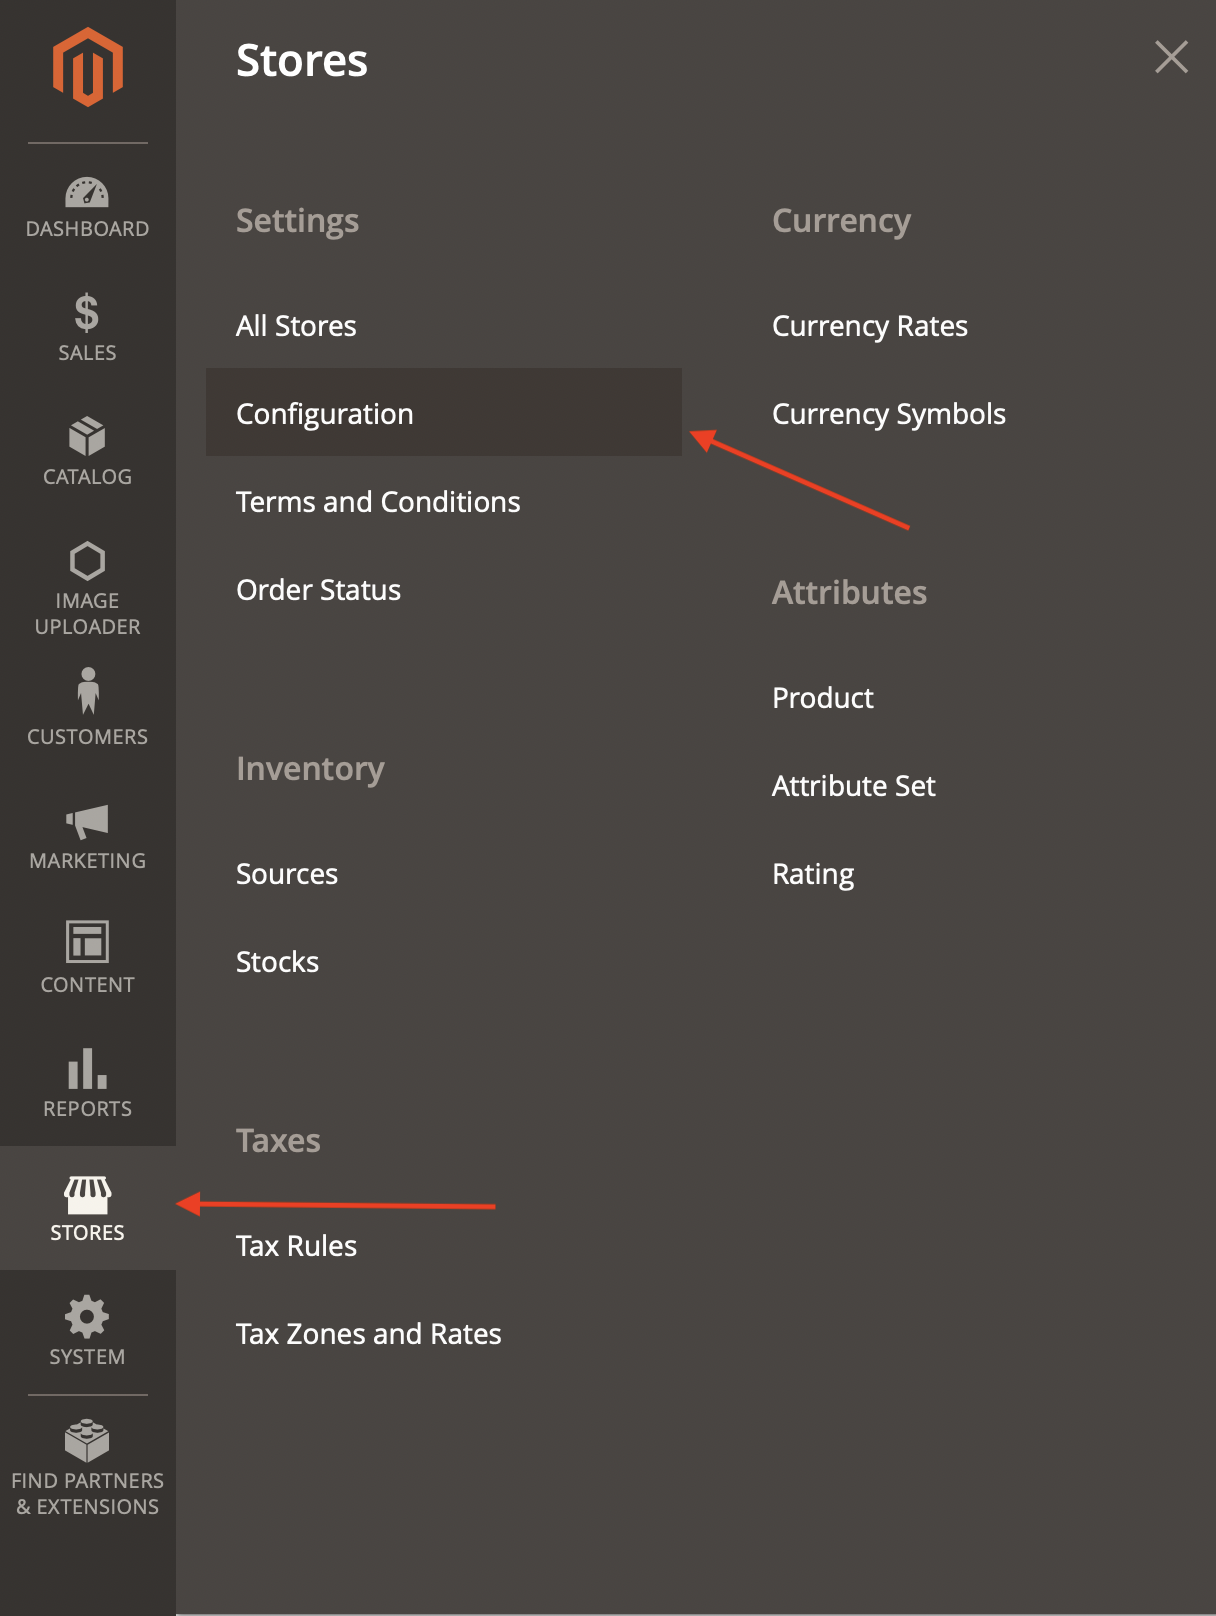
Please note that on the admin portal, you’ll see a dropdown at the top left of almost every page with the label Scope that allows you to change the website, store, or store view. You use this when you want to change settings to a specific website, store, or store view rather than the default settings that will apply to all websites, stores, and store views.
So, on the Configuration page, choose the store view you just created from the dropdown. You’ll be asked to confirm your action. Click OK in the pop up.
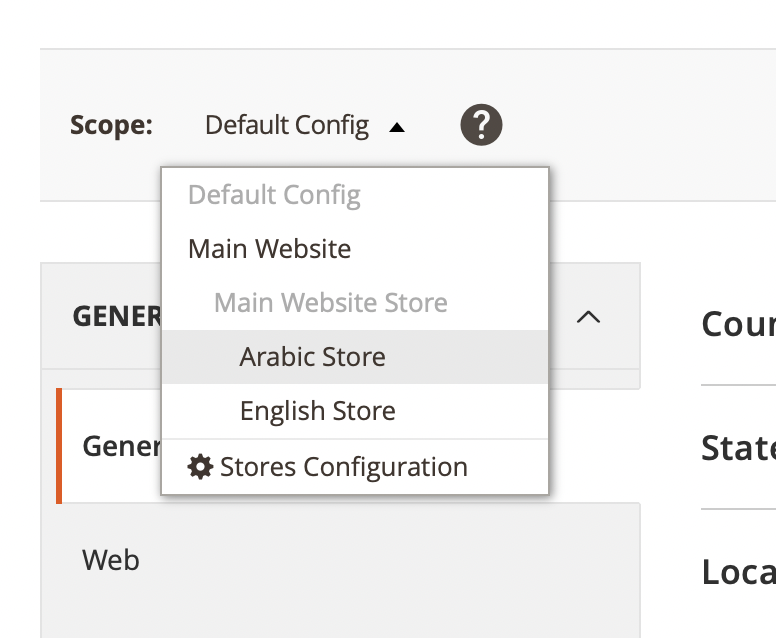
Then, choose General tab under the General section in the sidebar if it’s not already chosen. Open the collapsible with the title Locale Options. Under the collapsible, uncheck Use Website on the right of the first field, which should be Locale, then choose from the dropdown the language you’re adding.
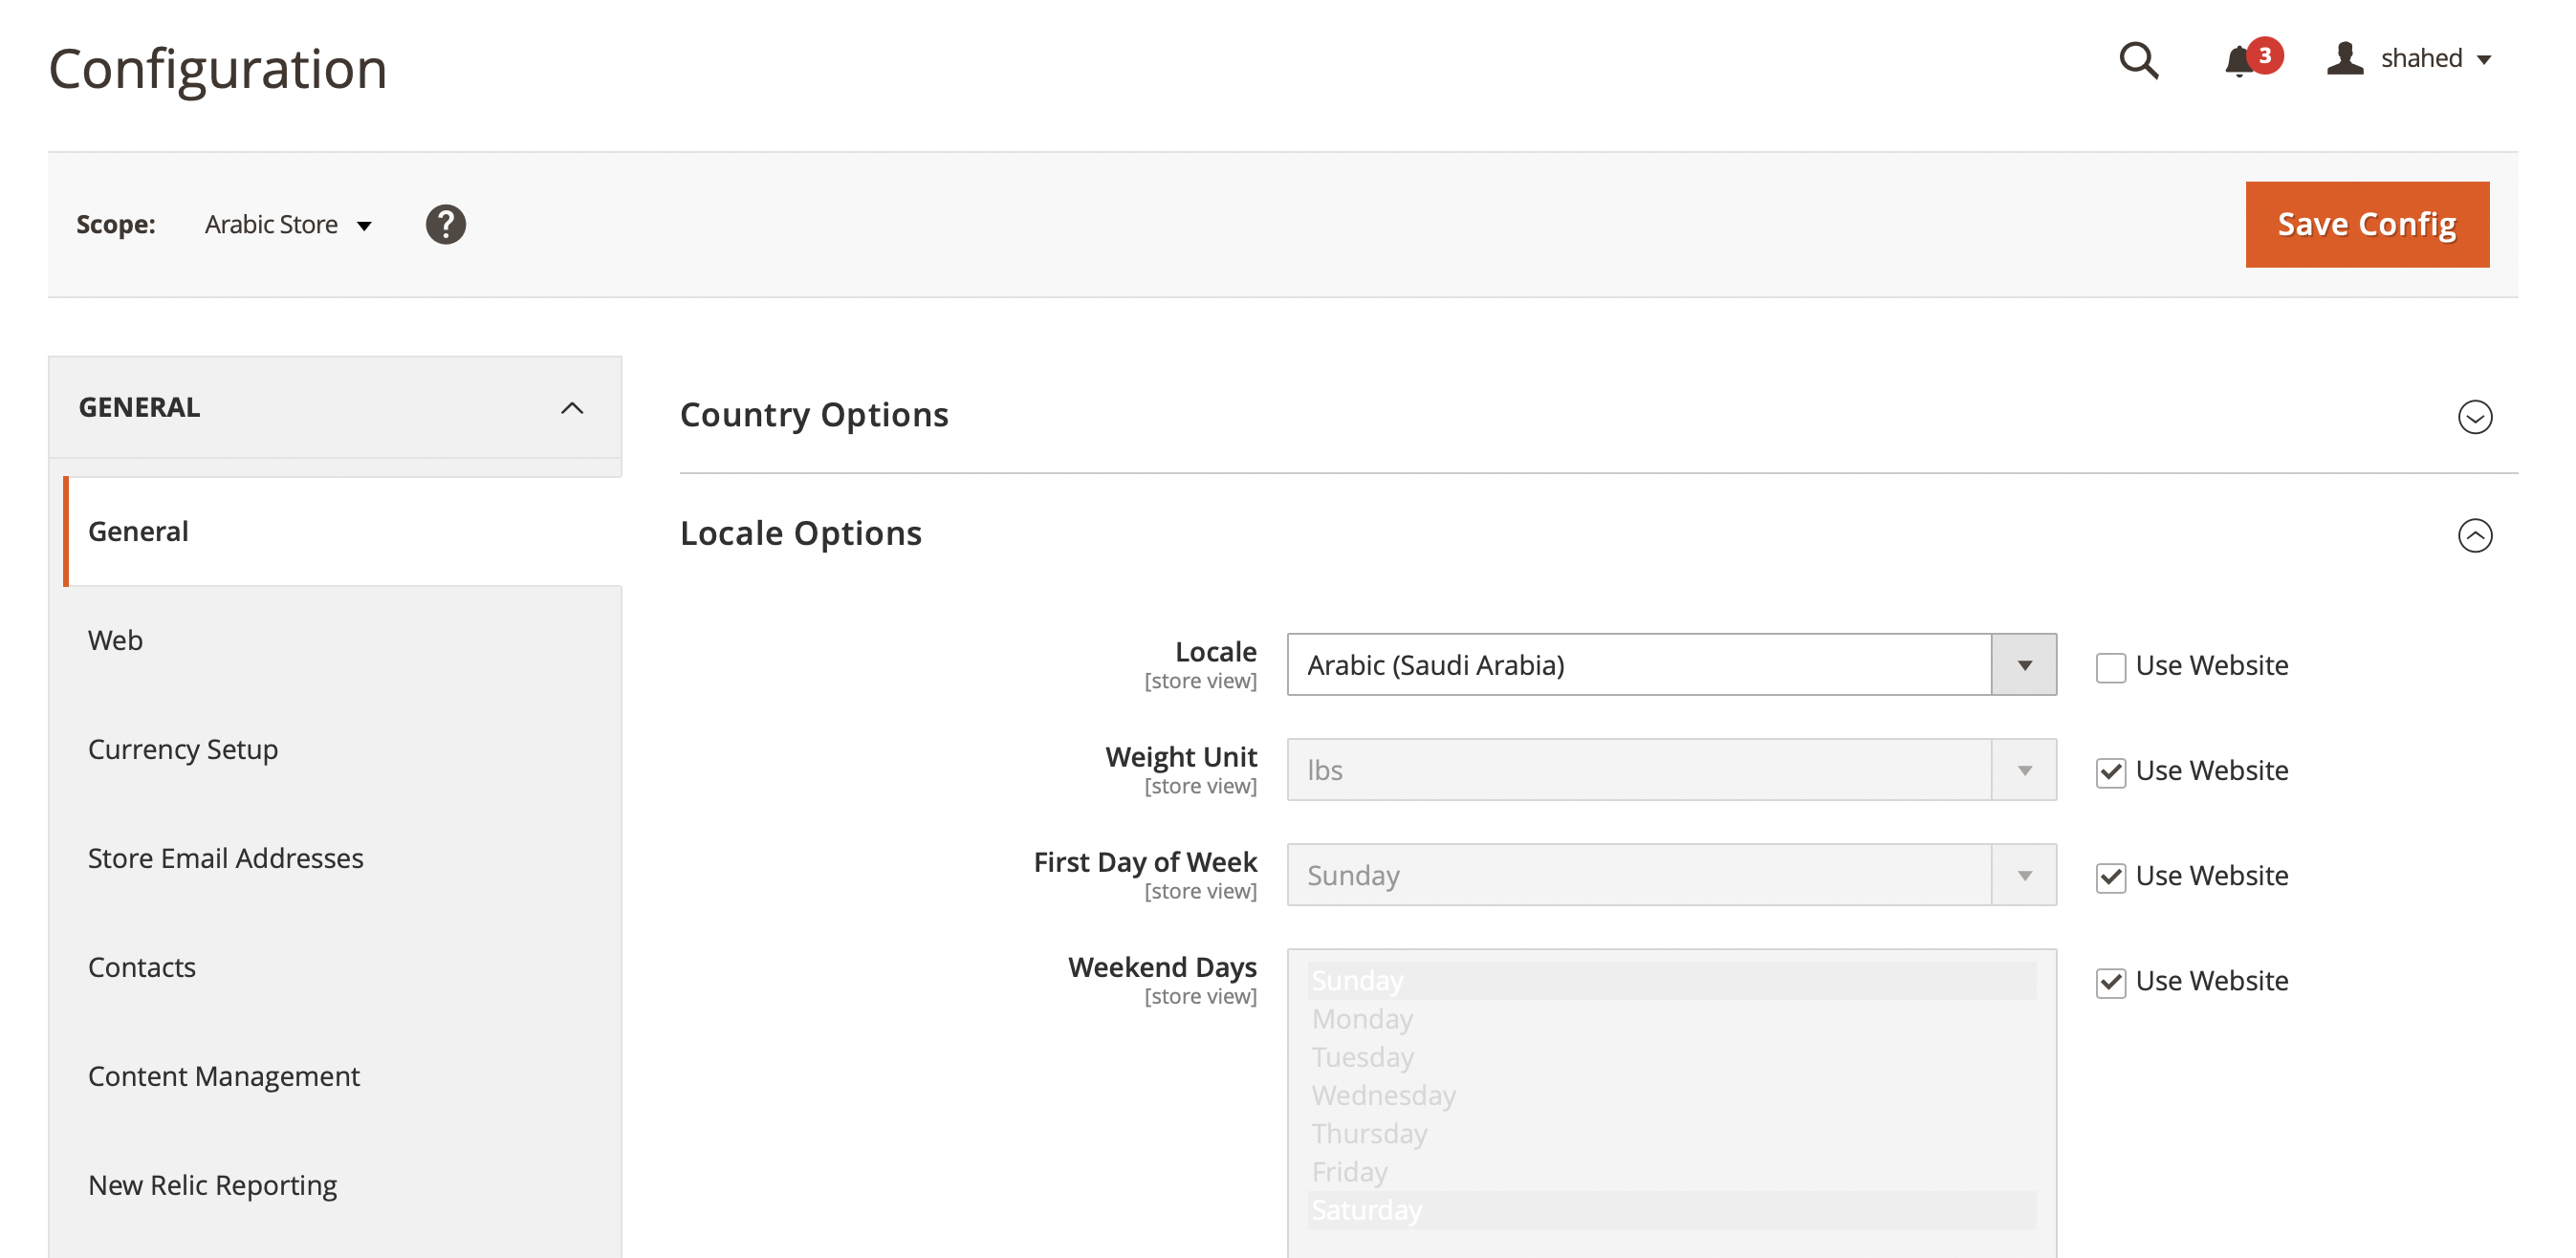
In this tutorial, we’re adding the Arabic language.
Once you’re done, click Save Config at the top right. This will change your website’s language. However, you’ll notice that nothing has changed when you open the store you just added. This is because we still need to add translations to the language we added, as well as change styling if necessary.
Install Magento 2 Language Packs
Other than the strings and text you might add yourself in your own module, because strings in Magento 2 are common, there are free and open-source Magento 2 language packs that allow you to easily add translations to your Magento 2 website.
You can find language packs on Magento’s Marketplace, although most of them are not free.
Mageplaza offers a wide set of language packs you can install that are free and open source. They have 55 Magento 2 language packs that you can use for free.
In this tutorial, we’ll install their Arabic Language pack. You can choose any language pack; the process is the same for any language pack regardless of the language.
If you choose a Magento 2 language pack from a different provider, the steps should also be the same unless your provider states different steps.
Open your terminal and switch to the Magento project’s root directory. In that directory, run the following command:
composer require mageplaza/magento-2-<LANGUAGE>-language-pack:dev-master mageplaza/module-smtp
Please note that you should replace <LANGUAGE> with the language you’re installing. In our case, it will be arabic. You can also find the name of the package by going to the GitHub page of the language (if you are downloading from Mageplaza) and checking the name of the repository.
After that’s done, you can go on your website, choose your new language if it’s not already chosen, and you’ll see that the page is translated to that language.
If the page isn’t translated, or there’s a problem with the styles of the page, then do the following.
Run the following command to generate the static content for the new language added:
php bin/magento setup:static-content:deploy ar_SA
Make sure to replace ar_SA with the language you’re adding. You’ll also need to add the option -f if your Magento 2 instance is set to developer mode.
After that, execute the following commands to trigger reindexing and clear the cache:
php bin/magento indexer:reindex
php bin/magento cache:clean
php bin/magento cache:flush
Magento 2 Translation of CMS Content
In Magento 2, CMS pages and blocks can be included in specific store views rather than the entire website. This means that the page can be translated into many languages based on the store it’s in.
In this section, we’ll see how to translate the same page to different languages and add the page to the store view of the desired language.
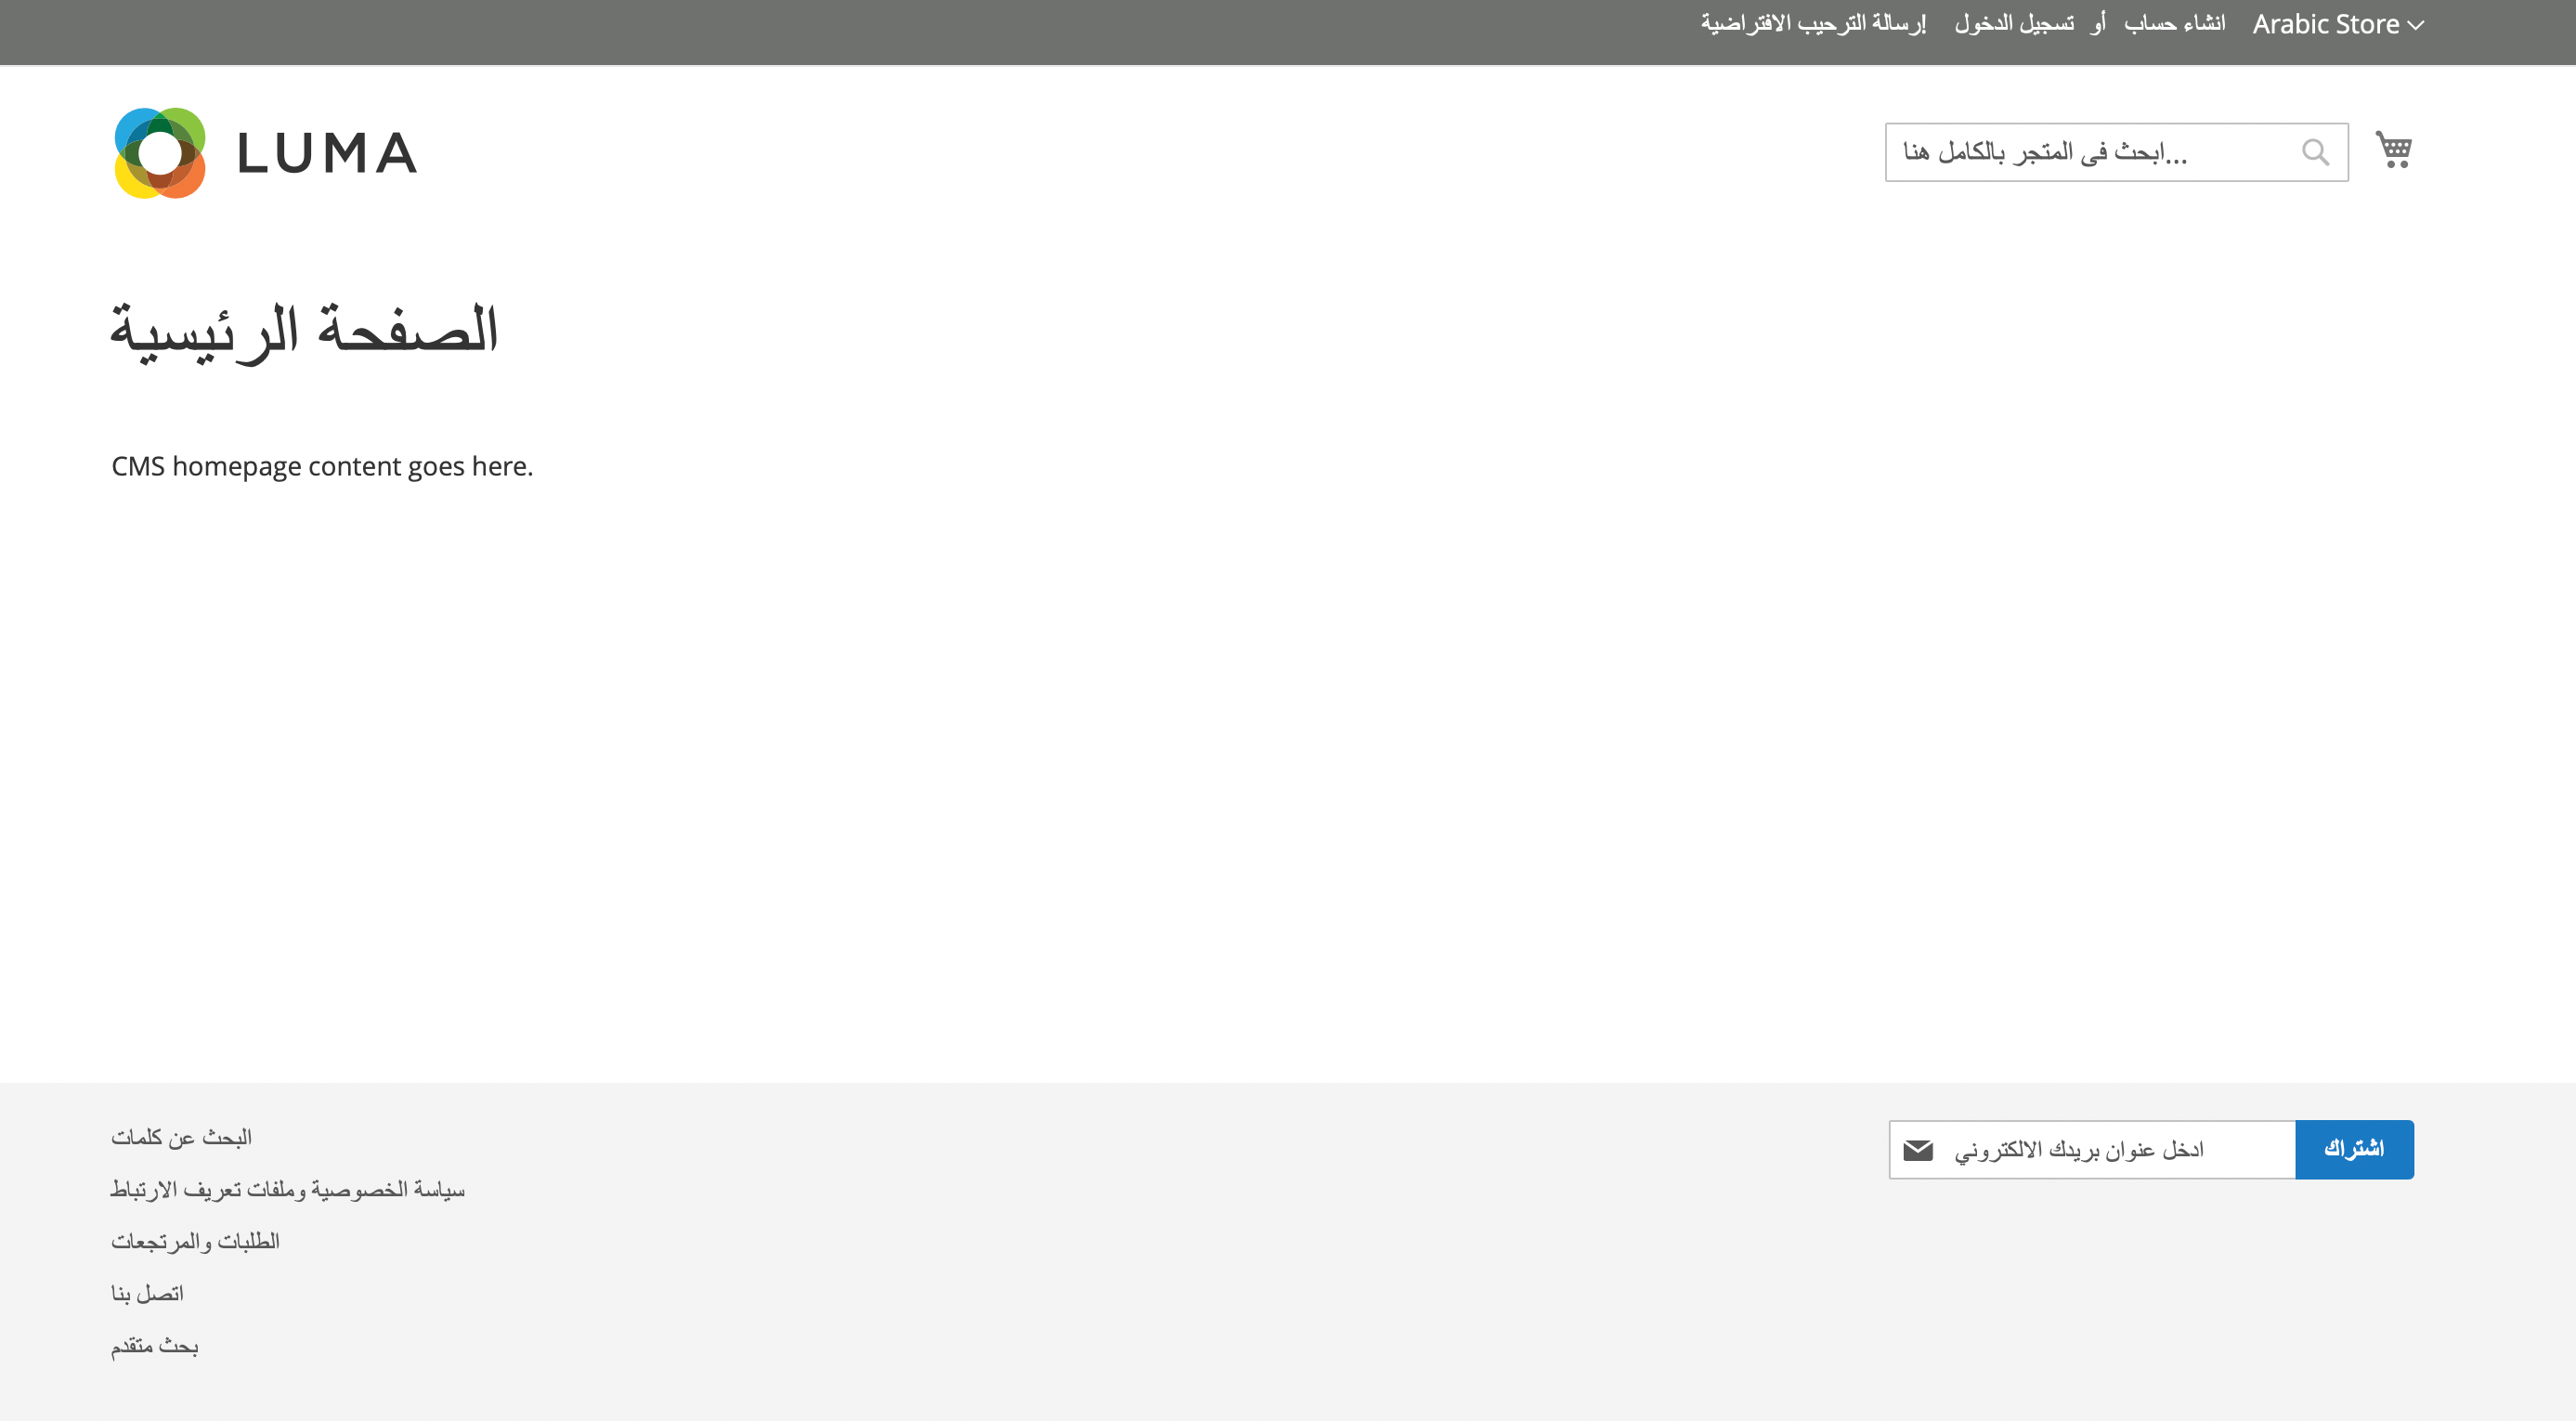
Currently, we have the default home page, which just says “CMS homepage content goes here”. This home page will show for both store views regardless of what the language is.
We’ll first change the store view this page appears in. In the admin panel, click on Content in the side panel, then click on Pages.
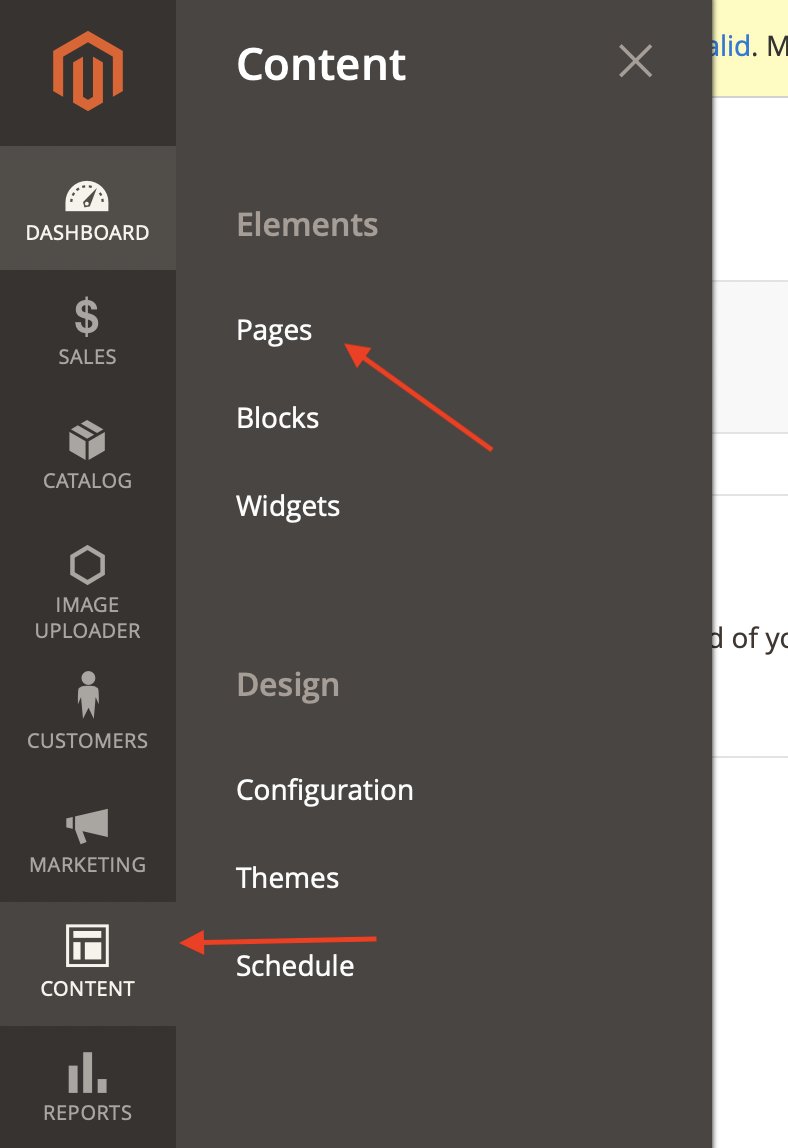
You’ll see a grid of all the pages in your website. Look for the Home page, then click on the Select dropdown in the Action column, then Edit.

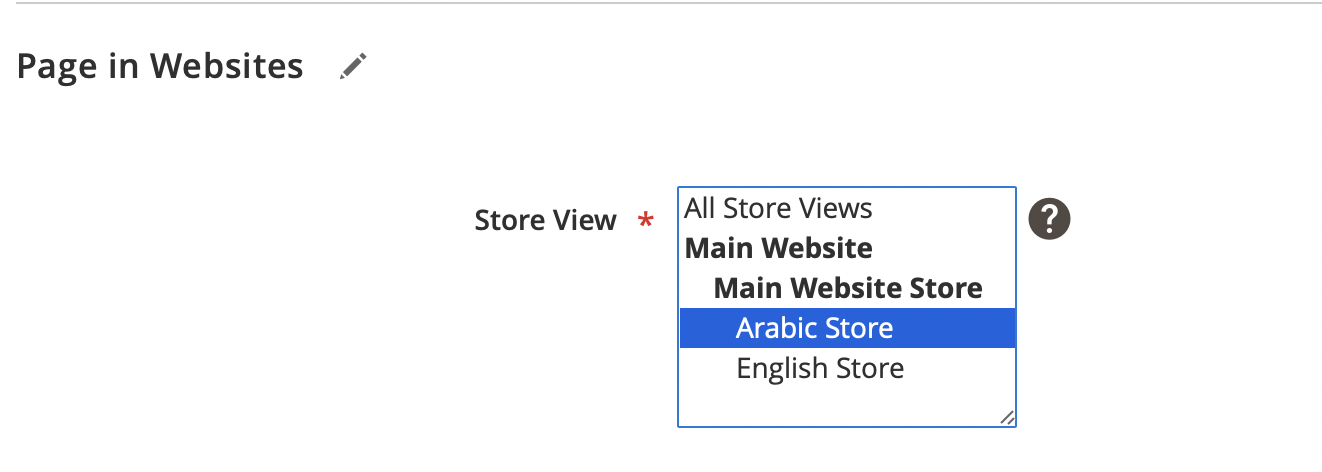
Then, scroll down to the Page in Websites collapsible, expand it, and choose the website you want this page to appear in. As this is the default page and it’s in English, we’ll choose to keep it in the English store.
Once you’re done, click Save.
Now, the previous Home page just appears on the English store. We’ll create a new one to appear on the Arabic store.
Go back to Pages and click on Add New Page.

First, enter the title of the page and the content you want under Content.
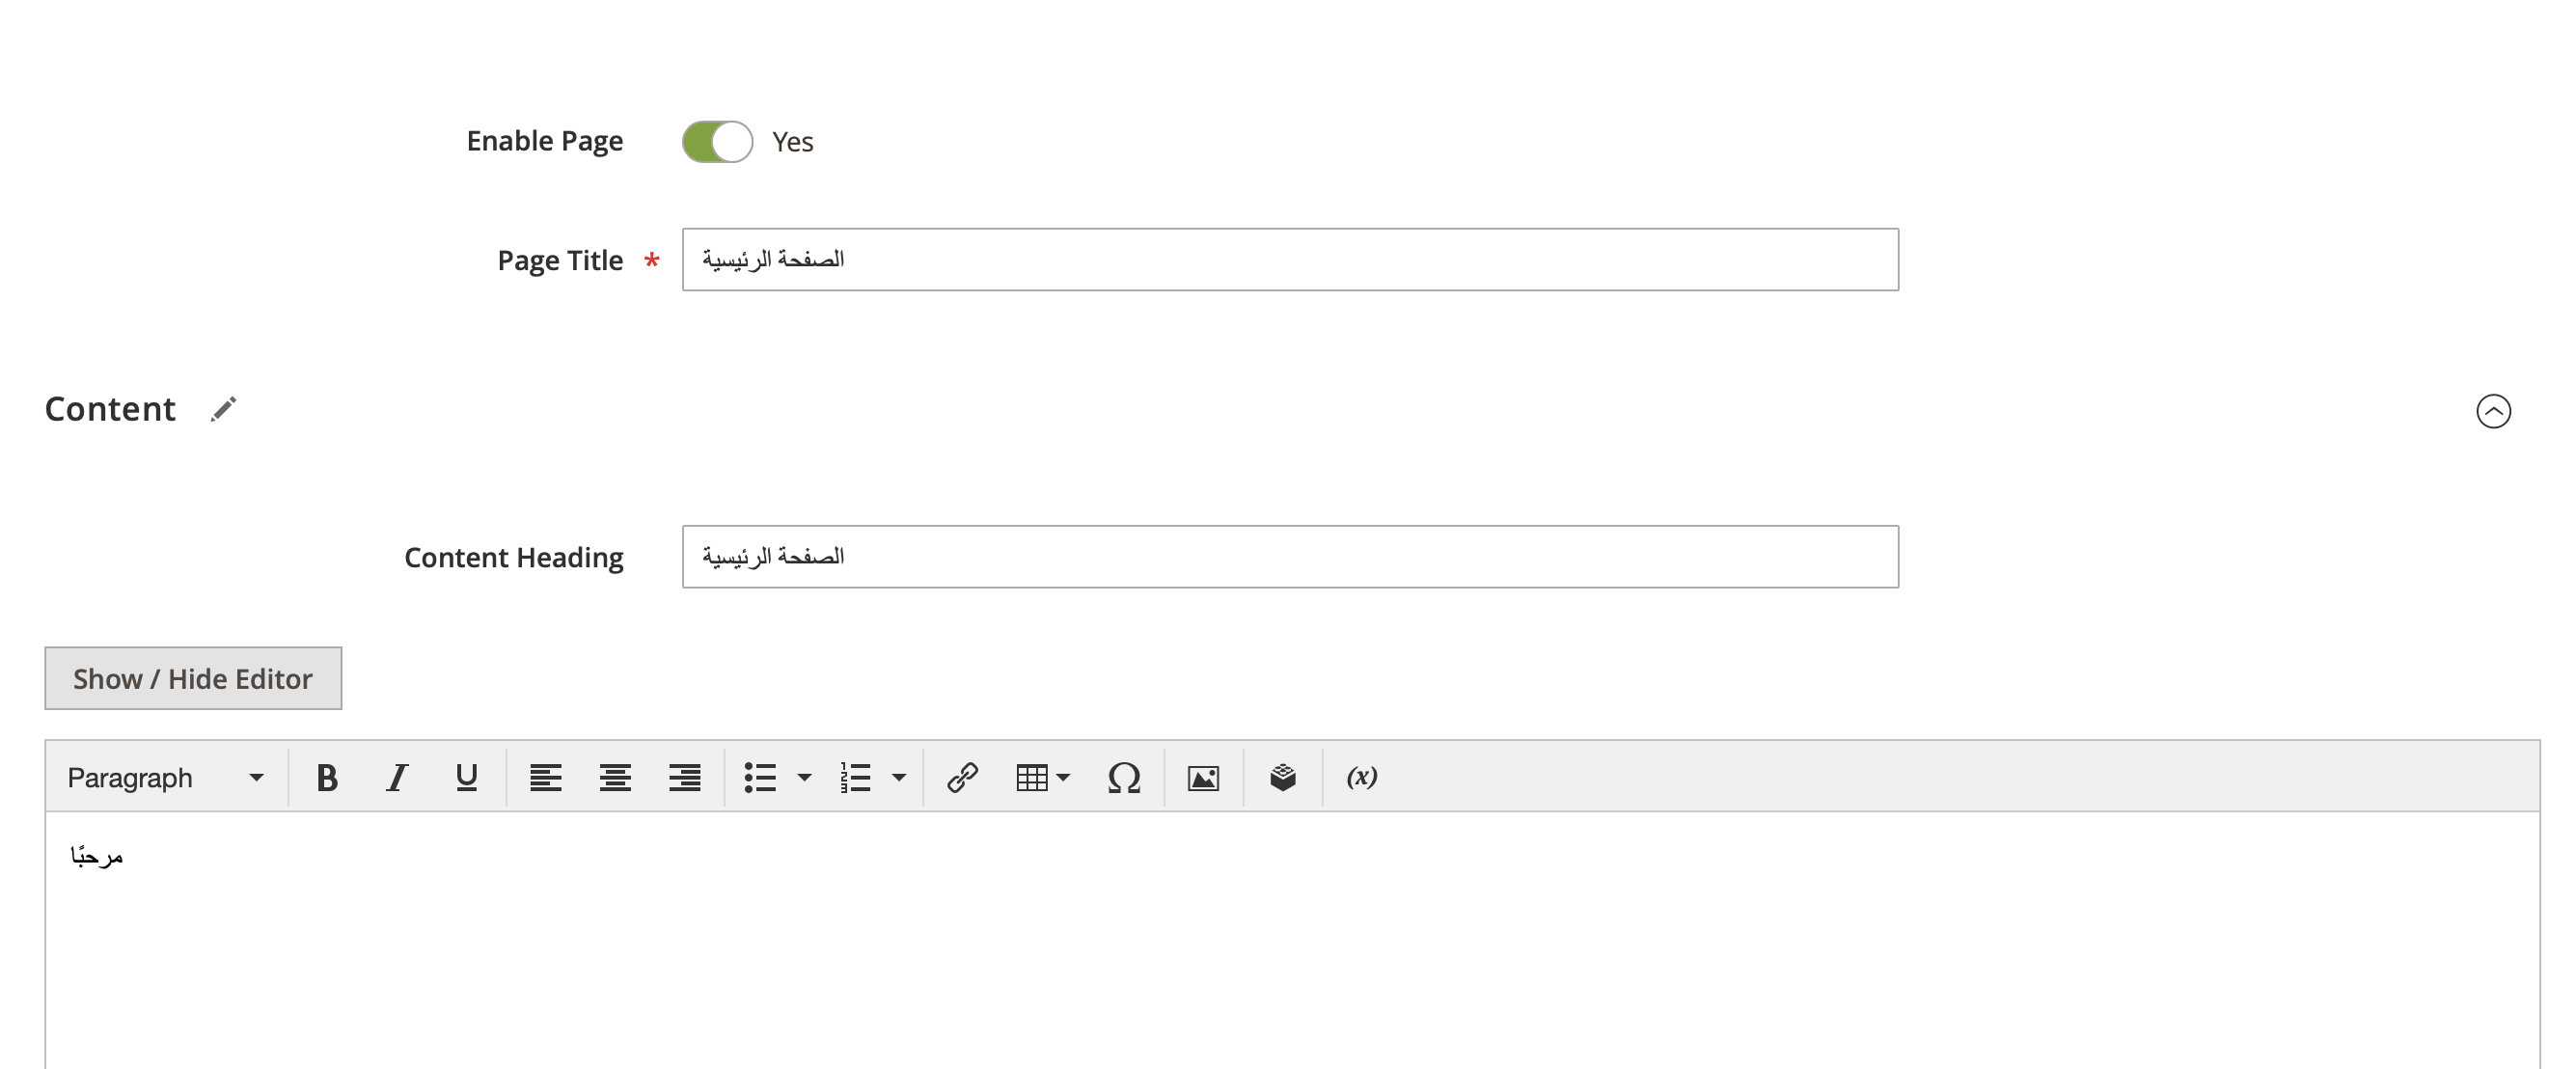
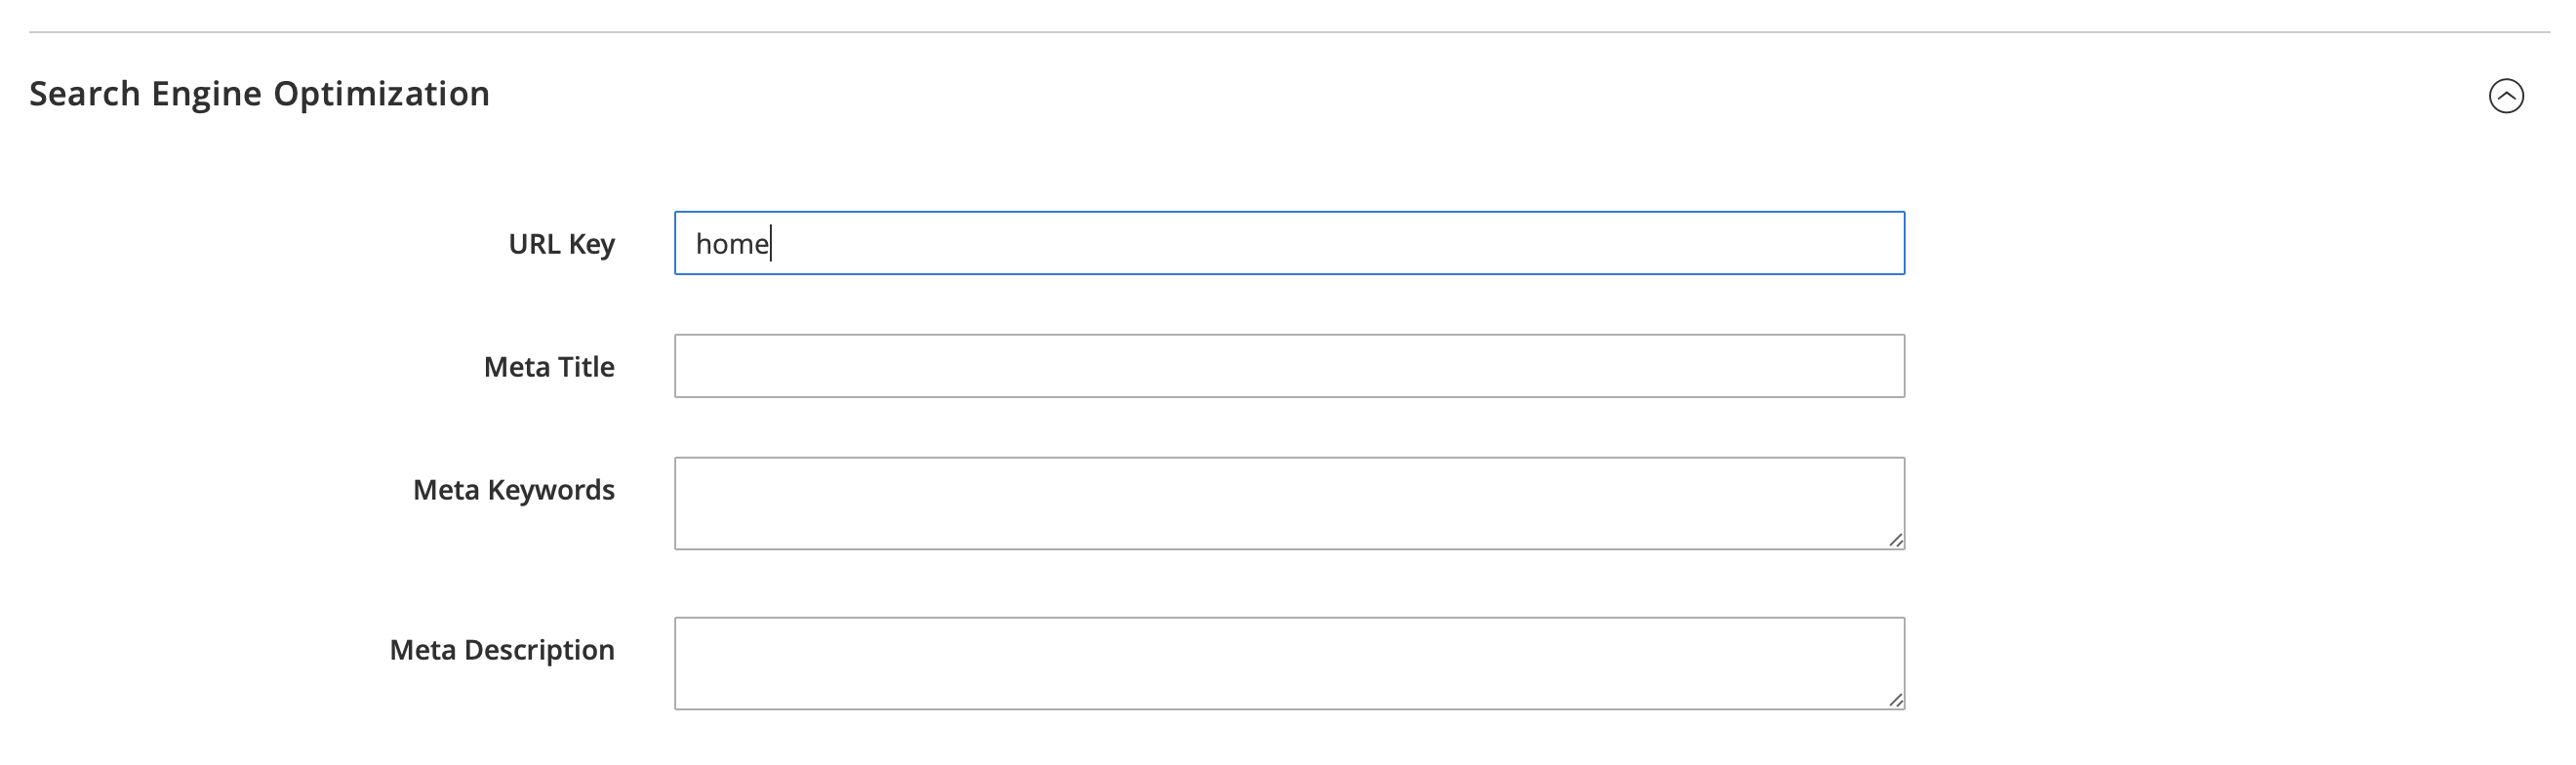
Then, open the collapsed section Search Engine Optimization and in the URL Key field enter home. This is essential for the Home page, as the home page is determined by the URL key home.
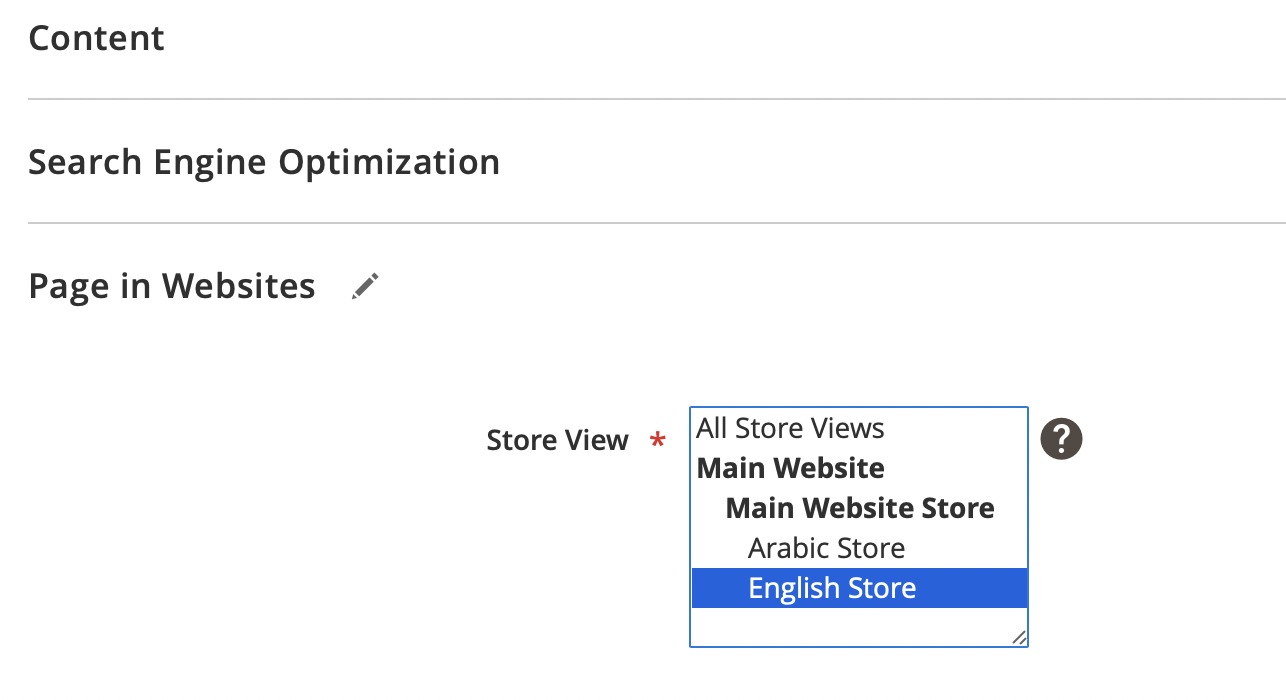
After that, scroll down to the Page in Websites collapsible and choose the new store view you added.
Once you’re done, click Save. Then, go to your website. You should see different content on the home page based on the language you choose.

Internationalizing Modules and Themes
In this section, we’ll see how to internationalize the custom modules and themes that we create. This includes translating the strings in the modules and theme, and changing CSS styles based on the locale.
This section assumes you already have a module or a theme created. If you need more info on that, you can check Magento 2’s documentation on how to create a module, and how to create a theme.
Using Magento 2 Translation Functions
There are a few Magento 2 translation functions or methods that you can use based on the programming language of the file. These functions will translate the strings passed as parameters to the current store view’s language.
PHP and PHTML
In PHP and PHTML template files, you can use the __() function to translate strings. For example:
__('Hello');
This will translate the string based on the language of the current store view.
You can also pass a parameter that you don’t want to be translated:
__('Hello, %1', $name);
JavaScript
In JavaScript files, you first need to add the 'mage/translate' library:
require(['jquery', 'mage/translate'], function ($, $t) {...});
Then, in your code, you can translate a string as follows:
$.mage.__('Hello');
Alternatively, you can use $t, which is available after you add the mage/translate library:
$t('Hello');
To pass a parameter, you need to use the JavaScript replace function:
$t('Hello, %1').replace('%1', name);
Email Templates
To translate strings in email templates you can use the trans directive. For example:
{{ trans "Hello" }}
You can also pass a parameter:
{{ trans "Hello, %name" name="World" }}
Templates of UI Components
To translate templates of UI Components, which are .html files, you can use i18n:
<p data-bind="i18n: 'Hello'"></p>
Alternatively, you can use Knockout comments:
<!-- ko i18n: 'Hello' --><!-- /ko -->
Or you can use the translate directive:
<translate args="Hello" />
UI Component Layouts
To translate strings in UI component layouts, you can add the translate attribute to any element and set it to true. For example:
<item name="label" xsi:type="string" translate="true">Hello</item>
Adding Magento 2 translation dictionaries
Both modules and themes can have translation dictionaries. These Magento 2 translation dictionaries are similar to language packs. You can use them to translate your own module or modify and override translations from other modules or language packs.
In a module’s structure, there are different directories for each part of the module. The Magento 2 translation dictionary resides in the directory i18n. This directory is an optional directory for a module.
Similarly, in a theme’s structure, the translation dictionaries also reside in the directory i18n.
Inside that directory reside CSV files for each language you want to translate the module or theme to. So, for example, if we want to translate a module of our own to Arabic since we’ve added the Arabic language, we add the CSV file ar_SA.csv inside the i18n directory in our module.
After adding new translations, you’ll probably need to clear Magento’s cache. You can either do that with the command line:
php bin/magento cache:clean
php bin/magento cache:flush
You can also do it from the Admin panel, by going to System then Cache Management and clearing it from there like we did earlier.
Creating the dictionary with Magento’s i18n tool
One way to create a dictionary is to use Magento’s i18n tool. However, this requires you to have already made use of the Magento 2 translation functions before you use the tool. So, make sure to do that before you use this tool, as it extracts strings from your code that uses translation functions.
To use the tool, run the following command:
php bin/magento i18n:collect-phrases -o="<PATH>/i18n/<LANGUAGE>.csv" <TRANSLATE_PATH>
Here, <PATH> is the path that leads to your module or theme starting from the root of the Magento 2 project; <LANGUAGE> is the language you’re translating to, which in our example will be ar_SA; and <TRANSLATE_PATH> is the path we’re translating and the path that the strings should be extracted from, which can be the path to the module, the theme, or just the entirety of Magento if you want to translate everything yourself.
Please note that this tool doesn’t do the translation for you; it just accumulates all the strings that are inside Magento 2 translation functions in your module and puts them in a CSV file ready for you to translate.
Manually creating the dictionary
Alternatively, you can create your dictionary manually. You just need to create the language CSV file in the i18n directory in your module or theme. As mentioned above, the name of the file should be based on the language the file is for. So, if you’re translating to Arabic, it will be ar_SA.csv.
Then, inside the file, you need to add on each line the string and its translation separated by a comma. For example:
"Hello","مرحبا"
Each string should be on a new line.
Changing assets based on locale
In your modules and themes, you can also change assets based on locale. Assets are all files inside your module inside the directory views/<AREA>/web, where <AREA> can be frontend or adminhtml, or inside your theme inside the directory web.
For example, let’s say you have an image that you want to show when the store is in English, and you have its equivalent in other languages. Magento allows you to easily specify an alternative for that image for different locales.
Inside views/<AREA>/web in your module or web in your theme, you just need to add the directory i18n. Then, inside i18n you’ll need to add a directory with the name of the locale you want to make changes for.
So, in our example, if we have an image at views/frontend/web/images/test.png in our module and we want to add a replacement for it in Arabic, we’ll need to create the directory i18n inside views/frontend/web. Then, inside i18n we create the directory ar_SA.
Inside each locale directory (in this example, ar_SA) the structure should be similar to views/frontend/web when adding replacements.
So, in this example, to replace views/frontend/web/images/test.png in the Arabic store view, we’ll add views/frontend/web/i18n/ar_SA/images/test.png which will be the replacement.
Then, to retrieve the image in a template phtml file, we can do the following:
<img src="<?= $block->getViewFileUrl('VENDOR_MODULE::images/test.png') ?>" />
Here, VENDOR_MODULE is the name of the module and its vendor.
So, when the locale is the default (in our example, English), the image at views/frontend/web/images/test.png inside the module will be used. However, when the locale is Arabic, the image at views/frontend/web/i18n/ar_SA/images/test.png will be used.
This works for not only images, but also all files inside web. So, it can work for CSS, JavaScript, or HTML files as well.
Best Practice for Magento Themes with Different Script Directions
When internationalizing your website to support two languages, and one of them is left-to-right (LTR) or right-to-left (RTL), the best practice would be to first create a main theme that provides styling based on the main language.
So, if the main language is LTR, then you create a theme to support that with all the styling required for the website.
Then, to support RTL, you create another theme that extends the main theme. Inside this new child theme, you can add any changes to styling necessary.
This removes the need to redundantly repeat changes in two CSS files — as long as you use the method detailed in the previous section about changing assets based on locales.
Given that, in most cases, your website will look the same for both languages, but might have minor differences, it’s best to have both share the common styles, then override the changes in your child theme.
After creating these two themes, for each store view you can assign the theme that supports its locale and text direction from the Admin panel.
Conclusion
With Magento 2, you can have many features ready for your ecommerce store out of the box. This makes it an extremely helpful ecommerce framework.
One of its strong assets is providing many languages for your users to attract more of them from different languages and countries. Magento 2 makes it easy to manage different content for each of the languages, as well as add Magento 2 translation dictionaries, change assets and styling based on locale.
You can still do more to internationalize your Magento 2 store, like translating product descriptions or changing names of categories based on locale, and more. Be sure to check out the Magento 2 translation documentation for more info.
Frequently Asked Questions (FAQs) on Magento 2 Translation and Internationalization
How does Magento 2 handle language translation for different regions?
Magento 2 uses a system known as internationalization to handle language translations for different regions. This system allows developers to create websites that can be easily translated into different languages. It uses CSV files to store translations for each language. When a user selects a particular language, Magento 2 will load the corresponding CSV file and display the website in that language.
What are the steps to translate a Magento 2 website into a different language?
Translating a Magento 2 website involves several steps. First, you need to install the language pack for the language you want to translate your website into. Then, you need to create a store view for that language. After that, you need to configure your website to use the new store view. Finally, you need to translate the content of your website into the new language.
How can I install a language pack in Magento 2?
Installing a language pack in Magento 2 is a straightforward process. You can download the language pack from the Magento 2 marketplace or from other trusted sources. Once you have downloaded the language pack, you can install it using the command line interface of Magento 2. After the installation, you need to clear the cache of your website to make the new language pack effective.
How can I create a store view for a new language in Magento 2?
Creating a store view for a new language in Magento 2 is done through the admin panel. You need to navigate to the “Stores” menu and then to the “All Stores” section. There, you can create a new store view by clicking on the “Create Store View” button. You need to provide a name for the new store view and select the language for it.
How can I configure my Magento 2 website to use a new store view?
Configuring your Magento 2 website to use a new store view is also done through the admin panel. You need to navigate to the “Stores” menu and then to the “Configuration” section. There, you can select the new store view from the “Store View” dropdown menu. After that, you need to change the “Locale” option to the language of the new store view.
How can I translate the content of my Magento 2 website into a new language?
Translating the content of your Magento 2 website into a new language can be done manually or using a translation extension. If you choose to do it manually, you need to edit each page of your website and provide the translation for each text string. If you choose to use a translation extension, it will automatically translate the content of your website into the new language.
What are some good translation extensions for Magento 2?
There are several good translation extensions for Magento 2. Some of the most popular ones include Magefan’s Magento 2 Translation Extension and Mageplaza’s Magento 2 Translation Extension. These extensions can automatically translate the content of your website into different languages and they are easy to install and use.
Can I use Google Translate to translate my Magento 2 website?
While it’s possible to use Google Translate to translate your Magento 2 website, it’s not recommended. Google Translate may not provide accurate translations for technical terms and it may not preserve the formatting of your website. It’s better to use a dedicated translation extension or to hire a professional translator.
How can I update the translations of my Magento 2 website?
Updating the translations of your Magento 2 website can be done through the admin panel. You need to navigate to the “Stores” menu and then to the “Translation” section. There, you can edit the CSV files for each language and update the translations.
Can I translate the admin panel of my Magento 2 website?
Yes, you can translate the admin panel of your Magento 2 website. You need to install a language pack for the language you want to translate the admin panel into. Then, you need to configure your user account to use the new language. After that, the admin panel will be displayed in the new language.