It seems that every page you visit on the Web uses Flash in some way or another — whether it’s an intro movie, or groovy buttons, Flash is everywhere. But if you don’t have Flash, does that mean you can’t use this facility? Do you have Dreamweaver 4? If you answered ‘yes’, then you’re set! Dreamweaver 4 gives you the tools to quickly add simple Flash movies directly to your Web pages.
Dreamweaver 4 comes with two handy tools: Flash Text and Flash Buttons, both of which allow you to add Flash to your pages very easily. There’s no need to mess around arranging or creating the designs — they’re all built in.
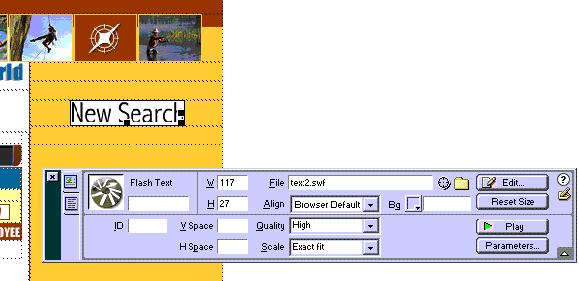
The “New Search” button is created with Dreamweaver 4’s Flash Text Tool
Flash Text
As you might expect from Macromedia, the addition of Flash Text and Buttons to your Web page is very easy. All the controls that manage this process appear in the Objects panel below. The default panel is Common Objects. If you don’t see this panel, select the arrow in the top right hand corner of the Objects panel and choose “Common” from the drop down list.
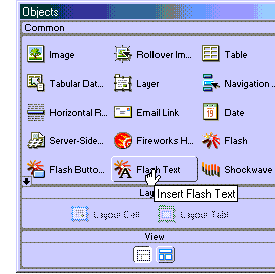
The Flash Text and Flash Button objects are located on the Common Objects Panel
First, we’ll explore the Flash Text feature. Open a new page and save it as FlashText.htm Note: you must first save a page before adding Flash Text and Flash Buttons.
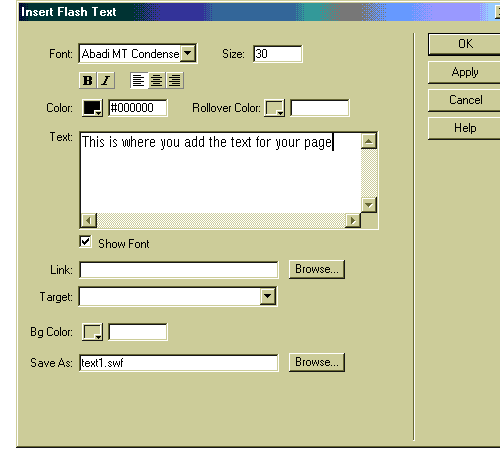
Select the Flash Text button. This opens the dialog window for the Flash Text control. You’ll see in the figure below that the window is very similar to dialog windows you might see with other Object controls in Dreamweaver. The Flash Text window is broken into a series of boxes that you’ll need to fill out in order to create the Flash Text movie.
The Flash Text maintains the properties that control how the Flash Text will appear in your Web Browser.
I always start by filling in the “Text” box with the text I want to see on the page. The Flash Text feature is great for small paragraphs of text on a page, though there’s a limit of 1024 characters for the text.
The Flash Text is modified with many of the tools you might have used to editing text in the Properties Panel, such as bold, italic, alignment and text color buttons. All modifica-tions you make to the text will apply to the entire paragraph of text. You won’t see the changes in the Text window, though. They’ll only appear when you select “OK” and view the Flash Text on your page. But first, let’s look at some of the other features.
An advantage you have with Flash text over conventional HTML text is that you can use any font and any font point size. The drop down Font list displays all the fonts registered to your computer. As you choose a font, you’ll see the text in the text area change to the style of the new font (deselecting the “Show Font” check box turns this feature off).
As we all know, HTML does not allow for much Font control — this is no longer a prob-lem. In addition to selecting any font, you can also select the exact size of the font. In the example above, the “Size” is set to 30, which translates to 30 points on the Web page. Font size in HTML can only be changed with the help of Cascading Style Sheets.
A big win for me is the ability to make my Flash Text interactive. Below the Text box you can add a link to another Web page. Write in your own links, or select the Browse but-ton and choose a link from your Website. The control is very similar to the “Browse for File” feature used for text and graphics on the Properties Panel. In addition, if your Website is frame based, you can direct your link to open in a “Target Window” through the Target drop down box. This works and behaves in exactly the same way as the Tar-get window on the Properties Panel.
By default, the background color for all of the Flash movies is white, however the Bg Color option can change your background to almost any color. Select this option to open the color palate from which you can choose your desired color.
A Website is created with a collection of files. There are graphics files (GIF and JPG), Web pages (HTML) and now you have Flash Movies. Each Flash file ends with the suf-fix of .swf (pronounced SWiF). The Flash Text must be in this format for it to be view-able in a Web page. So, when you save your Flash movie, remember to select this op-tion from the Save As file options. By default, the first Flash Text you create will be called text1.swf. If you don’t change the name of the file, and decide to add a second Flash Text movie to the page, the second file will be called text2.swf. The third will be text3.swf, and so on. Re-name your file words.swf. Select “OK” and view your text on the page. To test any links you may have added, you’ll need to either preview the page in your browser, or play the movie by select the green “play” button on the Properties Panel.
Flash Text Properties Panel
The Properties Panel is slightly modified for the specifics of Flash Text in Dreamweaver. Image D shows the features specific to Flash Text Properties Panel.

The Flash Text Properties Panel
On the whole, the panel looks very similar to the Flash Properties Panel, because we’re working with a Flash movie. The most significant difference is the Edit button. Selecting the Edit button opens the Flash Text window, in which all the options you have selected will appear. You can modify the text, font or any of the options, and then click “OK” to resave the file, and the changes are immediate. Why is this so exciting? It’s exciting be-cause the Flash SWF file format is a locked format. That is, when the SWF file is cre-ated, you can’t modify it: the original source file that was used to create the SWF has to be modified. Dreamweaver gets around this knotty problem by utilizing Flash Generator to build and modify the SWF files, which allows you to create and edit your Flash Text very easily.
Flash Buttons
If Flash Text is fun; Flash Buttons are downright cool. You will find on the Common Ob-jects Panel a button called “Flash Buttons”. Select this to open the Flash Buttons win-dow.
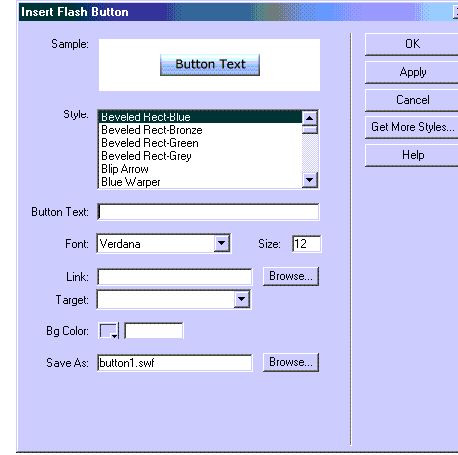
The Flash Button Window
Most of the Flash Button window replicates the Flash Text window: you can add text, apply any type or size of font, insert links, change the background color of the movie and modify the name of the final SWF file. The difference is the type of Flash movie we’re creating. The movie is now a stylized interactive button. And you know what? You have nearly 4 dozen styles to choose from. Scroll down the Style menu list to preview a style. You will see that the Sample in the top window keeps changing as you scroll. If you want to see the button animate, just roll your cursor over the sample. For instance, if you choose the Style “Star Spinner” and roll your cursor over it you will see the star spin when you roll.
The text you add to the “Button Text” field will be added to the button. Each style will de-fault the Font to the once that’s most appropriate for that button, however you can still modify the Font yourself
Let’s create a new Flash Button. Open the window and apply the following settings:
- Style: Slider
- Button Text: SitePoint
- Font: Impact
- Size: 16
- Link: http://www.sitepoint.com
- Save As: sitepoint.swf
OK, the button will take you to SitePoint, but the point is you can see how easy it is to configure a Flash Button. Select “OK” and the button will be embedded into your Web page. Press F12 to preview the page in your browser. As you roll your cursor over the button you will see that it animates and allows you to click it — when you do so, you’re taken to SitePoint.
Any Flash Button can modified from the Flash Button Properties Panel. Select the “Edit” from the Properties Panel with the Flash Button highlighted on the page in Dream-weaver. The Flash Button Window will open and all the parameters for the button can be modified.
A Few Flash Tricks
There is always time for a Flash trick or two. One of the things I mentioned earlier is that the default background color for each Flash movie is white. This can be changed if your users view your Website with Microsoft’s Internet Explorer 4.0+
Select a Flash movie, such as the Flash Text you create earlier, and open the Proper-ties Panel for the movie. If you fully expand the panel you’ll see in the bottom right hand corner a button called “Parameters”. Select the Parameters button. The Parameters window opens. This window allows you to add additional parameters to the movie that are specific to Internet Explorer (this is because Netscape and Microsoft handle Web plugins differently). For Parameter add “wmode” and for the value add “transparent” as shown in figure G.

The Parameters Window
Select “OK”. What you did will not be apparent until you preview the page in your browser — you’ll see that the additional parameter makes the background color for the Flash movie transparent. This allows the background color (or image) to show through in the same way a transparent GIF file will allow the background to show through. In addition, this allows Flash movies to be placed in Dreamweaver Layers and stacked on top of each other.
The addition of Flash Buttons and Text allows any non-Flash designer the freedom of adding Flash to their Websites, and gives their site a multimedia-driven lift.
Frequently Asked Questions about Flash and Dreamweaver
How can I add Flash content to my Dreamweaver website?
Adding Flash content to your Dreamweaver website is a straightforward process. First, you need to create your Flash content using Adobe Flash. Once you have your .swf file, open your Dreamweaver application and navigate to the page where you want to add the Flash content. Click on the ‘Insert’ menu, select ‘Media’, and then choose ‘SWF’. Locate your .swf file and click ‘OK’. Your Flash content will now be embedded in your Dreamweaver page.
Why isn’t my Flash content displaying correctly in Dreamweaver?
If your Flash content isn’t displaying correctly, there could be several reasons. First, check if your .swf file is corrupted or not properly exported from Adobe Flash. Second, ensure that the path to the .swf file in your Dreamweaver code is correct. Lastly, make sure that your web browser has the latest version of the Flash player installed.
Can I edit my Flash content directly in Dreamweaver?
No, you cannot edit Flash content directly in Dreamweaver. You need to edit the original .fla file in Adobe Flash, export it as a .swf file, and then reinsert it into your Dreamweaver page.
How can I make my Flash content responsive in Dreamweaver?
To make your Flash content responsive, you need to set the width and height properties of your .swf file to a percentage value instead of a fixed pixel value. This will allow the Flash content to resize based on the size of the user’s screen.
Can I add Flash content to my Dreamweaver website without using code?
Yes, Dreamweaver provides a visual interface for adding Flash content to your website. Simply navigate to the ‘Insert’ menu, select ‘Media’, and then choose ‘SWF’. Locate your .swf file and click ‘OK’. Your Flash content will now be embedded in your Dreamweaver page.
Why is my Flash content not playing automatically in some browsers?
Some browsers block Flash content from playing automatically to protect users from unwanted content. Users need to click on the Flash content or change their browser settings to allow Flash content to play automatically.
How can I add a fallback image for browsers that don’t support Flash?
You can add a fallback image by using the ‘object’ and ’embed’ tags in your HTML code. If a browser doesn’t support Flash, it will display the fallback image instead.
Can I use Flash content in a mobile-friendly Dreamweaver website?
Most mobile devices do not support Flash, so it’s not recommended to use Flash content in a mobile-friendly website. Instead, consider using HTML5 or CSS3 animations.
How can I optimize my Flash content for faster loading times?
You can optimize your Flash content by reducing the file size of your .swf file. This can be done by compressing your images, using vector graphics instead of bitmaps, and minimizing the use of complex animations.
Can I use Flash content in a Dreamweaver template?
Yes, you can use Flash content in a Dreamweaver template. Simply add the .swf file to your template in the same way you would add it to a regular Dreamweaver page.
 Matthew David
Matthew’s most recent publications include Flash MX Magic (New Riders), Flash MX Game Design f/x & Design (Coriolis) and content for Everything Ever Needed to Know about Live Motion 2.0, Flash 5 Magic, Inside Dreamweaver 4, Flash 5: Visual FX, Web Publishing Bible and The Dreamweaver Bible.