

Key Takeaways
- ActionScript can be used to create interactive animations in Flash, such as scaling a basic shape, motion, transparency, and color effects. The tutorial provides a step-by-step guide to creating a slider bar that controls the size of a square on the stage.
- The tutorial introduces the use of ActionScript’s startDrag() function, which allows a handle to be dragged left and right. The limitations on the dragging motion are defined by numerical parameters passed to the startDrag() function.
- The tutorial also introduces the use of an onEnterFrame handler, which defines actions that are executed in every frame. This is a key tool for achieving real-time interactivity in Flash.
- The tutorial demonstrates how to form a relationship between the position of a handle and the value of variables, allowing for the scaling of a shape based on the position of the handle. This is achieved using an onEnterFrame handler in ActionScript.
So you’ve learned the basics of Flash, but you still don’t understand how designers create such sophisticated Flash Websites and Interfaces. In this tutorial, I’m going to show you a simple way to create interactive animation with ActionScript.
In this example, ActionScript will be used to scale a basic shape, but this same procedure can be used for motion, transparency, color effects and more. I will assume you have some knowledge of basic ActionScript syntax and the basic Flash interface/tools. If you become overly confused, I would suggest you pause to read a few beginner Flash tutorials, such as Flash 101 here at SitePoint.
Our project will consist of a slider bar with a handle that controls the size of a square on the stage. As we slide the handle, the square will smoothly grow or shrink.
Getting Started
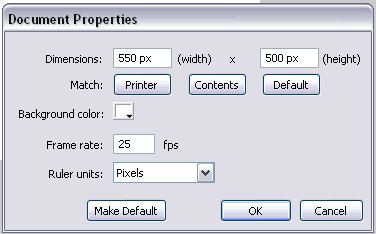
First, we need to set up our stage and create a few symbols. Open a new Flash document and set it to 550 pixels wide and 500 pixels tall. Set the frame rate to 25fps.
Next, we want to create 3 simple symbols, all Movie Clips. To make each symbol, choose Insert > New Symbol. We want these symbols to be stored in the library; we’ll place them on the stage later.
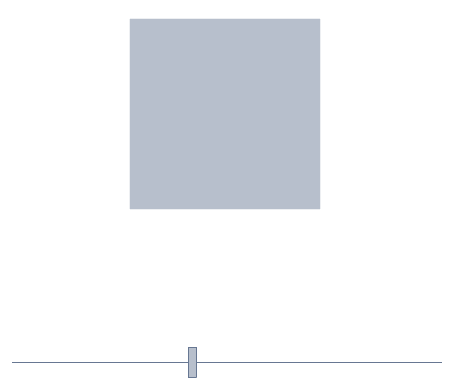
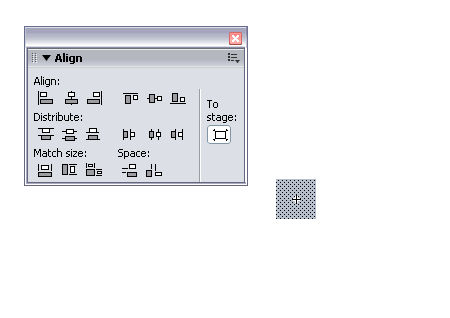
Name the first movie clip “shape”, and inside it create a 10 x 10-pixel square, using the align panel to center it both vertically and horizontally. You should now have a little square with the clip’s registration point located at its center (note that square is being shown at 400% zoom in the image below).
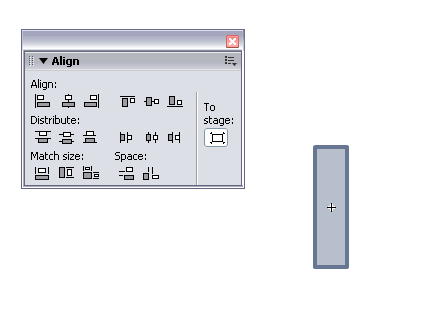
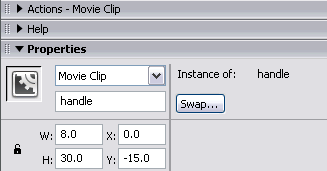
Let’s move back to the main timeline and create the symbols for the widget that will control the size of the square we just created. Create a new Movie Clip named “handle” and in it create a small rectangle 8 pixels wide and 30 pixels tall. Like the square, center this rectangle horizontally and vertically (again, the image below is shown at 400% zoom).
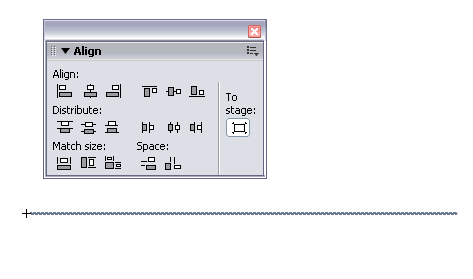
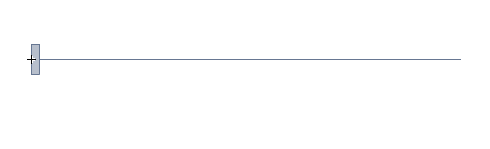
Move back to the main timeline and create the last symbol. This will serve as the track on which our handle will slide. Create a Movie Clip called “slider”. Inside this clip, simply place a horizontal line 400 pixels long, using a 1 pixel stroke. Align the line so the left end is at x=0 y=0. This can be done using the Align or Property panels.
We’ve made the 3 symbols we’re going to need. Now, it’s time to combine the handle and the slider to make a working control bar. From the library panel, click back into the slider symbol we just created. Insert a new layer above the layer that contains the line you made. As pictured below, drag an instance of “handle” from the library on to the stage. Use the property panel to set the position of the handle to 0,-15 and name the instance “handle”. The handle should now be positioned at the left end of the line and have the properties show below.
Your slider should now look like the one pictured below.
Bring On the Code!
It’s time for a little ActionScript! Create a third layer above the two existing layers in your slider symbol and name it “actions”. Select frame 1 of the actions layer and open the Actions (ActionSript) Panel. Copy or retype the following code into the panel for frame 1.
handle.onPress = function(){

  this.startDrag(false,0,0,400,0);

};


handle.onRelease = function(){

  this.stopDrag()

}
This code contains two action handlers. The first handle.onPress function defines what happens when the mouse button is pressed while the cursor hovers over our handle. In this case, we want to use the Flash function startDrag(); This will allow us to drag the handle left and right. The limitations on the dragging motion are define by the numerical parameters we pass to the startDrag() function. The syntax for this function is the following: startDrag(lock, left, top, right, bottom).
The “lock” parameter is true or false and tells Flash if it should lock the pointer to the center of the object while dragging. In this case, we give that parameter a value of false. We are more concerned with using the numerical values to limit the motion of the slider. By examining the values passed to the drag function, you’ll see we set both top and bottom to 0, which prevents the handle from being moved vertically. We set left to 0 and right to 400, to allow the handle to slide along our predefined track. The second handle.onRelease function says that when the mouse is released, the handle will stop being dragged.
Moving back to the main timeline, create a layer called “control”, place an instance of slider on the stage in your new layer and position it at 75, 450. If you select Control > Test Movie, you should have a working slider. It doesn’t yet control anything, but it should drag left and right as expected.
Next, create another layer on the main timeline, called “shape”. Drag an instance of your shape symbol onto the stage, position it at 270, 210 and name it “shape” in the property panel.

As for the slider clip, we now need to add some actions to the main timeline. Create a layer above the existing layers in the main timeline and call it “actions”. Click on frame 1 of that layer and open the actions panel. Place the following code in frame 1.
shape.targetWidth = shape._width;

shape.targetHeight = shape._height;


shape.onEnterFrame = function() {

    var speed = 5;

    this._width += (this.targetWidth - this._width)/speed;

    this._height += (this.targetHeight - this._height)/speed;

};
The first 2 lines initialize our two variables. We create the variables targetWidth and targetHeight and set them equal to the initial height and width of our shape symbol. Note that this initialization happens only once, at the start of our movie.
The second part of the code assigns an onEnterFrame handler to the shape. This might be new to you, but you’ll soon get to know it very well! onEnterFrame defines some action that’s executed in every frame. So, if the frame rate is 25 frames a second, the code in the onEnterFrame handler will run 25 times a second. Basically, it’s a way to achieve real-time interactivity.
Inside the function, we use a mathematical formula to define the change in size of our shape. Both code lines for the width and height evaluate to the same value in this example, because we’re dealing with a square and uniform scaling. This could, of course, be modified to handle all sorts of more complex actions. Since both lines do pretty much the same thing, I will examine only one of the lines of code.
this._height += (this.targetHeight - this._height)/speed;this._height is the actual height property of the item; changes to this value will be visually reflected in the movie.
this._targetHeightis a variable we use to keep track of what we want the height actually to be.This code increments the actual height of the object by a fraction of the difference between the actual and target heights. As this line is executed at every frame, the actual height will quickly approach the target height. It will also track any changes made to the value of the
targetHeightvariable and size our shape accordingly. This is the key to this entire exercise.If you are confused by the math used here, try doing it out with a pen and paper. If you write it out starting with a height of 10 and a target height of 100, you will see what happens when you execute the code again and again: the value of height will get closer and closer to the target height. Adjusting the "speed" variable will determine how fast the actual height reaches the target height.
Make it Work
We're almost done! You can test the movie again if you want. You will see your working slider at the bottom and a small square just sitting there, motionless. Why doesn't the square move? Because we have haven't told the slider to change the value of
targetHeightandtargetWidth.Double-click the instance of slider to edit that symbol again, click on frame 1 of your actions layer and re-open the actions panel. You should now be looking at the code that controls the dragging action of the slider. We want to add a little more code to this, to complete the functionality of our movie. Trade the existing code for the following code snippet.
handle.onPress = function(){

  this.startDrag(false,0,0,430,0);

};

handle.onRelease = function(){

  this.stopDrag()

}


handle.onEnterFrame = function(){

  _root.shape.targetWidth = this._x +10;

  _root.shape.targetHeight = this._x +10;

};
The first two functions remain the same, but the third is new. At this point in the lesson, this might look familiar. We are using an onEnterFrame handler to form a relationship between the position of the handle and the value of the targetWidth and targetHeight variables. We set the value of the target width and height to be the X position of the handle + 10.
As defined in our starDrag() function, the X value of handle will be between 0 and 400, so we will be able to scale our shape between 10 pixels and 410 pixels. You could remove the “+10” but then our shape could be sized down to 0, and I didn’t want to let it disappear.
Congratulations!
Move back to the main timeline, click Control > test movie …and there you go! If you have followed all the steps correctly, you should now have a working movie. I hope you found this tutorial helpful in learning Flash.
Download the full source code here.
Frequently Asked Questions about ActionScript Animation in Flash
What is ActionScript and how is it used in Flash?
ActionScript is a powerful, object-oriented programming language that is used primarily for the development of websites and software using the Adobe Flash Player platform. It allows developers to create highly interactive and dynamic content, such as games, web applications, and multimedia presentations. ActionScript is used in Flash to control animations and to manage user interaction with the interface. It provides a robust set of tools for creating complex, interactive animations that can respond to user input in a variety of ways.
How can I start learning ActionScript?
There are many resources available online to help you start learning ActionScript. Adobe’s official documentation is a great place to start, as it provides a comprehensive overview of the language and its features. There are also many tutorials and online courses available that can guide you through the process of learning ActionScript, from the basics to more advanced topics.
What are the differences between ActionScript 2 and ActionScript 3?
ActionScript 2 and ActionScript 3 are different versions of the same programming language, but they have some significant differences. ActionScript 3 is a more modern and powerful version, with improved performance and a more robust set of features. It also has a more strict syntax and requires a better understanding of object-oriented programming principles. On the other hand, ActionScript 2 is easier to learn and use, but it lacks some of the advanced features and performance improvements of ActionScript 3.
Can I hire a freelancer to do ActionScript programming for me?
Yes, there are many freelancers available who specialize in ActionScript programming. Websites like Upwork and Workana have a large pool of freelancers with expertise in ActionScript and Flash development. You can post a job listing detailing your project and its requirements, and interested freelancers will submit proposals for your consideration.
Are there any video tutorials available for learning ActionScript?
Yes, there are many video tutorials available online that can help you learn ActionScript. Websites like YouTube have a vast library of tutorials covering a wide range of topics, from the basics of ActionScript to more advanced techniques. These videos can be a great resource for visual learners, as they often provide step-by-step instructions and demonstrations.
How can I use ActionScript to create animations in Flash?
ActionScript can be used to create a variety of animations in Flash. This can include simple animations, such as moving an object across the screen, to more complex animations involving user interaction and dynamic content. The key to creating animations with ActionScript is understanding the Flash timeline and how to control it with code.
What are some common challenges when working with ActionScript?
Some common challenges when working with ActionScript include understanding its syntax, managing complex animations, and dealing with browser compatibility issues. However, with practice and the right resources, these challenges can be overcome.
Can I use ActionScript without Flash?
While ActionScript is most commonly used with Flash, it can also be used independently for other purposes. For example, it can be used to create standalone applications or games using Adobe AIR, a cross-platform runtime system.
Is ActionScript still relevant today?
While the use of Flash has declined in recent years due to the rise of HTML5 and other web technologies, ActionScript is still a powerful tool for creating interactive content. It is particularly popular in the gaming industry, where it is used to create complex, interactive games.
What are some best practices for working with ActionScript?
Some best practices for working with ActionScript include keeping your code organized and easy to read, using comments to document your code, and testing your animations frequently to ensure they work as expected. It’s also important to stay up-to-date with the latest developments in the language and to continually improve your skills through practice and learning.