
The following is a short extract from our new book, JavaScript: Novice to Ninja, 2nd Edition, written by Darren Jones. It’s the ultimate beginner’s guide to JavaScript. SitePoint Premium members get access with their membership, or you can buy a copy in stores worldwide.
It is a tradition when learning programming languages to start with a “Hello, world!” program. This is a simple program that outputs the phrase “Hello world!” to announce your arrival to the world of programming. We’re going to stick to this tradition and write this type of program in JavaScript. It will be a single statement that logs the phrase “Hello, world!” to the console.
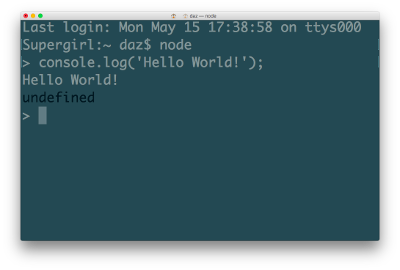
To get started, you’ll need to open up your preferred console (either the Node REPL, browser console, or ES6 Console on the web). Once the console has opened, all you need to do is enter the following code:
console.log('Hello world!');
Then press Enter. if all went to plan you should see an output of “Hello, world!” displayed; similar to the screenshot below.
Congratulations, you’ve just written your first JavaScript program! It might not look like much, but a wise person once said that every ninja programmer’s journey begins with a single line of code (or something like that, anyway!).
JavaScript in the Browser
JavaScript is an interpreted language and needs a host environment to run. Because of its origins, the main environment that JavaScript runs in is the browser, although it can be run in other environments; for example, our first program that we just wrote ran in the Node REPL. Node can also be used to run JavaScript on a server. By far the most common use of JavaScript is still to make web pages interactive. Because of this, we should have a look at what makes up a web page before we go any further.
Three Layers of the Web
Nearly all web pages are made up of three key ingredients ― HTML, CSS and JavaScript. HTML is used to mark up the content. CSS is the presentation layer, and JavaScript adds the interactivity.
Each layer builds on the last. A web page should be able to function with just the HTML layer ― in fact, many websites celebrate “naked day” when they remove the CSS layer from their site. A website using just the HTML layer will be in its purest form and look very old school, but should still be fully functional.
Keep These Layers Separate
It is widely considered best practice to separate the concerns of each layer, so each layer is only responsible for one thing. Putting them altogether can lead to very complicated pages where all of the code is mixed up together in one file, causing “tag soup” or “code spaghetti”. This used to be the standard way of producing a website and there are still plenty of examples on the web that do this.
Unobtrusive JavaScript
When JavaScript was initially used, it was designed to be inserted directly into the HTML code, as can be seen in this example that will display a message when a button is clicked:
<button id='button' href='#' onclick='alert("Hello World")'>Click Me</a>This made it difficult to see what was happening, as the JavaScript code was mixed up with the HTML. It also meant the code was tightly coupled to the HTML, so any changes in the HTML required the JavaScript code to also be changed to stop it breaking.
It’s possible to keep the JavaScript code away from the rest of the HTML by placing it inside its own <script> tags. The following code will achieve the same result as that above:
<script>
const btn = document.getElementById('button');
btn.addEventListener('click', function() {
    alert('Hello World!');
});
</script>
This is better because all the JavaScript is in one place, between the two script tags, instead of mixed with the HTML tags.
We can go one step further and keep the JavaScript code completely separate from the HTML and CSS in its own file. This can be linked to using the src attribute in the script tag to specify the file to link to:
<script src='main.js'></script>
The JavaScript code would then be placed in a file called main.js inside the same directory as the HTML document. This concept of keeping the JavaScript code completely separate is one of the core principles of unobtrusive JavaScript.
In a similar way, the CSS should also be kept in a separate file, so the only code in a web page is the actual HTML with links to the CSS and JavaScript files. This is generally considered best practice and is the approach we’ll be using in the book.
Self-Closing Tags
If you’ve used XML or XHTML, you might have come across self-closing tags such as this script tag:
<script src='main.js' />
These will fail to work in HTML5, so should be avoided.
You may see some legacy code that uses the language attribute:
<script src='main.js' language='javascript'></script>This is unnecessary in HTML5, but it will still work.
Graceful Degradation and Progressive Enhancement
Graceful degradation is the process of building a website so it works best in a modern browser that uses JavaScript, but still works to a reasonable standard in older browsers, or if JavaScript or some of its features are unavailable. An example of this are programs that are broadcast in high definition (HD) ― they work best on HD televisions but still work on a standard TV; it’s just the picture will be of a lesser quality. The programs will even work on a black-and-white television.
Progressive enhancement is the process of building a web page from the ground up with a base level of functionality, then adding extra enhancements if they are available in the browser. This should feel natural if you follow the principle of three layers, with the JavaScript layer enhancing the web page rather than being an essential element that the page cannot exist without. An example might be the phone companies who offer a basic level of phone calls, but provide extra services such as call-waiting and caller ID if your telephone supports it.
Whenever you add JavaScript to a web page, you should always think about the approach you want to take. Do you want to start with lots of amazing effects that push the boundaries, then make sure the experience degrades gracefully for those who might not have the latest and greatest browsers? Or do you want to start off building a functional website that works across most browsers, then enhance the experience using JavaScript? The two approaches are similar, but subtly different.
Your Second JavaScript Program
We’re going to finish the chapter with a second JavaScript program that will run in the browser. This example is more complicated than the previous one and includes a lot of concepts that will be covered in later chapters in more depth, so don’t worry if you don’t understand everything at this stage! The idea is to show you what JavaScript is capable of, and introduce some of the important concepts that will be covered in the upcoming chapters.
We’ll follow the practice of unobtrusive JavaScript mentioned earlier and keep our JavaScript code in a separate file. Start by creating a folder called rainbow. Inside that folder create a file called rainbow.html and another called main.js.
Let’s start with the HTML. Open up rainbow.html and enter the following code:
<head>
<meta charset='utf-8'>
<title>I Can Click A Rainbow</title>
</head>
<body>
<button id='button'>click me</button>
<script src='main.js'></script>
</body>
</html>
This file is a fairly standard HTML5 page that contains a button with an ID of button. The ID attribute is very useful for JavaScript to use as a hook to access different elements of the page. At the bottom is a script tag that links to our JavaScript file.
Now for the JavaScript. Open up main.js and enter the following code:
const btn = document.getElementById('button');

const rainbow = ['red','orange','yellow','green','blue','rebeccapurple','violet'];

function change() {
document.body.style.background = rainbow[Math.floor(7*Math.random())];
}
btn.addEventListener('click', change);
Our first task in the JavaScript code is to create a variable called btn (we cover variables in Chapter 2).
We then use the document.getElementById function to find the HTML element with the ID of btn (Finding HTML elements is covered in Chapter 6). This is then assigned to the btn variable.
We now create another variable called rainbow. An array containing a list of strings of different colors is then assigned to the rainbow variable (we cover strings and variables in Chapter 2 and arrays in Chapter 3).
Then we create a function called change (we cover functions in Chapter 4). This sets the background color of the body element to one of the colors of the rainbow (changing the style of a page will be covered in Chapter 6). This involves selecting a random number using the built-in Math object (covered in Chapter 5) and selecting the corresponding color from the rainbow array.
Last of all, we create an event handler, which checks for when the button is clicked on. When this happens it calls the change function that we just defined (event handlers are covered in Chapter 7).
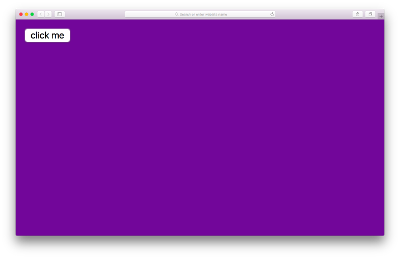
Open rainbow.html in your favorite browser and try clicking on the button a few times. If everything is working correctly, the background should change to every color of the rainbow, such as in the screenshot below.
If you want to try this out quickly, you can checkout the code on CodePen. For the sake of getting some practice in though, I would recommend you also take the time to create these files, write up the code by hand and try running it in your browser as well.
Don’t Break the Web
An important concept in the development of the JavaScript language is that it has to be backward compatible. That is, all old code must work the same way when interpreted by an engine running a new specification (it’s a bit like saying that PlayStation 4 must still be able to run games created for PlayStation 1, 2 and 3). This is to prevent JavaScript from “breaking the web” by making drastic changes that would mean legacy code on some websites not running as expected in modern browsers.
So new versions of JavaScript can’t do anything that isn’t already possible in previous versions of the language. All that changes is the notation used to implement a particular feature to make it easier to write. This is known as syntactic sugar, as it allows an existing piece of code to be written in a nicer and more succinct way.
The fact that all versions of JavaScript are backwardly compatible means that we can use transpilers to convert code from one version of JavaScript into another. For example, you could write your code using the most up-to-date version of JavaScript and then transpile it into version 5 code, which would work in virtually any browser.
A new version of ECMAScript every year means it’s likely that browsers will always be slightly when it comes to implementing the latest features (they’re getting faster at doing this, but it’s still taken two years for most browsers to support ES6 modules). This means that if you want to use the most up-to-date coding techniques, you’ll probably have to rely on using a transpiler, such as Babel, at some point.
If you find that some code isn’t working in your browser, you can add the following link into your HTML document:
<script src='https://unpkg.com/babel-standalone@6/babel.min.js'></script>Note that this link needs to go before any JavaScript that needs to be transpiled.
You also have to change the type attribute to text/babel in any links to JavaScript files. For example, the link to the JavaScript file in the example above would change to:
<script type='text/babel' src='main.js'></script>This isn’t the best long-term solution as it requires the browser to transpile all the code at run-time, although it’s fine for experimenting with code. A better solution is to transpile your code as part of a build process, which is covered in Chapter 15.
A number of online editors such as CodePen, Babel REPL and JS Fiddle allow you to transpile code in the browser. The ECMAScript 6 compatibility table also contains up-to-date information about which features have been implemented in various transpilers.
Frequently Asked Questions (FAQs) about Your First JavaScript Programs
What is the significance of the “Hello World” program in JavaScript?
The “Hello World” program is a simple script that outputs the text “Hello, World!” on the screen. It’s often the first program that beginners learn because it provides a basic introduction to the syntax and structure of a programming language. In JavaScript, this program introduces concepts like how to use the console.log() function to print output and how to structure a JavaScript program.
How do I run a JavaScript program in my web browser?
To run a JavaScript program in your web browser, you need to embed the JavaScript code within an HTML file. You can place the JavaScript code within the <script> tags in the HTML file. Once you’ve done this, you can open the HTML file in your web browser to run the JavaScript program.
Can I write JavaScript code directly in the browser console?
Yes, you can write and execute JavaScript code directly in the browser console. This is a great way to test small snippets of JavaScript code. To access the console in most browsers, you can right-click on the webpage, select “Inspect” or “Inspect Element”, and then navigate to the “Console” tab.
What is the role of semicolons in JavaScript?
In JavaScript, semicolons are used to separate statements. They are typically placed at the end of a statement, although they can be omitted in some cases due to JavaScript’s automatic semicolon insertion (ASI) feature. However, it’s generally considered good practice to always include semicolons to make your code more readable and prevent potential errors.
How can I include comments in my JavaScript code?
In JavaScript, you can include comments in your code by using two forward slashes (//) for single-line comments and /…/ for multi-line comments. Comments are ignored by the JavaScript interpreter and are useful for explaining your code to other developers or your future self.
What does the console.log() function do in JavaScript?
The console.log() function in JavaScript is used to print output to the browser console. This is particularly useful for debugging, as you can print out the values of variables or the results of functions to help understand how your code is working.
How do I declare a variable in JavaScript?
In JavaScript, you can declare a variable using the var, let, or const keywords, followed by the name of the variable. For example, you could declare a variable named “message” and assign it the value “Hello, World!” like this: let message = “Hello, World!”;
What is the difference between let, var, and const in JavaScript?
The let, var, and const keywords are all used to declare variables in JavaScript, but they have different scopes and behaviors. The var keyword declares a variable with function scope, while let and const declare variables with block scope. Additionally, const declares a constant variable, which means its value cannot be changed once it’s been assigned.
How do I create a function in JavaScript?
In JavaScript, you can create a function using the function keyword, followed by the name of the function, a pair of parentheses (), and a pair of curly braces {}. The code that makes up the body of the function goes inside the curly braces. For example, a simple “Hello, World!” function might look like this: function sayHello() { console.log(“Hello, World!”); }
How do I call or invoke a function in JavaScript?
To call or invoke a function in JavaScript, you use the name of the function followed by a pair of parentheses (). If the function takes any arguments, you would include those inside the parentheses. For example, to call the sayHello() function from the previous question, you would write: sayHello();
 Darren Jones
Darren loves building web apps and coding in JavaScript, Haskell and Ruby. He is the author of Learn to Code using JavaScript, JavaScript: Novice to Ninja and Jump Start Sinatra.He is also the creator of Nanny State, a tiny alternative to React. He can be found on Twitter @daz4126.


