
Key Takeaways
- Laravel and Git can be used together to efficiently deploy websites, with Git handling file changes and Laravel automating repetitive tasks. This allows for a streamlined and controlled deployment process that can be customized to individual needs.
- The deployment process involves setting up a central repository, creating local and live websites by cloning this repository, and installing Laravel. Git is then used to track file changes and push these changes to the central repository on the production server.
- Laravel can be used to automate the deployment process by creating a route that references a controller, creating the controller, and using Laravel’s SSH facade to repeat the Git deployment workflow. This allows for easy deployment simply by visiting a specific URL.
- To ensure security during deployment, it’s important to prevent unauthorized access to the deployment page. This can be achieved by using .gitignore to ignore certain files, and checking that these files exist before running the deployment route. Other methods such as password protection or IP address restriction can also be used.

You can’t be a successful web developer without using some sort of deployment workflow for your websites. It doesn’t matter how good or bad your workflow might be. If you can’t get your website up to production then your client will never pay you for your hard work.
There are many different ways to deploy your website to your production server. Each one of them has their own list of pros and cons, and each one starts and finishes the same way. What makes a good website deployment workflow is what happens in the between.
The other day I was working on a project where I was using FileZilla to FTP my files up to my live production server. I’ve never considered FileZilla to be the easiest interface to use, but for the longest time I thought it to be standard practice.
For the same project, I was also using Git to track my file changes. I started to type out git push origin when I stopped to think to myself. Wouldn’t it be convenient if deploying websites was as easy as pushing Git repositories?
If you think about it, Git is the perfect tool to handle website files in deployment. It keeps track of all your file changes, and it pushes or pulls only what it needs with one command. I decided to set out on a Google journey to search for a way to use Git when deploying my own websites.
One popular method I found using Git to deploy your websites is by making good use of Git Hooks (Tom Oram likes to use a similar approach). Imagine as soon as you type git push origin into your terminal console, Git Hooks launch a predefined script. That predefined script accesses your production server and pulls your most recent file changes. With the same command you used to push your changes, you were also able to update your website. I thought this method was awesome until I realized that just because I push my local repository doesn’t mean I am ready to go live with it.
I wanted something that was as easy as pushing a repository with Git. More important, I wanted to be in full control when pushing content live. I was able to find a similar workflow that used Git to handle the file transferring. On top of that I found out I could also use the PHP framework Laravel to automate the more repetitive tasks.
Here is the website deployment workflow I came up with:
Getting Started with Structure
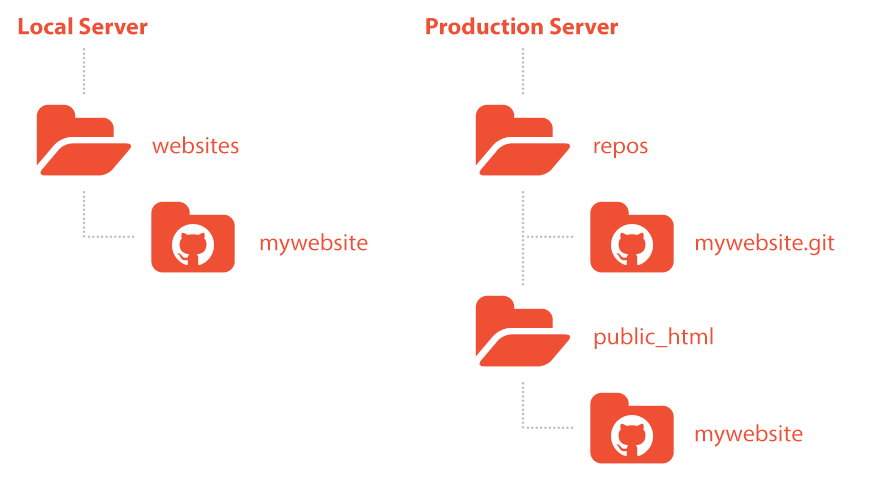
In this section, we will set up a --bare repository as our central repository and create two repositories by cloning. One is for our local website where we will be executing our deployment process, and the other for our live website. We will also be installing Laravel.
Before getting started, you will need a local server and production server with Git installed on both.
Helpful Resources:
1. Initialize your --bare repository
SSH into your production server and locate the directory you would like your central repository to be.
ssh username@domain.com

cd repos
Now initialize your repository.
git init --bare --shared mywebsite.git
It’s usually considered a good practice to keep this folder outside of your public folder structure. This way, someone can’t stumble upon your private repository on accident.
2. Clone to create live website
Determine where in your public_html you would like to host your live website files.
cd ~/public_html/
Now you clone the central --bare repository you just created and logout of this SSH session.
git clone username@domain.com:~/repos/mywebsite.git mywebsite

exit
3. Clone to create local website
If you’re using something like Homestead, you may need to use the Vagrant command to SSH into your local server to access your files.
vagrant ssh
Follow the steps you just went through to create your live website.
cd websites

git clone username@domain.com:~/repos/mywebsite.git mywebsite
4. Setting up Laravel
Before setting Laravel up, you need to have it installed on your local website.
Helpful Resources:
Add your remote server settings to the configuration file by opening /app/config/remote.php.
    'connections' => array(

        'production' => array(

            'host'      => 'domain.com',

            'username'  => 'username',

            'password'  => '********************',

            'key'       => '',

            'keyphrase' => '',

            'root'      => '/var/www',

        ),

    ),
Remember the “production” key because we will need to reference it later.
Add your files to your local website repository so we can track any changes to them.
git add .
Execute your initial commit.
git commit -m 'initial commit with laravel'
Finally, push to your central repository on your production server.
git push origin master
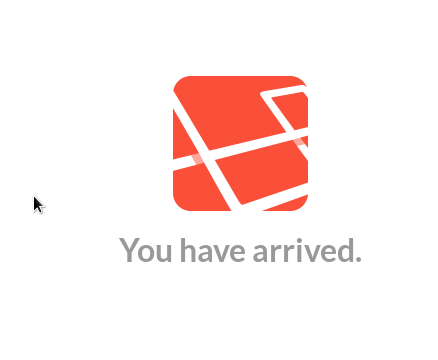
When you visit your localhost you should see Laravel’s, “You have arrived.” screen.
Great job! you’re all set up and configured, so you should now be ready to dive into the fun stuff.
The Core Workflow Using Git
Once everything is set up, deploying your websites with Git is a piece of cake. Let’s look at the code to try and understand what’s going on at its core.
It’s important to understand the workflow because we will rewrite it later in PHP with Laravel. It’ll also help us debug any problems that may come up.
1. Go ahead and SSH into your live server, and then find your production repository.
ssh username@domain.com

cd public_html/mywebsite
2. Now pull your central repository down to merge the new file changes.
git pull origin master
If you have done everything correct up to this point, you should see Laravel’s, “You have arrived.” screen when you visit your live site.
If you wanted to stop here, I wouldn’t think any less of you. That in itself is a pretty solid deployment workflow. But we can make it even more efficient by automating it using Laravel.
Automating Deployment with Laravel
Ok, so now that we know how to deploy a website using Git let’s use Laravel to automate the process. This part may not be necessary, but if you’re already using Laravel I ask, “Why not?” Using Laravel here makes this website deployment workflow easy, efficient, controllable, and customizable.
1. Let’s begin by creating a simple route that references a controller.
Open up your routes.php page in your /app folder, and append the following line of PHP to the file.
Route::get('/deploy', 'Server@deploy');
Whenever we visit http://localhost/deploy the public function deploy in the Server controller will execute.
2. Now let’s create the controller we’re referencing, and save it.
Start off with an empty Server class that extends the BaseController.
    class Server extends BaseController {
    }
Now insert a public function deploy into the controller.
    class Server extends BaseController {
        public function deploy() {
        }

    }
Save it in your /app/controllers folder, and name it Server.php.
Here’s where it gets fun!
3. Insert Laravel’s SSH facade into the deploy function and repeat the Git deployment workflow.
Insert the SSH facade. We want to access the production remote configurations we set up earlier.
SSH::into('production')->run();
Now the run() function will accept two arguments that we need to provide. The first, and most important one is an array of terminal commands we want to run when we execute our deploy function.
	SSH::into('production')->run(array(

	    'cd ~/public_html/mywebsite',

	    'git pull origin master'

	));
The second is a function we want called to handle the feedback we’re receiving from the server.
	SSH::into('production')->run(array(

	    'cd ~/public_html/mywebsite',

	    'git pull origin master'

	), function($line){
	    echo $line.PHP_EOL; // outputs server feedback

	});
Now whenever we want to deploy our website, all we have to do is visit http://localhost/deploy and we’re done. Easy enough right? Yes, and no.
There are a couple of security breaches we need to handle before we can call this a night. Anyone and their mother could stumble upon http://domain.com/deploy and deploy our website as is. What we need to do is set something in place to prevent this.
There are many ways of going about doing this, and we could debate which method is the most secure until we’re blue in the face. You can password protect the route, you could prevent access by IP address, etc.
For this example we’re going to use .gitignore, and check to make sure the file exists before we run the route we just created.
4. Create a .gitignore file in controllers to ignore Server.php.
Create a new file and save it in /app/controllers as .gitignore.
Add the following line of text to the file and save it.
Server.php
5. Make sure Server.php file exists before running the route that deploys our website.
Remember the route we created earlier to deploy our website? We need to wrap it with this conditional statement, and then we’ll be ready to go live with it.
    if (file_exists(__DIR__.'/controllers/Server.php')) {

        // route goes here

    }
It should look like this when we’re all done.
    if (file_exists(__DIR__.'/controllers/Server.php')) {

	    Route::get('/deploy', 'Server@deploy');

    }
Finish up by Getting Creative
So there you have it! Just stage all your updated files, commit, push, and you’re ready to start deploying with a Git friendly workflow.
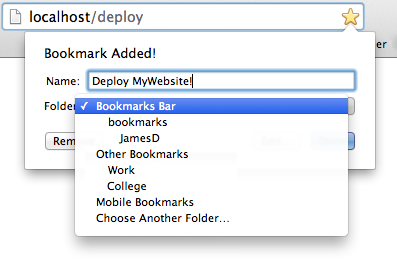
If you want to you can take this tutorial a step further. Just add http://localhost/deploy to your bookmarks for quick one-click deployment. You can even create a simple HTML form that posts to the page that allows you to pull specific branches. The possibilities are endless.
Deploying with Git and Laravel has taken a boring and daunting task of deploying my websites, and made it fun again. It’s easy to set up if you understand Git, but it’s even easier to use.
Please share with me the creative ways you’re using to make website deployment easier!
Frequently Asked Questions (FAQs) about Deploying a Website Using Laravel and Git
How can I resolve conflicts when deploying my Laravel website using Git?
Conflicts may arise when deploying your Laravel website using Git, especially when multiple developers are working on the same project. To resolve these conflicts, you need to use Git’s conflict resolution tools. When a conflict arises, Git will pause the rebase and give you a chance to fix the conflict. You can then add the resolved files with ‘git add’ and continue the rebase with ‘git rebase –continue’. Always ensure to pull the latest changes from the repository before starting your work to minimize conflicts.
How can I use Git branches effectively in my Laravel project?
Git branches are a powerful tool for managing different versions of your Laravel project. You can create a new branch for each feature or bug fix, which allows you to work on multiple tasks simultaneously without affecting the main codebase. Once the task is complete, you can merge the branch back into the main codebase. This approach ensures that the main codebase remains stable and bug-free.
How can I automate the deployment process of my Laravel website using Git?
Automating the deployment process can save you a lot of time and effort. You can use Git hooks, which are scripts that Git executes before or after events such as commit, push, and receive. You can write a script to automatically deploy your website whenever you push to the master branch. This way, you can ensure that your website is always up-to-date with the latest changes.
How can I rollback changes in my Laravel project using Git?
Git provides several ways to rollback changes. You can use ‘git revert’ to create a new commit that undoes the changes made in a specific commit. Alternatively, you can use ‘git reset’ to move the HEAD pointer to a previous commit, effectively “forgetting” the commits that came after it. Be careful when using ‘git reset’, as it can permanently delete your changes.
How can I keep my Laravel project secure when deploying with Git?
Security is a crucial aspect of any web development project. When deploying your Laravel project with Git, make sure to add sensitive files such as .env to your .gitignore file to prevent them from being committed to the repository. Also, always use secure protocols such as SSH or HTTPS when pushing and pulling from the repository.
How can I manage database migrations in my Laravel project using Git?
Laravel’s migration system is a powerful tool for managing your database schema. When deploying your project, you can use ‘php artisan migrate’ to apply any pending migrations. However, be careful when working with multiple developers, as conflicting migrations can cause issues. Always pull the latest changes from the repository before creating a new migration to avoid conflicts.
How can I use Git to collaborate with other developers on my Laravel project?
Git is a powerful tool for collaboration. You can use branches to work on different features simultaneously, and pull requests to review and merge changes into the main codebase. Also, Git’s conflict resolution tools can help you resolve any conflicts that arise when merging changes.
How can I use Git to track changes in my Laravel project?
Git provides a comprehensive history of all changes made to your project. You can use ‘git log’ to view the commit history, and ‘git diff’ to see the changes made in a specific commit. This can be very useful for debugging and understanding the evolution of your project.
How can I optimize the performance of my Laravel website when deploying with Git?
Performance optimization is a crucial aspect of web development. When deploying your Laravel website with Git, you can use Laravel’s built-in caching features to improve performance. Also, consider using a CDN to serve static assets, and optimize your images and other assets to reduce load times.
How can I handle errors and exceptions in my Laravel project using Git?
Handling errors and exceptions properly is crucial for a smooth user experience. Laravel provides a powerful exception handling system that you can use to handle different types of errors. When an error occurs, you can use Git to revert to a previous stable state while you fix the error.