Creating a CRUD App in Minutes with Angular’s $resource

Most Single Page Applications involve CRUD operations. If you are building CRUD operations using AngularJS, then you can leverage the power of the $resource service. Built on the top of the $http service, Angular’s $resource is a factory that lets you interact with RESTful backends easily. So, let’s explore $resource and use it to implement CRUD operations in Angular.
Key Takeaways
- Leverage $resource for Efficient CRUD Operations: Utilize Angular’s $resource service to simplify CRUD operations in your AngularJS applications, allowing for easy interaction with RESTful services.
- Setup and Configuration: Ensure to include the `angular-resource.js` library in your project and declare a dependency on the `ngResource` module to make use of $resource.
- Utilizing $resource Methods: Understand and implement the five default methods provided by $resource (`get()`, `query()`, `save()`, `remove()`, `delete()`) to interact with RESTful APIs effectively.
- Extending $resource: Customize and extend $resource by adding custom methods or changing configurations such as URL parameter handling and request/response transformations.
- Practical Implementation: Follow the detailed guide to build a movie app using $resource, demonstrating practical usage of CRUD operations in a real-world AngularJS application scenario.
Prerequisites
The $resource service doesn’t come bundled with the main Angular script. You need to download a separate file called angular-resource.js and include it in your HTML page. The script can be downloaded from http://cdnjs.cloudflare.com/ajax/libs/angular.js/1.2.16/angular-resource.min.js.
Also, your main app module should declare a dependency on the ngResource module in order to use $resource. The following example demonstrates how to do it:
angular.module('mainApp',['ngResource']); //mainApp is our main moduleGetting Started
$resource expects a classic RESTful backend. This means you should have REST endpoints in the following format:
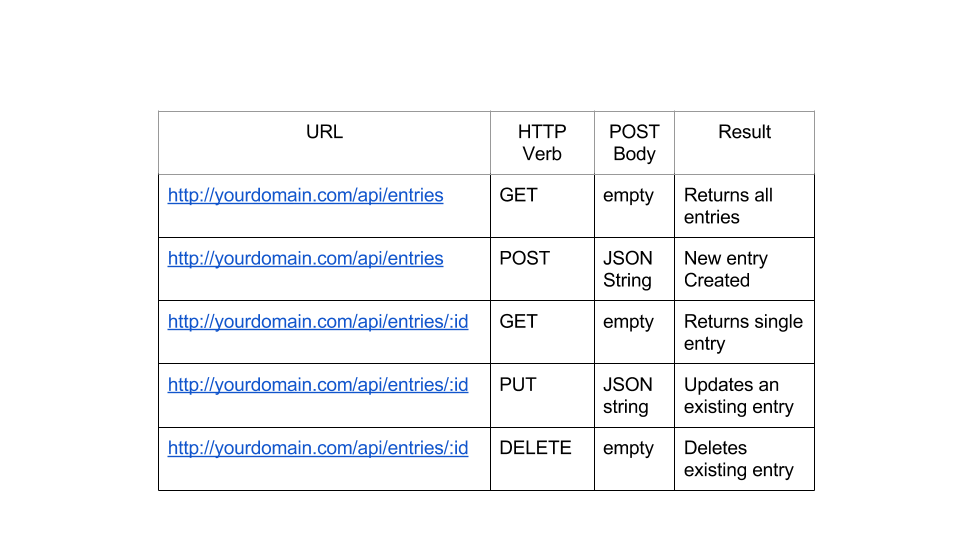
You can create the endpoints using the server side language of your choice. However, I have used Node + Express + MongoDB to design the RESTful API for the demo app. Once you have the URLs ready you can take help of $resource for interacting with these URLs. So, let’s see how exactly $resource works.
How Does $resource Work?
To use $resource inside your controller/service you need to declare a dependency on $resource. The next step is calling the $resource() function with your REST endpoint, as shown in the following example. This function call returns a $resource class representation which can be used to interact with the REST backend.
angular.module('myApp.services').factory('Entry', function($resource) {
  return $resource('/api/entries/:id'); // Note the full endpoint address
});
The result of the function call is a resource class object which has the following five methods by default:
get()query()save()remove()delete()
Now, let’s see how we can use the get(), query() and save() methods in a controller:
angular.module('myApp.controllers',[]);
angular.module('myApp.controllers').controller('ResourceController',function($scope, Entry) {
  var entry = Entry.get({ id: $scope.id }, function() {
    console.log(entry);
  }); // get() returns a single entry
  var entries = Entry.query(function() {
    console.log(entries);
  }); //query() returns all the entries
  $scope.entry = new Entry(); //You can instantiate resource class
  $scope.entry.data = 'some data';
  Entry.save($scope.entry, function() {
    //data saved. do something here.
  }); //saves an entry. Assuming $scope.entry is the Entry object
});
The get() function in the above snippet issues a GET request to /api/entries/:id. The parameter :id in the URL is replaced with $scope.id. You should also note that the function get() returns an empty object which is populated automatically when the actual data comes from server. The second argument to get() is a callback which is executed when the data arrives from server. This is a useful trick because you can set the empty object returned by get() to the $scope and refer to it in the view. When the actual data arrives and the object is populated, the data binding kicks in and your view is also updated.
The function query() issues a GET request to /api/entries (notice there is no :id) and returns an empty array. This array is populated when the data arrives from server. Again you can set this array as a $scope model and refer to it in the view using ng-repeat. You can also pass a callback to query() which is called once the data comes from server.
The save() function issues a POST request to /api/entries with the first argument as the post body. The second argument is a callback which is called when the data is saved. You might recall that the return value of the $resource() function is a resource class. So, in our case we can call new Entry() to instantiate an actual object out of this class, set various properties on it and finally save the object to backend.
Ideally, you will only use get() and query() on the resource class (Entry in our case). All the non GET methods like save() and delete() are also available in the instance obtained by calling new Entry() (call this a $resource instance). But the difference is that these methods are prefixed with a $. So, the methods available in the $resource instance (as opposed to $resource class) are:
$save()$delete()$remove()
For instance, the method $save() is used as following:
$scope.entry = new Entry(); //this object now has a $save() method
$scope.entry.$save(function() {
  //data saved. $scope.entry is sent as the post body.
});
We have explored the create, read and delete parts of CRUD. The only thing left is update. To support an update operation we need to modify our custom factory Entity as shown below.
angular.module('myApp.services').factory('Entry', function($resource) {
  return $resource('/api/entries/:id', { id: '@_id' }, {
    update: {
      method: 'PUT' // this method issues a PUT request
    }
  });
});
The second argument to $resource() is a hash indicating what should be the value of the parameter :id in the URL. Setting it to @_id means whenever we will call methods like $update() and $delete() on the resource instance, the value of :id will be set to the _id property of the instance. This is useful for PUT and DELETE requests. Also note the third argument. This is a hash that allows us to add any custom methods to the resource class. If the method issues a non-GET request it’s made available to the $resource instance with a $ prefix. So, let’s see how to use our $update method. Assuming we are in a controller:
$scope.entry = Movie.get({ id: $scope.id }, function() {
  // $scope.entry is fetched from server and is an instance of Entry
  $scope.entry.data = 'something else';
  $scope.entry.$update(function() {
    //updated in the backend
  });
});
When the $update() function is called, it does the following:
- AngularJS knows that
$update()function will trigger a PUT request to the URL/api/entries/:id. - It reads the value of
$scope.entry._id, assigns the value to:idand generates the URL. - Sends a PUT request to the URL with
$scope.entryas the post body.
Similarly, if you want to delete an entry it can be done as following:
$scope.entry = Movie.get({ id: $scope.id }, function() {
  // $scope.entry is fetched from server and is an instance of Entry
  $scope.entry.data = 'something else';
  $scope.entry.$delete(function() {
    //gone forever!
  });
});
It follows the same steps as above, except the request type is DELETE instead of PUT.
We have covered all the operations in a CRUD, but left with a small thing. The $resource function also has an optional fourth parameter. This is a hash with custom settings. Currently, there is only one setting available which is stripTrailingSlashes. By default this is set to true, which means trailing slashes will be removed from the URL you pass to $resource(). If you want to turn this off you can do so like this:
angular.module('myApp.services').factory('Entry', function($resource) {
  return $resource('/api/entries/:id', { id: '@_id' }, {
    update: {
      method: 'PUT' // this method issues a PUT request
    }
  }, {
    stripTrailingSlashes: false
  });
});
By the way, I didn’t cover each and every thing about $resource. What we covered here are the basics that will help you get started with CRUD apps easily. If you want to explore $resource in detail, you can go through the documentation.
Building a Movie App
To reinforce the concepts of $resource let’s build an app for movie lovers. This is going to be a SPA where users can add a new movie to our database, update an existing movie, and finally delete one. We will use $resource to interact with the REST API. You can check out a live demo of what we are going to build here.
Just note that the API I have built is CORS enabled, so it is possible for you to create an Angular app separately and use the URL http://movieapp-sitepointdemos.rhcloud.com/ as the API. You can develop the Angular app and play around with it without worrying about the backend.
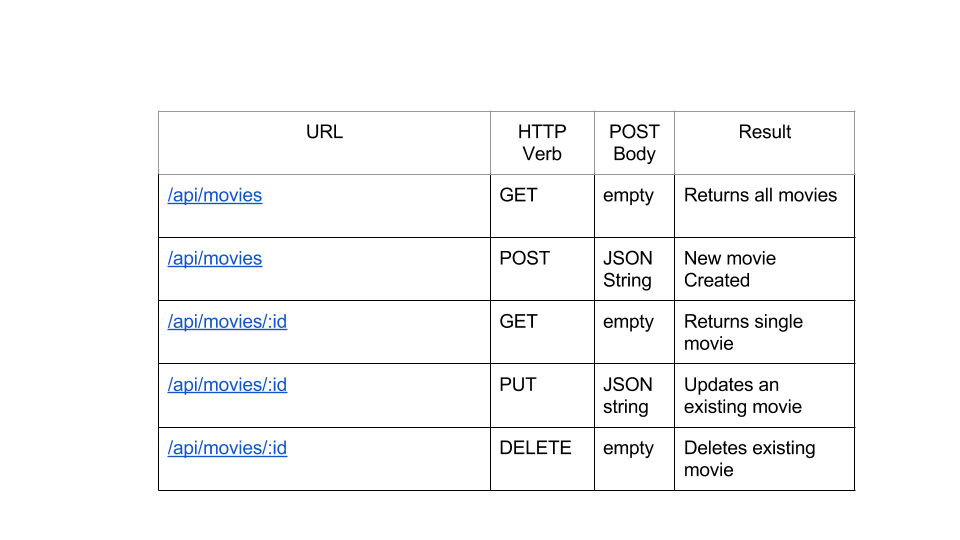
Our API
I have created a RESTful backend using Node and Express. Take a look at the following screenshot to get to know the API.
Directory Structure
Let’s start with the following directory structure for our AngularJS app:
movieApp

  /css

    bootstrap.css

    app.css

  /js

    app.js

    controllers.js

    services.js

  /lib

    angular.min.js

    angular-resource.min.js

    angular-ui-router.min.js

  /partials

    _form.html

    movie-add.html

    movie-edit.html

    movie-view.html

    movies.html

  index.html
Just note that we will be using Angular UI Router for routing.
Creating Our Service to Interact with REST Endpoints
As discussed in previous sections we will create a custom service that will use $resource internally to interact with the REST API. The service is defined in js/services.js.
services.js:
angular.module('movieApp.services', []).factory('Movie', function($resource) {
  return $resource('http://movieapp-sitepointdemos.rhcloud.com/api/movies/:id', { id: '@_id' }, {
    update: {
      method: 'PUT'
    }
  });
});
The name of our factory is Movie. As we are using MongoDB, each movie instance has a property called _id. The rest is simple and straightforward.
Now that we have our service ready let’s build views and controllers.
index.html : Building the App Entry Page
The index.html is our app entry point. To start we need to include all the required scripts and stylesheets in this page. We will use Bootstrap to quickly create the layout. Here is the content of index.html.
<!DOCTYPE html>
  <html data-ng-app="movieApp">
  <head lang="en">
    <meta charset="utf-8">
    <meta http-equiv="X-UA-Compatible" content="IE=edge">
    <meta name="viewport" content="width=device-width, initial-scale=1">
    <base href="/"/>
    <title>The Movie App</title>
    <link rel="stylesheet" type="text/css" href="css/bootstrap.min.css"/>
    <link rel="stylesheet" type="text/css" href="css/app.css"/>
  </head>
  <body>
    <nav class="navbar navbar-default" role="navigation">
      <div class="container-fluid">
        <div class="navbar-header">
          <a class="navbar-brand" ui-sref="movies">The Movie App</a>
        </div>
        <div class="collapse navbar-collapse">
          <ul class="nav navbar-nav">
            <li class="active"><a ui-sref="movies">Home</a></li>
          </ul>
        </div>
      </div>
    </nav>
    <div class="container">
      <div class="row top-buffer">
        <div class="col-xs-8 col-xs-offset-2">
          <div ui-view></div> <!-- This is where our views will load -->
        </div>
      </div>
    </div>
    <script type="text/javascript" src="lib/angular.min.js"></script>
    <script type="text/javascript" src="js/app.js"></script>
    <script type="text/javascript" src="js/controllers.js"></script>
    <script type="text/javascript" src="js/services.js"></script>
    <script type="text/javascript" src="lib/angular-ui-router.min.js"></script>
    <script type="text/javascript" src="lib/angular-resource.min.js"></script>
  </body>
</html>
The markup is pretty self explanatory. Just pay special attention to <div ui-view></div>. The ui-view directive comes from UI Router module and acts as a container for our views.
Creating Main Module and States
Our main module and states are defined in js/app.js:
app.js:
angular.module('movieApp', ['ui.router', 'ngResource', 'movieApp.controllers', 'movieApp.services']);
angular.module('movieApp').config(function($stateProvider) {
$stateProvider.state('movies', { // state for showing all movies
url: '/movies',
templateUrl: 'partials/movies.html',
controller: 'MovieListController'
}).state('viewMovie', { //state for showing single movie
url: '/movies/:id/view',
templateUrl: 'partials/movie-view.html',
controller: 'MovieViewController'
}).state('newMovie', { //state for adding a new movie
url: '/movies/new',
templateUrl: 'partials/movie-add.html',
controller: 'MovieCreateController'
}).state('editMovie', { //state for updating a movie
url: '/movies/:id/edit',
templateUrl: 'partials/movie-edit.html',
controller: 'MovieEditController'
});
}).run(function($state) {
$state.go('movies'); //make a transition to movies state when app starts
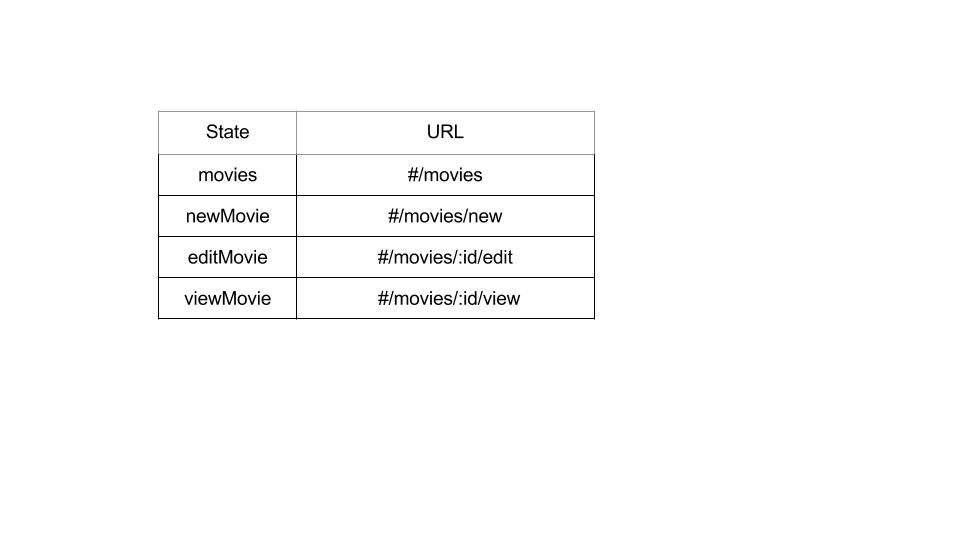
});So, our application has the following four states:
moviesviewMovienewMovieeditMovie
Each state is composed of a url, templateUrl and controller. Also note that when our main module is loaded we make a transition to state movies showing all the movies in our system. Take a look at the following screenshot to know which state corresponds to what URL.
Creating Templates
All of our templates are inside partials. Let’s see what each of them does!
_form.html:
_form.html contains a simple form which allows users to enter data. Note that this form will be included by movie-add.html and movie-edit.html because both of them accept inputs from users.
Here is the content of _form.html:
<div class="form-group">
  <label for="title" class="col-sm-2 control-label">Title</label>
  <div class="col-sm-10">
    <input type="text" ng-model="movie.title" class="form-control" id="title" placeholder="Movie Title Here"/>
  </div>
</div>
<div class="form-group">
  <label for="year" class="col-sm-2 control-label">Release Year</label>
  <div class="col-sm-10">
    <input type="text" ng-model="movie.releaseYear" class="form-control" id="year" placeholder="When was the movie released?"/>
  </div>
</div>
<div class="form-group">
  <label for="director" class="col-sm-2 control-label">Director</label>
  <div class="col-sm-10">
    <input type="text" ng-model="movie.director" class="form-control" id="director" placeholder="Who directed the movie?"/>
  </div>
</div>
<div class="form-group">
  <label for="plot" class="col-sm-2 control-label">Movie Genre</label>
  <div class="col-sm-10">
    <input type="text" ng-model="movie.genre" class="form-control" id="plot" placeholder="Movie genre here"/>
  </div>
</div>
<div class="form-group">
  <div class="col-sm-offset-2 col-sm-10">
    <input type="submit" class="btn btn-primary" value="Save"/>
  </div>
</div>
The template uses ng-model to bind various movie details to different properties of scope model movie.
movie-add.html
This template is used to accept user inputs and add a new movie to our system. Here is the content:
<form class="form-horizontal" role="form" ng-submit="addMovie()">
  <div ng-include="'partials/_form.html'"></div>
</form>
When the form is submitted the function addMovie() of the scope is called which in turn sends a POST request to server to create a new movie.
movie-edit.html:
This template is used to accept user inputs and update an existing movie in our system.
<form class="form-horizontal" role="form" ng-submit="updateMovie()">
  <div ng-include="'partials/_form.html'"></div>
</form>
Once the form is submitted the scope function updateMovie() is called which issues a PUT request to server to update a movie.
movie-view.html:
This template is used to show details about a single movie. The content looks like following:
<table class="table movietable">
  <tr>
    <td><h3>Details for {{movie.title}}</h3></td>
    <td></td>
  </tr>
  <tr>
    <td>Movie Title</td>
    <td>{{movie.title}}</td>
  </tr>
  <tr>
    <td>Director</td>
    <td>{{movie.director}}</td>
  </tr>
  <tr>
    <td>Release Year</td>
    <td>{{movie.releaseYear}}</td>
  </tr>
  <tr>
    <td>Movie Genre</td>
    <td>{{movie.genre}}</td>
  </tr>
</table>
<div>
  <a class="btn btn-primary" ui-sref="editMovie({id:movie._id})">Edit</a>
</div>
In the end there is an edit button. Once clicked it changes the state to editMovie with the movie id in the $stateParams.
movies.html
This template displays all the movies in the system.
<a ui-sref="newMovie" class="btn-primary btn-lg nodecoration">Add New Movie</a>
<table class="table movietable">
  <tr>
    <td><h3>All Movies</h3></td>
    <td></td>
  </tr>
  <tr ng-repeat="movie in movies">
    <td>{{movie.title}}</td>
    <td>
      <a class="btn btn-primary" ui-sref="viewMovie({id:movie._id})">View</a>
      <a class="btn btn-danger"  ng-click="deleteMovie(movie)">Delete</a>
    </td>
  </tr>
</table>
It loops through all the movie objects obtained from the API and displays the details. There is also a button Add New Movie which changes the state to newMovie. As a result a new route loads and we can create a new movie entry.
For each movie there are two buttons, View and Delete. View triggers a state transition so that the details for the movie are displayed. Delete button deletes the movie permanently.
Creating Controllers
Each state has a controller. So, in total we have four controllers for four states. All the controllers go into js/controllers.js. The controllers just utilize our custom service Movie and work the way we have discussed above. So, here is how our controllers look.
controllers.js:
angular.module('movieApp.controllers', []).controller('MovieListController', function($scope, $state, popupService, $window, Movie) {
  $scope.movies = Movie.query(); //fetch all movies. Issues a GET to /api/movies
  $scope.deleteMovie = function(movie) { // Delete a movie. Issues a DELETE to /api/movies/:id
    if (popupService.showPopup('Really delete this?')) {
      movie.$delete(function() {
        $window.location.href = ''; //redirect to home
      });
    }
  };
}).controller('MovieViewController', function($scope, $stateParams, Movie) {
  $scope.movie = Movie.get({ id: $stateParams.id }); //Get a single movie.Issues a GET to /api/movies/:id
}).controller('MovieCreateController', function($scope, $state, $stateParams, Movie) {
  $scope.movie = new Movie();  //create new movie instance. Properties will be set via ng-model on UI
  $scope.addMovie = function() { //create a new movie. Issues a POST to /api/movies
    $scope.movie.$save(function() {
      $state.go('movies'); // on success go back to home i.e. movies state.
    });
  };
}).controller('MovieEditController', function($scope, $state, $stateParams, Movie) {
  $scope.updateMovie = function() { //Update the edited movie. Issues a PUT to /api/movies/:id
    $scope.movie.$update(function() {
      $state.go('movies'); // on success go back to home i.e. movies state.
    });
  };
  $scope.loadMovie = function() { //Issues a GET request to /api/movies/:id to get a movie to update
    $scope.movie = Movie.get({ id: $stateParams.id });
  };
  $scope.loadMovie(); // Load a movie which can be edited on UI
});
Conclusion
Assuming the app is deployed under localhost/movieApp, you can access it at http://localhost/movieApp/index.html. If you are a movie lover, you can start adding your favorite movies too! The source code for the app developd in this article is available on GitHub for download.
I hope you enjoyed this tutorial! Feel free to comment if you’d like to add something.
Frequently Asked Questions (FAQs) about Creating a CRUD App with Angular’s $resource
What is Angular’s $resource and why is it important in creating a CRUD app?
Angular’s $resource is a factory that creates a resource object that allows you to interact with RESTful server-side data sources. It is important in creating a CRUD (Create, Read, Update, Delete) app because it simplifies the process of interacting with server-side data. It provides a high-level, easy-to-use abstraction over the lower-level HTTP methods, making it easier to perform CRUD operations.
How do I install and use Angular’s $resource?
To install Angular’s $resource, you need to include the AngularJS resource script in your HTML file. You can then inject the $resource service into your controller or service. Once injected, you can use it to create resource classes that can interact with your server-side data.
Can I use Angular’s $resource with other server-side technologies?
Yes, Angular’s $resource can be used with any server-side technology that supports RESTful APIs. This includes technologies like Node.js, Ruby on Rails, and ASP.NET, among others.
How do I handle errors with Angular’s $resource?
Angular’s $resource provides a way to handle errors through the use of promises. When a request is made, a promise is returned. This promise has a ‘catch’ method that can be used to handle any errors that occur during the request.
Can I customize the behavior of Angular’s $resource?
Yes, Angular’s $resource is highly customizable. You can define custom actions, set default parameters, and even transform request and response data.
How do I perform CRUD operations with Angular’s $resource?
Angular’s $resource provides methods for each of the CRUD operations. For example, to create a new resource, you would use the ‘save’ method. To read a resource, you would use the ‘get’ method. To update a resource, you would use the ‘update’ method. And to delete a resource, you would use the ‘remove’ or ‘delete’ method.
How do I use Angular’s $resource with a non-RESTful API?
While Angular’s $resource is designed to work with RESTful APIs, it can be used with non-RESTful APIs by defining custom actions. These custom actions can be used to map to the specific endpoints of your non-RESTful API.
Can I use Angular’s $resource with AngularJS 1.x?
Yes, Angular’s $resource is compatible with AngularJS 1.x. However, it is recommended to use the latest version of Angular for the best performance and security.
How do I test my CRUD app that uses Angular’s $resource?
You can test your CRUD app that uses Angular’s $resource by using Angular’s built-in testing tools. These tools allow you to mock the $resource service and simulate server responses.
Can I use Angular’s $resource with other Angular modules?
Yes, Angular’s $resource can be used with other Angular modules. It is often used in conjunction with modules like ngRoute for routing and ngAnimate for animations.
Sandeep is the Co-Founder of Hashnode. He loves startups and web technologies.


Published in
·Animation·Content strategy·Copywriting·Design·Design & UX·Usability·UX·January 28, 2016