
We previously looked at some essential Grav plugins with which to round off the installation of a personal blog. In this post, we’ll take a look at some additional, advanced plugins, rounding it all off with an installation of Varnish for supercaching, taking performance to a whole new level.
![]()
Related Pages
Once a blog has enough posts, user retention becomes more difficult – as users find it hard to locate related or interesting posts to read, they leave your site. The related pages plugin helps with that.
Out of the box, it includes some sensible defaults for calculating relation scores between posts, and can include title scanning, content parsing, matching by taxonomies, and much more. Once the scanning has been configured, rendering the pages is a matter of including the generated list of related items in an existing template, like so:
{% if config.plugins.relatedpages.enabled and related_pages|length > 0 %}
    <h4>Related Posts</h4>
    {% include 'partials/relatedpages.html.twig' %}
{% endif %}
Note that the styling, while decent in its default form, is ultimately up to you. That’s where the next plugin comes in handy.
Custom JS and CSS without extending the theme
Sometimes, all you need to do is include a small JS or CSS modification in your pages. A full theme extension would, in that case, be overkill. That’s where the assets plugin comes in.
Once installed, you have the ability to add JS / CSS frontmatter to your pages:
{assets:js order:10}
custom-script.js
/blog/some-blog/post/script.js
//cdnjs.cloudflare.com/ajax/libs/1140/2.0/1140.min.js
http://somesite.com/js/cookies.min.js
{/assets}

{assets:inline_css}
h1 {color: red !important;}
{/assets}
Notice the inline_ prefix when dealing with inline CSS / JS
This then lets you easily tweak the look and feel of certain pages when needed – like adding some fancy demo logic into the mix, custom styling in case the page is of a different type than what you usually post, and more.
Search
Having many posts is pointless if there’s no way for people to search them and find the one they’re looking for. Given that Grav is a flat-file system with no database, searching takes more than just firing off a MySQL LIKE %% query.
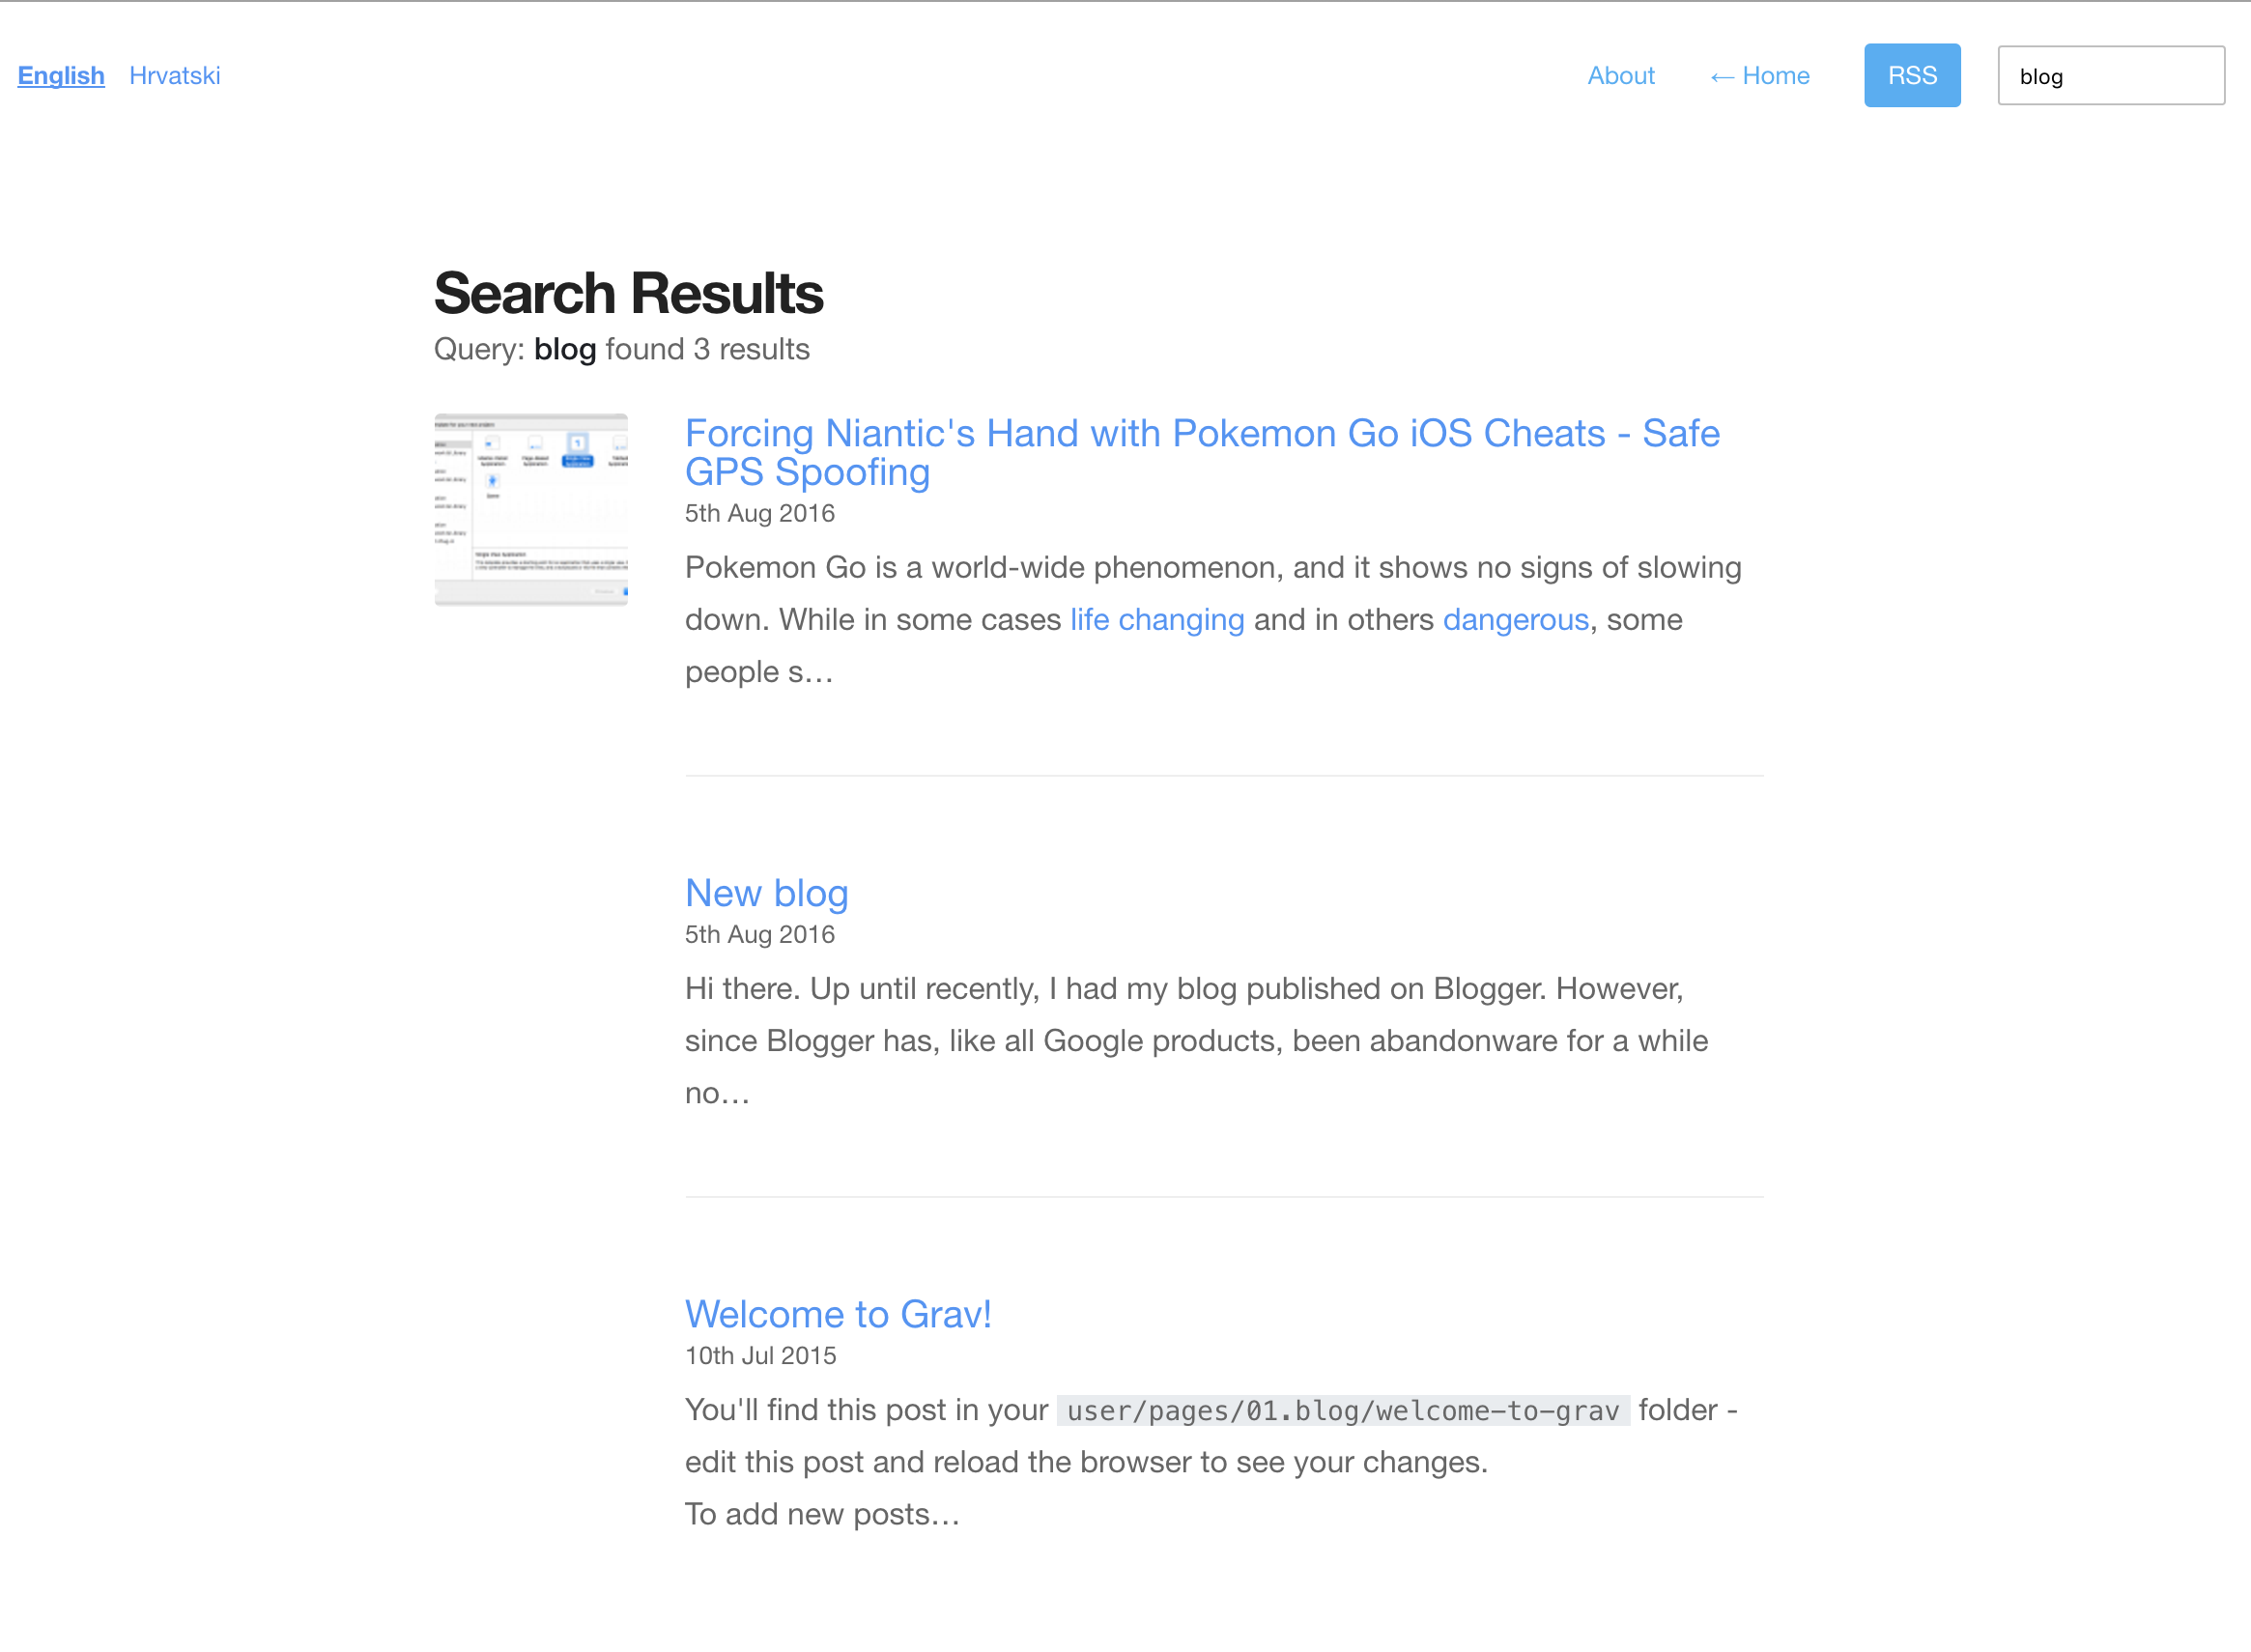
The simplesearch plugin (named that way purely because it uses a very simple method of searching – string matching) adds this feature. It comes with its own search field partial, and a search results page, but these can of course be fully customized.
For example, after copying the user/plugins/simplesearch/templates/simplesearch_results.html.twig file into user/themes/cacti-swader/templates/ and modifying it, here’s how the implementation looks on my own blog:
Caveats
Filters
To make sure it works across all pages, the filters value in the configuration file must be EMPTY, not non-existent. If you remove it completely, it will fall back to the default of the plugin’s original configuration file, which limits the results to those that have a category of blog. Here’s my configuration in user/config/plugins/simplesearch.yaml:
enabled: true
built_in_css: true
display_button: false
min_query_length: 3
route: /search
filters: ""
template: simplesearch_results
order:
  by: date
  dir: desc
Performance
While effective, this plugin will lose performance as your collection of posts grows, because it iterates through every page you have and compares its content to the given search query. The length of the posts and their number directly correlates to the search performance. It is recommended to implement a more powerful search engine once the number of posts reaches critical mass (e.g. over 1000).
Multi-language and SimpleSearch
If you’re using the language switcher by utilizing a multi-language theme, you might want to modify the langswitcher.html.twig partial to ignore the search query string when switching languages because of this. Use the instructions in the linked issue to fix the problem. And while we’re on the topic of language, to modify the string “Search results” and other values on the search results page, you can either modify the user/plugins/simplesearch/language.yaml file, or change the strings used in the search results template to use those defined in the theme’s language file.
Comments
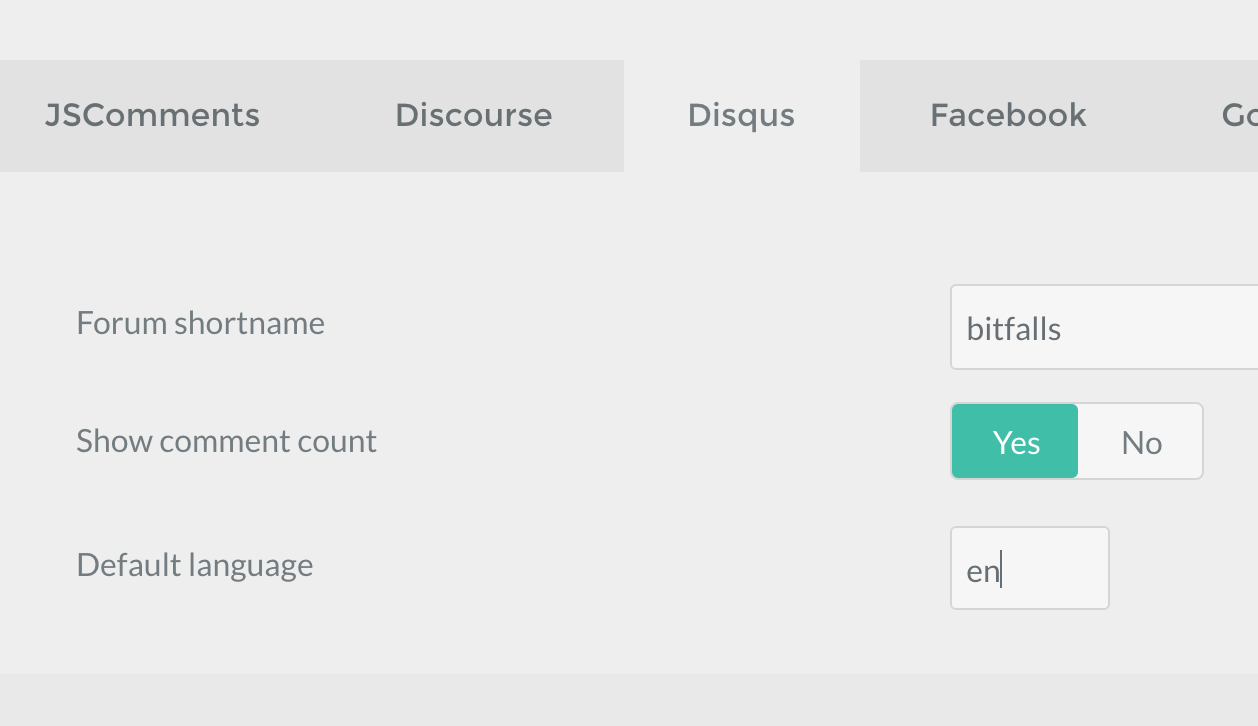
To add a comments section, we can use the JsComments plugin. It’s an abstraction of several popular comment systems, allowing for their site-wide installation in an instant, by just modifying the config file and adding the appropriate license key or identification code.
Unfortunately, Disqus is still the most viable option today, so let’s go with that.
The Admin Panel UI intuitively offers all the options we need to set, most notably the “Enabled” and “Active” option in the main tab, and the Disqus shortname in the Disqus tab:
Once done, the JS snippet needs to be injected into the template or page in which we want the comments rendered. This snippet is identical for all providers, and automatically switches out the comment system code when and if you decide on a different provider:
    {% if config.plugins.jscomments.enabled %}
        {{ jscomments() }}
    {% endif %}
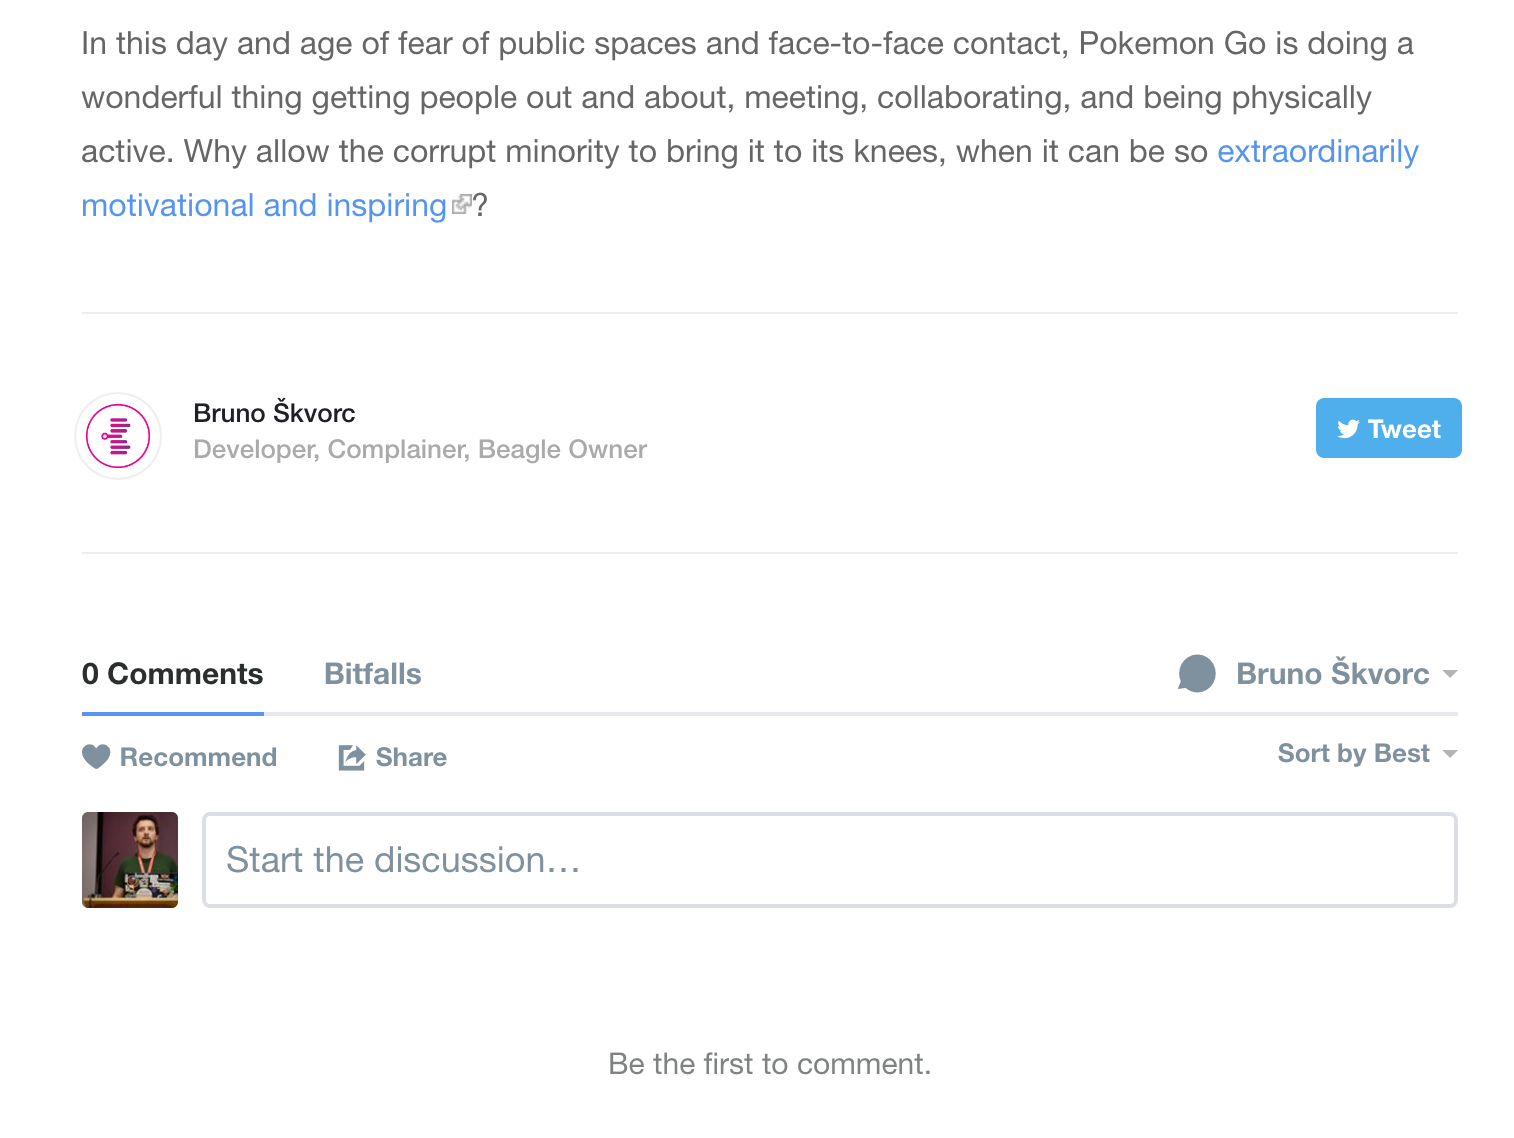
Here’s how the implementation looks on my blog:
Difference from Official Comments
There is also an official comments plugin which provides native commenting functionality and saves the comments in local files, but it’s missing some crucial features (see list in README file) and it’s flat-file based, not JS-based, which means they don’t play nice with full page caching.
When pages with JS comments are cached, they’re loaded asynchronously after the page is shown, regardless of the level of caching, which makes sure they’re always up to date even if you cache your content very aggressively.
Image Optimization and CDNs
Any good blog post is rich with text-breaking images to increase readability. But images tend to get pretty heavy sometimes, and bandwidth is precious – especially during traffic spikes. There are two options: CDN, and image optimization.
CDN
Grav’s CDN plugin works great with pullzone CDNs like MaxCDN.
A pullzone CDN is a special type of setup many CDNs offer where, when a file is requested from your site, it is first copied to the CDN, then to all its remote locations for serving around the world, and then served back to the user.
Pullzones usually aren’t free, and need additional setting up, plus some CNAME records at your domain’s registrar, but all the effort is worth it when the speed gains and bandwidth savings are considered.
Once fully configured on the CDN’s side, implementing a pullzone in Grav is extremely simple. The plugin provides the typical yaml configuration file (fully editable in the Admin UI):
enabled: true
inline_css_replace: true
pullzone: yourdomain.cdn.com
tags: 'a|link|img|script'
extensions: 'jpe?g|png|gif|ttf|otf|svg|woff|xml|js|css'
The above means: Replace all links to resources with the yourdomain.cdn.com domain, including url() calls in CSS, and do the same for all the listed extensions in all a, link, img, and script tags. This effectively makes the CDN auto-serve all static assets.
For assets you don’t want CDNed, there’s a nocdn mode, too.
Image Optimization
Whereas a CDN will serve assets with great efficiency and over great distances, you might also be interested in merely optimizing your images and reducing their filesize. The rather specific optimus plugin ties into the Optimus image optimization service.
Optimus is an arguably much more affordable service, clocking in at $19 per year for personal projects, but it lacks the geo-diversity of a CDN and only handles images. That said, this too can lead to some astonishing bandwidth savings.
Once installed, Optimus is automatically activated and sends all images for processing to the service. There are two things to keep in mind:
- the initial load of images will be slow, because it’ll take time for Optimus to process them and send them back
- the images will get saved and cached locally – they get returned back to your server, so it’s still you serving them.
The ideal approach would be using Optimus to optimize images, and then forwarding those to a CDN pullzone, thus reducing bandwidth for static assets to near 0%, but at a cost of about an extra $100 per year when looked at in total.
There is another way to super-cache your site, though, and that one’s free.
Caching with Varnish
As a final, super-optimization step, we’ll take advantage of Varnish, the reverse proxy server which caches full pages for arbitrary amounts of time and serves them very, very quickly. It protects your server from traffic spikes, and saves server resources for other processes and sites.
After installing it with something like sudo apt-get install varnish, we can modify some settings files. The default value for DAEMON_OPTS in /etc/default/varnish is actually fine as it is by default:
DAEMON_OPTS="-a :6081
             -T localhost:6082
             -f /etc/varnish/default.vcl
             -S /etc/varnish/secret
             -s malloc,256m"
Note: find out about these values in our original Varnish post
The other file to pay attention to is /etc/varnish/default.vcl, and its backend value.
backend default {
    .host = "127.0.0.1";
    .port = "8080";
}
The port should be changed to the port of the regular server, and the host should be renamed to the hostname of the server as defined in the server configuration. For my example during local development, it ends up looking like this:
backend default {
    .host = "test.app";
    .port = "80";
}
For this to work, the /etc/hosts file of the server you’re running your development sites on needs to have the 127.0.0.1 test.app entry, and you need to have the server configuration of this particular site named test.app, like so:
server {

    listen 80;
    listen 443 ssl;

    server_name test.app;

    ...
Now, the combination of these files makes sure that when visiting the page http://test.app:6081, Varnish actually fetches the content from http://test.app:80, saves it, and forwards it to the browser.
The same applies to live servers, but obviously those will differ in domain names.
Deploying for production entails the following:
- change port for Nginx / Apache to something esoteric (9123)
- change backend port in
/etc/varnish/default.vclto that port - change Varnish front end port to 80
Once done, you successfully got a Varnish-powered supercached site going, and you’re ready for those Hacker News / Reddit traffic spikes!
Conclusion
As you can see, there’s a lot that can be done with Grav (and around it), and we haven’t even looked at fully custom plugins or themes yet – something we’ll do in the near future.
With the setup presented in this post, and the plugins from the previous list, your blog is 100% production ready.
Have you given Grav a try yet? How do you feel about our suggestions in this post? Would you approach anything differently? Let us know!
Frequently Asked Questions (FAQs) about Grav Tweaks
What are the benefits of using Grav CMS for my website?
Grav CMS is a modern, open-source, flat-file CMS. It doesn’t require a database, which makes it faster and more efficient than traditional CMS platforms. It’s also highly flexible and customizable, allowing you to create a unique website that fits your specific needs. Moreover, Grav CMS is easy to install and manage, making it a great choice for both beginners and experienced developers.
How can I optimize my Grav CMS for high traffic?
There are several ways to optimize your Grav CMS for high traffic. First, you can use caching to reduce server load and improve page load times. Grav CMS has built-in caching that can be easily configured. Second, you can use a CDN to distribute your content globally and reduce latency. Lastly, you can optimize your images and other media files to reduce their size and improve page load times.
What are some must-do tweaks for Grav CMS?
Some must-do tweaks for Grav CMS include enabling caching, optimizing images, using a CDN, configuring your .htaccess file for better SEO, and setting up a backup system. These tweaks will help improve your website’s performance and reliability.
How can I improve the SEO of my Grav CMS website?
Grav CMS has several built-in features that can help improve your website’s SEO. For example, you can use the SEO Tab plugin to easily manage your meta tags, create XML sitemaps, and more. You can also configure your .htaccess file to enable clean URLs, which are more SEO-friendly.
How can I backup my Grav CMS website?
Backing up your Grav CMS website is crucial to prevent data loss. You can use the Backup Manager plugin to easily create and manage backups. You can also manually backup your website by copying the ‘user’ folder, which contains all your website’s content and configuration files.
How can I secure my Grav CMS website?
There are several ways to secure your Grav CMS website. First, you can use the Login plugin to add authentication to your website. Second, you can use the Security Headers plugin to add security headers to your website. Lastly, you can keep your Grav CMS and its plugins up-to-date to ensure you have the latest security patches.
How can I add a contact form to my Grav CMS website?
You can use the Form plugin to easily add a contact form to your Grav CMS website. The plugin provides a simple and flexible way to create and manage forms.
How can I add a blog to my Grav CMS website?
You can use the Blog Site Skeleton to easily add a blog to your Grav CMS website. The skeleton provides a pre-configured blog with a clean and modern design.
How can I add social media buttons to my Grav CMS website?
You can use the Social Buttons plugin to easily add social media buttons to your Grav CMS website. The plugin supports several social media platforms, including Facebook, Twitter, and LinkedIn.
How can I customize the design of my Grav CMS website?
Grav CMS supports Twig templating, which allows you to easily customize the design of your website. You can also use themes to change the look and feel of your website. Grav CMS has a large collection of themes that you can choose from.
 Bruno Skvorc
Bruno is a blockchain developer and technical educator at the Web3 Foundation, the foundation that's building the next generation of the free people's internet. He runs two newsletters you should subscribe to if you're interested in Web3.0: Dot Leap covers ecosystem and tech development of Web3, and NFT Review covers the evolution of the non-fungible token (digital collectibles) ecosystem inside this emerging new web. His current passion project is RMRK.app, the most advanced NFT system in the world, which allows NFTs to own other NFTs, NFTs to react to emotion, NFTs to be governed democratically, and NFTs to be multiple things at once.