Introduction to Django
Overview
This chapter introduces you to Django and its role in web development. You will begin by learning how the Model View Template (MVT) paradigm works and how Django processes HTTP requests and responses. Equipped with the basic concepts, you'll create your first Django project, called Bookr, an application for adding, viewing, and managing book reviews. It's an application you'll keep enhancing and adding features to throughout this book. You will then learn about the manage.py command (used to orchestrate Django actions). You will use this command to start the Django development server and test whether the code you've written works as expected. You will also learn how to work with PyCharm, a popular Python IDE that you'll be using throughout this book. You will use it to write code that returns a response to your web browser. Finally, you'll learn how to use PyCharm's debugger to troubleshoot problems with your code. By the end of this chapter, you'll have the necessary skills to start creating projects using Django.
Introduction
"The web framework for perfectionists with deadlines." It's a tagline that aptly describes Django, a framework that has been around for over 10 years now. It is battle-tested and widely used, with more and more people using it every day. All this might make you think that Django is old and no longer relevant. On the contrary, its longevity has proved that its Application Programming Interface (API) is reliable and consistent, and even those who learned Django v1.0 in 2007 can mostly write the same code for Django 3 today. Django is still in active development, with bugfixes and security patches being released monthly.
Like Python, the language in which it is written, Django is easy to learn, yet powerful and flexible enough to grow with your needs. It is a "batteries-included" framework, which is to say that you do not have to find and install many other libraries or components to get your application up and running. Other frameworks, such as Flask or Pylons, require manually installing third-party frameworks for database connections or template rendering. Instead, Django has built-in support for database querying, URL mapping, and template rendering (we'll go into detail on what these mean soon). But just because Django is easy to use doesn't mean it is limited. Django is used by many large sites, including Disqus (https://disqus.com/), Instagram (https://www.instagram.com/), Mozilla (https://www.mozilla.org/), Pinterest (https://www.pinterest.com/), Open Stack (https://www.openstack.org/), and National Geographic (http://www.nationalgeographic.com/).
Where does Django fit into the web? When talking about web frameworks, you might think of frontend JavaScript frameworks such as ReactJS, Angular, or Vue. These frameworks are used to enhance or add interactivity to already-generated web pages. Django sits in the layer beneath these tools and instead is responsible for routing a URL, fetching data from databases, rendering templates, and handling form input from users. However, this does not mean you must pick one or the other; JavaScript frameworks can be used to enhance the output from Django, or to interact with a REST API generated by Django.
In this book, we will build a Django project using the methods that professional Django developers use every day. The application is called Bookr, and it allows browsing and adding books and book reviews. This book is divided into four sections. In the first section, we'll start with the basics of scaffolding a Django app and quickly build some pages and serve them with the Django development server. You'll be able to add data to the database using the Django admin site.
The next section focuses on adding enhancements to Bookr. You'll serve static files to add styles and images to the site. By using Django's form library, you'll add interactivity, and by using file uploads, you will be able to upload book covers and other files. You'll then implement user login and learn how to store information about the current user in the session.
In section three, you'll build on your existing knowledge and move to the next level of development. You'll customize the Django admin site and then learn about advanced templating. Next, you'll learn how to build a REST API and generate non-HTML data (such as CSVs and PDFs), and you'll finish the section by learning about testing Django.
Many third-party libraries are available to add functionality to Django and to make development easier and thus save time. In the final section, you'll learn about some of the useful ones and how to integrate them into your application. Applying this knowledge, you'll integrate a JavaScript library to communicate with the REST framework you built in the previous section. Finally, you'll learn how to deploy your Django application to a virtual server.
By the end of the book, you will have enough experience to design and build your own Django project from start to finish.
Scaffolding a Django Project and App
Before diving deep into the theory behind Django paradigms and HTTP requests, we'll show you how easy it is to get a Django project up and running. After this first section and exercise, you will have created a Django project, made a request to it with your browser, and seen the response.
A Django project is a directory that contains all the data for your project: code, settings, templates, and assets. It is created and scaffolded by running the django-admin.py command on the command line with the startproject argument and providing the project name. For example, to create a Django project with the name myproject, the command that is run is this:
django-admin.py startproject myproject
This will create the myproject directory, which Django populates with the necessary files to run the project. Inside the myproject directory are two files (shown in Figure 1.1):

Figure 1.1: Project directory for myproject
manage.py is a Python script that is executed at the command line to interact with your project. We will use it to start the Django dev server, a development web server you will use to interact with your Django project on your local computer. Like django-admin.py, commands are passed in on the command line. Unlike django-admin.py, this script is not mapped in your system path, so we must execute it using Python. We will need to use the command line to do that. For example, inside the project directory, run the following command:
python3 manage.py runserverThis passes the runserver command to the manage.py script, which starts the Django dev server. We will examine more of the commands that manage.py accepts in the Django Project section. When interacting with manage.py in this way, we call these management commands. For example, we might say that we are "executing the runserver management command."
The startproject command also created a directory with the same name as the project, in this case, myproject (Figure 1.1). This is a Python package that contains settings and some other configuration files that your project needs to run. We will examine its contents in the Django Project section.
After starting the Django project, the next thing to do is to start a Django app. We should try to segregate our Django project into different apps, grouped by functionality. For example, with Bookr, we will have a reviews app. This will hold all the code, HTML, assets, and database classes specific to working with book reviews. If we decided to expand Bookr to sell books as well, we might add a store application, containing the files for the bookstore. Apps are created with the startapp management command, passing in the application name. For example:
python3 manage.py startapp myappThis creates the app directory (myapp) inside the project directory. Django automatically populates this with files for the app that are ready to be filled in when you start developing. We'll examine these files and discuss what makes a good app in the Django Apps section.
Now that we've introduced the basic commands to scaffold a Django project and application, let's put them into practice by starting the Bookr project in the first exercise of this book.
Exercise 1.01: Creating a Project and App, and Starting the Dev Server
Throughout this book, we will be building a book review website named Bookr. It will allow you to add fields for publishers, contributors, books, and reviews. A publisher will publish one or more books, and each book will have one or more contributors (author, editor, co-author, and so on). Only admin users will be allowed to modify these fields. Once a user has signed up for an account on the site, they will be able to start adding reviews to a book.
In this exercise, you will scaffold the bookr Django project, test that Django is working by running the dev server, then create the reviews Django app.
You should already have a virtual environment set up with Django installed. To learn how to do that, you can refer to the Preface. Once you're ready, let's start by creating the Bookr project:
- Open a Terminal and run the following command to create the bookr project directory and the default subfolders:
django-admin startproject bookrThis command does not generate any output but will create a folder called bookr inside the directory in which you ran the command. You can look inside this directory and see the items we described before for the myproject example: the bookr package directory and manage.py file.
- We can now test that the project and Django are set up correctly by running the Django dev server. Starting the server is done with the manage.py script.
In your Terminal (or Command Prompt), change into the bookr project directory (using the cd command), then run the manage.py runserver command.
python3 manage.py runserver
Note
On Windows, you may need to run replace python3 (highlighted) with just python to make the command work every time you run it.
This command starts the Django dev server. You should get output similar to the following:
Watching for file changes with StatReloaderPerforming system checks...System check identified no issues (0 silenced).You have 17 unapplied migration(s). Your project may not work properly until you apply the migrations for app(s): admin, auth, contenttypes, sessions.
Run 'python manage.py migrate' to apply them.September 14, 2019 - 09:40:45Django version 3.0a1, using settings 'bookr.settings'Starting development server at http://127.0.0.1:8000/Quit the server with CONTROL-C.You will probably have some warnings about unapplied migrations, but that's okay for now.
- Open up a web browser and go to http://127.0.0.1:8000/, which will show you the Django welcome screen (Figure 1.2). If you see this, you know your Django project was created successfully and it all is working fine for now:
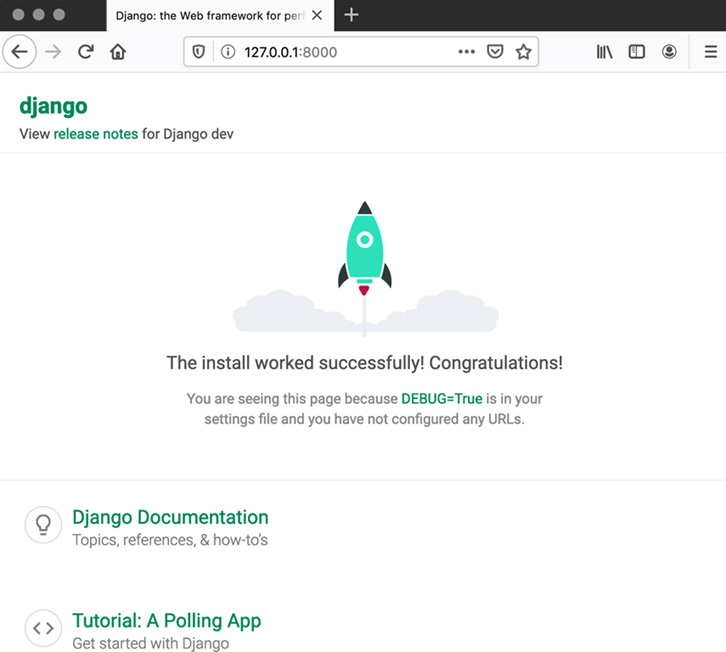
Figure 1.2: Django welcome screen
- Go back to your Terminal and stop the development server running using the Ctrl + C key combination.
- We'll now create the reviews app for the bookr project. In your Terminal, make sure you are in the bookr project directory, then execute the following command to create the reviews app:
python3 manage.py startapp reviewsNote
After creating the reviews app, the files in your bookr project directory would look like this: http://packt.live/3nZGy5D.
There is no output if the command was successful, but a reviews app directory has been created. You can look inside this directory to see the files that were created: the migrations directory, admin.py, models.py, and so on. We'll examine these in detail in the Django Apps section.
In this exercise, we created the bookr project, tested that the project was working by starting the Django dev server, then created the reviews app for the project. Now that we've had some hands-on time with a Django project, we'll return to some of the theory behind Django's design and HTTP requests and responses.
Model View Template
A common design pattern in application design is Model View Controller (MVC), where the model of the application (its data) is displayed in one or more views and a controller marshals interaction between the model and view. Django follows a somewhat similar paradigm called Model View Template (MVT).
Like MVC, MVT also uses models for storing data. However, with MVT, a view will query a model and then render it with a template. Usually, with MVC languages, all three components need to be developed with the same language. With MVT, the template can be in a different language. In the case of Django, the models and views are written in Python and the Template in HTML. This means that a Python developer could work on the models and views, while a specialist HTML developer works on the HTML. We'll first explain models, views, and templates in more detail, and then look at some example scenarios where they are used.
Models
Django models define the data for your application and provide an abstraction layer to SQL database access through an Object Relational Mapper (ORM). An ORM lets you define your data schema (classes, fields, and their relationships) using Python code, without needing an understanding of the underlying database. This means you can define your database layer in Python code and Django will take care of generating SQL queries for you. ORMs will be discussed in detail in Chapter 2, Models and Migrations.
Note
SQL stands for Structured Query Language and is a way of describing a type of database that stores its data in tables, with each table having several rows. Think of each table being like an individual spreadsheet. Unlike a spreadsheet, though, relationships can be defined between the data in each table. You can interact with data by executing SQL queries (often referred to as just queries when talking about databases). Queries allow you to retrieve data (SELECT), add or change data (INSERT and UPDATE respectively), and remove data (DELETE). There are many SQL database servers to choose from, such as SQLite, PostgreSQL, MySQL, or Microsoft SQL Server. Much of the SQL syntax is similar between databases, but there can be some differences in dialect. Django's ORM takes care of these differences for you: when we start coding, we will use the SQLite database to store data on disk, but later when we deploy to a server, we will switch to PostgreSQL but won't need to make any code changes.
Normally, when querying a database, the results come back as primitive Python objects, (for example, lists of strings, integers, floats, or bytes). When using the ORM, results are automatically converted into instances of the model classes you have defined. Using an ORM means that you are automatically protected from a type of vulnerability known as a SQL injection attack.
If you're more familiar with databases and SQL, you always have the option of writing your own queries too.
Views
A Django view is where most of the logic for your application is defined. When a user visits your site, their web browser will send a request to retrieve data from your site (in the next section, we will go into more detail on what an HTTP request is and what information it contains). A view is a function that you write that will receive this request in the form of a Python object (specifically, a Django HttpRequest object). It is up to your view to decide how it should respond to the request and what it should send back to the user. Your view must return an HttpResponse object that encapsulates all the information being provided to the client: content, HTTP status, and other headers.
The view can also optionally receive information from the URL of the request, for example, an ID number. A common design pattern of a view is to query a database via the Django ORM using an ID that is passed into your view. Then the view can render a template (more on this in a moment) by providing it with data from the model retrieved from the database. The rendered template becomes the content of HttpResponse and is returned from the view function. Django takes care of the communication of the data back to the browser.
Templates
A template is a HyperText Markup Language (HTML) file (usually – any text file can be a template) that contains special placeholders that are replaced by variables your application provides. For example, your application could render a list of items in either a gallery layout or a table layout. Your view would fetch the same models for either one but would be able to render a different HTML file with the same information to present the data differently. Django emphasizes safety, so it will take care of automatically escaping variables for you. For example, the < and > symbols (among others) are special characters in HTML. If you try to use them in a variable, then Django automatically encodes them so they render correctly in a browser.
MVT in Practice
We'll now look at some examples to illustrate how MVT works in practice. In the examples, we have a Book model that stores information about different books, and a Review model that stores information about different reviews of the books.
In the first example, we want to be able to edit the information about a book or review. Take the first scenario, editing a book's details. We would have a view to fetch the Book data from the database and provide the Book model. Then, we would pass context information containing the Book object (and other data) to a template that would show a form to capture the new information. The second scenario (editing a review) is similar: fetch a Review model from the database, then pass the Review object and other data to a template to display an edit form. These scenarios might be so similar that we can reuse the same template for both. Refer to Figure 1.3.
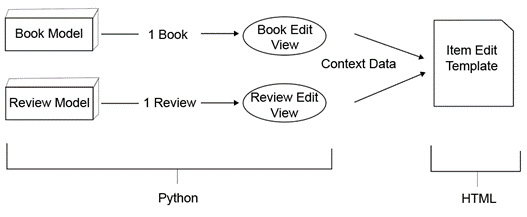
Figure 1.3: Editing a single book or review
You can see here that we use two models, two views, and one template. Each view fetches a single instance of its associated model, but they can both use the same template, which is a generic HTML page to display a form. The views can provide extra context data to slightly alter the display of the template for each model type. Also illustrated in the diagram are the parts of the code that are written in Python and those that are written in HTML.
In the second example, we want to be able to show the user a list of the books or reviews that are stored in the application. Furthermore, we want to allow the user to search for books and get a list of all that match their criteria. We will use the same two models as the previous example (Book and Review), but we will create new views and templates. Since there are three scenarios, we'll use three views this time: the first fetches all books, the second fetches all reviews, and the last searches for books based on some search criteria. Once again, if we write a template well, we might be able to just use a single HTML template again. Refer to Figure 1.4:
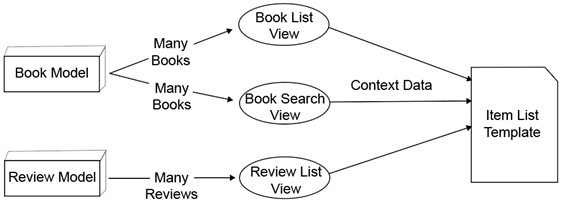
Figure 1.4: Viewing multiple books or reviews
The Book and Review models remain unchanged from the previous example. The three views will fetch many (zero or more) books or reviews. Then, each view can use the same template, which is a generic HTML file that iterates over a list of objects that it is given and renders them. Once again, the views can send extra data in the context to alter how the template behaves, but the majority of the template will be as generic as possible.
In Django, a model does not always need to be used to render an HTML template. A view can generate the context data itself and render a template with it, without requiring any model data. See Figure 1.5 for a view sending data straight to a template:

Figure 1.5: From view to template without a model
In this example, there is a welcome view to welcome a user to the site. It doesn't need any information from the database, so it can just generate the context data itself. The context data depends on the type of information you want to display; for example, you could pass the user information to greet them by name if they are logged in. It is also possible for a view to render a template without any context data. This can be useful if you have static information in an HTML file that you want to serve.
Introduction to HTTP
Now that you have been introduced to MVT in Django, we can look at how Django processes an HTTP request and generates an HTTP response. But first, we need to explain in more detail what HTTP requests and responses are, and what information they contain.
Let's say someone wants to visit your web page. They type in its URL or click a link to your site from a page they are already on. Their web browser creates an HTTP request, which is sent to the server hosting your website. Once a web server receives the HTTP request from your browser, it can interpret it and then send back a response. The response that the server sends might be simple, such as just reading an HTML or image file from disk and sending it. Or, the response might be more complex, maybe using server-side software (such as Django) to dynamically generate the content before sending it:

Figure 1.6: HTTP request and HTTP response
The request is made up of four main parts: the method, path, headers, and body. Some types of requests don't have a body. If you just visit a web page, your browser will not send a body, whereas if you are submitting a form (for example, by logging into a site or performing a search), then your request will have a body containing the data you're submitting. We'll look at two example requests now to illustrate this.
The first request will be to an example page with the URL https://www.example.com/page. When your browser visits that page, behind the scenes, this is what it's sending:
GET /page HTTP/1.1Host: www.example.comUser-Agent: Mozilla/5.0 (X11; Ubuntu; Linux x86_64; rv:15.0) Firefox/15.0.1Cookie: sessid=abc123def456The first line contains the method (GET) and the path (/page). It also contains the HTTP version, in this case, 1.1, although you don't have to worry about this. Many different HTTP methods can be used, depending on how you want to interact with the remote page. Some common ones are GET (retrieve the remote page), POST (send data to the remote page), PUT (create a remote page), and DELETE (delete the remote page). Note that the descriptions of the actions are somewhat simplified—the remote server can choose how it responds to different methods, and even experienced developers can disagree on the correct method to implement for a particular action. It's also important to note that even if a server supports a particular method, you will probably need the correct permissions to perform that action—you can't just use DELETE on a web page you don't like, for example.
When writing a web application, the vast majority of the time, you will only deal with GET requests. When you start accepting forms, you'll also have to use POST requests. It is only when you are working with advanced features such as creating REST APIs that you will have to worry about PUT, DELETE, and other methods.
Referring back to the example request again, from line 2 onward are the headers of the request. The headers contain extra metadata about the request. Each header is on its own line, with the header name and its value separated by a colon. Most are optional (except for Host —more on that soon). Header names are not case sensitive. For the sake of the example, we're only showing three common headers here. Let's look at the example headers in order:
- Host: As mentioned, this is the only header that is required (for HTTP 1.1 or later). It is needed for the webserver to know which website or application should respond to the request, in case there are multiple sites hosted on a single server.
- User-Agent: Your browser usually sends to the server a string identifying its version and operating system. Your server application could use this to serve different pages to different devices (for example, a mobile-specific page for smartphones).
- Cookie: You have probably seen a message when visiting a web page that lets you know that it is storing a cookie in the browser. These are small pieces of information that a website can store in your browser that can be used to identify you or save settings for when you return to the site. If you were wondering about how your browser sends these cookies back to the server, it is through this header.
There are many other standard headers defined and it would take up too much space to list them all. They can be used to authenticate to the server (Authorization), tell the server what kind of data you can receive (Accept), or even state what language you'd like for the page (Accept-Language, although this will only work if the page creator has made the content available in the particular language you request). You can even define your own headers that only your application knows how to respond to.
Now let's look at a slightly more advanced request: one that sends some information to a server, and thus (unlike the previous example) contains a body. In this example, we are logging into a web page by sending a username and password. For example, you visit https://www.example.com/login and it displays a form to enter username and password. After you click the Login button, this is the request that is sent to the server:
POST /login HTTP/1.1Host: www.example.comContent-Type: application/x-www-form-urlencodedContent-Length: 32username=user1&password=password1As you can see, this looks similar to the first example, but there are a few differences. The method is now POST, and two new headers have been introduced (you can assume your browser would still be sending the other headers that were in the previous example too):
- Content-Type: This tells the server the type of data that is included in the body. In the case of application/x-www-form-urlencoded, the body is a set of key-value pairs. An HTTP client could set this header to tell the server if it was sending other types of data, such as JSON or XML, for example.
- Content-Length: For the server to know how much data to read, the client must tell it how much data is being sent. The Content-Length header contains the length of the body. If you count the length of the body in this example, you'll see it's 32 characters.
The headers are always separated from the body by a blank line. By looking at the example, you should be able to tell how the form data is encoded in the body: username has the value user1 and password the value password1.
These requests were quite simple, but most requests don't get much more complicated. They might have different methods and headers but should follow the same format. Now that you've seen requests, we'll take a look at the HTTP responses that come back from the server.
An HTTP response looks similar to a request and consists of three main parts: a status, headers, and a body. Like a request, though, depending on the type of response, it might not have a body. The first response example is a simple successful response:
HTTP/1.1 200 OKServer: nginxContent-Length: 18132Content-Type: text/htmlSet-Cookie: sessid=abc123def46<!DOCTYPE html><html><head>…The first line contains the HTTP version, a numeric status code (200), and then a text description of what the code means (OK —the request was a success). We'll show some more statuses after the next example. Lines 2 to 5 contain headers, similar to a request. Some headers you have seen before; we will explain them all in this context:
- Server: This is similar to but the opposite of the User-Agent header: this is the server telling the client what software it is running.
- Content-Length: The client uses this value to determine how much data to read from the server to get the body.
- Content-Type: The server uses this header to indicate to the client what type of data it is sending. The client can then choose how it will display the data—an image must be displayed differently to HTML, for example.
- Set-Cookie: We saw in the first request example how a client sends a cookie to the server. This is the corresponding header that a server sends to set that cookie in the browser.
After the headers is a blank line, and then the body of the response. We haven't shown it all here, just the first few characters of the HTML that is being received, out of the 18,132 that the server has sent.
Next, we'll show an example of a response that is returned if a requested page is not found:
HTTP/1.1 404 Not FoundServer: nginxContent-Length: 55Content-Type: text/html<!DOCTYPE html><html><body>Page Not Found</body></html>It is similar to the previous example, but the status is now 404 Not Found. If you've ever been browsing the internet and received a 404 error, this is the type of response your browser received. The various status codes are grouped by the type of success or failure they indicate:
- 100-199: The server sends codes in this range to indicate protocol changes or that more data is required. You don't have to worry about these.
- 200-299: A status code in this range indicates the successful handling of a response. The most common one you will deal with is 200 OK.
- 300-399: A status code in this range means the page you are requesting has moved to another address. An example of this is a URL shortening service that would redirect you from the short URL to the full one when you visit it. Common responses are 301 Moved Permanently or 302 Found. When sending a redirect response, the server will also include a Location header that contains the URL that should be redirected to.
- 400-499: A status code in this range means that the request could not be handled because there was a problem with what the client sent. This is in contrast to a request not being able to be handled due to a problem on the server (we will discuss those soon). We've already seen a 404 Not Found response; this is due to a bad request because the client is requesting a document that does not exist. Some other common responses are 401 Unauthorized (the client should log in) and 403 Forbidden (the client is not allowed to access the specific resource). Both problems could be avoided by having the client login, hence them being considered client-side (request) problems.
- 500-599: Status codes in this range indicate an error on the server's side. The client shouldn't expect to be able to adjust the request to fix the problem. When working with Django, the most common server error status you will see is 500 Internal Server Error. This will be generated if your code raises an exception. Another common one is 504 Gateway Timeout, which might occur if your code is taking too long to run. The other variants that are common to see are 502 Bad Gateway and 503 Service Unavailable, which generally mean there is a problem with your application's hosting in some way.
These are only some of the most common HTTP statuses. You can find a more complete list at https://developer.mozilla.org/en-US/docs/Web/HTTP/Status. Like HTTP headers, though, statuses are arbitrary, and an application can return custom statuses. It is up to the server and clients to decide what these custom statuses and codes mean.
If this is your first time being introduced to the HTTP protocol, there's quite a lot of information to take in. Luckily, Django does all the hard work and encapsulates the incoming data into an HttpRequest object. Most of the time, you don't need to know about most of the information coming in, but it's available if you need it. Likewise, when sending a response, Django encapsulates your data in an HttpResponse object. Normally you just set the content to return, but you also have the freedom to set HTTP status codes and headers. We will discuss how to access and set the information in HttpRequest and HttpResponse later in this chapter.
Processing a Request
This is a basic timeline of the request and response flows, so you can get an idea of what the code you'll be writing does at each stage. In terms of writing code, the first part you will write is your view. The view you create will perform some actions, such as querying the database for data. Then the view will pass this data to another function to render a template, finally returning the HttpResponse object encompassing the data you want to send back to the client.
Next, Django needs to know how to map a specific URL to your view, so that it can load the correct view for the URL it receives as part of a request. You will write this URL mapping in a URL configuration Python file.
When Django receives a request, it parses the URL config file, then finds the corresponding view. It calls the view, passing in an HttpRequest object representing the request. Your view will return its HttpResponse, then Django takes over again to send this data to its host web server and back out to the client that requested it:
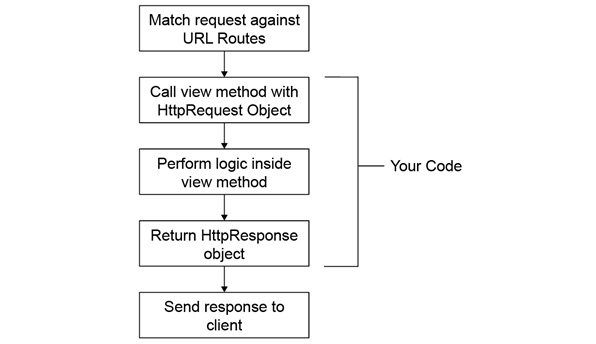
Figure 1.7: Request and response flow
The request-response flow is illustrated in Figure 1.7; the sections indicated as Your Code are code that you write—the first and last steps are taken care of by Django. Django does the URL matching for you, calls your view code, then handles passing the response back to the client.
Django Project
We already introduced Django projects in a previous section. To remind ourselves of what happens when we run startproject (for a project named myproject): the command creates a myproject directory with a file called manage.py, and a directory called myproject (this matches the project name, in Exercise 1.01, Creating a Project and App, and Starting the Dev Server; this folder was called bookr, the same as the project). The directory layout is shown in Figure 1.8. We'll now examine the manage.py file and the myproject package contents in more detail:

Figure 1.8: Project directory for myproject
manage.py
As the name suggests, this is a script that is used to manage your Django project. Most of the commands that are used to interact with your project will be supplied to this script on the command line. The commands are supplied as an argument to this script; for example, if we say to run the manage.py runserver command, we would mean running the manage.py script like this:
python3 manage.py runserverThere are a number of useful commands that manage.py provides. You will be introduced to them in more detail throughout the book; some of the more common ones are listed here:
- runserver: Starts the Django development HTTP server, to serve your Django app on your local computer.
- startapp: Creates a new Django app in your project. We'll talk about what apps are in more depth soon.
- shell: Starts a Python interpreter with the Django settings pre-loaded. This is useful for interacting with your application without having to manually load in your Django settings.
- dbshell: Starts an interactive shell connected to your database, using the default parameters from your Django settings. You can run manual SQL queries in this way.
- makemigrations: Generate database change instructions from your model definitions. You will learn what this means and how to use this command in Chapter 2, Models and Migrations.
- migrate: Applies migrations generated by the makemigrations command. You will use this in Chapter 2, Models and Migrations, as well.
- test: Run automated tests that you have written. You'll use this command in Chapter 14, Testing.
A full list of all commands is available at https://docs.djangoproject.com/en/3.0/ref/django-admin/.
The myproject Directory
Moving on from the manage.py file, the other file item created by startproject is the myproject directory. This is the actual Python package for your project. It contains settings for the project, some configuration files for your web server, and the global URL maps. Inside the myproject directory are five files:
- __init__.py
- asgi.py
- settings.py
- urls.py
- wsgi.py

Figure 1.9: The myproject package (inside the myproject project directory)
__init__.py
An empty file that lets Python know that the myproject directory is a Python module. You'll be familiar with these files if you've worked with Python before.
settings.py
This contains all the Django settings for your application. We will explain the contents soon.
urls.py
This has the global URL mappings that Django will initially use to locate views or other child URL mappings. You will add a URL map to this file soon.
asgi.py and wsgi.py
These files are what ASGI or WSGI web servers use to communicate with your Django app when you deploy it to a production web server. You normally don't need to edit these at all, and they aren't used in day-to-day development. Their use will be discussed more in Chapter 17, Deployment of a Django Application.
Django Development Server
You have already started the Django dev server in Exercise 1.01, Creating a Project and App, and Starting the Dev Server. As we mentioned previously, it is a web server intended to only be run on the developer's machine during development. It is not intended for use in production.
By default, the server listens on port 8000 on localhost (127.0.0.1), but this can be changed by adding a port number or address and port number after the runserver argument:
python3 manage.py runserver 8001This will have the server listen on port 8001 on localhost (127.0.0.1).
You can also have it listen on a specific address if your computer has more than one, or 0.0.0.0 for all addresses:
python3 manage.py runserver 0.0.0.0:8000This will have the server listen on all your computer's addresses on port 8000, which can be useful if you want to test your application from another computer or your smartphone.
The development server watches your Django project directory and will restart automatically every time you save a file so that any code changes you make are automatically reloaded into the server. You still have to manually refresh your browser to see changes there, though.
When you want to stop the runserver command, it can be done in the usual way for stopping processes in the Terminal: by using the Ctrl + C key combination.
Django Apps
Now that we've covered a bit of theory about apps, we can be more specific about their purpose. An app directory contains all the models, views, and templates (and more) that they need to provide application functionality. A Django project will contain at least one app (unless it has been heavily customized to not rely on a lot of Django functionality). If well designed, an app should be able to be removed from a project and moved to another project without modification. Usually, an app will contain models for a single design domain, and this can be a useful way of determining whether your app should be split into multiple apps.
Your app can have any name as long as it is a valid Python module name (that is, using only letters, numbers, and underscores) and does not conflict with other files in your project directory. For example, as we have seen, there is already a directory called myproject in the project directory (containing the settings.py file), so you could not have an app called myproject. As we saw in Exercise 1.01, Creating a Project and App, and Starting the Dev Server, creating an app uses the manage.py startapp appname command. For example:
python3 manage.py startapp myappThe startapp command creates a directory within your project with the name of the app specified. It also scaffolds files for the app. Inside the app directory are several files and a folder, as shown in Figure 1.10:
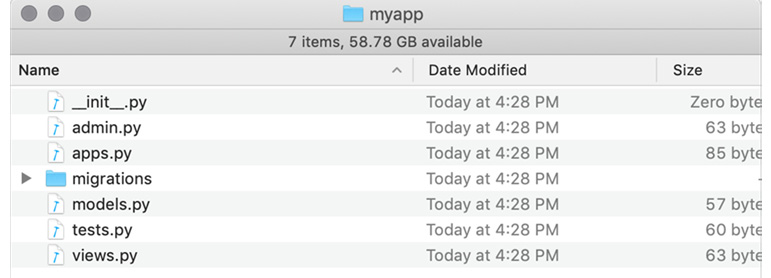
Figure 1.10: The contents of the myapp app directory
- __init.py__: An empty file indicating that this directory is a Python module.
- admin.py: Django has a built-in admin site for viewing and editing data with a Graphical User Interface (GUI). In this file, you will define how your app's models are exposed in the Django admin site. We'll cover this in more detail in Chapter 4, Introduction to Django Admin.
- apps.py: This contains some configuration for the metadata of your app. You won't need to edit this file.
- models.py: This is where you will define the models for your application. You'll read about this in more detail in Chapter 2, Models and Migrations.
- migrations: Django uses migration files to automatically record changes to your underlying database as the models change. They are generated by Django when you run the manage.py makemigrations command and are stored in this directory. They do not get applied to the database until you run manage.py migrate. They will be also be covered in Chapter 2, Models and Migrations.
- tests.py: To test that your code is behaving correctly, Django supports writing tests (unit, functional, or integration) and will look for them inside this file. We will write some tests throughout this book and cover testing in detail in Chapter 14, Testing.
- views.py: Your Django views (the code that responds to HTTP requests) will go in here. You will create a basic view soon, and views will be covered in more detail in Chapter 3, URL Mapping, Views, and Templates.
We will examine the contents of these files more later, but for now, we'll get Django up and running in our second exercise.
PyCharm Setup
We confirmed in Exercise 1.01, Creating a Project and App, and Starting the Dev Server, that the Bookr project has been set up properly (since the dev server runs successfully), so we can now start using PyCharm to run and edit our project. PyCharm is an IDE for Python development, and it includes features such as code completion, automatic style formatting, and a built-in debugger. We will then use PyCharm to start writing our URL maps, views, and templates. It will also be used to start and stop the development server, which will allow the debugging of our code by setting breakpoints.
Exercise 1.02: Project Setup in PyCharm
In this exercise, we will open the Bookr project in PyCharm and set up the project interpreter so that PyCharm can run and debug the project:
- Open PyCharm. When you first open PyCharm, you will be shown the Welcome to PyCharm screen, which asks you what you want to do:
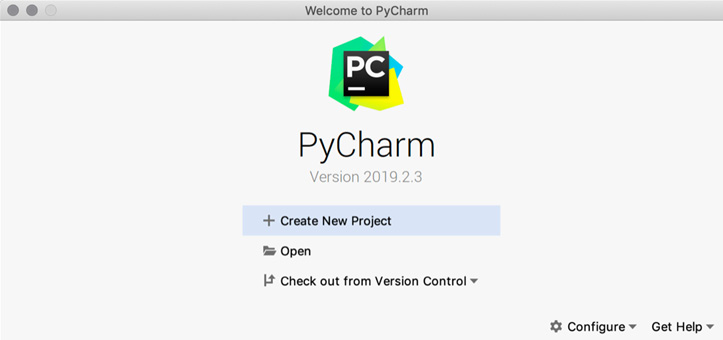
Figure 1.11: PyCharm welcome screen
- Click Open, then browse to the bookr project you just created, then open it. Make sure you are opening the bookr project directory and not the bookr package directory inside.
If you haven't used PyCharm before, it will ask you about what settings and themes you want to use, and once you have answered all those questions, you will see your bookr project structure open in the Project pane on the left of the window:

Figure 1.12: PyCharm Project pane
Your Project pane should look like Figure 1.12 and show the bookr and reviews directories, and the manage.py file. If you do not see these and instead see asgi.py, settings.py, urls.py, and wsgi.py, then you have opened the bookr package directory instead. Select File -> Open, then browse and open the bookr project directory.
Before PyCharm knows how to execute your project to start the Django dev server, the interpreter must be set to the Python binary inside your virtual environment. This is done first by adding the interpreter to the global interpreter settings.
- Open the Preferences (macOS) or Settings (Windows/Linux) window inside PyCharm.
macOS:
PyCharm Menu -> Preferences
Windows and Linux:
File -> Settings
- In the preferences list pane on the left, open the Project: bookr item, then click Project Interpreter:
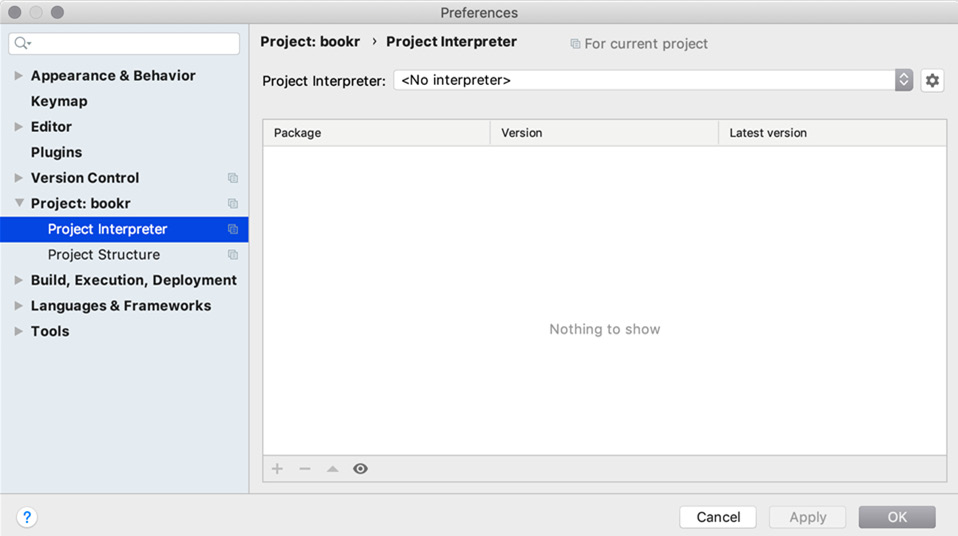
Figure 1.13: Project interpreter settings
- Sometimes PyCharm can automatically determine virtual environments, so in this case, Project Interpreter may already be populated with the correct interpreter. If it is, and you see Django in the list of packages, you can click OK to close the window and complete this exercise.
In most cases, though, the Python interpreter must be set manually. Click the cog icon next to the Project Interpreter dropdown, then click Add….
- The Add Python Interpreter window is now displayed. Select the Existing environment radio button and then click the ellipses (…) next to the Interpreter dropdown. You should then browse and select the Python interpreter for your virtual environment:
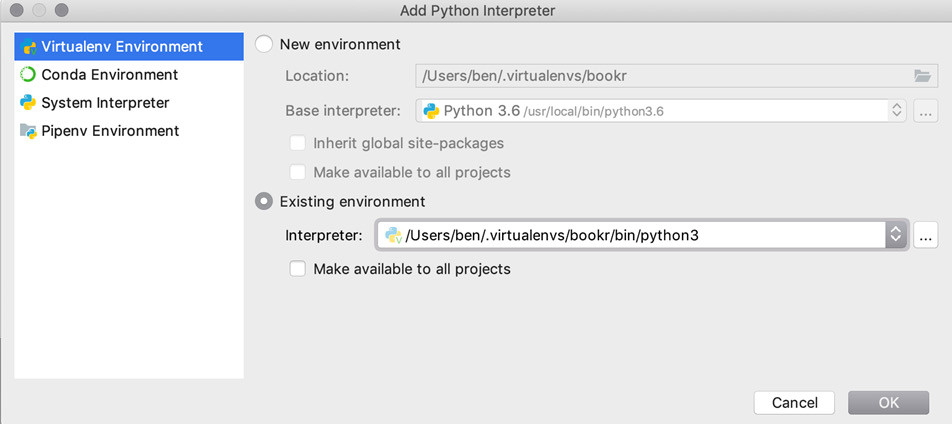
Figure 1.14: The Add Python Interpreter window
- On macOS (assuming you called the virtual environment bookr), the path is usually /Users/<yourusername>/.virtualenvs/bookr/bin/python3. Similarly, in Linux, it should be /home/<yourusername>/.virtualenvs/bookr/bin/python3.
If you're unsure, you can run the which python3 command in the Terminal where you previously ran the python manage.py command and it will tell you the path to the Python interpreter:
which python3/Users/ben/.virtualenvs/bookr/bin/python3On Windows, it will be wherever you created your virtual environment with the virtualenv command.
After selecting the interpreter, your Add Python Interpreter window should look like Figure 1.14.
- Click OK to close the Add Python interpreter window.
- You should now see the main preferences window, and Django (and other packages in your virtual environment) will be listed (see Figure 1.15):
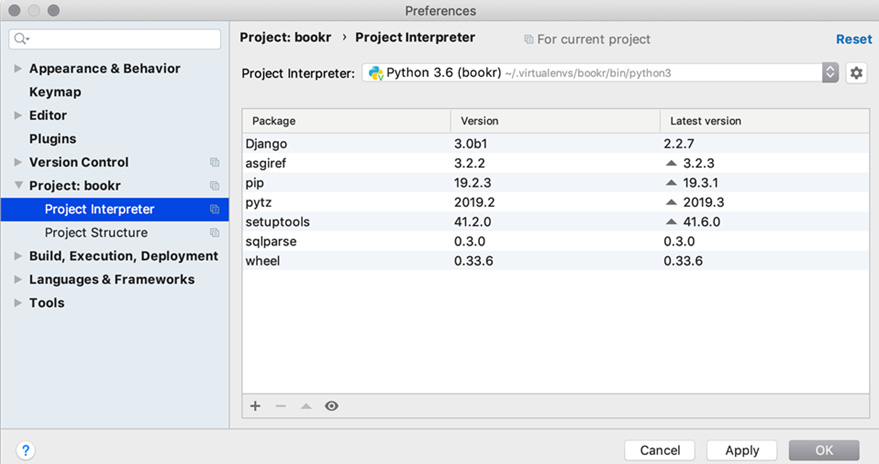
Figure 1.15: Packages in the virtual environment are listed
- Click OK in the main Preferences window to close it. PyCharm will now take a few seconds to index your environment and the libraries installed. You can see the process in its bottom-right status bar. Wait for this process to finish and the progress bar will disappear.
- To run the Django dev server, Python needs to be configured with a run configuration. You will set this up now.
Click Add Configuration… in the top right of the PyCharm project window, to open the Run/Debug Configuration window:

Figure 1.16: The Add Configuration… button in the top right of the PyCharm window
- Click the + button in the top left of this window and select Python from the dropdown menu:

Figure 1.17: Adding a new Python configuration in the Run/Debug Configuration window
- A new configuration panel with fields regarding how to run your project will display on the right of the window. You should fill out the fields as follows.
The Name field can be anything but should be understandable. Enter Django Dev Server.
Script Path is the path to your manage.py file. If you click the folder icon in this field, you can browse your filesystem to select the manage.py file inside the bookr project directory.
Parameters are the arguments that come after the manage.py script, the same as if running it from the command line. We will use the same argument here to start the server, so enter runserver.
Note
As mentioned earlier, the runserver command can also accept an argument for the port or address to listen to. If you want to, you can add this argument after runserver in the same Parameters field.
The Python interpreter setting should have been automatically set to the one that was set in steps 5 to 8. If not, you can click the arrow dropdown on the right to select it.
Working directory should be set to the bookr project directory. This has probably already been set correctly.
Add content roots to PYTHONPATH and Add source roots to PYTHONPATH should both be checked. This will ensure that PyCharm adds your bookr project directory to PYTHONPATH (the list of paths that the Python interpreter searches when loading a module). Without those checked, the imports from your project will not work correctly:
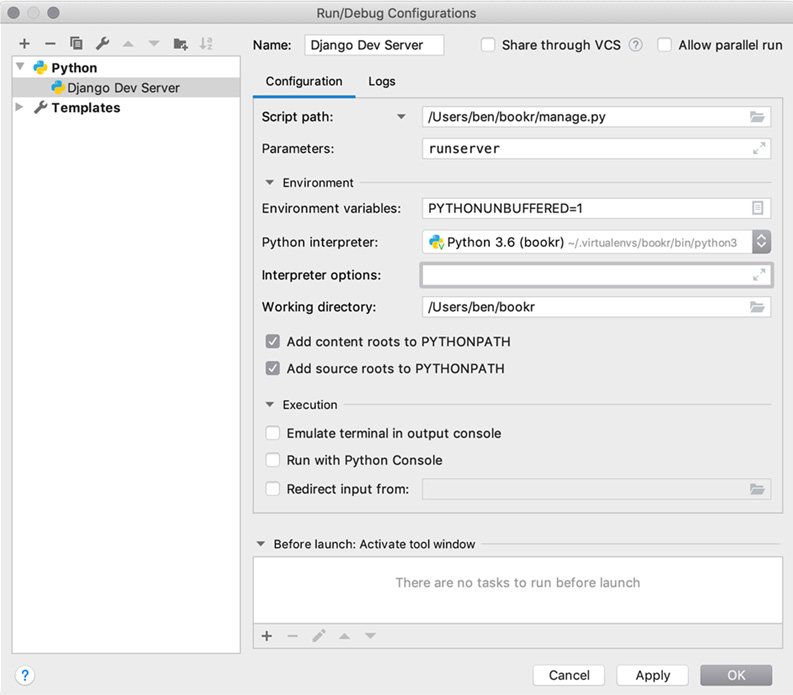
Figure 1.18: Configuration settings
Ensure that your Run/Debug configurations window looks similar to Figure 1.18, then click OK to save the configuration.
- Now, instead of starting the Django dev server in a Terminal, you can click the play icon in the top right of the Project window to start it (see Figure 1.19):

Figure 1.19: Django dev server configuration with play, debug, and stop buttons
- Click the play icon to start the Django dev server.
Note
Make sure you stop any other instances of the Django dev server that are running (such as in a Terminal) otherwise the one you are starting will not be able to bind to port 8000 and will fail to start.
- A console will open at the bottom of the PyCharm window, which will show output indicating that the dev server has started (Figure 1.20):

Figure 1.20: Console with the Django dev server running
- Open a web browser and navigate to http://127.0.0.1:8000. You should see the same Django example screen as you did earlier, in Exercise 1.01, Creating a Project and App, and Starting the Dev Server (Figure 1.2), which will confirm that once again everything is set up correctly.
In this exercise, we opened the Bookr project in PyCharm, then set the Python interpreter for our project. We then added a run configuration in PyCharm, which allows us to start and stop the Django dev server from within PyCharm. We will also be able to debug our project later by running it inside PyCharm's debugger.
View Details
You now have everything set up to start writing your own Django views and configure the URLs that will map to them. As we saw earlier in this chapter, a view is simply a function that takes an HttpRequest instance (built by Django) and (optionally) some parameters from the URL. It will then do some operations, such as fetching data from a database. Finally, it returns HttpResponse.
To use our Bookr app as an example, we might have a view that receives a request for a certain book. It queries the database for this book, then returns a response containing an HTML page showing information about the book. Another view could receive a request to list all the books, then return a response with another HTML page containing this list. Views can also create or modify data: another view could receive a request to create a new book; it would then add the book to the database and return a response with HTML that displays the new book's information.
In this chapter, we will only be using functions as views, but Django also supports class-based views, which allow you to leverage object-oriented paradigms (such as inheritance). This allows you to simplify code used in multiple views that have the same business logic. For example, you might want to show all books or just books by a certain publisher. Both views need to query a list of books from the database and render them to a book list template. One view class could inherit from the other and just implement the data fetching differently and leave the rest of the functionality (such as rendering) identical. Class-based views can be more powerful but also harder to learn. They will be introduced later, in Chapter 11, Advanced Templates and Class-Based Views, when you have more experience with Django.
The HttpRequest instance that is passed to the view contains all the data related to the request, with attributes such as these:
- method: A string containing the HTTP method the browser used to request the page; usually this is GET, but it will be POST if the user has submitted a form. You can use this to change the flow of the view, for example, show an empty form on GET, or validate and process a form submission on POST.
- GET: A QueryDict instance containing the parameters used in the URL query string. This is the part of the URL after the ?, if it contains one. We go further into QueryDict soon. Note that this attribute is always available even if the request was not GET.
- POST: Another QueryDict containing the parameters sent to the view in a POST request, like from a form submission. Usually, you would use this in conjunction with a Django form, which will be covered in Chapter 6, Forms.
- headers: A case-insensitive key dictionary with the HTTP headers from the request. For example, you could vary the response with different content for different browsers based on the User-Agent header. We discussed some HTTP headers that are sent by the client earlier in this chapter.
- path: This is the path used in the request. Normally, you don't need to examine this because Django will automatically parse the path and pass it to view function as parameters, but it can be useful in some instances.
We won't be using all these attributes yet, and others will be introduced later, but you can now see what role the HttpRequest argument plays in your view.
URL Mapping Detail
We briefly mentioned URL maps earlier in the Processing a Request section. Django does not automatically know which view function should be executed when it receives a request for a particular URL. The role of a URL mapping to build this link between a URL and a view. For example, in Bookr, you might want to map the URL /books/ to a books_list view that you have created.
The URL-to-view mapping is defined in the file that Django automatically created called urls.py, inside the bookr package directory (although a different file can be set in settings.py; more on that later).
This file contains a variable, urlpatterns, which is a list of paths that Django evaluates in turn until it finds a match for the URL being requested. The match will either resolve to a view function, or to another urls.py file also containing a urlpatterns variable, which will be resolved in the same manner. URL files can be chained in this manner for as long as you want. In this way, you can split URL maps into separate files (such as one or more per app) so that they don't become too large. Once a view has been found, Django calls it with an HttpRequest instance and any parameters parsed from the URL.
Rules are set by calling the path function, which takes the path of the URL as the first argument. The path can contain named parameters that will be passed to a view as function parameters. Its second argument is either a view or another file also containing urlpatterns.
There is also the re_path function, which is similar to path except it takes a regular expression as the first argument for a more advanced configuration. There is much more to URL mapping; however, and it will be covered in Chapter 3, URL Mapping, Views, and Templates.

Figure 1.21: The default urls.py file
To illustrate these concepts, Figure 1.21 shows the default urls.py file that Django generates. You can see the urlpatterns variable, which lists all the URLs that are set up. Currently, there is only one rule set up, which maps any path starting with admin/ to the admin URL maps (the admin.site.urls module). This is not a mapping to a view; instead, it is an example of chaining URL maps together—the admin.site.urls module will define the remainder of the paths (after admin/) that map to the admin views. We will cover the Django admin site in Chapter 4, Introduction to Django Admin.
We will now write a view and set up a URL map to it to see these concepts in action.
Exercise 1.03: Writing a View and Mapping a URL to It
Our first view will be very simple and will just return some static text content. In this exercise, we will see how to write a view, and how to set up a URL map to resolve to a view:
Note
As you make changes to files in your project and save them, you might see the Django development server automatically restarting in the Terminal or console in which it is running. This is normal; it automatically restarts to load any code changes that you make. Please also note that it won't automatically apply changes to the database if you edit models or migrations—more on this in Chapter 2, Models and Migrations.
- In PyCharm, expand the reviews folder in the project browser on the left, then double-click the views.py file inside to open it. In the right (editor) pane in PyCharm, you should see the Django automatically generated placeholder text:
from django.shortcuts import render# Create your views here.It should look like this in the editor pane:
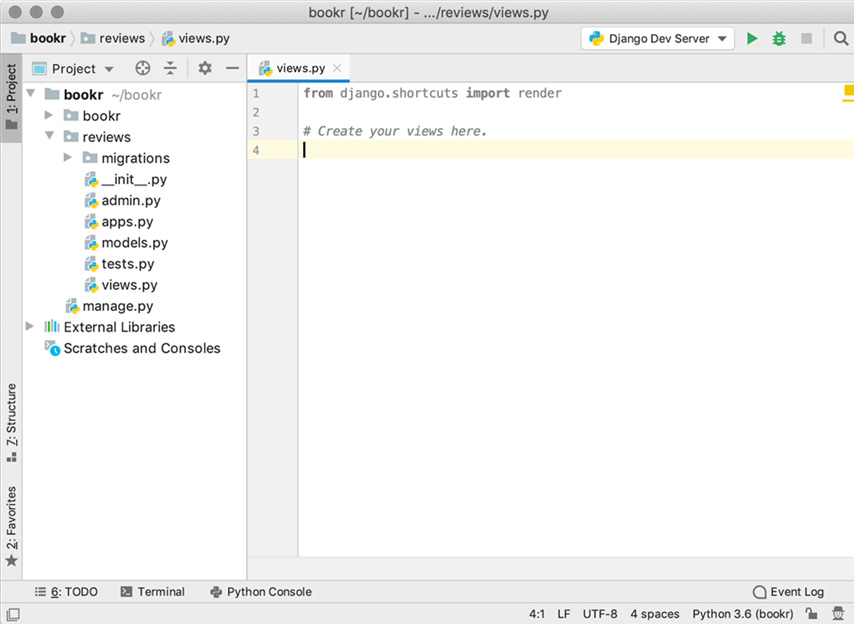
Figure 1.22: views.py default content
- Remove this placeholder text from views.py and instead insert this content:
from django.http import HttpResponsedef index(request): return HttpResponse("Hello, world!")First, the HttpResponse class needs to be imported from django.http. This is what is used to create the response that goes back to the web browser. You can also use it to control things such as the HTTP headers or status code. For now, it will just use the default headers and 200 Success status code. Its first argument is the string content to send as the body of the response.
Then, the view function returns an HttpResponse instance with the content we defined (Hello, world!):
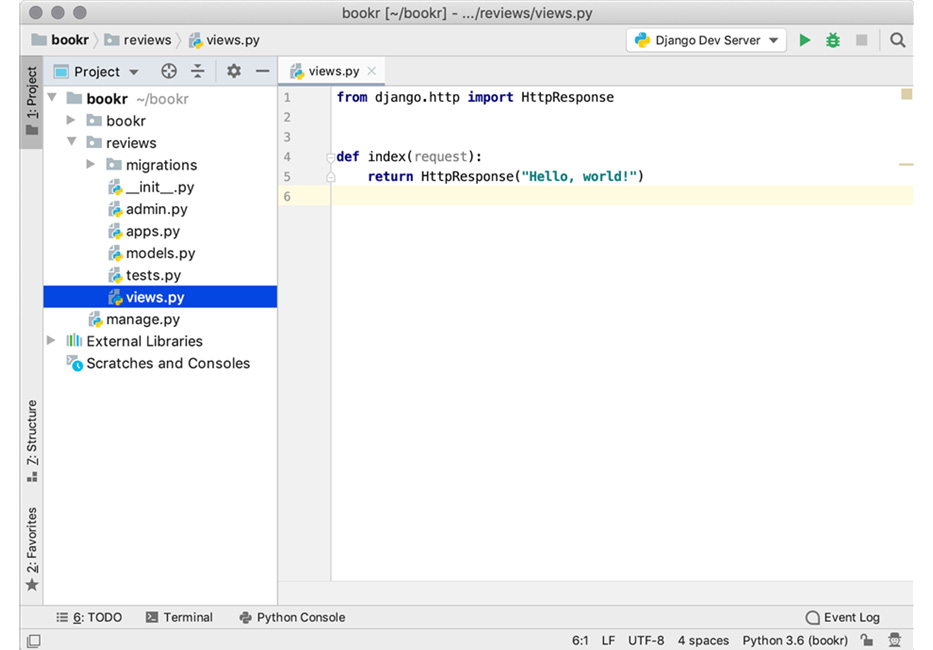
Figure 1.23: The contents of views.py after editing
- We will now set up a URL map to the index view. This will be very simple and won't contain any parameters. Expand the bookr directory in the Project pane, then open urls.py. Django has automatically generated this file.
For now, we'll just add a simple URL to replace the default index that Django provides.
- Import your views into the urls.py file, by adding this line after the other existing imports:
import reviews.views - Add a map to the index view to the urlpatterns list by adding a call to the path function with an empty string and a reference to the index function:
urlpatterns = [path('admin/', admin.site.urls),\ path('', reviews.views.index)]Note
The preceding code snippet uses a backslash ( \ ) to split the logic across multiple lines. When the code is executed, Python will ignore the backslash, and treat the code on the next line as a direct continuation of the current line.
Make sure you don't add brackets after the index function (that is, it should be reviews.views.index and not reviews.views.index()) as we are passing a reference to a function rather than calling it. When you're finished, your urls.py file should like Figure 1.24:
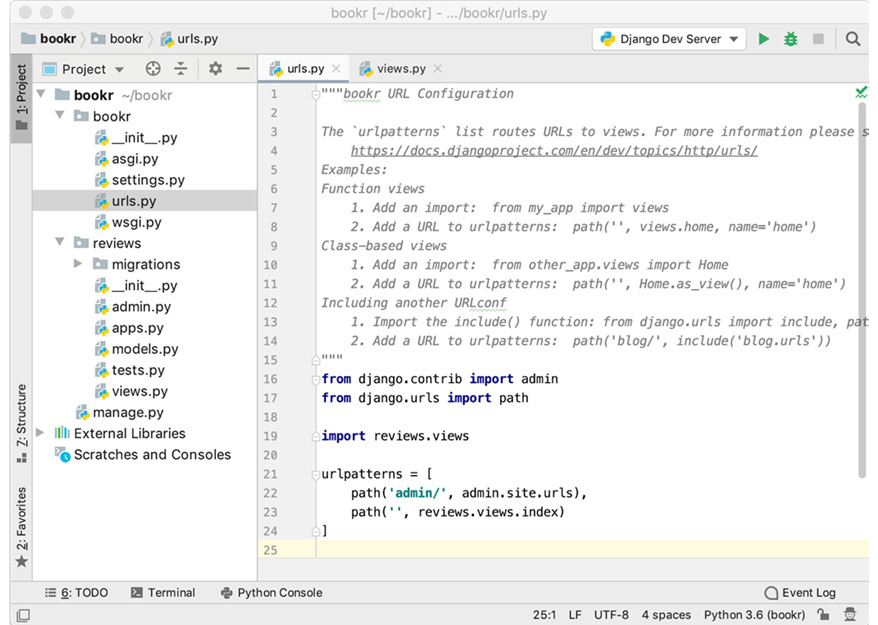
Figure 1.24: urls.py after editing
- Switch back to your web browser and refresh. The Django default welcome screen should be replaced with the text defined in the view, Hello, world!:

Figure 1.25: The web browser should now display the Hello, world! message
We just saw how to write a view function and map a URL to it. We then tested the view by loading it in a web browser.
GET, POST, and QueryDict Objects
Data can come through an HTTP request as parameters on a URL or inside the body of a POST request. You might have noticed parameters in a URL when browsing the web—the text after a ? —for example, http://www.example.com/?parameter1=value1¶meter2=value2. We also saw earlier in this chapter an example of form data in a POST request, for logging in a user (the request body was username=user1&password=password1).
Django automatically parses these parameter strings into QueryDict objects. The data is then available on the HttpRequest object that is passed to your view—specifically, in the HttpRequest. GET and HttpRequest. POST attributes, for URL parameters and body parameters respectively. QueryDict objects are objects that mostly behave like dictionaries, except that they can contain multiple values for a key.
To show different methods of accessing items, we'll use a simple QueryDict named qd with only one key (k) as an example. The k item has three values in a list: the strings a, b, and c. The following code snippets show output from a Python interpreter.
First, the QueryDictqd is constructed from a parameter string:
>>> qd = QueryDict("k=a&k=b&k=c")When accessing items with square bracket notation or the get method, the last value for that key is returned:
>>> qd["k"]'c'>>> qd.get("k")'c'To access all the values for a key, the getlist method should be used:
>>> qd.getlist("k")['a', 'b', 'c']getlist will always return a list—it will be empty if the key does not exist:
>>> qd.getlist("bad key")[]While getlist does not raise an exception for keys that do not exist, accessing a key that does not exist with square bracket notation will raise KeyError, like a normal dictionary. Use the get method to avoid this error.
The QueryDict objects for GET and POST are immutable (they cannot be changed), so the copy method should be used to get a mutable copy if you need to change its values:
>>> qd["k"] = "d"AttributeError: This QueryDict instance is immutable>>> qd2 = qd.copy()>>> qd2<QueryDict: {'k': ['a', 'b', 'c']}>>>> qd2["k"] = "d">>> qd2["k"]"d"To give an example of how QueryDict is populated from a URL, imagine an example URL: http://127.0.0.1:8000?val1=a&val2=b&val2=c&val3.
Behind the scenes, Django passes the query from the URL (everything after the ?) to instantiate a QueryDict object and attach it to the request instance that is passed to the view function. Something like this:
request.GET = QueryDict("val1=a&val2=b&val2=c&val3")Remember, this is done to the request instance before you receive it inside your view function; you do not need to do this.
In the case of our example URL, we could access the parameters inside the view function as follows:
request.GET["val1"]Using standard dictionary access, it would return the value a:
request.GET["val2"]Again, using standard dictionary access, there are two values set for the val2 key, so it would return the last value, c:
request.GET.getlist("val2")This would return a list of all the values for val2: ["b", "c"]:
request.GET["val3"]This key is in the query string but has no value set, so this returns an empty string:
request.GET["val4"]This key is not set, so KeyError will be raised. Use request.GET.get("val4") instead, which will return None:
request.GET.getlist("val4")Since this key is not set, an empty list ([]) will be returned.
We will now look at QueryDict in action using the GET parameters. You will examine POST parameters further in Chapter 6, Forms.
Exercise 1.04: Exploring GET Values and QueryDict
We will now make some changes to our index view from the previous exercise to read values from the URL in the GET attribute, and then we will experiment with passing different parameters to see the result:
- Open the views.py file in PyCharm. Add a new variable called name that reads the user's name from the GET parameters. Add this line after the index function definition:
name = request.GET.get("name") or "world" - Change the return value so the name is used as part of the content that is returned:
return HttpResponse("Hello, {}!".format(name))In PyCharm, the changed code will look like this:
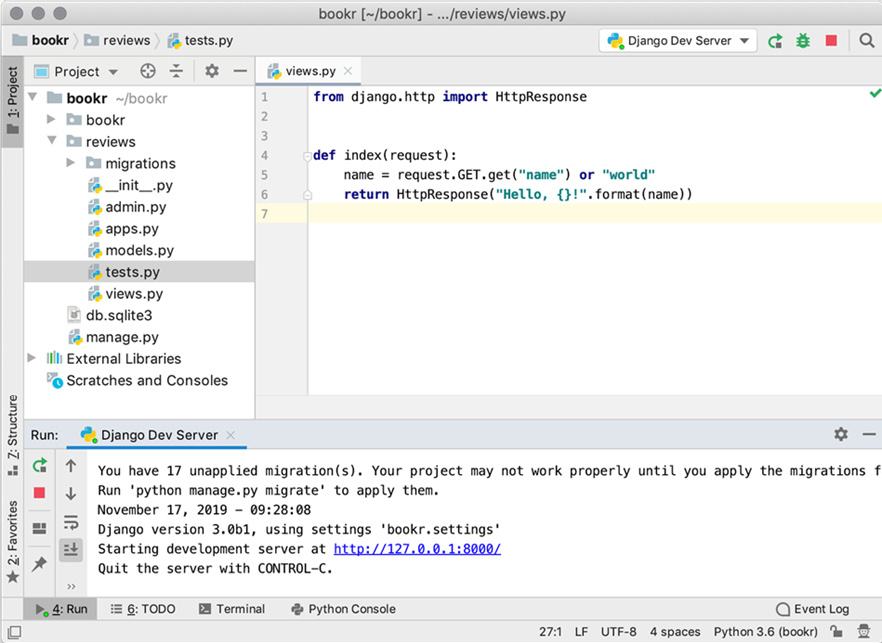
Figure 1.26: Updated views.py file
- Visit http://127.0.0.1:8000 in your browser. You should notice that the page still says Hello, world! This is because we have not supplied a name parameter. You can add your name into the URL, for example, http://127.0.0.1:8000?name=Ben:

Figure 1.27: Setting the name in the URL
- Try adding two names, for example, http://127.0.0.1:8000?name=Ben&name=John. As we mentioned, the last value for the parameter is retrieved with the get function, so you should see Hello, John!:

Figure 1.28: Setting multiple names in the URL
- Try setting no name, like this: http://127.0.0.1:8000?name=. The page should go back to displaying Hello, world!:

Figure 1.29: No name set in the URL
Note
You might wonder why we set name to the default world by using or instead of passing 'world' as the default value to get. Consider what happened in step 5 when we passed in a blank value for the name parameter. If we had passed 'world' as a default value for get, then the get function would still have returned an empty string. This is because a value is set for name, it's just that it's blank. Keep this in mind when developing your views, as there is a difference between no value being set, and a blank value being set. Depending on your use case, you might choose to pass the default value for get.
In this exercise, we retrieved values from the URL in our view using the GET attribute of the incoming request. We saw how to set default values and which value is retrieved if multiple values are set for the same parameter.
Exploring Django Settings
We haven't yet looked at how Django stores its settings. Now that we've seen the different parts of Django, it is a good time to examine the settings.py file. This file contains many settings that can be used to customize Django. A default settings.py file was created for you when you started the Bookr project.
We will discuss some of the more important settings in the file now, and a few others that might be useful as you become more fluent with Django. You should open your settings.py file in PyCharm and follow along so you can see where and what the values are for your project.
Each setting in this file is just a file-global variable. The order in which we will discuss the settings is the same order in which they appear in this file, although we may skip over some—for example, there is the ALLOWED_HOSTS setting between DEBUG and INSTALLED_APPS, which we won't cover in this part of the book (you'll see it in Chapter 17, Deployment of a Django Application (Part 1 – Server Setup)):
SECRET_KEY = '…'This is an automatically generated value that shouldn't be shared with anyone. It is used for hashing, tokens, and other cryptographic functions. If you had existing sessions in a cookie and changed this value, the sessions would no longer be valid.
DEBUG = TrueWith this value set to True, Django will automatically display exceptions to the browser to allow you to debug any problems you encounter. It should be set to False when deploying your app to production:
INSTALLED_APPS = […]As you write your own Django apps (such as the reviews app) or install third-party applications (which will be covered in Chapter 15, Django Third-Party Libraries), they should be added to this list. As we've seen, it is not strictly necessary to add them here (our index view worked without our reviews app being in this list). However, for Django to be able to automatically find the app's templates, static files, migrations, and other configuration, it must be listed here:
ROOT_URLCONF = 'bookr.urls'This is the Python module that Django will load first to find URLs. Note that it is the file we added our index view URL map to previously:
TEMPLATES = […]Right now, it's not too important to understand everything in this setting as you won't be changing it; the important line to point out is this one:
'APP_DIRS': True,This tells Django it should look in a templates directory inside each INSTALLED_APP when loading a template to render. We don't have a templates directory for reviews yet, but we will add one in the next exercise.
Django has more settings available that aren't listed in the settings.py file, and so it will use its built-in defaults in these cases. You can also use the file to set arbitrary settings that you make up for your application. Third-party applications might want settings to be added here as well. In later chapters, we will add settings here for other applications. You can find a list of all settings, and their defaults, at https://docs.djangoproject.com/en/3.0/ref/settings/.
Using Settings in Your Code
It can sometimes be useful to refer to settings from settings.py in your own code, whether they be Django's built-in settings or ones you have defined yourself. You might be tempted to write code like this to do it:
from bookr import settingsif settings.DEBUG: # check if running in DEBUG mode do_some_logging()Note
The # symbol in the preceding code snippet denotes a code comment. Comments are added into code to help explain specific bits of logic.
This method is incorrect, for a number of reasons:
- It is possible to run Django and specify a different settings file to read from, in which case the previous code would cause an error as it would not be able to find that particular file. Or, if the file exists, the import would succeed but would contain the wrong settings.
- Django has settings that might not be listed in the settings.py file, and if they aren't, it will use its own internal defaults. For example, if you removed the DEBUG = True line from your settings.py file, Django would fall back to using its internal value for DEBUG (which is False). You would get an error if you tried to access it using settings.DEBUG directly, though.
- Third-party libraries can change how your settings are defined, so your settings.py file would look completely different. None of the expected variables may exist at all. The behavior of all these applications is beyond the scope of this book, but it is something to be aware of.
The preferred way is to use django.conf module instead, like this:
from django.conf import settings # import settings from here insteadif settings.DEBUG: do_some_logging()When importing settings from django.conf, Django mitigates the three issues we just discussed:
- Settings are read from whatever Django settings file has been specified.
- Any default settings values are interpolated.
- Django takes care of parsing any settings defined by a third-party library.
In our new short example code snippet, even if DEBUG is missing from the settings.py file, it will fall back to the default value that Django has internally (which is False). The same is true for all other settings that Django defines; however, if you define your own custom settings in this file, Django will not have internal values for them, so in your code, you should have some provision for them not existing—how your code behaves is your choice and beyond the scope of this book.
Finding HTML Templates in App Directories
Many options are available to tell Django how to find templates, which can be set in the TEMPLATES setting of settings.py, but the easiest one (for now) is to create a templates directory inside the reviews directory. Django will look in this (and in other apps'templates directories) because of APP_DIRS being True in the settings.py file, as we saw in the previous section.
Exercise 1.05: Creating a Templates Directory and a Base Template
In this exercise, you will create a templates directory for the reviews app. Then, you will add an HTML template file that Django will be able to render to an HTTP response:
- We discussed settings.py and its INSTALLED_APPS setting in the previous section (Exploring Django Settings). We need to add the reviews app to INSTALLED_APPS for Django to be able to find templates. Open settings.py in PyCharm. Update the INSTALLED_APPS setting and add reviews to the end. It should look like this:
INSTALLED_APPS = ['django.contrib.admin',\ 'django.contrib.auth',\ 'django.contrib.contenttypes',\ 'django.contrib.sessions',\ 'django.contrib.messages',\ 'django.contrib.staticfiles',\ 'reviews']In PyCharm, the file should look like this now:
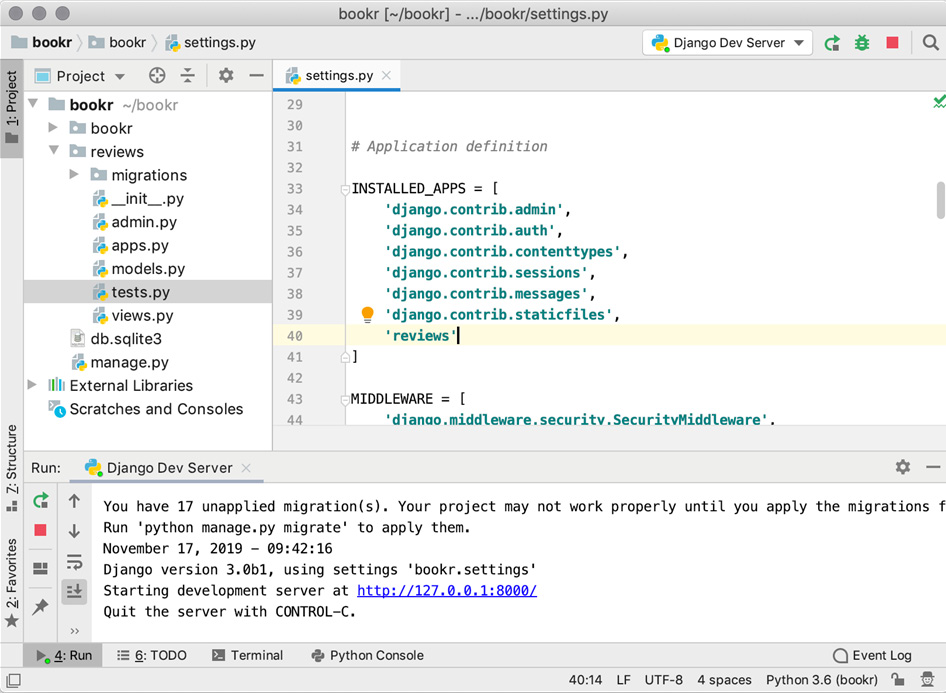
Figure 1.30: The reviews app added to settings.py
- Save and close settings.py.
- In the PyCharm Project browser, right-click the reviews directory and select New -> Directory:

Figure 1.31: Creating a new directory inside the reviews directory
- Enter the name templates and click OK to create it:

Figure 1.32: Name the directory templates
- Right-click the newly created templates directory and select New -> HTML File:

Figure 1.33: Creating a new HTML file in the templates directory
- In the window that appears, enter the name base.html, leave HTML 5 file selected, and then press Enter to create the file:

Figure 1.34: The New HTML File window
- After PyCharm creates the file, it will automatically open it too. It will have this content:
<!DOCTYPE html><html lang="en"><head> <meta charset="UTF-8"> <title>Title</title></head><body></body></html> - Between the <body>…</body> tags, add a short message to verify that the template is being rendered:
<body> Hello from a template!</body>Here is how it will look like in PyCharm:
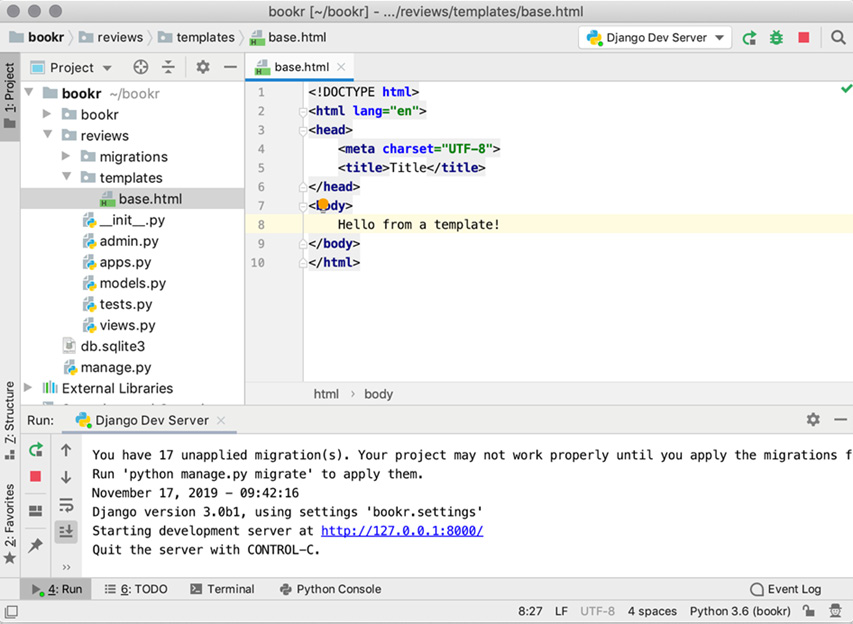
Figure 1.35: The base.html template with some example text
In this exercise, we created a templates directory for the reviews app and added an HTML template to it. The HTML template will be rendered once we implement the use of the render function on our view.
Rendering a Template with the render Function
We now have a template to use, but we need to update our index view so that it renders the template instead of returning the Hello (name)! text that it is currently displaying (refer to Figure 1.29 for how it currently looks). We will do this by using the render function and providing the name of the template. render is a shortcut function that returns an HttpResponse instance. There are other ways to render a template to provide more control over how it is rendered, but for now, this function is fine for our needs. render takes at least two arguments: the first is always the request that was passed to the view, and the second is the name/relative path of the template being rendered. We will also call it with a third argument, the render context that contains all the variables that will be available in the template—more on this in Exercise 1.07, Using Variables in Templates.
Exercise 1.06: Rendering a Template in a View
In this exercise, you will update your index view function to render the HTML template you created in Exercise 1.05, Creating a Templates Directory and a Base Template. You will make use of the render function, which loads your template from disk, renders it, and sends it to the browser. This will replace the static text you are currently returning from the index view function:
- In PyCharm, open views.py in the reviews directory.
- We no longer manually create an HttpResponse instance, so remove the HttpResponse import line:
from django.http import HttpResponse - Replace it with an import of the render function from django.shortcuts:
from django.shortcuts import render - Update the index function so that instead of returning HttpResponse, it's returning a call to render, passing in the request instance and template name:
def index(request): return render(request, "base.html")Here is how it will look like in PyCharm:
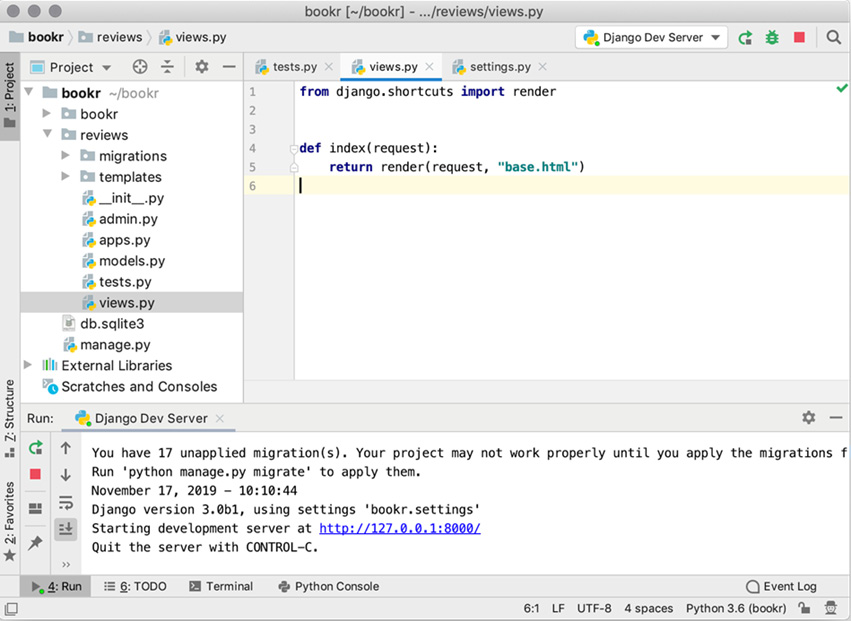
Figure 1.36: Completed views.py file
- Start the dev server if it's not already running. Then, open your web browser and refresh http://127.0.0.1:8000. You should see the Hello from a template! message rendered, as in Figure 1.37:

Figure 1.37: Your first rendered HTML template
Rendering Variables in Templates
Templates aren't just static HTML. Most of the time, they will contain variables that are interpolated as part of the rendering process. These variables are passed from the view to the template using a context: a dictionary (or dictionary-like object) that contains names for all the variables a template can use. We'll take Bookr again as an example. Without variables in your template, you would need a different HTML file for each book you wanted to display. Instead, we use a variable such as book_name inside the template, and then the view provides the template with a book_name variable set to the title of the book model it has loaded. When displaying a different book, the HTML does not need to change; the view just passes a different book to it. You can see how model, view, and template are all now coming together.
Unlike some other languages, such as PHP, variables must be explicitly passed to the template, and variables in the view aren't automatically available to the template. This is for security as well as to avoid accidentally polluting the template's namespace (we don't want any unexpected variables in the template).
Inside a template, variables are denoted by double braces, {{ }}. While not strictly a standard, this style is quite common and used in other templating tools such as Vue.js and Mustache. Symfony (a PHP framework) also uses double braces in its Twig templating language, so you might have seen them used similarly there.
To render a variable in a template, simply wrap it with braces: {{ book_name }}. Django will automatically escape HTML in output so that you can include special characters (such as < or >) in your variable without worrying about it garbling your output. If a variable is not passed to a template, Django will simply render nothing at that location, instead of throwing an exception.
There are many more ways to render a variable differently using filters, but these will be covered in Chapter 3, URL Routers, Views, and Templates.
Exercise 1.07: Using Variables in Templates
We'll put a simple variable inside the base.html file to demonstrate how Django's variable interpolation works:
- In PyCharm, open base.html.
- Update the <body> element so it contains a place to render the name variable:
<body>Hello, {{ name }}!</body> - Go back to your web browser and refresh (you should still be at http://127.0.0.1:8000). You will see that the page now displays Hello, !. This is because we have not set the name variable in the rendering context:

Figure 1.38: No value rendered in the template because no context was set
- Open views.py and add a variable called name, set to the value "world", inside the index function:
def index(request): name = "world" return render(request, "base.html") - Refresh your browser again. You should notice that nothing has changed: anything we want to render must be explicitly passed to the render function as context. This is the dictionary of variables that are made available when rendering.
- Add the context dictionary as the third argument to the render function. Change your render line to this:
return render(request, "base.html", {"name": name})In PyCharm, this should appear as follows:
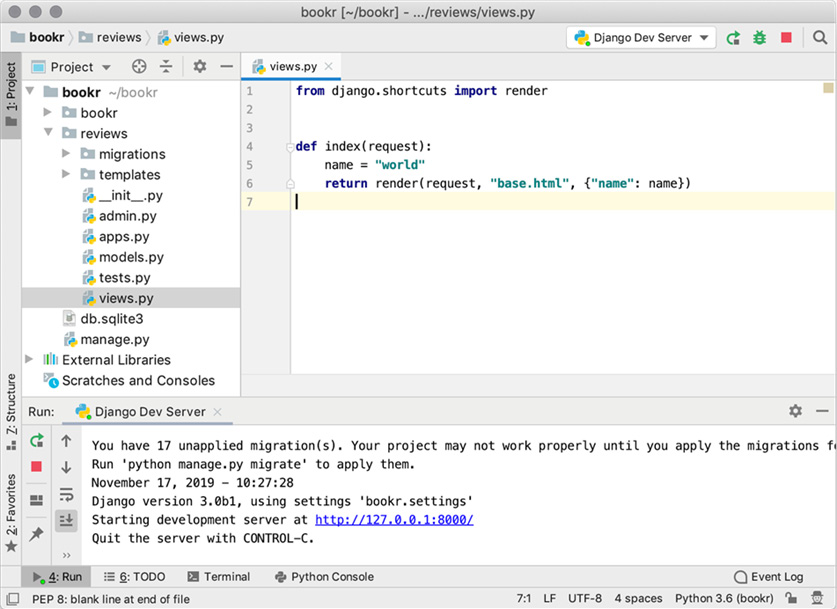
Figure 1.39: views.py with the name variable sent in the render context
- Refresh your browser again and you'll see it now says Hello, world!:

Figure 1.40: A template rendered with a variable
In this exercise, we combined the template we created in the previous exercise with the render function, to render an HTML page with the name variable that was passed to it inside a context dictionary.
Debugging and Dealing with Errors
When programming, unless you're the perfect programmer who never makes mistakes, you'll probably have to deal with errors or debug your code at some point. When there is an error in your program, there are usually two ways to tell: either your code will raise an exception, or you will get an unexpected output or results when viewing the page. Exceptions you will probably see more often, as there are many accidental ways to cause them. If your code is generating unexpected output, but not raising any exceptions, you will probably want to use the PyCharm debugger to find out why.
Exceptions
If you have worked with Python or other programming languages before, you have probably come across exceptions. If not, here's a quick introduction. Exceptions are raised (or thrown in other languages) when an error occurs. The execution of the program stops at that point in the code, and the exception travels back up the function call chain until it is caught. If it is not caught, then the program will crash, sometimes with an error message describing the exception and where it occurred. There are exceptions that are raised by Python itself, and your code can raise exceptions to quickly stop execution at any point. Some common exceptions that you might see when programming Python are listed here:
- IndentationError
Python will raise this if your code is not correctly indented or has mixed tabs and spaces.
- SyntaxError
Python raises this error if your code has invalid syntax:
>>> a === 1 File "<stdin>", line 1 a === 1 ^SyntaxError: invalid syntax - ImportError
This is raised when an import fails, for example, if trying to import from a file that does not exist or trying to import a name that is not set in a file:
>>> import missing_fileTraceback (most recent call last): File "<stdin>", line 1, in <module>ImportError: No module named missing_file - NameError
This is raised when trying to access a variable that has not yet been set:
>>> a = b + 5Traceback (most recent call last): File "<stdin>", line 1, in <module>NameError: name 'b' is not defined - KeyError
This is raised when accessing a key that is not set in a dictionary (or dictionary-like object):
>>> d = {'a': 1}>>> d['b']Traceback (most recent call last): File "<stdin>", line 1, in <module>KeyError: 'b' - IndexError
This is raised when accessing an index outside the length of a list:
>>> l = ['a', 'b']>>> l[3]Traceback (most recent call last): File "<stdin>", line 1, in <module>IndexError: list index out of range - TypeError
This is raised when trying to perform an operation on an object that does not support it, or when using two objects of the wrong type—for example, trying to add a string to an integer:
>>> 1 + '1'Traceback (most recent call last): File "<stdin>", line 1, in <module>TypeError: unsupported operand type(s) for +: 'int' and 'str'
Django also raises its own custom exceptions, and you will be introduced to them throughout the book.
When running the Django development server with DEBUG = True in your settings.py file, Django will automatically capture exceptions that occur in your code (instead of crashing). It will then generate an HTTP response showing you a stack trace and other information to help you debug the problem. When running in production, DEBUG should be set to False. Django will then return a standard internal server error page, without any sensitive information. You also have the option to display a custom error page.
Exercise 1.08: Generating and Viewing Exceptions
Let's create a simple exception in our view so you are familiar with how Django displays them. In this case, we'll try to use a variable that doesn't exist, which will raise NameError:
- In PyCharm, open views.py. In the index view function, change the context being sent to the render function so that it's using a variable that doesn't exist. We'll try to send invalid_name in the context dictionary, instead of name. Don't change the context dictionary key, just its value:
return render(request, "base.html", {"name": invalid_name}) - Go back to your browser and refresh the page. You should see a screen like Figure 1.41:
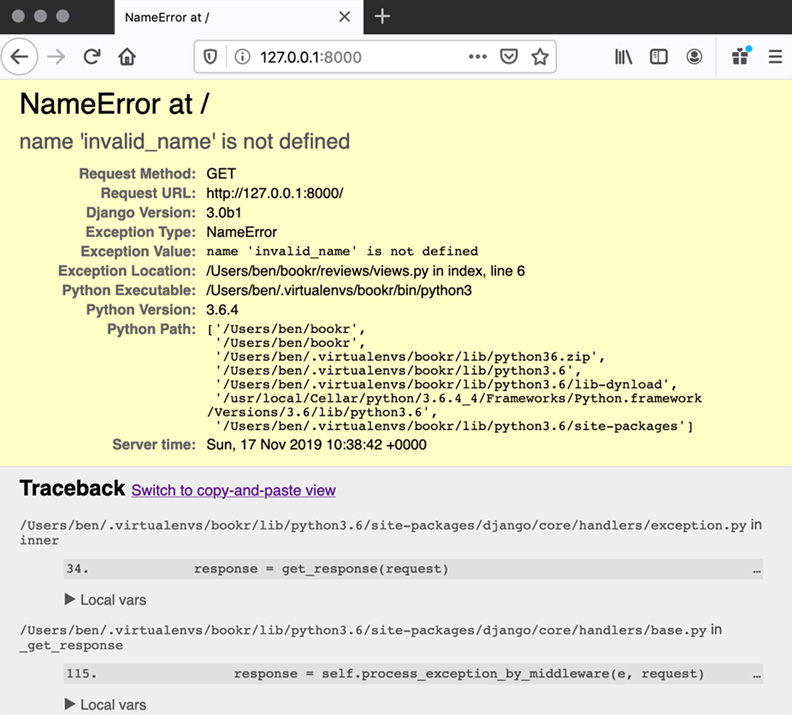
Figure 1.41: A Django exception screen
- The first couple of header lines on the page tell you the error that occurred:
NameError at /name 'invalid_name' is not defined - Below the header is a traceback to where the exception occurred. You can click on the various lines of code to expand them and see the surrounding code or click Local vars for each frame to expand them and see what the values of the variables are:

Figure 1.42: The line that causes the exception
- In our case, we can see the exception was raised on line 6 of our views.py file and, expanding Local vars, we see name has the value world and the only other variable is the incoming request (Figure 1.42).
- Go back to views.py and fix your NameError by renaming invalid_name back to name.
- Save the file and refresh your browser and Hello World should be displayed again (as in Figure 1.40).
In this exercise, we made our Django code raise an exception (NameError) by trying to use a variable that had not been set. We saw that Django automatically sent details of this exception and a stack trace to the browser to help us find the cause of the error. We then reverted our code change to make sure our view worked properly.
Debugging
When you're trying to find problems in your code, it can help to use a debugger. This is a tool that lets you go through your code line by line, rather than executing it all at once. Each time the debugger is paused on a particular line of code, you can see the values of all the current variables. This is very useful for finding out errors in your code that don't raise exceptions.
For example, in Bookr, we have talked about having a view that fetches a list of books from the database and renders them in an HTML template. If you view the page in the browser, you might see only one book when you expect several. You could have the execution pause inside your view function and see what values were fetched from the database. If your view is only receiving one book from the database, you know there is a problem with your database querying somewhere. If your view is successfully fetching multiple books but only one is being rendered, then it's probably a problem with the template. Debugging helps you narrow down faults like this.
PyCharm has a built-in debugger to make it easy to step through your code and see what is happening on each line. To tell the debugger where to stop the execution of the code, you need to set a breakpoint on one or more lines of code. They are named as such because the execution of the code will break (stop) at that point.
For breakpoints to be activated, PyCharm needs to be set to run your project in its debugger. There is a small performance penalty but it usually is not noticeable, so you might choose to always run your code inside the debugger so that you can quickly set a breakpoint without having to stop and restart the Django dev server.
Running the Django dev server inside the debugger is as simple as clicking the debug icon instead of the play icon (see Figure 1.19) to start it.
Exercise 1.09: Debugging Your Code
In this exercise, you will learn the basics of the PyCharm debugger. You will run the Django dev server in the debugger and then set a breakpoint in your view function to pause execution so you can examine the variables:
- If the Django dev server is running, stop it by clicking the stop button in the top-right corner of the PyCharm window:

Figure 1.43: Stop button in the top-right corner of the PyCharm window
- Start the Django dev server again inside the debugger by clicking the debug icon just to the left of the stop button (Figure 1.43).
- The server will take a few seconds to start, then you should be able to refresh the page in your browser to make sure it's still loading—you shouldn't notice any changes; all the code is executed the same as before.
- Now we can set a breakpoint that will cause execution to stop so we can see the state of the program. In PyCharm, click just to the right of the line numbers, on line 5, in the gutter on the left of the editor pane. A red circle will appear to indicate the breakpoint is now active:

Figure 1.44: A breakpoint on line 5
- Go back to your browser and refresh the page. Your browser will not display any content; instead, it will just continue to try to load the page. Depending on your operating system, PyCharm should become active again; if not, bring it to the foreground. You should see that line 5 is highlighted and at the bottom of the window, the debugger is shown. The stack frames (the chain of functions that were called to get to the current line) are on the left and current variables of the function are on the right:
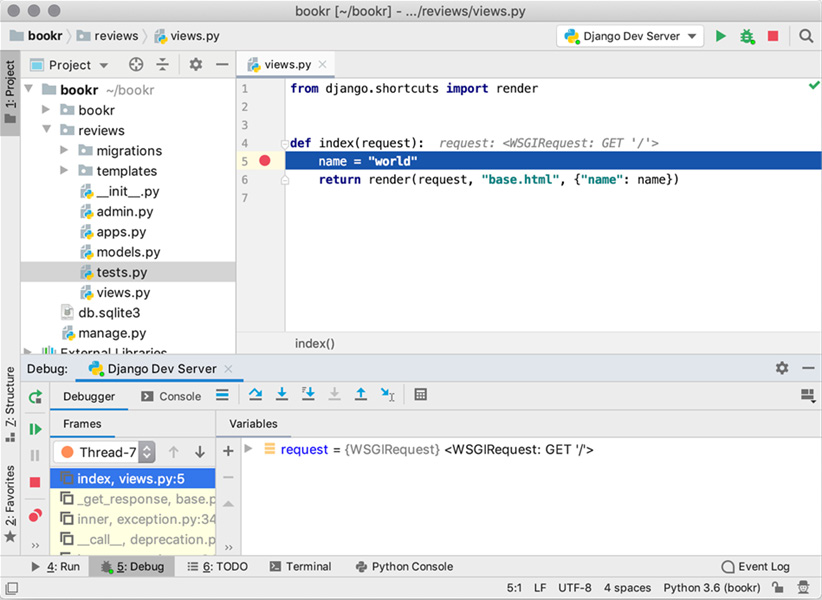
Figure 1.45: The debugger paused with the current line (5) highlighted
- There is currently one variable in scope, request. If you click the toggle triangle to the left of its name, you can show or hide the attributes it has set:
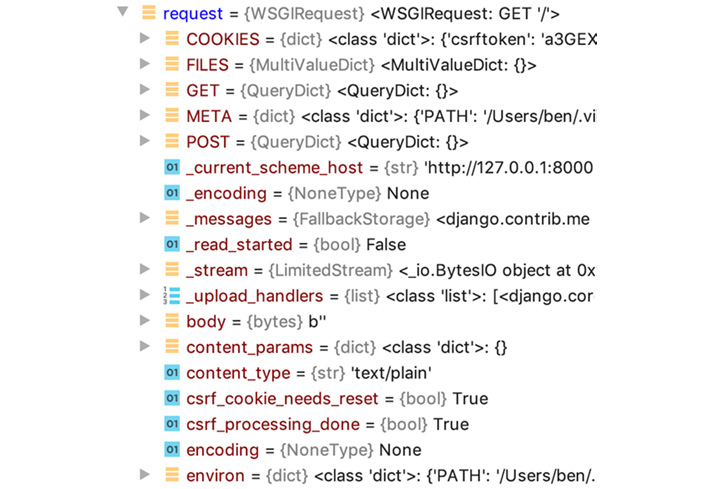
Figure 1.46: The attributes of the request variable
For example, if you scroll down through the list of attributes, you can see that the method is GET and the path is /.
- The actions bar, shown in Figure 1.47, is above the stack frames and variables. Its buttons (from left to right) are as follows:

Figure 1.47: The actions bar
- Step Over
Execute the current line of code and continue to the next line.
- Step Into
Step into the current line. For example, if the line contained a function, it would continue with the debugger inside this function.
- Step Into My Code
Step into the line being executed but continue until it finds code you have written. For example, if you're stepping into a third-party library code that later calls your code, it will not show you the third-party code, instead of continuing through until it returns to the code that you have written.
- Force Step Into
Step into code that would normally not be stepped into, such as Python standard library code. This is only available in some rare cases and is normally not used.
- Step Out
Return back out of the current code to the function or method that called it. The opposite of the Step In action.
- Run To Cursor
If you have a line of code further along from where currently are that you want to execute without having to click Step Over for all the lines in between, click to put your cursor on that line. Then, click Run To Cursor, and execution will continue until that line.
Note that not all buttons are useful all the time. For example, it can be easy to step out of your view and end up confusing Django library code.
- Step Over
- Click the Step Over button once to execute line 5.
- You can see the name variable has been added to the list of variables in the debugger view, and its value is world:

Figure 1.48: The new name variable is now in scope, with the value world
- We are now at the end of our index view function, and if we were to step over this line of code, it would jump to Django library code, which we don't want to see. To continue executing and send the response back to your browser, click the Resume Program button on the left of the window (Figure 1.49). You should see that your browser has now loaded the page again:

Figure 1.49: Actions to control execution—the green play icon is the Resume Program button
There are more buttons in Figure 1.49; from the top, they are Rerun (stops the program and restarts it), Resume Program (continues running until the next breakpoint), Pause Program (breaks the program at its current execution point), Stop (stops the debugger), View Breakpoints (opens a window to see all breakpoints you have set), and Mute Breakpoints (which will toggle all breakpoints on or off, but not remove them).
- For now, turn off the breakpoint in PyCharm by clicking it (the red circle next to line 5):

Figure 1.50: Clicking the breakpoint that was on line 5 disables it
This is just a quick introduction to how to set breakpoints in PyCharm. If you have used debugging features in other IDEs, then you should be familiar with the concepts—you can step through code, step in and out of functions, or evaluate expressions. Once you have set a breakpoint, you can right-click on it to change options. For example, you can make the breakpoint conditional so that execution stops only under certain circumstances. All this is beyond the scope of this book but it's useful to know about when trying to solve problems in your code.
Activity 1.01: Creating a Site Welcome Screen
The Bookr website that we are building needs to have a splash page that welcomes users and lets them know what site they are on. It will also contain links to other parts of the site, but these will be added in later chapters. For now, you will create a page with a welcome message.
These steps will help you complete the activity:
- In your index view, render the base.html template.
- Update the base.html template to contain the welcome message. It should be in both the <title> tag in <head> and in a new <h1> tag in the body.
After completing the activity, you should be able to see something like this:

Figure 1.51: Bookr welcome page
Note
The solution to this activity can be found at http://packt.live/2Nh1NTJ.
Activity 1.02: Book Search Scaffold
A useful feature for a site like Bookr is the ability to search through the data to find something on the site quickly. Bookr will implement book searching, to allow users to find a particular book by part of its title. While we don't have any books to find yet, we can still implement a page that shows the text the user searched for. The user enters the search string as part of the URL parameters. We will implement the searching and a form for easy text entry in Chapter 6, Forms.
These steps will help you complete the activity:
- Create a search result HTML template. It should include a variable placeholder to show the search word(s) that were passed in through the render context. Show the passed-in variable in the <title> and <h1> tags. Use an <em> tag around the search text in the body to make it italic.
- Add a search view function in views.py. The view should read a search string from the URL parameters (in the request's GET attribute). It should then render the template you created in the previous step, passing in the search value to be substituted, using the context dictionary.
- Add a URL mapping to your new view to urls.py. The URL can be something like /book-search.
After completing this activity, you should be able to pass in a search value through the URL's parameters and see it rendered on the resulting page. It should look like this:

Figure 1.52: Searching for Web Development with Django
You should also be able to pass in special HTML characters such as < and > to see how Django automatically escapes them in the template:

Figure 1.53: Notice how HTML characters are escaped so we are protected from tag injection
Note
The solution to this activity can be found at http://packt.live/2Nh1NTJ.
You have scaffolded the book search view and can demonstrate how variables are read from the GET parameters. You can also use this view to test how Django escapes special HTML characters automatically in a template. The search view does not actually search or show results yet, as there are no books in the database, but this will be added in Chapter 6, Forms.
Summary
This chapter was a quick introduction to Django. You first got up to speed on the HTTP protocol and the structure of HTTP requests and responses. We then saw how Django uses the MVT paradigm, and then how it parses a URL, generates an HTTP request, and sends it to a view to get an HTTP response. We scaffolded the Bookr project and then created the reviews app for it. We then built two example views to illustrate how to get data from a request and use it when rendering templates. You should have experimented to see how Django escapes output in HTML when rendering a template.
You did all this with the PyCharm IDE, and you learned how to set it up to debug your application. The debugger will help you find out why things aren't working as they should. In the next chapter, you will start to learn about Django's database integration and its model system, so you can start storing and retrieving real data for your application.