Getting Started
When you began your Python development journey, you were most likely introduced to Python's Integrated Development and Learning Environment (IDLE). IDLE's simplicity is ideal for newcomers but leaves much to be desired by those who are more comfortable with the language and are in need of an efficient and productive workflow. A range of code editors and integrated development environments (IDEs) are available for Python development—some for general development with multilanguage support (such as Atom or Sublime) and others built exclusively for Python (such as PyCharm). Selecting a development environment is a matter of personal preference. As an experienced programmer, you might have already tried a few editors and thus are aware of what features you most desire. If you're in need of an extensible code editor that provides ample flexibility, efficiency, and productivity for managing Python source code, then Visual Studio Code is well worth your consideration.
Visual Studio Code (also referred to as VS Code) is a free, open-source, and cross-platform code editor developed by Microsoft. Ranked as the Most Popular Development Environment in the 2019 Stack Overflow Developer Survey, Visual Studio Code is a feature-rich highly customizable code editor that not only is great for editing source code but has built-in support for collaboration and cloud-hosted environments. Visual Studio Code's source code is available in the product's GitHub repository at github.com/microsoft/vscode. You're welcome to contribute to the project and can also view the product roadmap within the repository. Visual Studio Code is updated monthly with new features and bug fixes. For early adopters, the VS Code Insiders build provides a new build at least every day with features and bug fixes.
Visual Studio Code has built-in support only for JavaScript, TypeScript, HTML, and CSS, but it supports many additional languages, such as Python, through extensions. Before you begin programming in Python, you must install the extension. You can then begin to familiarize yourself with the editor's interface within the context of Python.
Installing Visual Studio Code
As a free, cross-platform code editor, Visual Studio Code runs on macOS, Linux, and Windows. Download Visual Studio Code from code.visualstudio.com. If the browser doesn't detect your operating system, visit code.visualstudio.com/#alt-downloads for more options. Platform-specific installation steps are available at code.visualstudio.com/docs/setup/setup-overview. Both macOS and Windows provide the option to add Visual Studio Code to your PATH environment variable. Adding Visual Studio Code to your PATH environment variable provides the convenience of opening a folder directly from the console using the command code <folder> or code. (to open the current folder).
As mentioned, Microsoft releases a new version of Visual Studio Code often with new features and important bug fixes. If your platform supports auto-updating, Visual Studio Code prompts you to install the new release when it becomes available. As an alternative, you can manually check for updates by running Help ➪ Check For Updates on Linux and Windows or by running Code ➪ Check For Updates on macOS.
Note
If you're interested in trying the VS Code Insiders build, you can download a copy from code.visualstudio.com/insiders/. You can install the Insiders build side by side with the latest monthly build, which enables you to use both versions of the code editor independently.
The Visual Studio Code User Interface
Visual Studio Code's user interface (UI) provides a simple minimal layout that keeps your source code as the focus of the development environment. When you first start Visual Studio Code, it displays a default layout. Each time you start Visual Studio Code going forward, the editor opens in the same state it was in when last closed.
You can make yourself at home by customizing the layout to your liking. However, before you start moving things around, you should get to know the main areas of the UI and their respective function (see Figure 1.1).
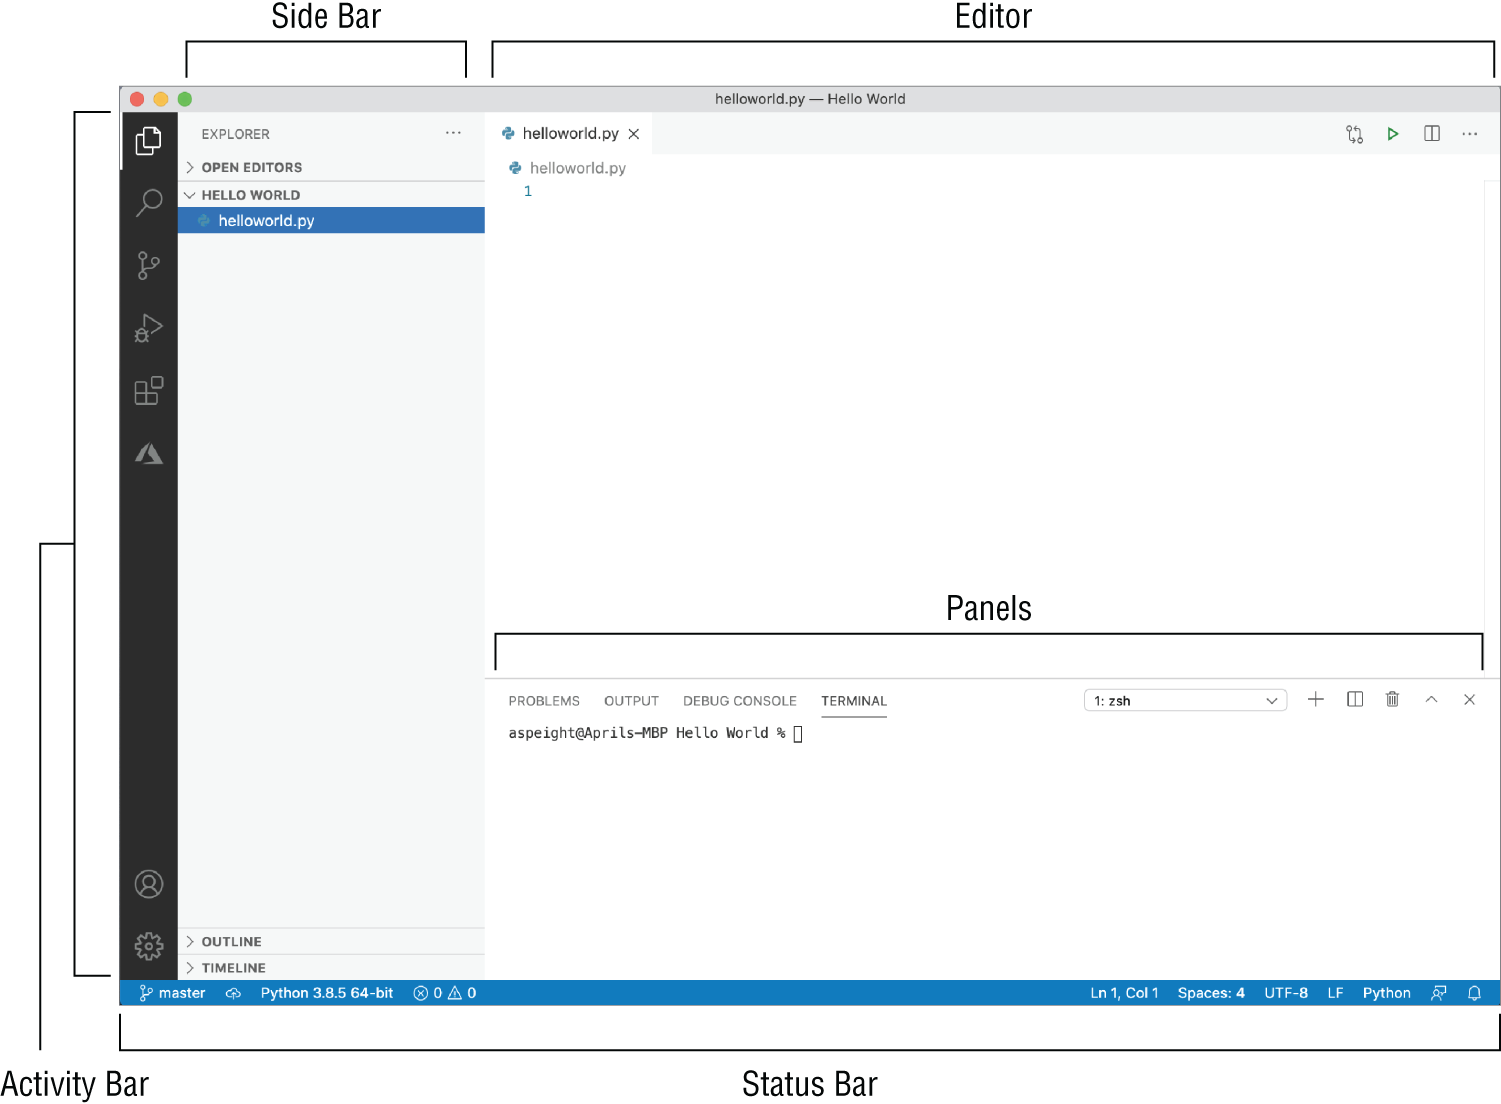
Figure 1.1: The Visual Studio Code user interface.
Activity Bar
The Activity Bar, located on the far-left side, lets you switch between views. Views provide quick access to common tasks such as the following:
- Explorer —File and folder management
- Search —Global search and replace across open folders using plain text or regular expressions
- Source Control —Git source control for maintaining code repositories
- Run —Features used during debugging, such as variables, call stacks, and breakpoints
- Extensions —Browsing, installation, and management of extensions from the Extension Marketplace
In addition to the default views, the Activity Bar can also include custom views provided by extensions that you install from the Extension Marketplace. Each view has an icon that reflects its respective function.
You can reorder views by dragging and dropping them in the Activity Bar. Views can also be hidden if you right-click the view and select Hide From Activity Bar. Views are part of your custom layout that is preserved each time you run Visual Studio Code.
Side Bar
The Side Bar, located to the right of the Activity Bar, displays the active view. If no view is selected, the Side Bar is collapsed. You can resize the Side Bar by clicking and dragging the edge that it shares with the editor. The default views for the Side Bar are Explorer, Search, Source Control, Run, and Extensions (see Figures 1.2 through 1.6, respectively).
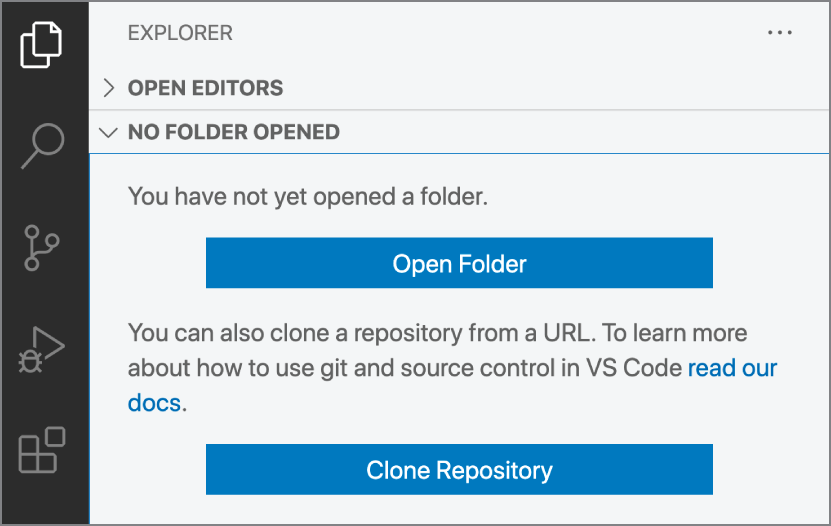
Figure 1.2: Explorer view.
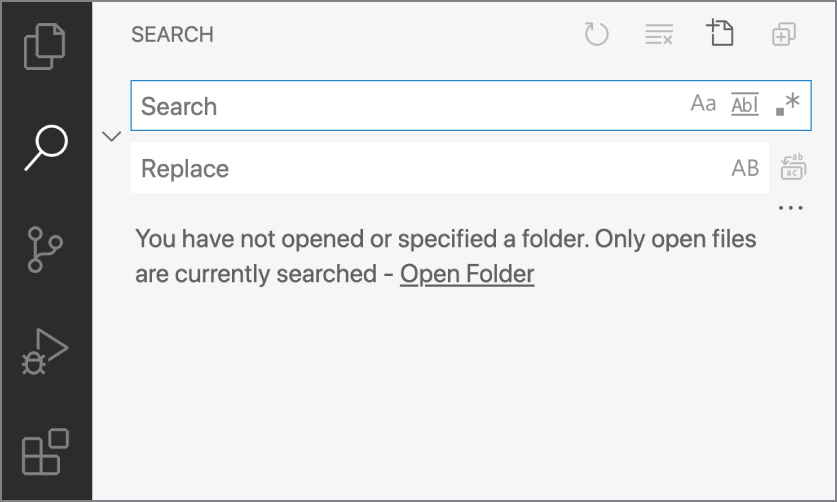
Figure 1.3: Search view.
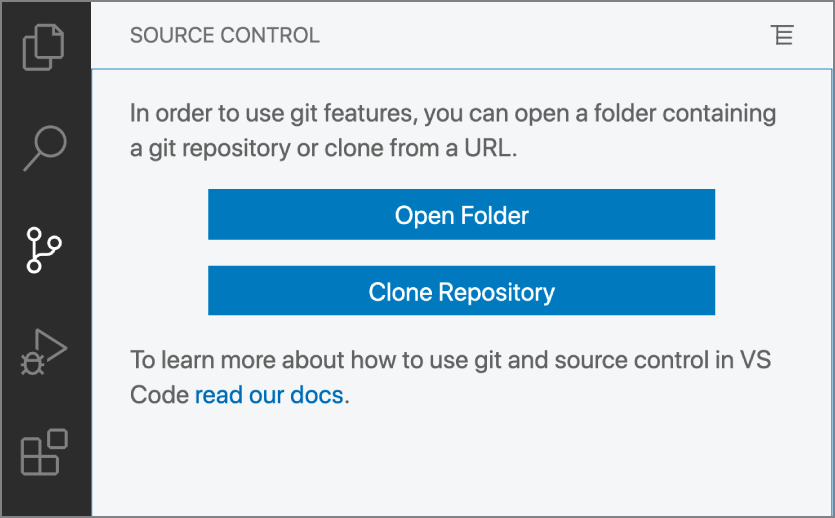
Figure 1.4: Source Control view.
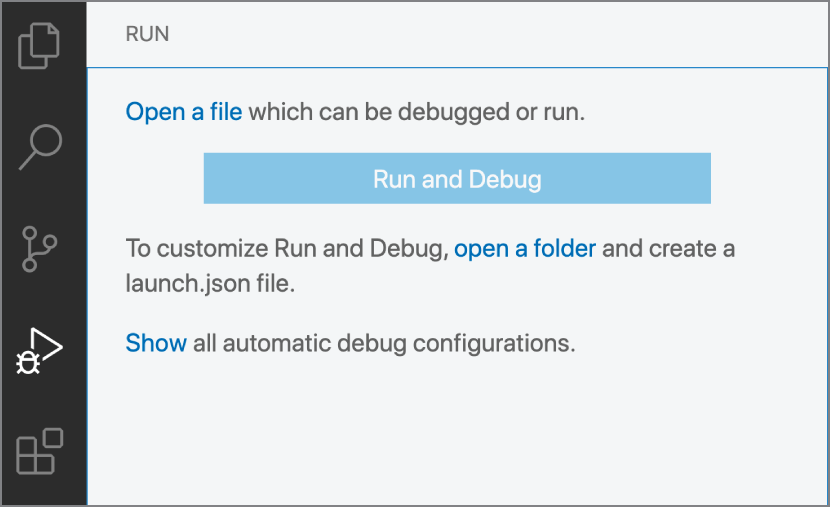
Figure 1.5: Run view.
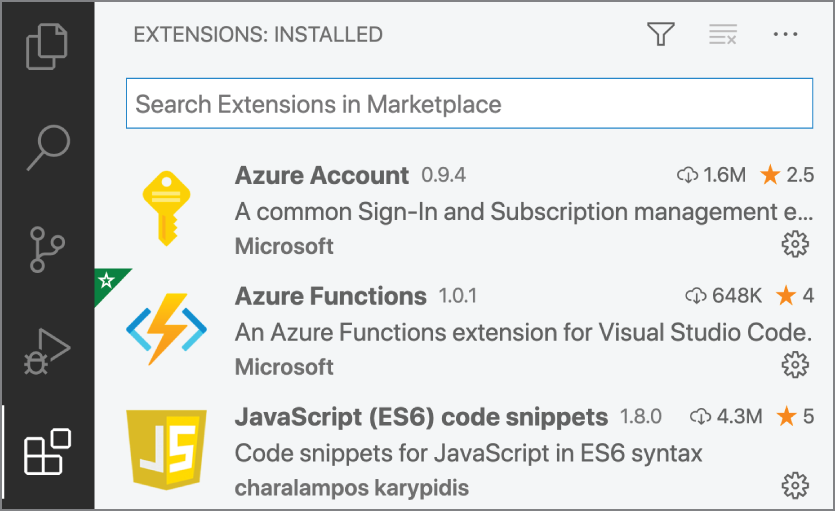
Figure 1.6: Extensions view.
Editor
The editor, which fills most of the screen, is where you edit files. You can resize the editor by clicking and dragging the edges that it shares with the Side Bar and the panels.
The top editor region can change depending on the type of file that's active in the editor. For example, if you edit a Markdown file, a Preview icon appears, thus enabling Visual Studio Code's Markdown Preview (see Figure 1.7).

Figure 1.7: In the top image, the Preview icon appears in the top editor region since a Markdown file is opened. Clicking the icon displays a preview of the Markdown file, as shown in the bottom image.
When you open a Python file, you instead see a Run Python File In Terminal icon (displayed as a Play button) in the top editor region. (The Run Python File In Terminal icon is a quick way for you to run a Python program.) When selected, a terminal opens, and the Python file is run (see Figure 1.8).

Figure 1.8: The Run Python File In Terminal icon displays at the top of the editor region. Clicking the icon runs the Python file.
For most file types, the top editor region also includes an Open Changes icon for viewing changes in the file since the last commit to source control (see Figure 1.9). Selecting the icon opens the Diffs editor (see Figure 1.10). The Diffs editor opens in a new tab with a side-by-side view of the diffs. You could also access the Diffs editor by selecting the file in the Source Control view.

Figure 1.9: When the Open Changes icon is clicked, a new tab opens that shows the diffs for the file.

Figure 1.10: The Diffs editor shows the changes made in the file since the last commit.
The region also contains a Split Editor Right icon for splitting the editor (see Figure 1.11). When selected, a new editor group opens to the right of the initial editor. You can open and modify files in either editor window.
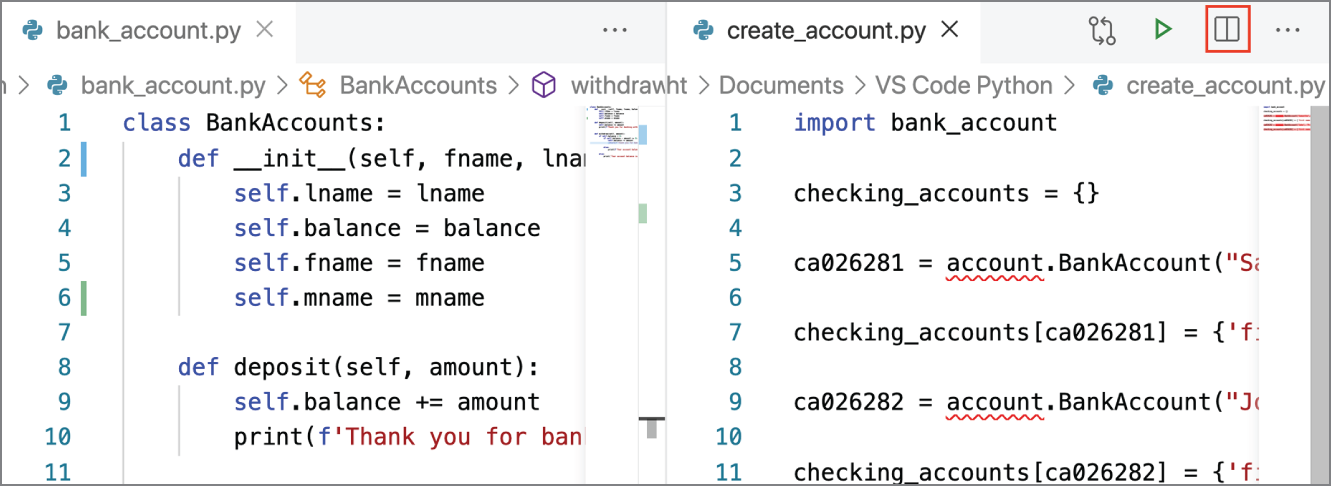
Figure 1.11: When the Split Editor Right icon is clicked, a new editor group is opened to the right.
An opened and active file displays the source code in the middle of the editor, and a Minimap is located at the top right (see Figure 1.12). The Minimap provides a condensed miniature view of the entire file and is great for quick navigation and visually knowing where you are in the context of the entire file.
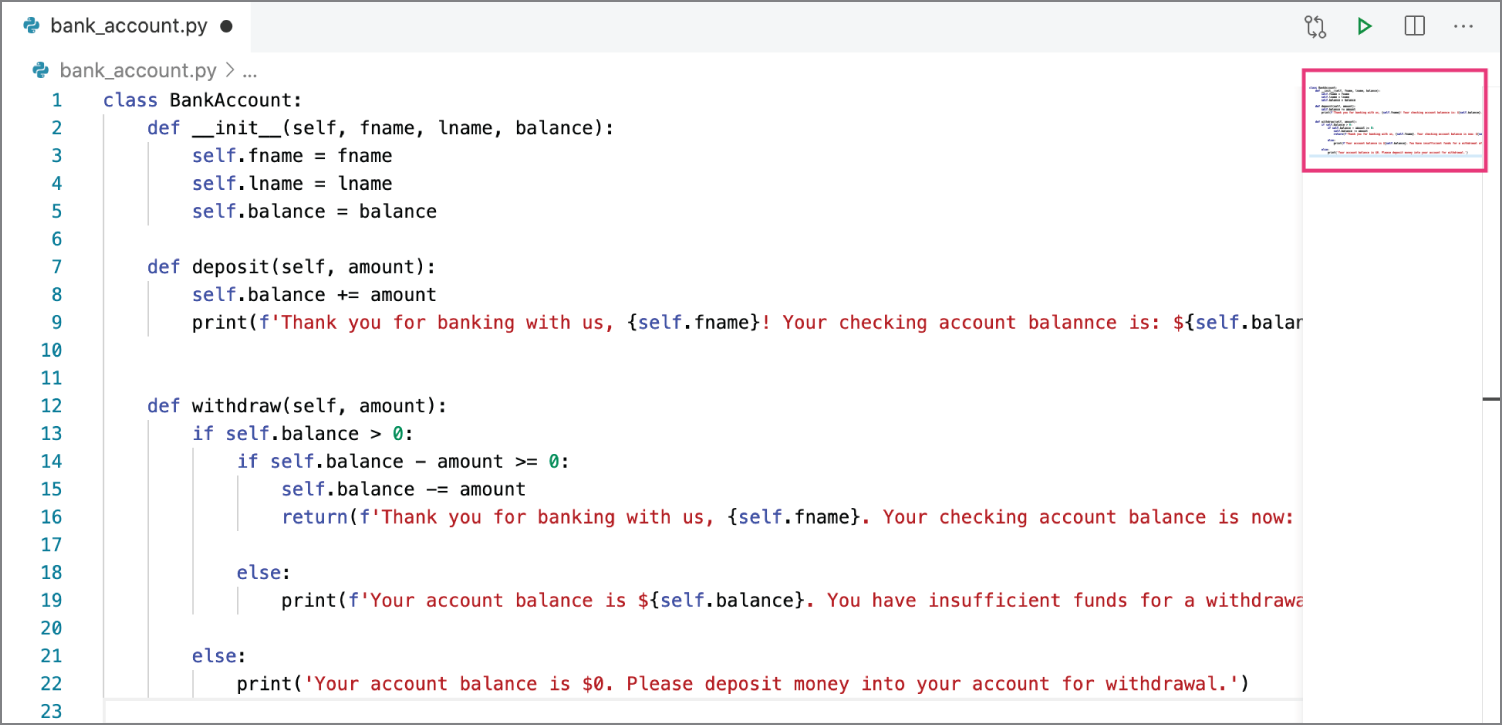
Figure 1.12: A Minimap displays at the right of the bankaccount.py file. You can click anywhere in the Minimap to quickly navigate to the code at that location.
You can open as many files as you like in the editor. Each opened file is distinguishable by a tabbed header. The active file is the file in which your cursor appears. You can drag tabs to reorder them and also pin tabs (Cmd+K Shift+Enter/Ctrl+K Shift+Enter 1) to keep your most used files within reach. A pinned tab displays with the language icon for the respective file (see Figure 1.13).

Figure 1.13: The helloworld.py file is a pinned tab. A pin icon next to the filename in the tab indicates that the file is pinned.
For the sake of organization, you can group opened files into separate editor groups (see Figure 1.14) within the split window.
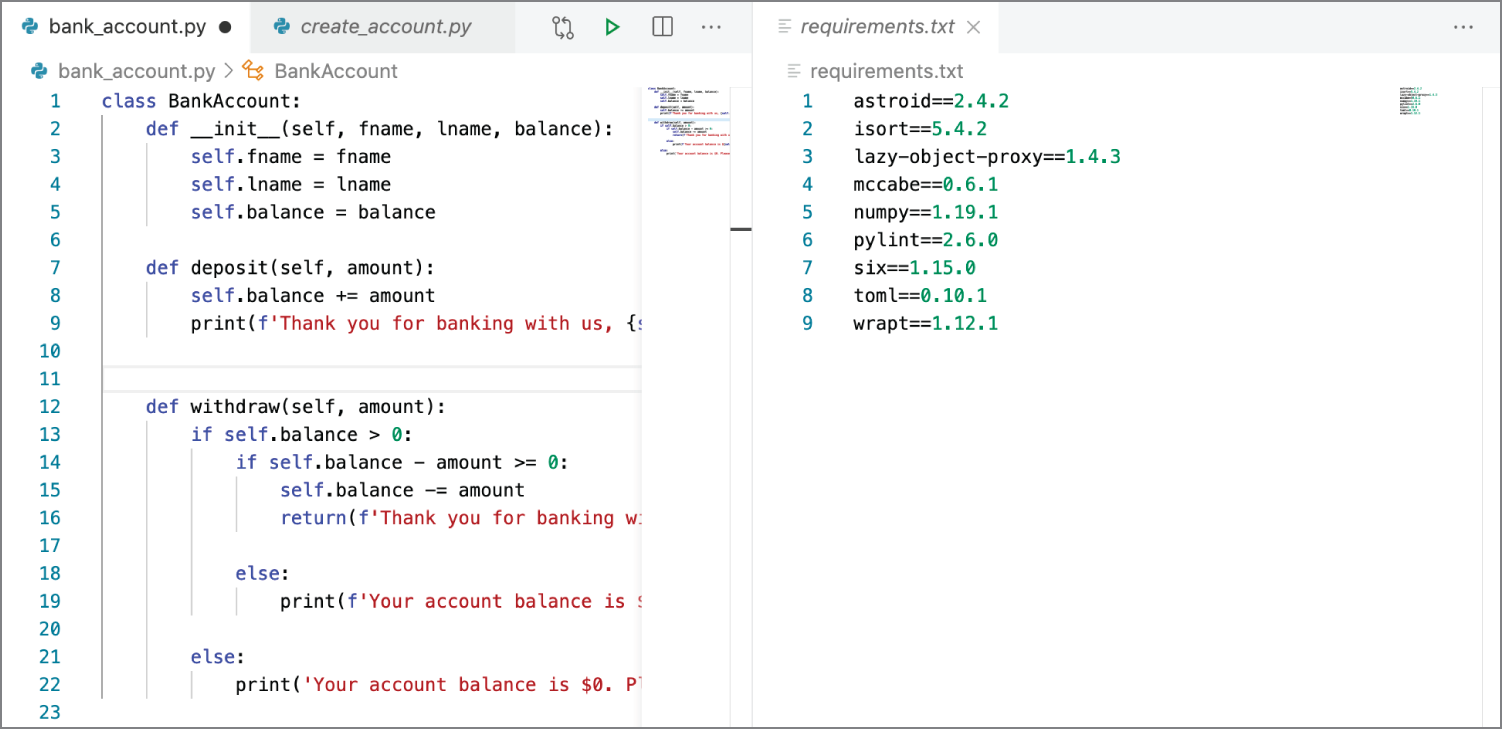
Figure 1.14: Editor groups are used to edit source code for a Python program that creates bank accounts.
New editors can be opened in multiple ways:
- In the Explorer view, press Ctrl+click/Alt+click and click a file.
- In the Explorer view, select a file and press Ctrl+Enter/Ctrl+\ to open a file to the right of an existing editor group.
- Click the Split Editor icon in the top editor region.
- Drag and drop a file to any side of the editor region.
- In the Quick Open (Cmd+P/Ctrl+P) list, highlight a file and press Cmd+Enter/Ctrl+Enter.
Note
To open a file in a specific editor group, the editor group must be active.
By default, files and editor groups display vertically adjacent to the right of one another (see Figure 1.15). However, you can drag and drop the editor title area to reorder and resize the editors.
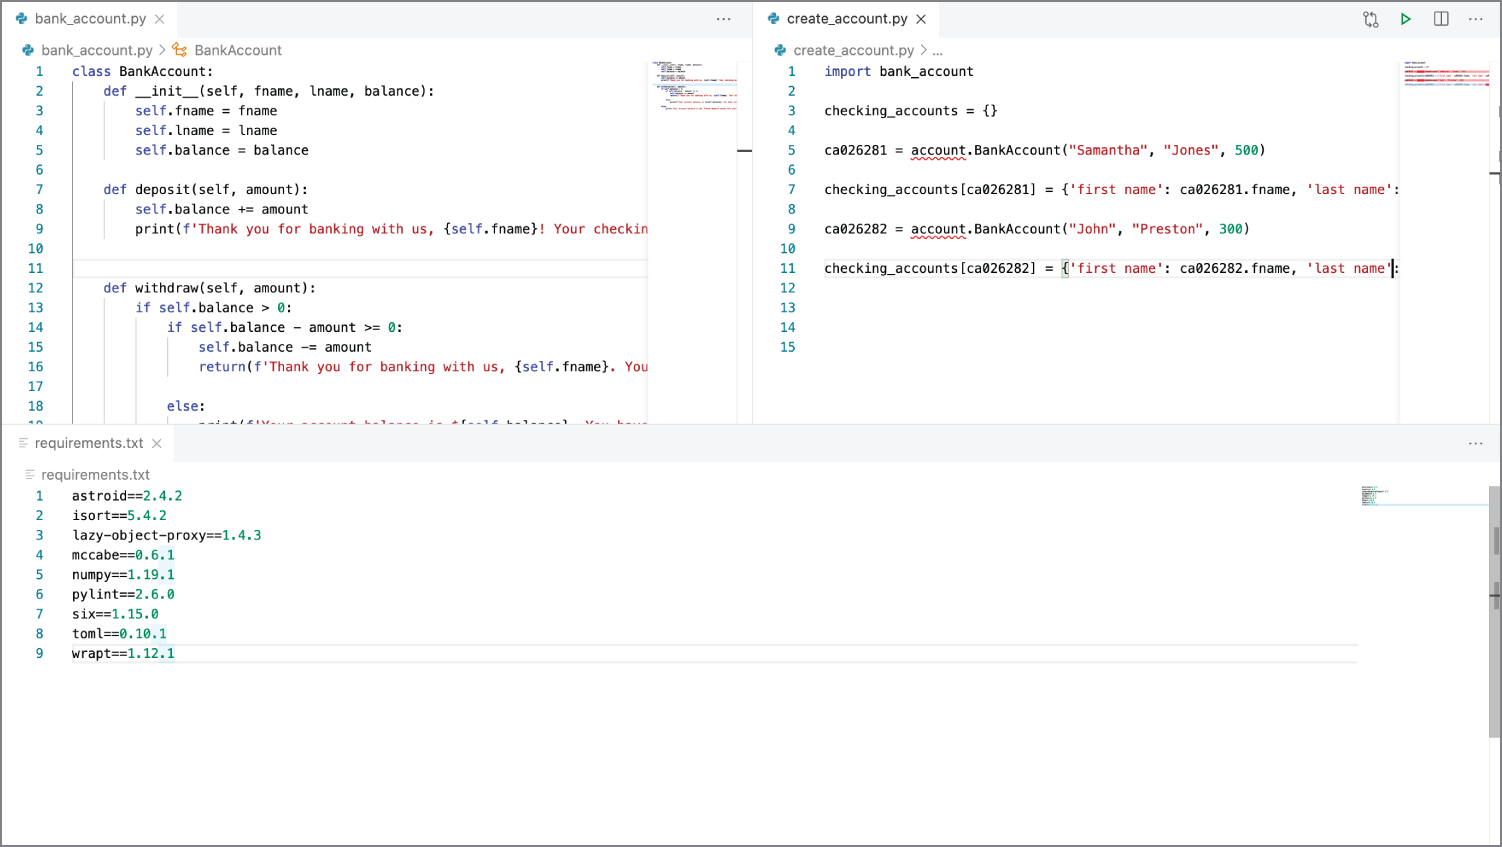
Figure 1.15: Three editor group windows are used within the editor to display the content within each file. Two editor group windows display vertically, and one displays horizontally at the bottom of the editor.
Note
When you have more than one editor open, you can switch between them quickly by holding Cmd/Ctrl and pressing 1, 2, or 3.
Panels
The panels below the editor contain one or more areas for program output, debug information, errors and warnings, and so on. You can also drag some of the views from the Activity Bar (such as Search) into the Panels area.
You can also open the integrated terminal in the Panels area. The integrated terminal provides a command-line interface for your operating system. The default layout of Visual Studio Code includes an integrated terminal that's open to the root of your project. You can also open a REPL terminal for your Python interpreter within Visual Studio Code. The integrated terminal is activated whenever you run a Python program. You can manually start a terminal with the keyboard shortcut Ctrl+~/Ctrl+Shift+`. Additional information on how to run Python programs is given in Chapter 2, “Hello World for Python.”
Status Bar
The Status Bar, located along the bottom of the VS Code window, contains information about the opened project and files you edit. Some of the basic features of the Status Bar include the following:
- Source control management with Git
- Total number of problems for the opened programs (e.g., undefined variables)
- Line/column
- Indentation setting for spaces or tabs
- Encoding setting
- End-of-line sequence setting
- Language mode
- Visual Studio Code feedback mechanism
- Notifications
Clicking an item in the Status Bar either executes a command or opens a window for you to modify the respective setting. For Python development, an additional label appears in the Status Bar for the selected Python interpreter.
Extensions that you install from the Extension Marketplace may add additional labels to the Status Bar to provide quick access to trigger extension commands. For example, with the GitHub Pull Requests and Issues extension, you can publish your source code to GitHub from the Status Bar.
Command Palette
Visual Studio Code provides access to every available command through the Command Palette, and many of these commands are not available through menus or other UI elements. Within the Command Palette, you can run commands to execute editor tasks in addition to extension commands (see Figure 1.16). You can access the Command Palette with the keyboard shortcut Cmd+Shift+P/Ctrl+Shift+P. Get used to this keystroke; you'll be using it a lot with Visual Studio Code!
Once the Command Palette is open, you can search for extension commands by typing a few characters of the extension name. In the list that appears, scroll through the results to find the command you need; then press Enter. Figure 1.17 shows an example.
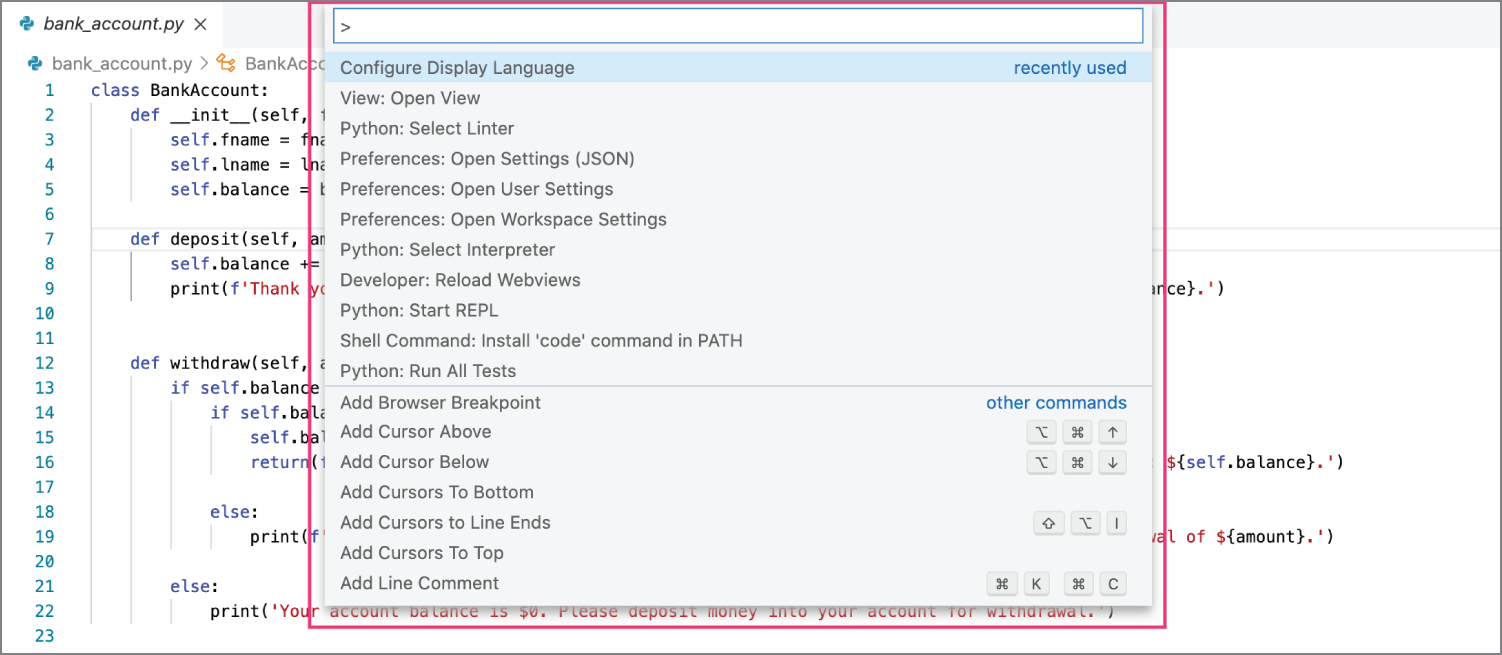
Figure 1.16: The Command Palette displays at the top of the editor.
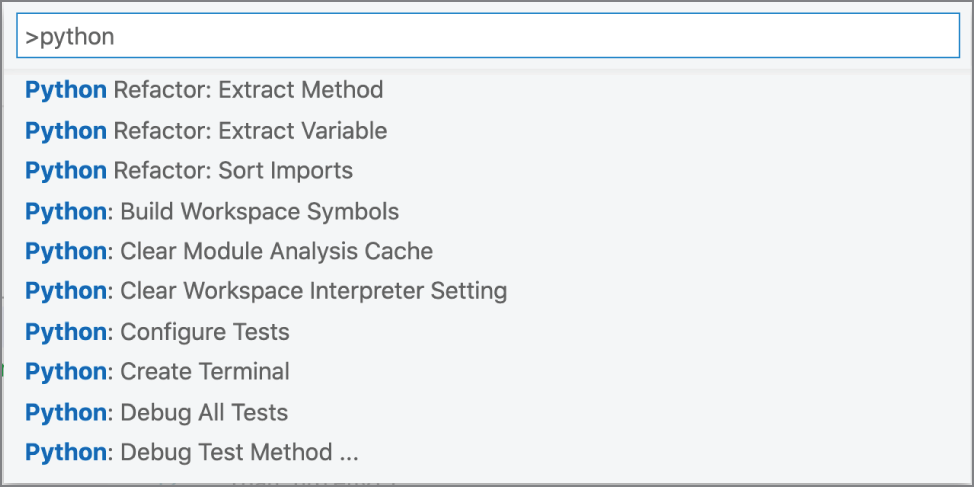
Figure 1.17: By entering Python, a list of commands for the Python extension displays in the Command Palette.
Scroll through the Command Palette to view a complete list of commands. Most commands follow a naming convention of Function/Extension: Action (e.g., Python: Select Interpreter). If there is a keybinding configured for the command, the keyboard shortcut displays to the right of the command. As you repeatedly use a command, the command appears at the top of the Command Palette as a recently used command. This provides quick access to your most frequently used commands.
Note
Unsure of which actions you can take from wherever you are in your source code? From the Command Palette, type ? to get a list of available commands that you can execute.
Note
In this book, you are prompted to run commands from the Command Palette whenever the naming convention Function/Extension: Action appears.
Extensions
You can extend the functionality of Visual Studio Code by installing extensions from the Visual Studio Code Marketplace. The Visual Studio Code Marketplace contains more than 1,500 extensions created by both Microsoft and the developer community. Such extensions add more features, themes, tools, and language support for your development workflow. You can search the Marketplace for extensions within the Extensions view (see Figure 1.18).
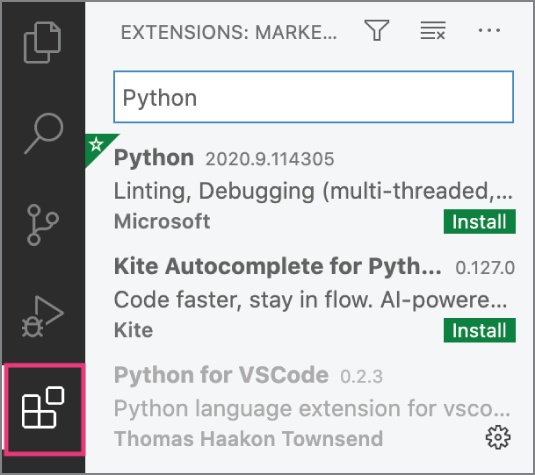
Figure 1.18: The Extension Marketplace is accessed via the Extensions view in the Activity Bar.
Note
The Visual Studio Code Marketplace can also be accessed via the browser at marketplace.visualstudio.com/VSCode. If you choose to install an browser extension, you are prompted to open Visual Studio Code to complete the installation.
In the Extensions view, you can type directly into the search bar to search for an extension. The search results display the name of the extension, the extension version, a brief extension description, and the publisher's name. When you select an extension from the search results, the editor displays the extension details page (see Figure 1.19).
You install an extension by clicking the Install button on the extension details page. Changed your mind and find that you no longer need an extension? You can uninstall an extension from the extension details page by clicking Uninstall (see Figure 1.20).
The More Actions menu (i.e., the triple dot icon located at the top right of the Extensions view) provides access to view all of your installed, recommended, enabled, and disabled extensions. If you're in the market for a new extension to support your development workflow, check out the recommended extensions. The Extensions view provides extension recommendations based on recently opened files as well as other extensions installed.
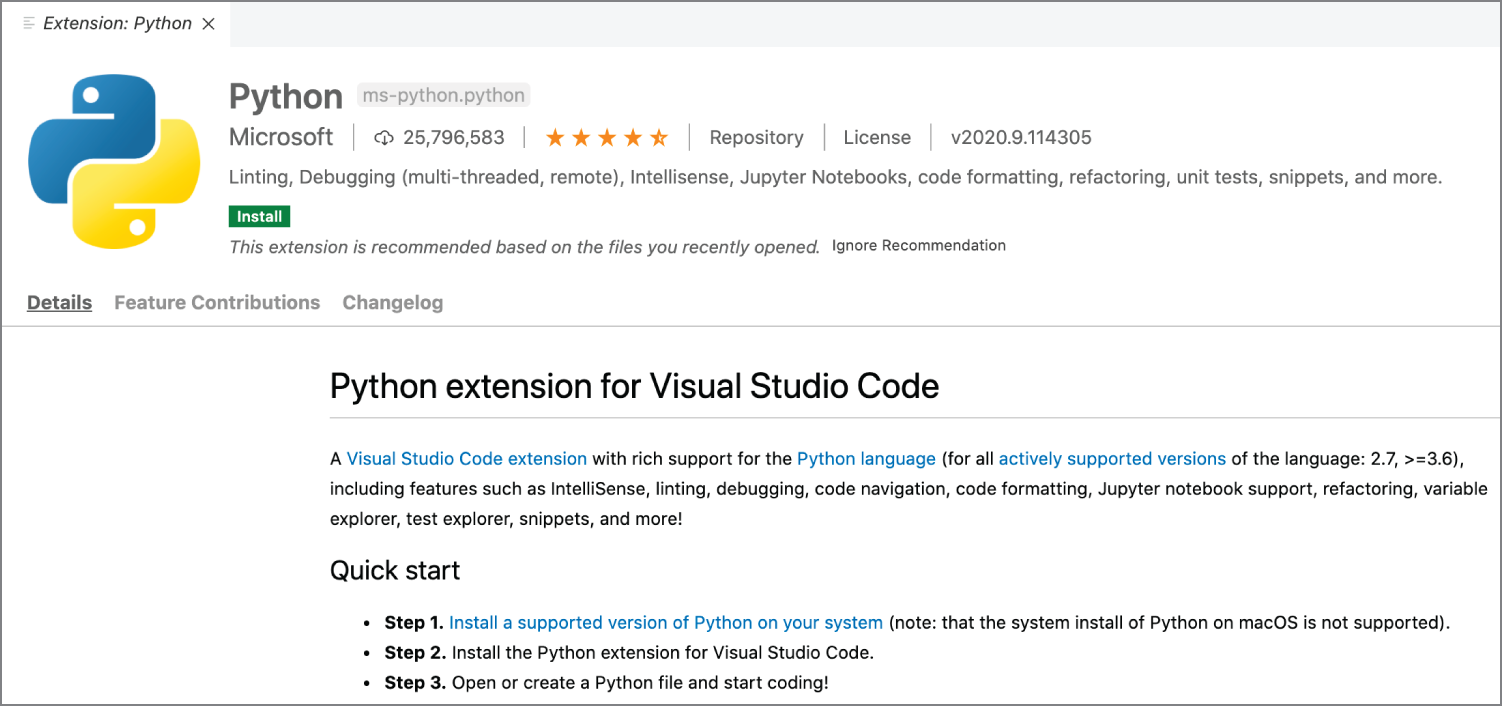
Figure 1.19: The Python extension page displays helpful information about the extension.

Figure 1.20: The Uninstall button appears only once an extension is installed. Clicking the button removes the extension from Visual Studio Code.
Note
Anyone can write an extension for personal use or publication to the Marketplace. For more information, see the Extension application programming interface (API) documentation at code.visualstudio.com/api.
Customizations
Essentially, every UI element and function within Visual Studio Code can be customized. While some customizations are purely aesthetic in nature, a significant number of customizations in Visual Studio Code can turn your development environment into an accessible and productive environment. You can choose to make customizations either globally for the editor or for a specific workspace. A project folder in Visual Studio Code is considered to be a workspace. The workspace itself consists of the files and folders within the project.
Settings
Settings in Visual Studio Code can be managed both globally and by workspace. Global settings are managed within the User settings and apply to any instance of Visual Studio Code you open. Workspace settings apply only when a workspace is opened and can be shared across developers on a project. Workspace settings also override User settings.
You can manage the User and Workspace settings in the Settings editor (press Cmd+,/Ctrl+, or select Preferences ➪ Open Settings; see Figure 1.21). In the editor, the settings are categorized into their respective groups. All extension settings are grouped under the Extensions heading. The search bar provides a quick way to find the setting you need.
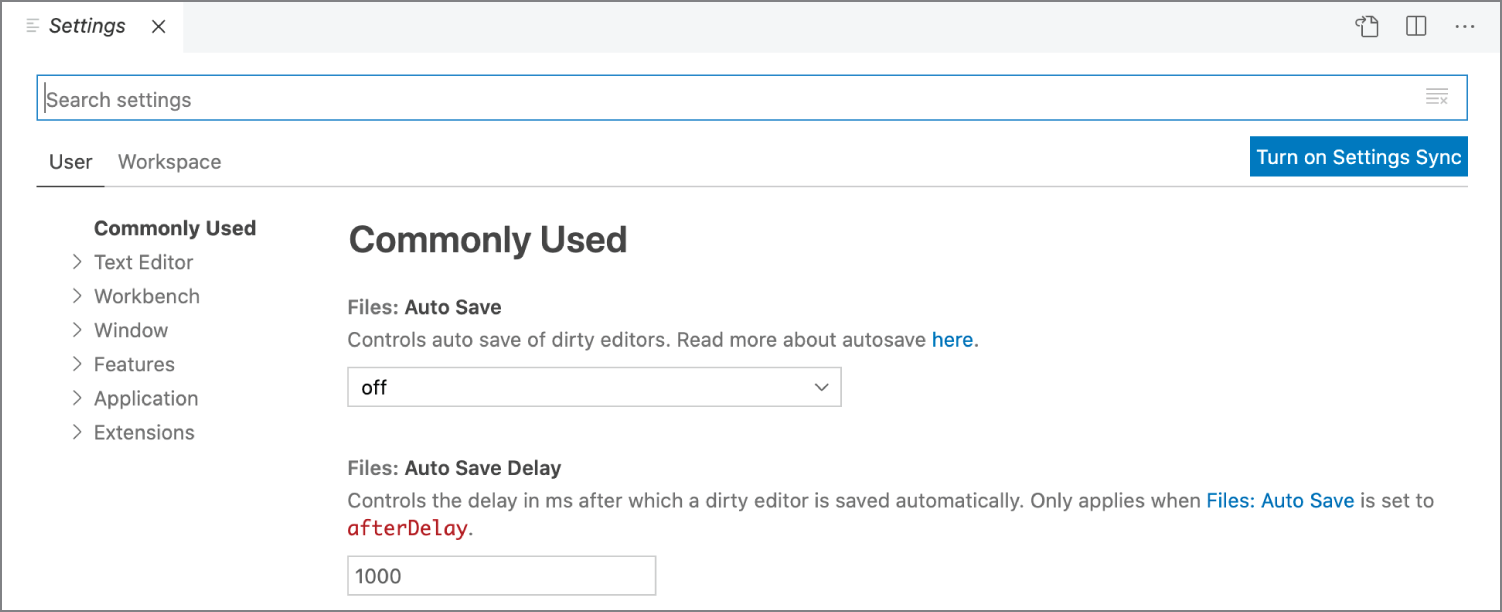
Figure 1.21: The Settings editor lists all settings for Visual Studio Code and the installed extensions.
Changes are automatically saved as you make selections in the editor. If you want to revert to the default value for a setting, click the gear icon next to the setting and select Reset Setting (see Figure 1.22).
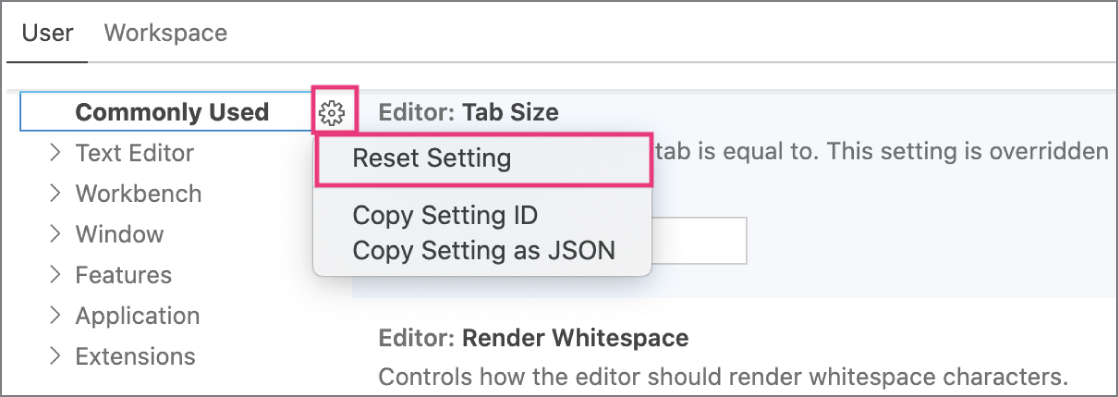
Figure 1.22: The Reset Settings menu option resets the setting to the default value.
Visual Studio Code saves your settings in a file named settings.json within a .vscode folder. You can work with settings directly in this file, if you prefer, rather than the UI. If you prefer to manage the underlying settings.json file, click the Open Settings (JSON) icon at the top of the editor region (see Figure 1.23). Alternatively, you can run the command Open Settings (JSON).

Figure 1.23: Clicking the Open Settings (JSON) icon opens the settings.json file in a new editor.
Although you can manually edit the settings.json file, Visual Studio Code provides a shortcut for modifying some of the settings. If you hover over a setting and see a pencil icon display to the left of the key, you can click the pencil icon to view a list of possible values (see Figure 1.24).
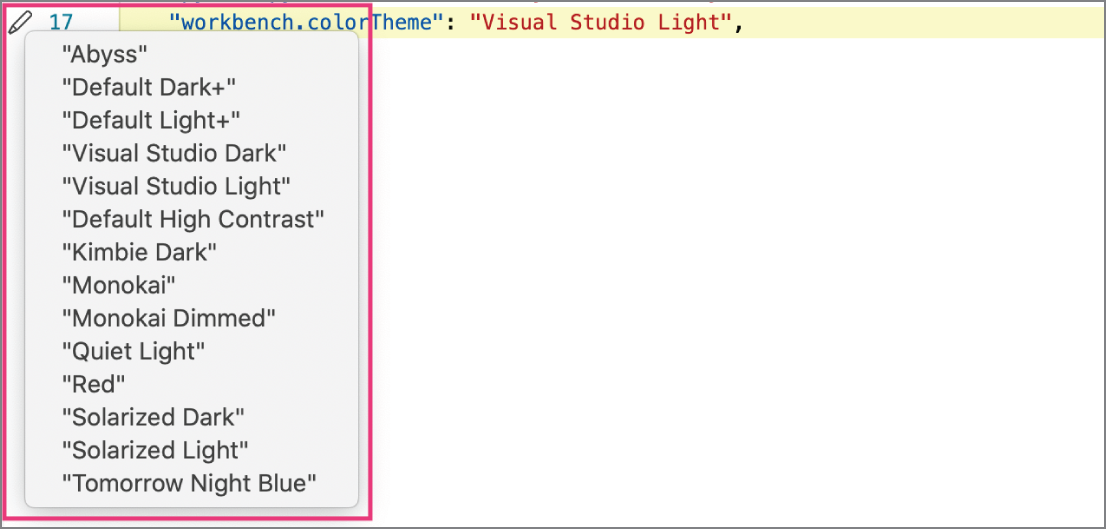
Figure 1.24: In the settings.json file, clicking the pencil icon next to a setting provides a list of possible values for the setting.
Unlike the Settings editor, you must save (Cmd+S/Ctrl+S) the settings.json file for the changes to take effect. If Visual Studio Code detects any syntax errors in the file, a prompt displays requesting that you fix the errors in the file. The syntax for settings follows the category/extension: setting format (e.g., python: pythonPath is the setting for the Python interpreter path for the Python extension).
Note
Need to reset all of your User settings to the default settings? In the settings.json file, delete everything between the curly braces and save the file.
Color Themes and Icons
Aesthetics can truly enhance one's experience by providing color combinations and iconography to meet one's visual needs and preferences. Color themes enable you to change the color of both the editor UI and the syntax highlighting for your code. The Color Theme picker (Cmd+K, Cmd+T/Ctrl+K, Ctrl+T provides access to the available color themes. You can install additional color themes from the Visual Studio Code Marketplace or create your own custom color theme.
File icon themes enable you to change the file icons shown in the File Explorer and tabbed headings. The File Icon Theme picker (Preferences ➪ File Icon Theme) provides access to the available file icon themes. Like with color themes, you can install additional themes from the Visual Studio Code Marketplace or create your own custom file icon theme.
Keybindings
Once you become experienced with Visual Studio Code, you'll likely want to improve your efficiency by learning keyboard shortcuts for your most common commands. Keybindings give you the ability to execute most Visual Studio Code commands with the help of keyboard shortcuts. Although some keybindings are preset by default, you can manage all keybindings yourself in the Keyboard Shortcuts editor (Cmd+K, Cmd+S/Ctrl+K, Ctrl+S). The Keyboard Shortcuts editor lists all available commands with and without keybindings.
To change a keybinding in the Keyboard Shortcuts editor, select the command and use the keyboard shortcut Cmd+K, Cmd+K/Ctrl+K, Ctrl+K. In the window that appears, enter your desired key combination and press Enter. If there is a keybinding conflict, an alert appears at the bottom of the window that tells you how many existing commands have the keybinding. Selecting the alert displays a list of all commands that have the assigned key combination.
Prefer to use the keyboard shortcuts from another development environment? No problem! Keymap extensions (Cmd+K, Cmd+M/Ctrl+K, Ctrl+M) are available in the Extensions Marketplace for Vim, Sublime, and Atom, to name a few. These extensions port the keybindings from the other editors into Visual Studio Code.
Display Language
The default display language for Visual Studio Code is English. You can modify this setting with Language Pack extensions. When you first open Visual Studio Code, the editor auto-detects the operating system's UI language. If the language is not English, Visual Studio Code prompts you to install the appropriate Language Pack (if available). Once the Language Pack is installed, restart Visual Studio Code to apply the changes.
If you prefer to override the default UI language, use the Configure Display Language command and select from one of the available languages.
Summary
In this chapter, you learned how to do the following:
- Download and install Visual Studio Code from
code.visualstudio.com/#downloads - Navigate the Visual Studio Code interface
- Reorder views in the Activity Bar
- Create an editor group and open a new editor
- Access the Command Palette
- Search for and install extensions in the Extensions view
- Manage settings both globally and by workspace
- Change color themes
- Create custom keybindings
- Change the display language
Over time, you will be able to better determine which additional extensions, customizations, and settings can help you foster an efficient and productive workflow. If you're ever in need of additional information on Visual Studio Code features, browse the documentation at code.visualstudio.com/docs.
Note
- 1 Keystrokes presented in this book are provided for macOS first followed by Windows/Linux.