Swift Fundamentals
Since Apple announced the Swift programming language back in 2014 at the Worldwide Developer Conference (WWDC), it has gone on to become one of the fastest-growing programming languages.
Swift is a modern, general-purpose programming language that focuses on type safety and expressive and concise syntax. Positioned as a modern replacement for Objective-C, it has taken over from Apple’s older language as the future of development across all their platforms.
Since open-sourcing Swift, Apple has provided support for running your Swift code on a whole host of platforms including Linux. Despite these alternative ways to use and write Swift code, the simplest is still on a Mac using Apple’s Xcode.
In this chapter, we will look at the fundamentals of the Swift language and examine the syntax and functionality of the basic Swift component.
In this chapter, we will cover the following recipes:
- Writing your first code in Swift
- Using the basic types – strings, ints, floats, and booleans
- Reusing code in functions
- Encapsulating functionality in object classes
- Bundling values into structs
- Enumerating values with enums
- Passing around functionality with closures
- Using protocols to define interfaces
Technical requirements
We will walk you through setting up Xcode 15.0 and use this development environment unless otherwise stated. Xcode 15.0 can be downloaded from the Apple App Store on a Mac running the latest OS.
We will be using Swift 5.9. This version will also be more compatible with future versions of Swift, which means that code written now with Swift 5.9 can run alongside code written with future versions of Swift.
We will be using Playgrounds in Xcode to implement the recipes contained in this book unless otherwise stated. The benefit of using Xcode Playgrounds is its simplicity of quickly writing and compiling Swift syntax.
All the code for this chapter can be found in the book’s GitHub repository at https://github.com/PacktPublishing/Swift-Cookbook-Third-Edition/tree/main/Chapter%201.
Writing your first code in Swift
In this recipe, we’ll get you started with the Xcode integrated development environment (IDE) and get you ready to write your first lines of Swift code… buckle up!
Getting ready
For this recipe, you will need Xcode 15 or newer.
How to do it…
Once you have successfully downloaded Xcode from the Apple App Store, we’ll need to launch the application:
- Launch Xcode from the dock or via the Apple App Store, as shown in the following screenshot:

Figure 1.1 – Xcode in the App Store
- You’ll be presented with the following splash screen:
Figure 1.2 – Xcode splash screen
- From here, in the toolbar on your Mac, click File > New > Playground…:
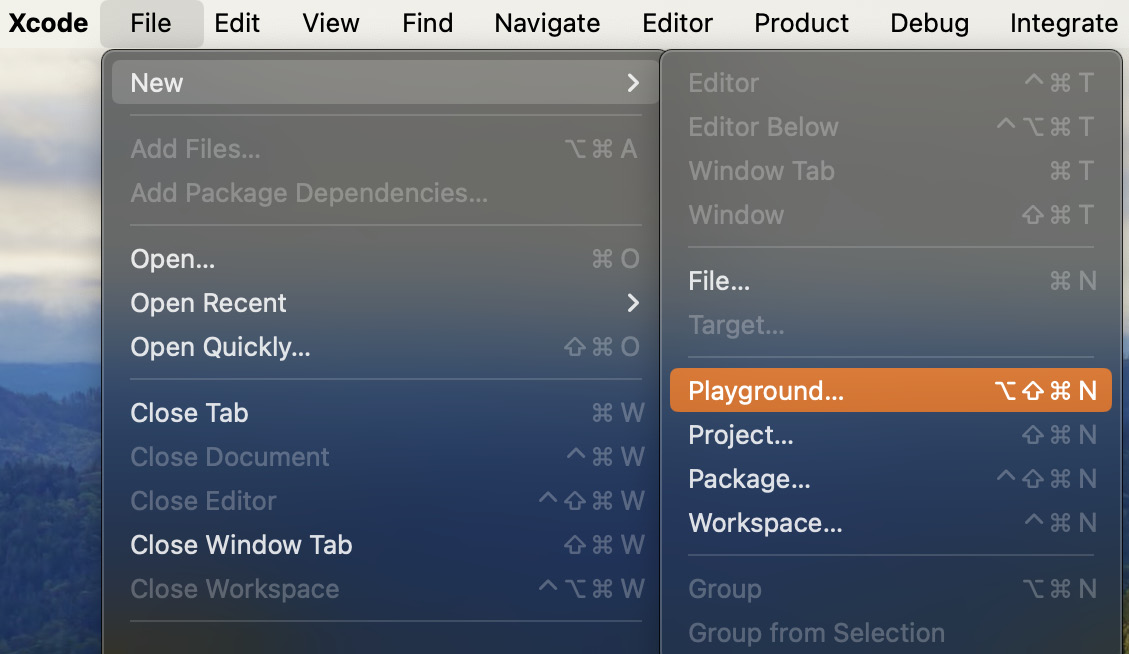
Figure 1.3 – Selecting Playground…
- Select Blank from the iOS tab and press Next:
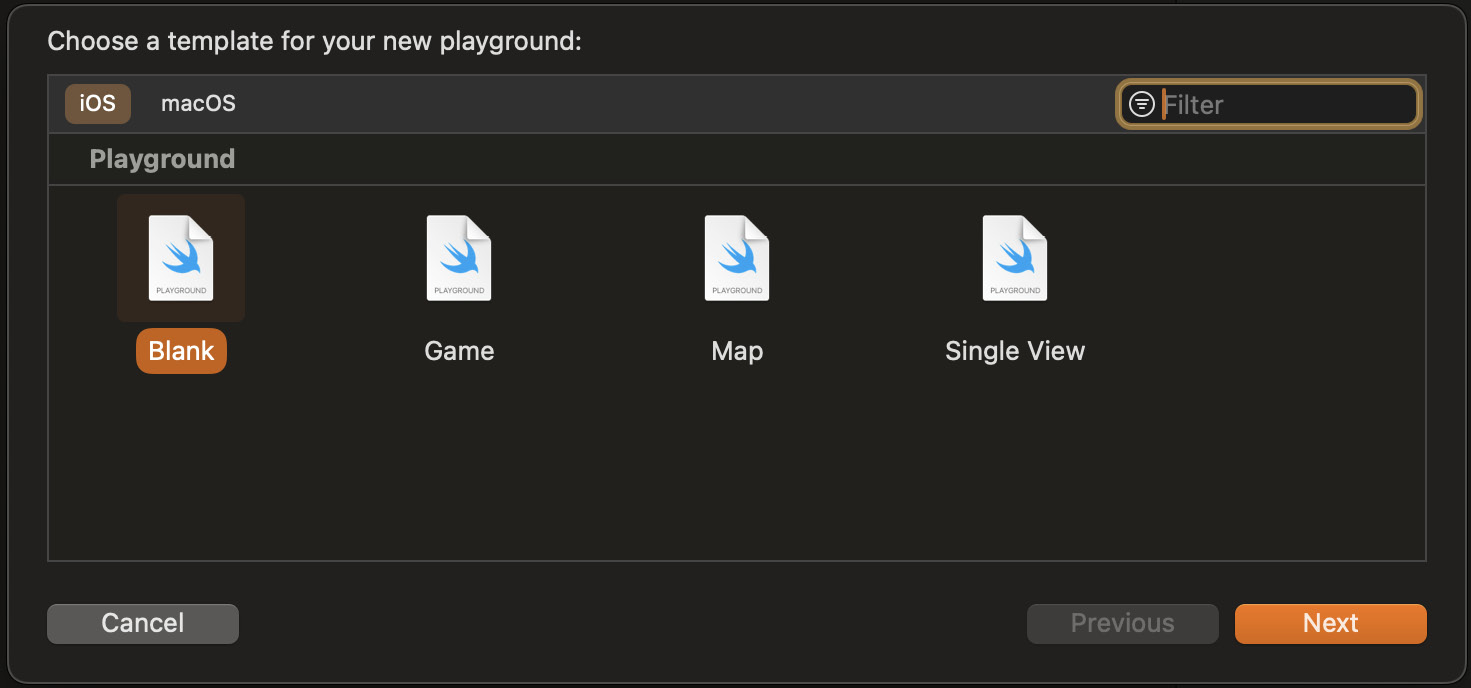
Figure 1.4 – Choose Blank, but notice the other options
- Choose a name and file location (this can be anything and anywhere you want) and press Create:
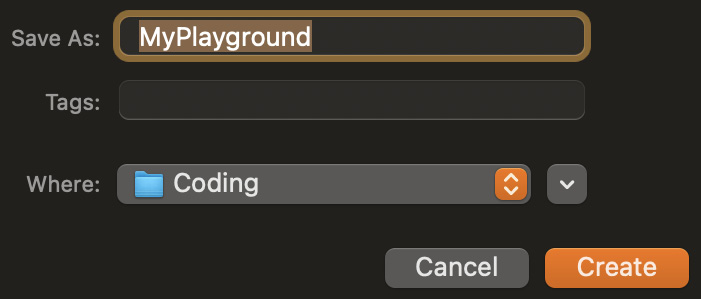
Figure 1.5 – Provide a name and location for our project
- You should now see the following playground:
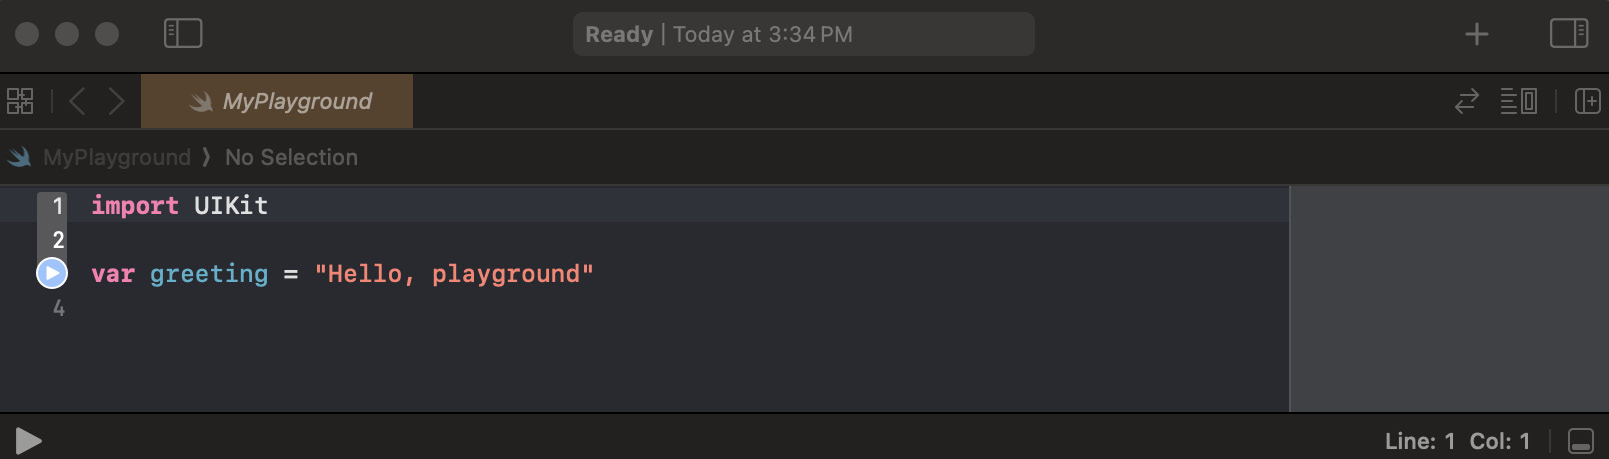
Figure 1.6 – Our new playground
- Change the text to anything you want:
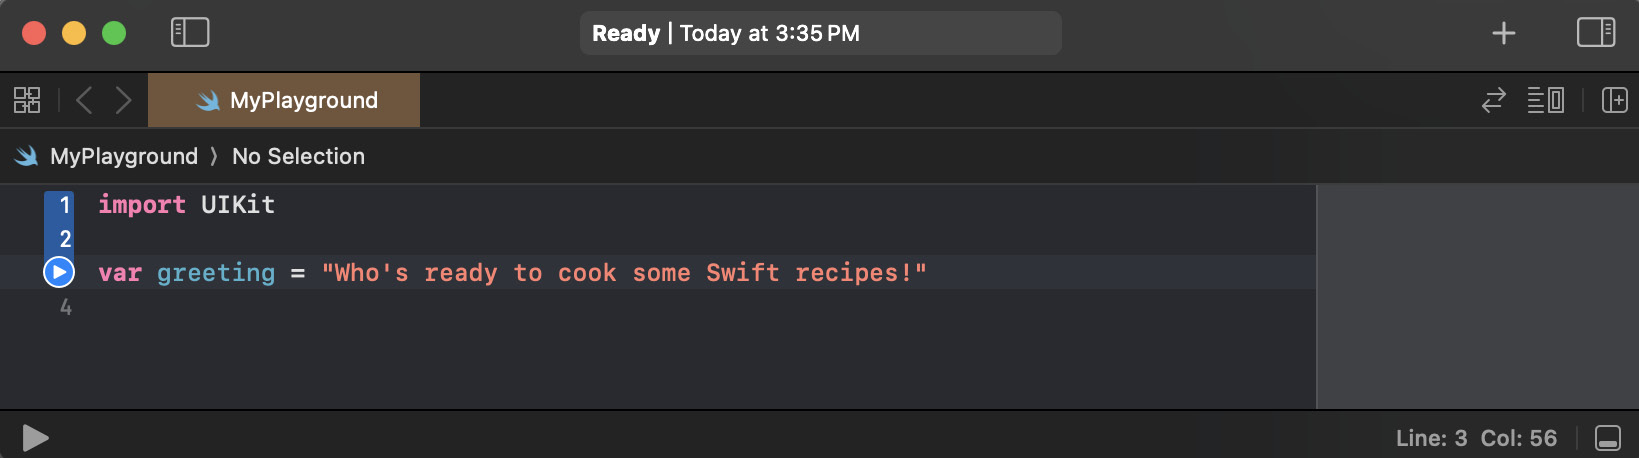
Figure 1.7 – Changing the string is as simple as replacing its text
- Now, press play at the bottom on the left just under the line numbers:
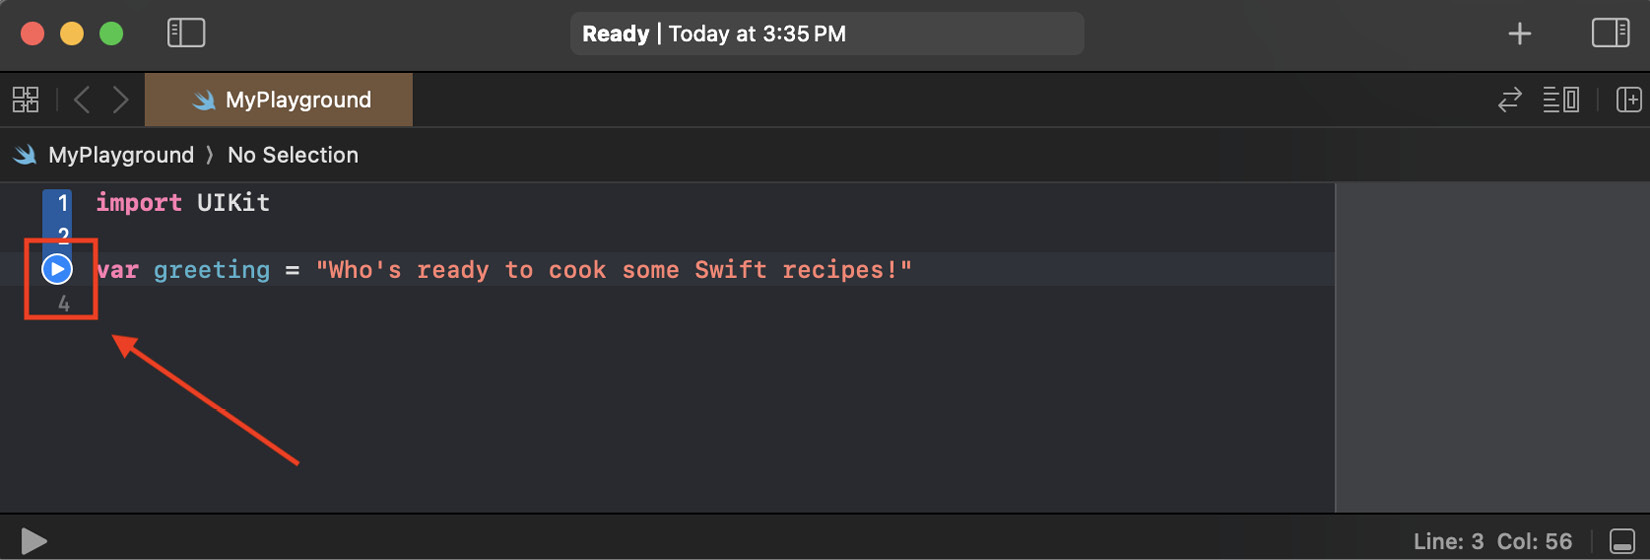
Figure 1.8 – Click the blue play button on the left
- You should now see the output of your program in the right-hand column:
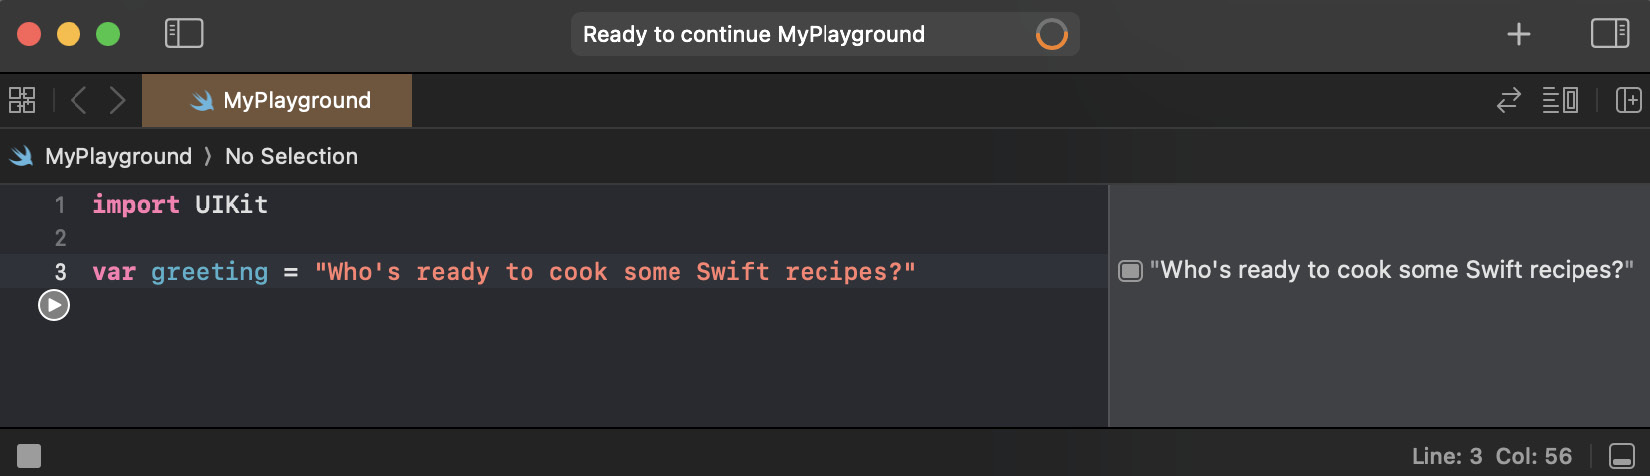
Figure 1.9 – Our output is now on the right
Congratulations, your first Swift program is now complete!
There’s more…
If you put your cursor over the output column on the right-hand side, you will see two buttons, one that looks like an eye and another that is a rounded square:
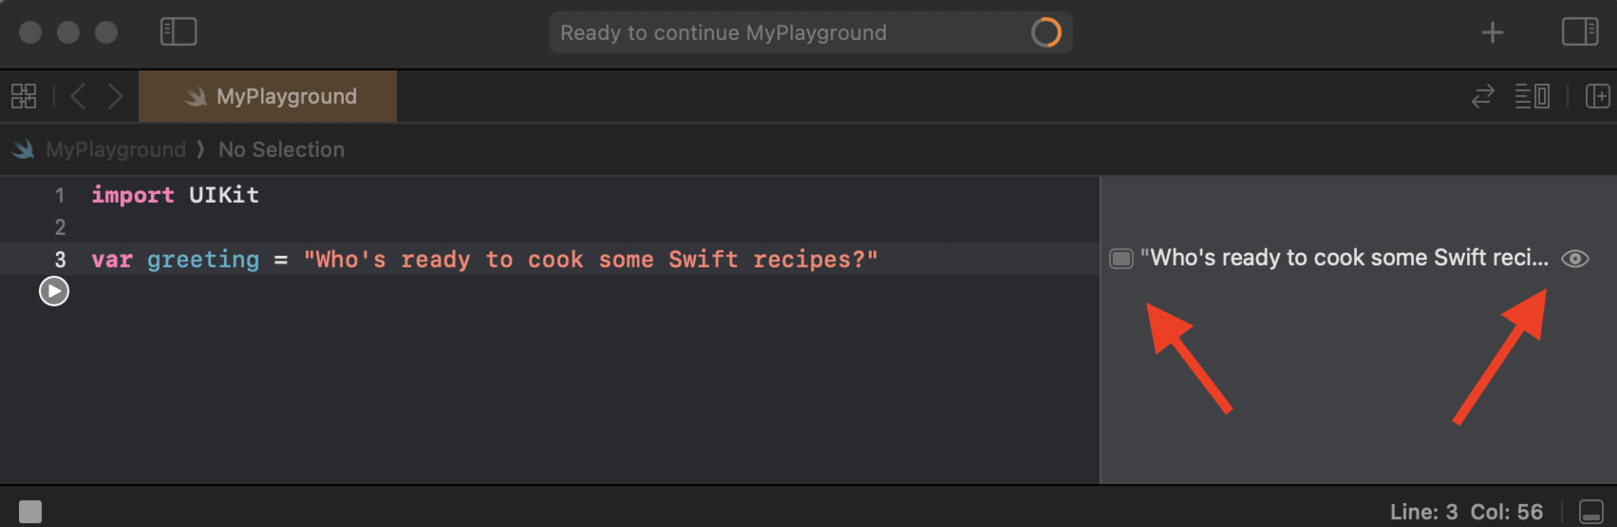
Figure 1.10 – Two icons are available on our output
Click on the eye button to get a Quick Look box of the output. This isn’t particularly useful for a text string, but can be useful for more visual output, such as colors and views:
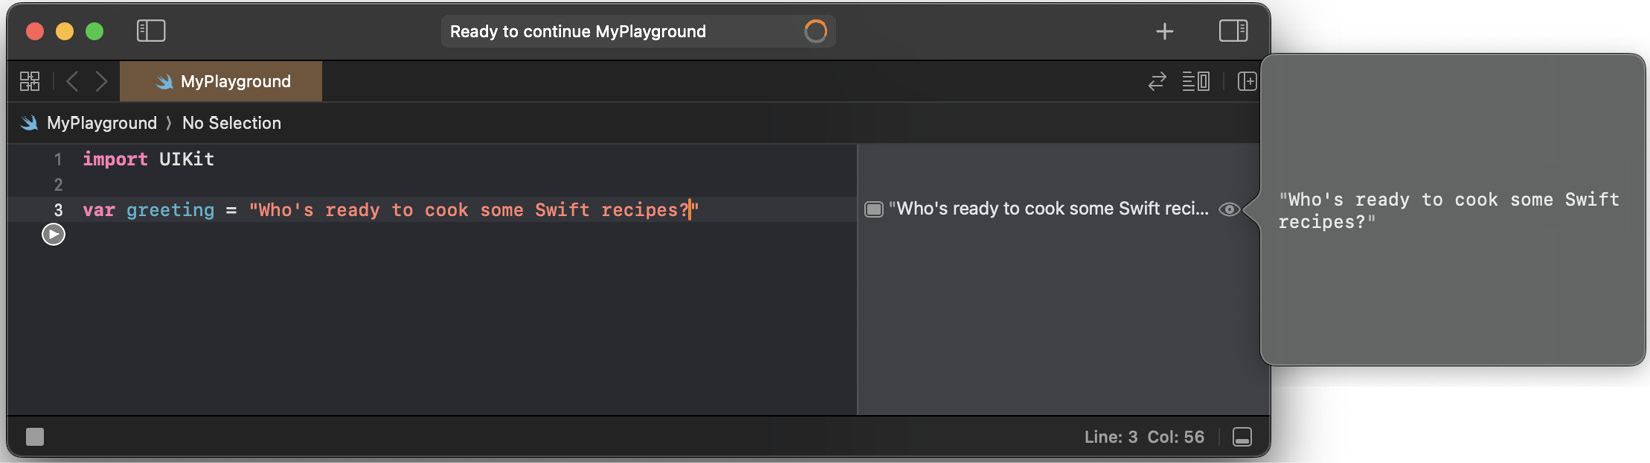
Figure 1.11 – The Quick Look box could quickly provide more details about our output
Click on the square button, and a box will be added inline, under your code, showing the output of the code. This can be useful if you want to see how the output changes as you change the code:
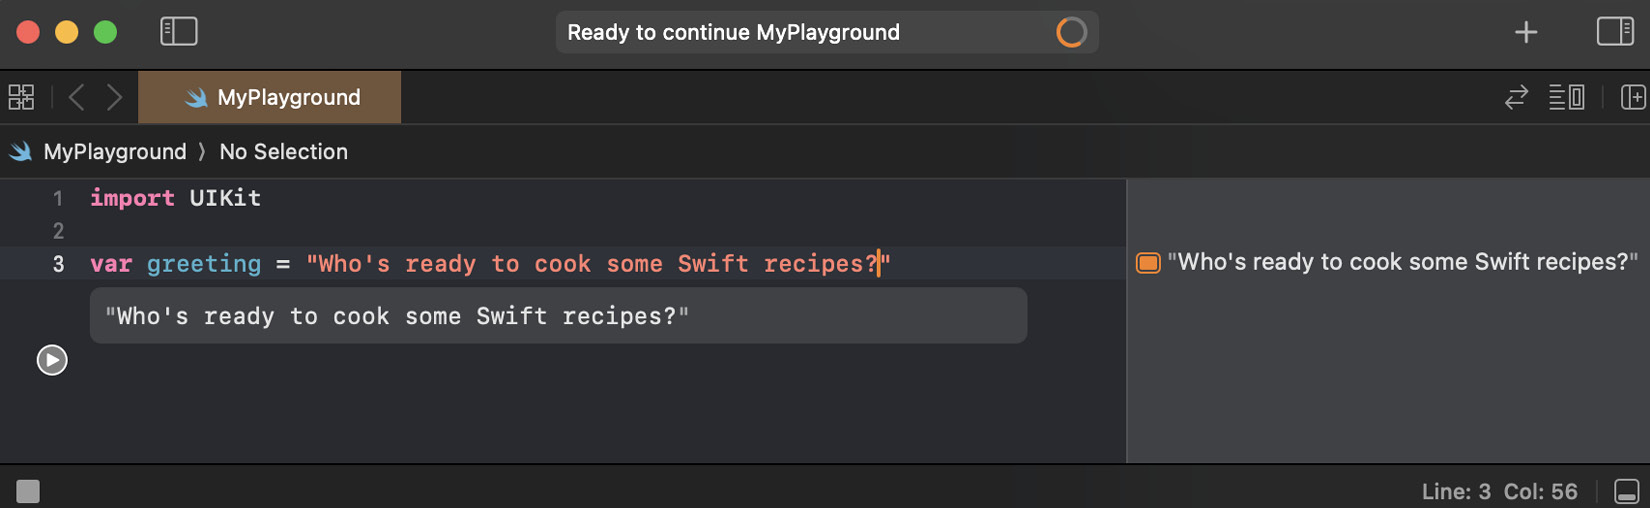
Figure 1.12 – Now we can see our output directly where it is called from
See also
For those curious about Swift’s predecessor, the following link to Apple’s documentation will be interesting: https://developer.apple.com/library/archive/documentation/Cocoa/Conceptual/ProgrammingWithObjectiveC/Introduction/Introduction.html.
Using the basic types – strings, ints, floats, and booleans
Many of the core operations in any programming language involve manipulating text and numbers, and determining true and false statements.
Let’s learn how to accomplish these operations in Swift by looking at its basic types and learning how to assign constants and variables. In doing so, we will touch upon Swift’s static typing and mutability system.
Getting ready
Just like we did in the previous recipe, open Xcode and create a new playground (again, call it what you want).
How to do it…
Let’s start by writing some code that explores the basic types available to us in Swift.
- Write the following code into your newly opened Swift Playground; we’ll start with an example of Strings:
Code snippet
let phrase: String = "The quick brown fox jumps over the lazy dog" - Now, let’s add an example of an integer:
Code snippet
let numberOfFoxes: Int = 1let numberOfAnimals: Int = 2The following is an example of how we use floating points in Swift:
Code snippet
let averageCharactersPerWord: Float = (3+5+5+3+5+4+3+4+3) / 9print(averageCharactersPerWord) // 3.8888888/*phrase = "The quick brown ? jumps over the lazy ?"// Doesn't compile*/ - Now, add some code that handles concatenation in Swift and multiline expressions:
Code snippet
var anotherPhrase = phraseanotherPhrase = "The quick brown 🦊 jumps over the lazy 🐶"print(phrase)// "The quick brown fox jumps over the lazy dog"print(anotherPhrase) // "The quick brown 🦊 jumps over the lazy 🐶"var phraseInfo = "The phrase" + " has: "print(phraseInfo) // "The phrase has: "phraseInfo = phraseInfo + "\(numberOfFoxes) fox and \(numberOfAnimals) animals"print(phraseInfo)// "The phrase has: 1 fox and 2 animals"print("Number of characters in phrase: \(phrase.count)")let multilineExplanation = """Why is the following phrase often used?"The quick brown fox jumps over the lazy dog"This phrase contains every letter in the alphabet."""let phrasesAreEqual = phrase == anotherPhraseprint(phrasesAreEqual) // falselet phraseHas43Characters = phrase.count == 40 + 3print(phraseHas43Characters) // true - Press the play button at the bottom of the window to run the playground and verify that Xcode doesn’t show any errors.
Your playground should look like the following screenshot, with an output for each line in the timeline on the right-hand side and printed values in the console at the bottom:
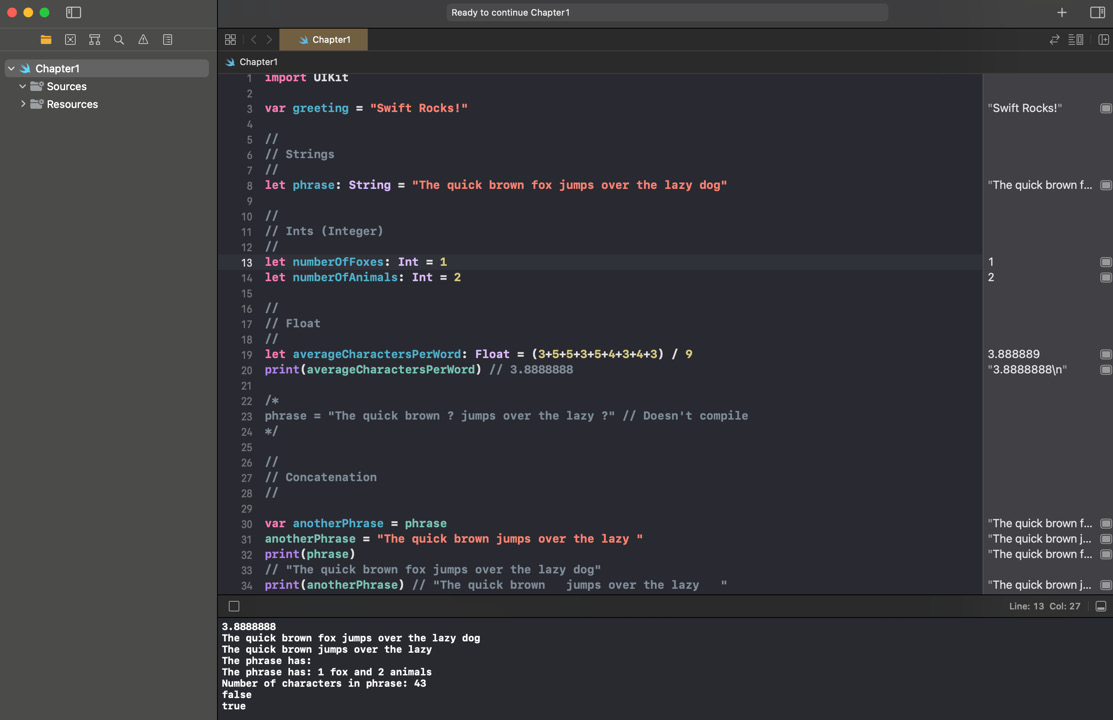
Figure 1.13 – Output in Swift Playground
How it works…
Let’s step through the preceding code line by line to understand it.
In the following line of code, we are assigning some text to a constant value:
Code snippet
let phrase: String = "The quick brown fox jumps over the lazy dog"We define a new constant value by using the let keyword, and we give that constant a name: phrase.
The colon (:) shows that we want to define what type of information we want to store in the constant, and that type is defined after the colon.
In this case, we want to assign a String type (String is how most programming languages refer to text).
The = sign indicates that we are assigning a value to the constant we have defined, and "The quick brown fox jumps over the lazy dog" is a String literal, which means that it’s an easy way to construct a string.
Any text contained within "" marks is treated as a String literal by Swift.
We are assigning the String literal on the right-hand side of the = sign to the constant on the left-hand side of the = sign.
Next, we are assigning two more constants, but this time, they are of the Int type, or integers:
Code snippet
let numberOfFoxes: Int = 1let numberOfAnimals: Int = 2Rather than assigning a value directly, we can assign the outcome from a mathematical expression to the constant.
This constant is a Float type, or floating-point number:
Code snippet
let averageCharactersPerWord: Float = (3+5+5+3+5+4+3+4+3) / 9In other words, it can store fractions rather than integers. Notice that in the timeline on the right of this line, the value is displayed as 3.88889.
The print function allows us to see the output from any expression printed to the console or displayed in the playground:
Code snippet
print(averageCharactersPerWord)We will cover functions in a later recipe, Reusing code in functions, but for now, all you need to know is that in order to use a function, you type its name (in this case, print) and then enclose any required input to the function within brackets, ().
When our code calls this function, the timeline to the right of the code displays the output of the statement as 3.88888, which differs from the line above it.
The actual value of the mathematical expression we performed is 3.88888888... with an infinite number of 8s. However, the print function has rounded this up to just five decimal places and rounded it in a different way than the timeline for the line above.
This potential difference between the true value of a floating-point number and how it’s represented by the Swift language is important to remember when dealing with floats.
Next, you’ll see the following lines colored gray:
Code snippet
/*phrase = "The quick brown ? jumps over the lazy ?" // Doesn't compile*/The playground doesn’t produce an output for these lines because they are comments. The /* syntax before the line of code and the */ syntax after the line of code denotes that this is a comment block and, therefore, Swift should ignore anything typed in this block.
Remove /* and */ and you’ll see that // Doesn't compile is still colored gray. This is because // also denotes a comment. Anything after this on the same line is also ignored.
If you now try and run this code, Xcode will tell you that there is a problem with this line, so let’s look at the line to determine the issue.
On the left-hand side of the = sign, we have phrase, which we declared earlier, and now we are trying to assign a new value to it.
We can’t do this because we defined phrase as a constant using the let keyword. We should only use let for things we know will not change.
This ability to define something as unchanging, or immutable, is an important concept in Swift, and we will revisit it in later chapters.
If we want to define something that can change, we declare it as a variable using the var keyword as follows:
Code snippet
var anotherPhrase = phraseSince anotherPhrase is a variable, we can assign a new value to it:
Code snippet
anotherPhrase = " The quick brown 🦊 jumps over the lazy 🐶"Strings in Swift are fully Unicode compliant, so we can have some fun and use emojis instead of words.
Now, let’s print out the values of our strings to see what values they hold:
Code snippet
print(phrase)// "The quick brown fox jumps over the lazy dog"print(anotherPhrase)// "The quick brown 🦊 jumps over the lazy 🐶"In this section, up till this point, we have done the following:
- Defined a string called phrase
- Defined a string called anotherPhrase as having the same value as phrase
- Changed the value of anotherPhrase
- Printed the value of phrase and anotherPhrase
In our output, we see that only anotherPhrase prints the new value that was assigned, even though the values of phrase and anotherPhrase were initially the same.
Although phrase and anotherPhrase had the same value, they do not have an intrinsic connection; so, when anotherPhrase is assigned a new value, this does not affect phrase.
Strings can be easily combined using the + operator:
Code snippet
var phraseInfo = "The phrase" + " has: "print(phraseInfo) // "The phrase has: "The preceding code gives the result you would expect; the strings are concatenated.
You will often want to create strings by including values derived from other expressions. We can do this with string interpolation:
Code snippet
phraseInfo = phraseInfo + "\(numberOfFoxes) fox and \(numberOfAnimals) animals"print(phraseInfo) // "The phrase has: 1 fox and 2 animals"The values inserted after \( and before ) can be anything that can be represented as a string, including other strings, integers, floats, or expressions.
We can also use expressions with string interpolation, such as displaying the number of characters in a string:
Code snippet
print("Number of characters in phrase: \(phrase.count)")Strings in Swift are collections, which are containers of elements; in this case, a string is a collection of characters.
We will cover collections in more depth in Chapter 2, Mastering the Building Blocks, but for now, it’s enough to know that your collections can tell you how many elements they contain through their count property.
We use this to output the number of characters in the phrase.
Multiline string literals can be defined using """ at the beginning and end of the string:
Code snippet
let multilineExplanation = """Interesting note
Why is the phrase, “The quick brown fox jumps over the lazy dog” often used in code?
This phrase contains every letter in the alphabet!
The contents of the multiline string must be on a separate line from the start and end with signifiers. Within a multiline string literal, you can use a single quote character (") without needing to use an additional escape character, as you would with a single-line string literal.
Boolean or Bool values represent either true or false. In the next line, we evaluate the value of a Boolean expression and assign the result to the phrasesAreEqual constant:
Code snippet
let phrasesAreEqual: Bool = phrase == anotherPhraseprint(phrasesAreEqual) // falseIn the preceding code, the equality operator, ==, compares the values on its left and right and evaluates to true if the two values are equal, and false otherwise.
As we discussed earlier, although we assigned anotherPhrase the value of phrase initially, we then assigned a new, different value to anotherPhrase; therefore, phrase and anotherPhrase are not equal and the expression assigns the value of false.
Each side of the == operator can be any expression that evaluates to match the type of the other side, as we do with the following code:
Code snippet
let phraseHas43Characters: Bool = phrase.characters.count == 40 + 3print(phraseHas43Characters) // trueIn this case, the character count of phrase equals 43. Since 40 + 3 also equals 43, the constant is assigned the value of true.
There’s more…
During this recipe, we defined a number of constants and variables, and when we did this, we also explicitly defined their type. For example, consider the following line of Swift code:
Code snippet
let clearlyAString: String = "This is a string literal"Swift is a statically typed language. This means any constant or variable that we define has to have a specific type, and once defined, it cannot be changed to a different type.
However, in the preceding line of code, the clearlyAString constant is clearly a string! The right-hand side of the expression is a string literal, and therefore, we know that the left-hand side will be a string.
More importantly, the Swift compiler also knows this (a compiler is the program that turns Swift code into machine code).
Swift is all about being concise, so since the type can be inferred by the compiler, we do not need to explicitly state it.
Instead of the preceding code, we can use the following code and it will still run, even though we didn’t specify the type:
Code snippet
let clearlyAString = "This is a string literal"In fact, all the type declarations that we have made so far can actually be removed.
Go back through the code we have already written and remove all type declarations (:String, :Int, :Float, and :Bool), as all these can be inferred.
Now, run the playground to confirm that this is still valid Swift code.
See also
Further information regarding these base types in Swift can be found in Apple’s documentation of the Swift language:
Integers, Floats, and Booleans: http://swiftbook.link/docs/the-basics
Strings and characters: http://swiftbook.link/docs/strings
Reusing code in functions
Functions are a building block of almost all programming languages, allowing functionality to be defined and reused.
Swift’s syntax provides an expressive way to define your functions, creating concise and readable code.
In this recipe, we will run through the different types of functions we can create and understand how to define and use them.
Getting ready
In this recipe, we can use the playground from the previous recipe. Don’t worry if you didn’t work through the previous recipe, as this one will contain all the code you need.
How to do it…
Let’s look at how functions are defined in Swift:
Code snippet
func nameOfFunction(parameterLabel1 parameter1: ParameterType1, parameterLabel2 parameter2: ParameterType2,...) -> OutputType { // Function's implementation // If the function has an output type, // the function must return a valid value return output}Let’s look at this in more detail to see how a function is defined:
- func: This indicates that you are declaring a function.
- nameOfFunction: This will be the name of your function and, by convention, is written in camel case (this means that each word, apart from the first, is capitalized and all spaces are removed).
The name should describe what the function does and should provide some context to the value returned by the function, if one is returned. This will also be how you will invoke the method from elsewhere in your code, so bear that in mind when naming it.
- parameterLabel1 parameter1: ParameterType1: This is the first input, or parameter, into the function.
You can specify as many parameters as you like, separated by commas. Each parameter has a parameter name (parameter1) and type (ParameterType1). The parameter name is how the value of the parameter will be made available to your function’s implementation.
You can optionally provide a parameter label in front of the parameter name (parameterLabel1) that will be used to label the parameter when your function is used (at the call site).
- -> OutputType: This indicates that the function returns a value and indicates the type of that value. If no value is returned, this can be omitted.
- { }: The curly brackets indicate the start and end of the function’s implementation; anything within them will be executed when the function is called.
- return output: If the function returns a value, you type return and then specify the value to return. This ends the execution of the function; any code written after the return statement is not executed.
Now, let’s put our learning about functions into action.
Imagine that we are building a contacts app to hold the details of your family and friends, and we want to create a string of a contact’s full name.
Let’s explore some of the ways in which functions can be used:
Code snippet
// Input parameters and outputfunc fullName(givenName: String, middleName: String, familyName: String) -> String { return "\(givenName) \(middleName) \(familyName)"}The preceding function takes three string parameters and outputs a string that puts all these together with spaces in between.
The only thing this function does is take inputs and produce an output without causing any side effects; this type of function is often called a pure function.
To call this function, we enter the name of the function followed by the input parameters within brackets, (), where each parameter value is preceded by its label:
Code snippet
let myFullName = fullName(givenName: "Mandy", middleName: "Mary", familyName: "Barker")print(myFullName) // Mandy Mary BarkerSince the function returns a value, we can assign the output of this function to a constant or a variable, just like any other expression.
The next function takes the same input parameters, but its purpose is not to return a value. Instead, it prints out the parameters as one string separated by spaces:
Code snippet
// Input parameters, with a side effect and no outputfunc printFullName(givenName: String, middleName: String, familyName: String) { print("\(givenName) \(middleName) \(familyName)")}We can call this function in the same way as the preceding function, although it can’t be assigned to anything since it doesn’t have a return value:
Code snippet
printFullName(givenName: "Mandy", middleName: "Mary", familyName: "Barker")The following function takes no parameters as everything it needs to perform its task is contained within it, although it does output a string.
This function calls the fullName function we defined earlier, taking advantage of its ability to produce a full name when given the component names.
Reusing functionality is the most useful feature that functions provide. Let us see how to take advantage of this feature through the following code:
Code snippet
func fullName() -> String { return fullName(givenName: "Mandy", middleName: "Mary", familyName: "Barker")}Since fullName takes no parameters, we can execute it by entering the function name followed by empty brackets, (), and since it returns a value, we can assign the outcome of fullName to a variable:
Code snippet
let personsFullName = fullName()Our final example takes no parameters and returns no value:
Code snippet
// No inputs, no outputfunc printFullName() { let personsFullName = fullName() print(personsFullName)}You can call this function in the same way as the previous functions with no parameters, and there is no return value to assign:
Code snippet
printFullName()As you can see from the preceding example, having input parameters and providing an output value are not required when defining a function.
There’s more…
Now, let’s look at a couple of ways of making your use of functions more expressive and concise.
Default parameter values
One convenience in Swift is the ability to specify default values for parameters. These allow you to omit the parameter when calling, as the default value will be provided instead.
Let’s use the same example as earlier in this recipe, where we are creating a contacts app to hold information about our family and friends.
Many of your family members are likely to have the same family name as you, so we can set the family name as the default value for that parameter. Therefore, the family name only needs to be provided if it is different from the default.
Enter the following code into a playground:
Code snippet
func fullName(givenName: String, middleName: String, familyName: String = "Pendlebury") -> String { return "\(givenName) \(middleName) \(familyName)"}Defining a default value looks similar to assigning a value to the familyName: String = "Pendlebury" parameter.
When calling the function, the parameter with the default value does not have to be given:
Code snippet
let chris = fullName(givenName: "Chris", middleName: "Brian", familyName: "Barker")let madeleine = fullName(givenName: "Madeleine", middleName: "Rose", familyName: "Barker")let mandy = fullName(givenName: "Mandy", middleName: "Mary")print(chris) // Chris Brian Barkerprint(madeleine) // Madeleine Rose Barkerprint(mandy) // Mandy Mary PendleburyParameter overloading
Swift supports parameter overloading, which allows for functions to have the same name and only be differentiated by the parameters that they take.
Let’s learn more about parameter overloading by entering the following code into a playground:
Code snippet
func combine(_ string1: String, _ string2: String) -> String { return "\(string1) \(string2)"}func combine(_ integer1: Int, _ integer2: Int) -> Int { return integer1 + integer2}let combinedString = combine("Madeleine", "Barker")let combinedInt = combine(6, 10)print(combinedString) // Madeleine Barkerprint(combinedInt) // 16Both the preceding functions have the name combined, but one takes two strings as parameters, and the other takes two integers.
Therefore, when we call the function, Swift knows which implementation we intended by the values we pass as parameters.
We’ve introduced something new in the preceding function declarations under Default parameter values: anonymous parameter labels such as _givenName: String.
When we declare the parameters, we use an underscore, _, for the parameter label. This indicates that we don’t want a parameter name shown when calling the function. This should only be used if the purpose of the parameters is clear without the labels.
See also
Further information about functions can be found at https://docs.swift.org/swift-book/documentation/the-swift-programming-language/functions/.
Encapsulating functionality in object classes
Object-oriented programming (OOP) is a programming paradigm common to most software development. At its core is the object class. Objects allow us to encapsulate data and functionality, which can then be stored and passed around.
In this recipe, we will build some class objects, to break down their components, and understand how they are defined and used.
Getting ready
In this recipe, we can use the playground from the previous recipe. Don’t worry if you didn’t work through the previous recipe, as this one will contain all the code you need.
How to do it…
Let’s write some code to create and use class objects, and then we will walk through what the code is doing:
- First, let’s create a Person class object:
Code snippet
class Person {} - Within the curly brackets, { }, add three constants representing the person’s name, and one variable representing their country of residence:
Code snippet
let givenName: Stringlet middleName: Stringlet familyName: Stringvar countryOfResidence: String = "UK" - Below the properties, yet still within the curly brackets, add an initialization method for our Person object:
Code snippet
init(givenName: String, middleName: String, familyName: String) { self.givenName = givenName self.middleName = middleName self.familyName = familyName} - Now, add a variable as a property of the class, with a computed value:
Code snippet
var displayString: String { return "\(self.fullName()) - Location: \(self.countryOfResidence)" } - Add a function within the Person object that returns the person’s full name:
Code snippet
func fullName() -> String { return "\(givenName) \(middleName) \(familyName)"} - Next, create a Friend object that extends the functionality of the Person object:
Code snippet
final class Friend: Person {} - Within the Friend class object, add a variable property to hold details of where the user met the friend, and override the display string property to customize its behavior for Friend objects:
Code snippet
var whereWeMet: String? override var displayString: String { let meetingPlace = whereWeMet ?? "Don't know where we met" return "\(super.displayString) - \(meetingPlace)" } - In addition to the Friend object, create a Family object that extends the functionality of the Person object:
Code snippet
final class Family: Person {} - Add a relationship property to the Family object and create an initializer method to populate it in addition to the other properties from Person:
Code snippet
final class Family: Person { let relationship: String init(givenName: String, middleName: String, familyName: String = "Barker", relationship: String) { self.relationship = relationship super.init(givenName: givenName, middleName: middleName, familyName: familyName) }} - Give the Family object a custom displayString method that includes the value of the relationship property by adding this code within the Family object
definition (within the curly brackets):
Code snippet
override var displayString: String { return "\(super.displayString) - \(relationship)" } - Finally, create instances of the new objects and print the display string to see how its value differs:
Code snippet
let steve = Person(givenName: "Steven", middleName: "Paul", familyName: "Jobs")let sam = Friend(givenName: "Sam", middleName: "Wow", familyName: "Rowley")sam.whereWeMet = "Work together at Jaguar Land Rover"let maddie = Family(givenName: "Madeleine", middleName: "Barker", relationship: "Daughter")let mark = Family(givenName: "Mark", middleName: "David", familyName: "Pendlebury", relationship: "Brother-In-Law")mark.countryOfResidence = "UK"print(steve.displayString)// Steven Paul Jobsprint(sam.displayString)// Sam Wow Rowley - Work together at Jaguar Land Roverprint(maddie.displayString)// Madeleine Barker - Daughterprint(mark.displayString)// Mark David Pendlebury - Brother-In-Law
How it works…
Classes are defined with the class keyword. Class names start with a capital letter by convention, and the implementation of the class is contained (or scoped) within curly brackets:
Code snippet
class Person { //...}An object can have property values, which are contained within the object.
These properties can have initial values, as countryOfResidence does in the following code:
Code snippet
let givenName: String let middleName: String let familyName: String var countryOfResidence: String = "UK"However, bear in mind that constants (defined with let) cannot be changed once the initial value has been set:
If your class were to just have the preceding property definitions, the compiler would raise a warning, as givenName, middleName, and familyName are defined as non-optional strings. However, we have not provided any way to populate those values.
The compiler needs to know how the object will be initialized so that we can be sure that all the non-optional properties will indeed have values:
Code snippet
class Person { let givenName: String let middleName: String let familyName: String var countryOfResidence: String = "UK" init(givenName: String, middleName: String, familyName: String) { self.givenName = givenName self.middleName = middleName self.familyName = familyName } //...}The init method is a special method (functions defined within objects are called methods) that’s called when the object is initialized. In the Person object of the preceding code, givenName, middleName, and familyName must be passed in when the object is initialized, and we assign those provided values to the object’s properties.
The self. prefix is used to differentiate between the property and the value passed in, as they have the same name.
We do not need to pass in a value for countryOfResidence as this has an initial value. This isn’t ideal though, as when we create a Person object, it will always have the countryOfResidence variable set to "UK", and we will then have to change that value, if different, after initialization.
Another way to do this would be to use a default parameter value, as seen in the previous recipe. Amend the Person object initialization to the following:
Code snippet
class Person { let givenName: String let middleName: String let familyName: String var countryOfResidence: String init(givenName: String, middleName: String, familyName: String, countryOfResidence: String = "UK") { self.givenName = givenName self.middleName = middleName self.familyName = familyName self.countryOfResidence = countryOfResidence } //...}Now, you can provide a country of residence in the initialization or omit it to use the default value.
Next, let’s look at the displayString property of our Person class:
Code snippet
class Person { //... var displayString: String { return "\(self.fullName()) - Location: \(self.countryOfResidence)" } //...}This property declaration is different from the others. Rather than having a value assigned to it, it is followed by an expression contained within curly braces.
This is a computed property; its value is not static but is determined by the given expression every time the property is accessed. Any valid expressions can be used to compute the property but must return a value that matches the declared type of the property.
The compiler will enforce this, and you can’t omit the variable type for computed properties. In constructing the preceding return value, we use self.fullName() and self.countryOfResidence.
As we did in the preceding init method, we use self. to show that we are accessing the method and property of the current instance of the Person object.
However, since displayString is already a property on the current instance, the Swift compiler is aware of this context and so those self-references can be removed:
Code snippet
var displayString: String { return "\(fullName()) - Location:\(countryOfResidence)"}Objects can do work based on the information they contain, and this work can be defined in methods.
Methods are just functions that are contained within classes and have access to all the object’s properties. The Person object’s fullName method is an example of this:
Code snippet
class Person { //... func fullName() -> String { return "\(givenName) \(middleName) \(familyName))" } //...}All the abilities of a function are available, which we explored in the last recipe, Reusing code in functions, including optional inputs and outputs, default parameter values, and parameter overloading.
Having defined a Person object, we want to extend the concept of Person to define a friend. A friend is also a person, so it stands to reason that anything a Person object can do, a Friend object can also do.
We model this inherited behavior by defining Friend as a subclass of Person. We define the class that our Friend class inherits from (or the superclass), after the class name, separated by :, as follows:
Code snippet
final class Friend: Person { var whereWeMet: String? //...}By inheriting from Person, our Friend object inherits all the properties and methods from its superclass. We can then add any extra functionality we require. In this case, we add a property for details of where we met this friend.
The final prefix tells the compiler that we don’t intend for this class to be subclassed; it is the final class in the inheritance hierarchy. This allows the compiler to make some optimizations as it knows it won’t be extended.
In addition to implementing new functionalities, we can override functionalities from the superclass using the override keyword:
Code snippet
final class Friend: Person { //... override var displayString: String { let meetingPlace = whereWeMet ?? "Don't know where we met" return "\(super.displayString) - \(meetingPlace)" }}In the preceding code, we override the displayString computed property from Person as we want to add the "where wemet" information.
Within the computed property, we can access the superclass’s implementation by calling super., and then referencing the property or method.
Next, let’s look at how we can customize how our subclasses are initialized:
Code snippet
final class Family: Person { let relationship: String init(givenName: String, middleName: String, familyName: String = "Barker", relationship: String) { self.relationship = relationship super.init(givenName: givenName, middleName: middleName, familyName: familyName) } //...}Our Family class also inherits from Person, but we want to add a relationship property, which should form part of the initialization. So, we can declare a new init that also takes a relationship string value.
That passed-in value is then assigned to the relationship property because the superclass’s initializer is called.
With all our class objects defined, we can create instances of these objects and call methods and access properties of these objects:
Code snippet
let steve = Person(givenName: "Steven", middleName: "Paul", familyName: "Jobs")let sam = Friend(givenName: "Sam", middleName: "Wow", familyName: "Rowley")sam.whereWeMet = "Work together at Jaguar Land Rover"let maddie = Family(givenName: "Madeleine", middleName: "Barker", relationship: "Daughter")let mark = Family(givenName: "Mark", middleName: "David", familyName: "Pendlebury", relationship: "Brother-In-Law")mark.countryOfResidence = "US"print(steve.displayString)// Steven Paul Jobsprint(sam.displayString)// Sam Wow Rowley - Work together at Jaguar Land Roverprint(maddie.displayString)// Madeleine Barker - Daughterprint(mark.displayString)// Mark David Pendlebury - Brother-In-LawTo create an instance of an object, we use the name of the object like a function, passing in any required parameters. This returns an object instance that we can then assign to a constant or variable.
When creating an instance, we are actually calling the object’s init method, and you can do this explicitly, as follows:
Code snippet
let steve = Person.init(givenName: "Steven", middleName: "Paul", familyName: "Jobs")However, to be concise, this is usually omitted.
There’s more…
Class objects are reference types, which is a term that refers to the way they are stored and referenced internally. To see how these reference type semantics work, let’s look at how an object behaves when it is modified:
Code snippet
class VideoGameReview { let videoGameTitle: String var starRating: Int // Rating out of 5 init(videoGameTitle: String, starRating: Int) { self.videoGameTitle = videoGameTitle self.starRating = starRating }}// Write a reviewlet monkeyIslandReview = VideoGameReview(videoGameTitle: "The Secret of Monkey Island", starRating: 4)// Post it to social medialet referenceToReviewOnTwitter = monkeyIslandReviewlet referenceToReviewOnFacebook = monkeyIslandReviewprint(referenceToReviewOnTwitter.starRating) // 4print(referenceToReviewOnFacebook.starRating) // 4// Reconsider the reviewmonkeyIslandReview.starRating = 5// The change is visible from anywhere with a reference to the objectprint(referenceToReviewOnTwitter.starRating) // 5print(referenceToReviewOnFacebook.starRating) // 5In the preceding code, we have defined a VideoGameReview class object, created an instance of that VideoGameReview object, and then assigned that review to two separate constants.
As a class object is a reference type, it is a reference to the object that is stored in the constant, rather than a new copy of the object.
Therefore, when we reconsider our review, to give the classic game The Secret of Monkey Island five stars, we are changing the underlying object. All references that access that underlying object will receive the updated value when the starRating property is accessed.
See also
Further information about classes can be found at https://docs.swift.org/swift-book/documentation/the-swift-programming-language/classesandstructures.
Bundling values into structs
Class objects are great for encapsulating data and functionality within a unifying concept, such as a person, as they allow individual instances to be referenced. However, not everything is an object.
We may need to represent data that is logically grouped together, but there isn’t much more than that. It’s not more than the sum of its parts; it is the sum of its parts.
For this, there are structs. Short for structures, structs can be found in many programming languages. Structs are value types (as opposed to classes, which are reference types) and, as such, behave differently when passed around. In this recipe, we will learn how structs work in Swift, and when and how to use them.
Getting ready
In this recipe, we will build on top of the previous recipe, so open the playground you have used for the previous recipe. Don’t worry if you didn’t work through the previous recipe, as this one will contain all the code you need.
How to do it…
We have already defined a Person object as having three separate string properties relating to the person’s name. However, these three separate strings don’t exist in isolation from each other, as together they define a person’s name.
Currently, if you want to retrieve a person’s name, you have to access three separate properties and combine them. Let’s tidy this up by defining a person’s name as its own struct:
- Create a struct called PersonName:
Code snippet
struct PersonName {} - Add three properties to PersonName, for givenName, middleName, and familyName. Make the first two into constants, and the last one into a variable, as a family
name can change:
Code snippet
struct PersonName { let givenName: String let middleName: String var familyName: String} - Add a method to combine the three properties into a fullName string:
Code snippet
func fullName() -> String { return "\(givenName) \(middleName) \(familyName)" } - Provide a method to change the familyName property and prefix this method with the mutating keyword:
Code snippet
mutating func change(familyName: String) { self.familyName = familyName } - Create a PersonName struct, passing in the property values:
Code snippet
var duncansName = PersonName(givenName: "Duncan", middleName: "Zowie", familyName: "Jones")
How it works…
Defining a struct is very similar to defining an object class, and that is intentional. Much of the functionality available to a class is also available to a struct. Therefore, you will notice that aside from using the struct keyword instead of class, the definitions of a class and a struct are almost identical.
Within the PersonName struct, we have properties for the three components of the name and the fullName method we saw earlier to combine the three name components into a fullName string.
The method we created to change the familyName property has a new keyword that we haven’t seen before, mutating:
Code snippet
mutating func change(familyName: String) { self.familyName = familyName }This keyword must be added to any method in a struct that changes a property of the struct.
This keyword is to inform anyone using the method that it will change or mutate the struct. Unlike class objects, when you mutate a struct, you create a copy of the struct with the changed properties. This behavior is known as value-type semantics.
To see this in action, let’s first create a struct and then check that it behaves as we expect when we assign it to different values:
Code snippet
let duncansBirthName = PersonName(givenName: "Duncan", middleName: "Zowie", familyName: "Jones")print(duncansBirthName.fullName()) // Duncan Zowie Jonesvar duncansCurrentName = duncansBirthNameprint(duncansCurrentName.fullName()) // Duncan Zowie JonesSo far, so good. We have created a PersonName struct, assigned it to a constant called duncansBirthName, and then assigned that constant to a variable called duncansCurrentName.
Now, let’s see what happens when we mutate duncansCurrentName:
Code snippet
duncansCurrentName.change(familyName: "Bowie")print(duncansBirthName.fullName()) // Duncan Zowie Jonesprint(duncansCurrentName.fullName()) // Duncan Zowie BowieWhen we call the mutating method on the duncansCurrentName variable, only that variable is changed. This change is not reflected in duncansBirthName, even though these structs were once the same.
This behavior would be different if PersonName was an object class, and we explored that behavior in the previous recipe.
There’s more…
We can use how this value-type behavior interacts with constants and variables to restrict unintended changes.
To see this in action, first, let’s amend our Person class to our new PersonName struct:
Code snippet
class Person { let birthName: PersonName var currentName: PersonName var countryOfResidence: String init(name: PersonName, countryOfResidence: String = "UK") { birthName = name currentName = name self.countryOfResidence = countryOfResidence } var displayString: String { return "\(currentName.fullName()) - Location: \(countryOfResidence)" }}We’ve added the birthName and currentName properties of our new PersonName struct type, and we initiate them with the same value when the Person object is created.
Since a person’s birth name won’t change, we define it as a constant, but their current name can change, so it’s defined as a variable.
Now, let’s create a new Person object:
Code snippet
var name = PersonName(givenName: "Duncan", middleName: "Zowie", familyName: "Jones")let duncan = Person(name: name)print(duncan.currentName.fullName()) // Duncan Zowie JonesSince our PersonName struct has value semantics, we can use this to enforce the behavior that we expect our model to have. We would expect to not be able to change a person’s birth name, and if you try, you will find that the compiler won’t let you.
As we discussed earlier, changing the family name mutates the struct, and so a new copy is made. However, we defined birthName as a constant, which can’t be changed, so the only way we would be able to change the family name would be to change our definition of birthName from let to var:
Code snippet
duncan.birthName.change(familyName: "Moon") // Does not compile.// Compiler tells you to change let to varWhen we change currentName to have a new family name, which we can do since we defined it as var, it changes the currentName property but not the birthName property, even though these were assigned with the same value:
Code snippet
print(duncan.birthName.fullName()) // Duncan Zowie Jonesprint(duncan.currentName.fullName()) // Duncan Zowie Jonesduncan.currentName.change(familyName: "Bowie")print(duncan.birthName.fullName()) // Duncan Zowie Jonesprint(duncan.currentName.fullName()) // Duncan Zowie BowieWe have used a combination of objects and structs to create a model that enforces our expected behavior. This technique can help to reduce potential bugs in our code.
See also
Further information about structs can be found at https://docs.swift.org/swift-book/documentation/the-swift-programming-language/classesandstructures.
Enumerating values with enums
An enumeration is a programming construct that lets you define a value type with a finite set of options. Most programming languages have enumerations (usually abbreviated to enums), although the Swift language takes the concept further than most.
An example of an enum from the iOS/macOS SDK is ComparisonResult, which you would use when sorting items. When comparing for the purposes of sorting, there are only three possible results from a comparison:
- Ascending: The items are ordered in ascending order
- Descending: The items are ordered in descending order
- Same: The items are the same
There are a finite number of possible options for a comparison result; therefore, it’s a perfect candidate for being represented by an enum:
Code snippet
enum ComparisonResult : Int { case orderedAscending case orderedSame case orderedDescending}Swift takes the enum concept and elevates it to a first-class type. As we will see, this makes enums a very powerful tool for modeling your information.
This recipe will examine how and when to use enums in Swift.
Getting ready
This recipe will build on top of the earlier recipes, so open the playground you have used for the previous recipes. Don’t worry if you haven’t tried out the previous recipes, as this one will contain all the code you need.
How to do it…
In the Encapsulating functionality in object classes recipe, we created a Person object to represent people in our model, and in the Bundling values into structs recipe, we made a PersonName struct to hold information about a person’s name.
Now, let’s turn our attention to a person’s title (for example, Mr. or Mrs.), which precedes someone’s full name. There are a small and finite number of common titles that a person may have; therefore, an enum is a great way to model this information:
- Create an enum to represent a person’s title:
Code snippet
enum Title { case mr case mrs case mister case miss case dr case prof case other} - We define our enumeration with the enum keyword and provide a name for the enum. As with classes and structs, the convention is that this starts with a capital letter, and the implementation is
defined within curly brackets. We define each enum option with the case keyword, and, by convention, these start with a lowercase character. Assign the mr case of our Title enum to a value:
Code snippet
let title1 = Title.mr - Enums can be assigned by specifying the enum type, then a dot, and then the case. However, if the compiler can infer the enum type, we can omit the type and just provide the case, preceded by a dot.
- Define a constant value of the Title type and then assign a case to it with the type inferred:
Code snippet
let title2: Titletitle2 = .mr
How it works…
In many programming languages, including C and Objective-C, enums are defined as a type definition on top of an integer, with each case being given a defined integer value. In Swift, enums do not need to represent integers under the hood.
In fact, they do not need to be backed by any type and can exist as their own abstract concepts. Consider the following example:
Code snippet
enum CompassPoint { case North, South, East, West}It doesn’t make sense to map the compass points as integers, and in Swift, we don’t have to.
For Title also, an Int -based enum doesn’t seem appropriate; however, a String -based one may be. So, let’s declare our enum to be String -based:
Code snippet
enum Title: String { case mr = "Mr" case mrs = "Mrs" case mister = "Master" case miss = "Miss" case dr = "Dr" case prof = "Prof" case other // Inferred as "other"}The enum’s raw underlying type is declared after its name and a : separator. The raw types that can be used to back the enum are limited to types that can be represented as a literal.
This includes the following Swift base types:
- String
- Int
- Float
- Bool
Cases can be assigned a value of the raw type; however, certain types can be inferred and so do not need to be explicitly declared. For Int -backed enums, the inferred values are sequentially assigned starting at 0:
Code snippet
enum Rating: Int { case worst // Inferred as 0 case bad // Inferred as 1 case average // Inferred as 2 case good // Inferred as 3 case best // Inferred as 4}For String -based enums, the inferred value is the name of the case, so the other case in our Titleenum is inferred to be other.
We can get the underlying value of the enum in its raw type by accessing its rawValue property:
Code snippet
let title1 = Title.mrprint(title1.rawValue) // "Mr"There’s more…
As mentioned in the introduction to this recipe, Swift treats enums as a first-class type; therefore, they can have functionality that is not available to enums in most programming languages. This includes having computed variables and methods.
Methods and computed variables
Let’s imagine that it is important for us to know whether a person’s title relates to a professional qualification that the person holds.
Let’s add a method to our enum to provide that information:
Code snippet
enum Title: String { case mr = "Mr" case mrs = "Mrs" case mister = "Master" case miss = "Miss" case dr = "Dr" case prof = "Prof" case other // Inferred as "other" func isProfessional() -> Bool { return self == Title.dr || self == Title.prof }}For the list of titles that we have defined, Dr and Prof relate to professional qualifications, so we have our method return true if self (the instance of the enum type this method is called on) is equal to the dr case, or equal to the prof case.
This functionality feels more appropriate as a computed property since whether isProfessional applies or not is intrinsic to the enum itself, and we don’t need to do much work to determine the answer. So, let’s change this into a property:
Code snippet
enum Title: String { case mr = "Mr" case mrs = "Mrs" case mister = "Master" case miss = "Miss" case dr = "Dr" case prof = "Prof" case other // Inferred as "other" var isProfessional: Bool { return self == Title.dr || self == Title.prof }}Now, we can determine whether a title is a professional title by accessing the computed property on it:
Code snippet
let loganTitle = Title.mrlet xavierTitle = Title.profprint(loganTitle.isProfessional) // falseprint(xavierTitle.isProfessional) // trueWe can’t store any additional information on an enum, over and above the enum value itself, but being able to define methods and computed properties that provide extra information about the enum is a really powerful option.
Associated values
Our String -based enum seems perfect for our title information, except that we have a case called other. If the person has a title that we hadn’t considered when defining the enum, we can choose other, but that doesn’t capture what the other title is.
In our model, we would need to define another property to hold the value given for other, but that splits our definition of Title over two separate properties, which could cause an unintended combination of values.
Swift enums have a solution for this situation: associated values. We can choose to associate a value with each enum case, allowing us to bind a non-optional string to our other case.
Let’s rewrite our Title enum to use an associated value:
Code snippet
enum Title { case mr case mrs case mister case miss case dr case prof case other(String)}We have defined the other case to have an associated value by putting the value’s type in brackets after the case declaration. We do not need to add associated values for every case. Each case declaration can have associated values of different types or none at all.
Now, let’s look at how we assign an enum case with an associated type:
Code snippet
let mister: Title = .mrlet dame: Title = .other("Dame")The associated value is declared in brackets after the case, and the compiler enforces that the type matches the type declared in our enum definition.
As we declared the other case to have a non-optional string, we are ensuring that a title of other cannot be chosen without providing details of what the other title is, and we don’t need another property to fully represent Title in our model.
See also
Further information about enums can be found at http://swiftbook.link/docs/enums.
Passing around functionality with closures
Closures are also referred to as anonymous functions, and this is the best way to explain them. Closures are functions without a name and, like other functions, they can take a set of input parameters and can return an output.
Closures behave like other primary types. They can be assigned, stored, passed around, and used as input and output to functions and other closures.
In this recipe, we will explore how and when to use closures in our code.
Getting ready
We will continue to build on our contacts app example from earlier in this chapter, so you should use the same playground as in the previous recipes.
If, however, you are implementing this in a new playground, first add the relevant code from the previous recipes:
Code snippet
struct PersonName { let givenName: String let middleName: String var familyName: String func fullName() -> String { return "\(givenName) \(middleName) \(familyName)" } mutating func change(familyName: String) { self.familyName = familyName }}class Person { let birthName: PersonName var currentName: PersonName var countryOfResidence: String init(name: PersonName, countryOfResidence: String = "UK") { birthName = name currentName = name self.countryOfResidence = countryOfResidence } var displayString: String { return "\(currentName.fullName()) - Location: \(countryOfResidence)" }}How to do it…
Now, let’s define a number of types of closures, which we will then work through step by step:
- Define a closure to print this author’s details that takes No input and returns no output:
Code snippet
// No input, no outputlet printAuthorsDetails: () -> Void = { let name = PersonName(givenName: "Chris", middleName: "Brian", familyName: "Barker") let author = Person(name: name) print(author.displayString)}printAuthorsDetails() // "Chris Brian Barker - Location: UK" - Define a closure that creates a Person object. The closure takes No input, but returns a Person object as the output:
Code snippet
// No input, Person outputlet createAuthor: () -> Person = { let name = PersonName(givenName: "Chris", middleName: "Brian", familyName: "Barker") let author = Person(name: name) return author}let author = createAuthor()print(author.displayString) // "Chris Brian Barker - Location: UK" - Define a closure that prints a person’s details, taking the three components of their name as String inputs, but returning no output:
Code snippet
// String inputs, no outputlet printPersonsDetails: (String, String, String) -> Void = { (given, middle, family) in let name = PersonName(givenName: given, middleName: middle, familyName: family) let author = Person(name: name) print(author.displayString)}printPersonsDetails("Mandy", "Mary", "Barker")// "Mandy Mary Barker - Location: UK" - Finally, define a closure to create a person, taking the three name components as String inputs and returning a Person object as the output:
Code snippet
// String inputs, Person outputlet createPerson: (String, String, String) -> Person = { (given, middle, family) in let name = PersonName(givenName: given, middleName: middle, familyName: family) let person = Person(name: name) return person}let felix = createPerson("Madeleine", "Rose", "Barker")print(felix.displayString) // "Madeleine Rose Barker - Location: UK"
How it works…
Let’s take a look at the different types of closures we just implemented:
Code snippet
// No input, no outputlet printAuthorsDetails: () -> Void = { let name = PersonName(givenName: "Chris", middleName: "Brian", familyName: "Barker") let author = Person(name: name) print(author.displayString)}printAuthorsDetails() // "Chris Brian Barker - Location: UK"As a first-class type in Swift, closures can be assigned to constants or variables, and constants and variables need a type.
To define a closure’s type, we need to specify the input parameter types and the output type, and for the closure in the preceding code, the type is () -> Void. The Void type is another way of saying nothing, so this closure takes no inputs and returns nothing, and the closure’s functionality is defined within the curly brackets, as with other functions.
Now that we have this closure defined and assigned to the printAuthorsDetails constant, we can execute it like other functions, but with the variable name instead of the function’s name.
We can use the following closure, which will cause this author’s details to be printed:
Code snippet
printAuthorsDetails() // "Chris Brian Barker - Location: UK"The next closure type takes No input parameters, but returns a Person object, as you can see with the () -> Person type definition:
Code snippet
// No input, Person outputlet createAuthor: () -> Person = { let name = PersonName(givenName: "Chris", middleName: "Brian", familyName: "Barker") let author = Person(name: name) return author}let author = createAuthor()print(author.displayString) // "Chris Brian Barker - Location: UK"Since it has an output, the execution of the closure returns a value that can be assigned to a variable or constant. In the preceding code, we execute the createAuthor closure and assign the output to the author constant.
Since we defined the closure type as () -> Person, the compiler knows that the output type is Person, and so the type of constant can be inferred.
Since we don’t need to declare it explicitly, let’s remove the type declaration:
Code snippet
let author = createAuthor()print(author.displayString) // "Chris Brian Barker - Location: UK"Next, let’s take a look at a closure that takes input parameters:
Code snippet
// String inputs, no outputlet printPersonsDetails: (String, String, String) -> Void = { (given, middle, family) in let name = PersonName(givenName: given, middleName: middle, familyName: family) let author = Person(name: name) print(author.displayString)}You will remember, from the Reusing code in functions recipe, that we can define parameter labels, which determine how the parameters are referenced when the function is used, and parameter names, which define how the parameter is referenced from within the function.
In closures, these are defined a bit differently:
- Parameter labels cannot be defined for closures, so, when calling a closure, the order and parameter type have to be used to determine what values should be provided as parameters:
Code snippet
(String, String, String) -> Void - Parameter names are defined inside the curly brackets, followed by the in keyword:
Code snippet
(given, middle, family) in - Putting it all together, we can define and execute a closure with inputs and an output, as follows:
Code snippet
// String inputs, Person outputlet createPerson: (String, String, String) -> Person = { (given, middle, family) in let name = PersonName(givenName: given, middleName: middle, familyName: family) let person = Person(name: name) return person}
There’s more…
We’ve seen how we can store closures, but we can also use them as method parameters. This pattern can be really useful when we want to be notified when a long-running task is completed.
Let’s imagine that we want to save the details of our Person object to a remote database, maybe for backup or use on other devices.
We may want to be notified when this process has been completed, so we execute some additional code, perhaps printing a completion message, or updating some UI. While the actual saving implementation is outside the scope of this recipe, we can amend our Person class to allow this save functionality to be called, passing a closure to execute on completion.
Add a method to save to a remote database, taking in a completion Handler, and store it for subsequent execution:
Code snippet
class Person { //.... var saveHandler: ((Bool) -> Void)? func saveToRemoteDatabase(handler: @escaping (Bool) -> Void) { saveHandler = handler // Send person information to remove database // Once remote save is complete, it calls saveComplete(Bool) // We'll fake it for the moment, and assume the save is // complete. saveComplete(success: true) } func saveComplete(success: Bool) { saveHandler?(success) }}We define an optional variable to hold on to saveHandler during the long-running save operation. Our closure will take a Bool value to indicate whether the save was a success:
Code snippet
var saveHandler: ((Bool) -> Void)?Let’s now define a method to save our Person object, which takes a closure as a parameter:
Code snippet
func saveToRemoteDatabase(handler: @escaping (Bool) -> Void) { saveHandler = handler // Send person information to remove database // Once remote save is complete, it calls saveComplete(Bool) // We'll fake it for the moment, and assume the save is complete. saveComplete(success: true)}Our function stores the given closure in the variable and then starts the process of saving to the remote database (the actual implementation of this is outside the scope of this recipe). This save process will call the saveComplete method when completed.
We added a modifier, @escaping, just before the closure type definition. This tells the compiler that, rather than using the closure within this method, we intend to store the closure and use it later. The closure will be escaping the scope of this method.
This modifier is needed to prevent the compiler from doing certain optimizations that would be possible if the closure was nonescaping. It also helps users of this method understand whether the closure they provide will be executed immediately or at a later time.
With the save operation complete, we can execute the saveHandler variable, passing in the success Boolean:
Code snippet
func saveComplete(success: Bool) { saveHandler?(success)}Since we stored the closure as an optional, we need to unwrap it by adding a ? character after the variable name. If saveHandler has a value, the closure will be executed; if it is nil, the expression is ignored.
Now that we have a function that takes a closure, let’s see how we call it:
Code snippet
let fox = createPerson("Mandy", "Mary", "Barker")fox.saveToRemoteDatabase(handler: { success in print("Saved finished. Successful: \(success)")})Swift provides a more concise way to provide closures to functions.
When a closure is the last (or only) parameter, Swift allows it to be provided as a trailing closure. This means the parameter name can be dropped and the closure can be specified after the parameter brackets. So, we can rewrite the preceding code with the following neater syntax:
Code snippet
let fox = createPerson("Mandy", "Mary", "Barker")fox.saveToRemoteDatabase() { success in print("Saved finished. Successful: \(success)")}See also
Further information about closures can be found at https://docs.swift.org/swift-book/documentation/the-swift-programming-language/closures/.
Using protocols to define interfaces
Protocols are a way to describe the interface that a type provides. They can be thought of as a contract, defining how you can interact with instances of that type.
Protocols are a great way to abstract what something does from how it does it. As we will see in subsequent chapters, Swift adds functionalities to protocols that make them even more useful and powerful than in many other programming languages.
Getting ready
We will continue to build on examples from the previous recipes, but don’t worry if you haven’t followed these recipes yet as all the code you need is listed in the upcoming sections.
How to do it…
In the previous recipe, we added a method to our Person class that (given the full implementation) would save it to a remote database. This is a very useful functionality, and as we add more features to our app, there will likely be more types that we also want to save to a remote database:
- Create a protocol to define how we will interface with anything that can be saved in this way:
Code snippet
protocol Saveable { var saveNeeded: Bool { get set } func saveToRemoteDatabase(handler: @escaping (Bool) -> Void)} - Update our Person class so that it conforms to the Saveable protocol:
Code snippet
class Person: Saveable { //.... var saveHandler: ((Bool) -> Void)? var saveNeeded: Bool = true func saveToRemoteDatabase(handler: @escaping (Bool) -> Void) { saveHandler = handler // Send person information to remove database // Once remote save is complete, it calls // saveComplete(Bool) // We'll fake it for the moment, and assume the save is // complete. saveComplete(success: true) } func saveComplete(success: Bool) { saveHandler?(success) }}
How it works…
Protocols are defined with the protocol keyword, and the implementation is contained within curly brackets. As we have seen with other type definitions, it is conventional to begin a protocol name with a capital letter. It is also conventional to name a protocol as either something that the type is or something that it does. In this protocol, we are declaring that any type of implementation is Saveable.
Types conforming to this protocol have two parts of the interface to implement. Let’s look at the first:
Code snippet
var saveNeeded: Bool { get set }The Saveable protocol declares that anything implementing it needs to have a variable called saveNeeded, which is a Bool type.
This property will indicate that the information held in the remote database is out of date and a save is needed. In addition to the usual property declaration, a protocol requires us to define whether the property can be accessed (get) and changed (set), which is added in curly brackets after the type declaration.
Removing the set keywords makes it a read-only variable.
The second part of our protocol definition is to describe the method we can call to save the information to the remote database:
Code snippet
func saveToRemoteDatabase(handler: @escaping (Bool) -> Void)This func declaration is exactly the same as other function declarations we have seen. However, the implementation of this function, which would have been contained in curly brackets, is omitted. Any type conforming to this protocol must provide this function and its implementation.
Now that we have defined our protocol, we need to implement the Saveable protocol on our Person class that we have been using throughout this chapter:
Code snippet
class Person: Saveable { //.... var saveHandler: ((Bool) -> Void)? func saveToRemoteDatabase(handler: @escaping (Bool) -> Void) { saveHandler = handler // Send person information to remove database // Once remote save is complete, it calls // saveComplete(Bool) // We'll fake it for the moment, and assume the save is // complete. saveComplete(success: true) } func saveComplete(success: Bool) { saveHandler?(success) }}Conforming to a protocol looks similar to how a class inherits from another class, as we saw earlier in this chapter.
The protocol name is added after the type name, separated by :. By adding this conformance, the compiler will complain that our Person object doesn’t implement part of the protocol, as we haven’t declared a saveNeeded property. So, let’s add that:
Code snippet
class Person: Saveable { //.... var saveHandler: ((Bool) -> Void)? func saveToRemoteDatabase(handler: @escaping (Bool) -> Void) { saveHandler = handler // Send person information to remove database // Once remote save is complete, it calls // saveComplete(Bool) // We'll fake it for the moment, and assume the save is // complete. saveComplete(success: true) } func saveComplete(success: Bool) { saveHandler?(success) }}We’ll add a default value of true since when an instance of this object is created, it won’t be in the remote database, so it will need to be saved.
There’s more…
Protocol conformance can be applied to classes, structs, enums, and even other protocols. The benefit of a protocol is that it allows an instance to be stored and passed without needing to know how it’s implemented under the hood.
This provides many benefits, including testing using mock objects and changing implementations without changing how and where the implementations are used.
Let’s add a feature to our app that lets us set a reminder for a contact’s birthday, which we will also want to save to our remote database.
We can use protocol conformance to give our reminder the same consistent save functionality interface, even though a reminder may have a very different implementation for saving.
Let’s create our Reminder object and have it conform to the Saveable protocol:
Code snippet
class Reminder: Saveable { var dateOfReminder: String // There is a better way to storedates, but this will suffice currently. var reminderDetail: String // eg. Ali's birthday init(date: String, detail: String) { dateOfReminder = date reminderDetail = detail } var saveHandler: ((Bool) -> Void)? var saveNeeded: Bool = true func saveToRemoteDatabase(handler: @escaping (Bool) -> Void) { saveHandler = handler // Send reminder information to remove database // Once remote save is complete, it calls // saveComplete(success: Bool) // We'll fake it for the moment, and assume the save is // complete. saveComplete(success: true) } func saveComplete(success: Bool) { saveHandler?(success) }}Our Reminder object conforms to Saveable and implements all the requirements.
We now have two objects that represent very different things and have different functionalities, but they both implement Saveable; therefore, we can treat them in a common way.
To see this in action, let’s create an object that will manage the saving of information in our app:
Code snippet
class SaveManager { func save(_ thingToSave: Saveable) { thingToSave.saveToRemoteDatabase { success in print("Saved! Success: \(success)") } }}let maddie = createPerson("Madeleine", "Rose", "Barker")// This closure was// covered in the previous recipelet birthdayReminder = Reminder(date: "08/06/2006", detail: "Maddie's Birthday")let saveManager = SaveManager()saveManager.save(maddie)saveManager.save(birthdayReminder)In the preceding example, SaveManager doesn’t know the underlying type that it is being passed, but it doesn’t need to. It receives instances that conform to the Saveable protocol and, therefore, can use that interface to save each instance.
See also
Further information about protocols can be found at https://docs.swift.org/swift-book/documentation/the-swift-programming-language/protocols/.