It also aligns images correctly too. However, the font style always outputs to Sans Serif, but the monospace works - mystery there because using the div should probably work there too.
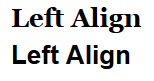
So you can see that with the div the spacing is greater distance from the Welcome. Holds true for normal paragraphs. Seems like the spacing is rather larger than normal.
Would you recommend to have squill.snow (the css file) reside on my server and that way I could make some of these changes to the paragraph property, etc?
Wanted to give you an update on the top and bottom alignment issue where the spacing was too much. What fixed the issue was using a separate CSS file for the output page making the margins like this:
  margin-top: -25px;
  margin-bottom: -45px;
Also changed some padding px too.
The real issue was that it looked fine in the editor but once it was drawn to the page the padding and margins weren’t right. So having separate CSS did the trick.
Only issue now is the fonts don’t output right but I can sort of fix that by not having that option available in the editor and then fix the output page to a specific font.
I want to again thank you for all of your assistance; without your help I would have totally been lost in the process and I do believe I learned a bit!
I think this is the best idea. Use the default CSS styles as far as you can, but the moment they don’t behave as they should, declare something more specific for your output page.
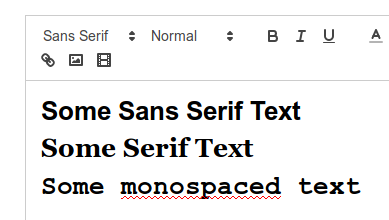
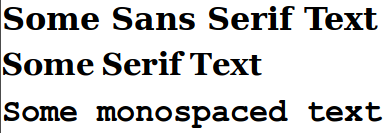
As you can see, the Sans Serif text has no styling applied to it, so you’d need to add this yourself. As far as I can tell, the other two display correctly.
Based on the above, can you re-phrase what the problem is.
I think what you stated is correct. The only one that doesn’t work is the Sans. Serif Text. I will try to see if I can get that formatted.
I discovered another issues last night - the justify only works in Chrome and not in FF or Edge or IE.
text-align: justify;
Lots of information about that not working when doing searches for answers but can’t find any solutions. Do you know of any?
Also looking for a way to use an alt image text hovering over the tool bar icons - as it is in the Sitepoint editor. Would you know how to do alt image text in Quill? I can’t find anything or get anything to work.
Thank you for that.
I can’t seem to merge what I currently have, without error, with what is in Code pen.
Here is code pen:
$(document).ready(function() {
  var quill = new Quill('#editor-container', {
    modules: {
      toolbar: '#toolbar-container'
    },
    placeholder: 'Compose an epic...',
    theme: 'snow'
  });

  // Enable all tooltips
  $('[data-toggle="tooltip"]').tooltip();

  // Can control programmatically too
  $('.ql-italic').mouseover();
  setTimeout(function() {
    $('.ql-italic').mouseout();
  }, 2500);
});
This is what I have:
// Fetch content from database here
        var editorContent = '<%=rs("myHtml")%>';
        var editor = document.getElementById('editor-container');
        var hiddenInput = document.getElementById('myHtml');
        var form = document.forms.mainform;

        var quill = new Quill(editor, {
            modules: {
                syntax: true,
                toolbar: '#toolbar-container'
            },
            placeholder: Compose an epic...',
            theme: 'snow'
        });

        editor.firstChild.innerHTML = editorContent;
All I can come up with is a partial looking tool bar - so an obvious error on my part.
I don’t know if it is this that is throwing it off or not - but that would be new in my code:
Oh yeah, sorry — the demo requires Bootstrap for the tooltips to work.
I can’t take credit for teh demo either, I just found it on the project’s homepage.
Anyway, here’s the full code:
I have tired hours of combinations and even though I can get the code you provided to work - as is - when I add this to my file I lose all table formatting underneath the editor:
I also can’t get the database info to drawn to the page.
I think there must be some conflicts was the bootsrap coding.
Also, there is more css and scripting on the one that works currently vs the newest one.
I was hoping there was another way of adding the alt images, but perhaps not. I know I couldn’t get anything to work.
Thanks though for finding that code because I couldn’t find it with all of my searches, but I think it’s easier to leave well enough alone and not be concerned about the alt images.
Bootstrap is a bit of a beast and adds a load of styles to the page that could potentially conflict with the pre-existing ones.
Yeah, I just wanted to show you a demo of the tooltips working. That wasn’t intended to be a replacement for the code you have.
Fantastic! This would have been my advice—just try and extract the styles you need from the Bootstrap package.
Hoooowever, saying this, when I posted my answer on Friday, I just Googled “Quill tooltips” and linked you to the first thing I found. Looking at this again on Sunday morning, it seems a tad heavy to include jQuery and the Bootstrap JS library for the sake of this functionality.
Also, and this is something I was unaware of, it seems that using the title attribute for tooltips has usability implications:
So, here’s the same demo using a smaller, dedicated library (Tippy.js). See what you think:
Thank you, I will look into that; for now it seems to work.
I will look at it for sure, thanks!
Since there is a problem with justify, except for Chrome, I have eliminated that with using a dropdown, without justify, in the toolbar.
Do you know how to make this work on mobiles?
input.setAttribute('type', 'file');
I know that accept="image/* works for type=“file” for normal uploads, but I can’t figure out how to upload on mobiles with the ajax. I tried to change file to images and it doesn’t work.
I should clarify, it opens up but it only allows Camera, Camcorder, Voice Recorder and Documents as a selection - not the photo album. I had the same issue with the regular uploader until I added accept="image/*
Ah ok, I misunderstood. In that case, remote debugging probably won’t help much.
I’m a bit busy today, but let me know how you get on with that. It’s not a problem that I have ever encountered, so don’t have any suggestions off the bat.