Visual Studio Community 2015: Adding Ecommerce Functionality

Key Takeaways
- Visual Studio Community 2015 can be utilized to seamlessly integrate ecommerce functionality into websites, providing a simple yet effective checkout process.
- Bootstrap and AngularJS are employed to enhance the user interface and dynamic interaction in the checkout page, ensuring a smooth user experience.
- The ecommerce setup includes a mock ASP.NET Web API app to simulate credit card processing, handling JSON data via POST and providing immediate feedback on transaction success or failure.
- AngularJS is crucial for real-time updates on the checkout page, such as dynamically calculating total prices and displaying messages based on transaction outcomes.
- The entire ecommerce process, from product listing to payment submission, is handled within a single form, simplifying the user flow and backend processing.
This article was sponsored by Microsoft. Thank you for supporting the sponsors who make SitePoint possible.
Welcome back to our series of articles using Microsoft’s modern IDE: Visual Studio Community 2015 to quickly design and build an attractive, functional site for a client. If you missed the previous instalments, check them out below:
- Visual Studio Community 2015: Setting Up a Site
- Visual Studio Community 2015: Adding Email and Contact Pages
In this article, we’re going to add an ecommerce solution to our site. The solution will be simple, consisting of a single page to handle the shopping cart, payment information and success or fail messages for the user.
We’ll submit our payment information to a mock ASP.NET Web API app. The Web API app will act like a credit card processor. It will consume JSON via POST. It will then send back an HTTP status code indicating success or failure. Based on this feedback, we can determine what to do. But we’ll keep it simple by showing the user a message based on the received status code.
While the solution is simple, it will demonstrate core components of any ecommerce solution. These include:
- Listing of products to buy
- Ability to add or remove products
- Total price of products and purchase
- Form to capture payment information
- Connection to some third party credit card processor
- Ability to display result from credit card processor
- Upon success, deliver purchased product
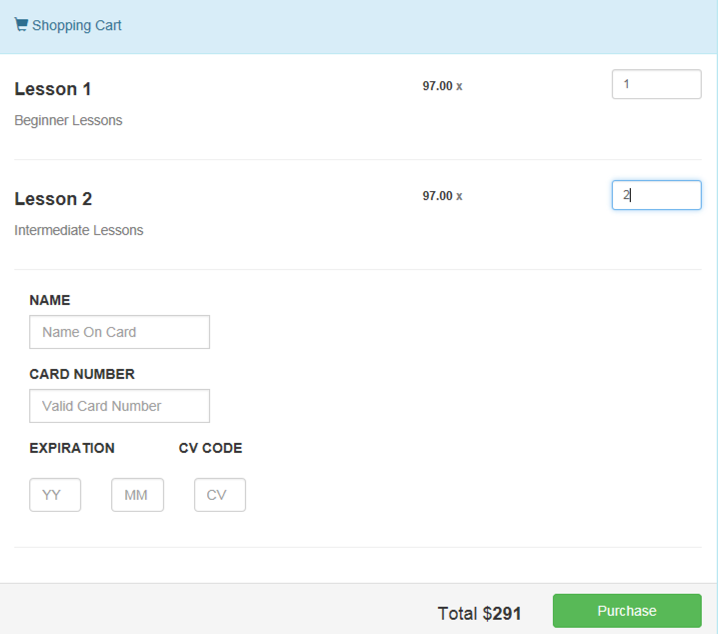
The checkout page will be styled in Bootstrap and use some AngularJS to help with a little dynamic display of the product totals. The final result will look like the following:
Creating the Checkout Page
To create the checkout page, we’ll need to add a view and a few model classes.
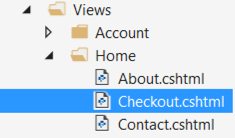
Open the Views folder then Home. Right click the Home folder and select to add a new item. Select MVC View Page. Name the file Checkout.cshtml.
We’re going to once again style our page using Bootstrap, which we’ve already added a reference for. The following code will make up our checkout page:
  <form action="Checkout" method="post">
  <p>
  <div class="container" ng-controller="ctrl">
  <div class="row">
  <div class="col-sm-12">
 <div class="panel panel-info">
    <div class="panel-heading">
      <div class="panel-title">
        <div class="row">
        <div class="col-sm-12">
        <h5><span class="glyphicon glyphicon-shopping-cart"></span> Shopping Cart</h5>
        </div>
        </div>
      </div>
    </div>
    <div class="panel-body">
      <div class="row">
        <div class="col-sm-6">
        <h4 class="product-name"><strong>Lesson 1</strong></h4>
        <h4><small>Beginner Lessons</small></h4>
        </div>
        <div class="col-sm-4">
        <div class="col-sm-6 text-right">
        <h6><strong>97.00 <span class="text-muted">x</span></strong></h6>
        </div>
        </div>
        <div class="col-sm-2">
        <input type="text" ng-model="lesson1_1000" name="lesson1_1000" placeholder="0" class="form-control input-sm">
        </div>
      </div>
      <hr>
      <div class="row">
        <div class="col-sm-6">
        <h4 class="product-name"><strong>Lesson 2</strong></h4>
        <h4><small>Intermediate Lessons</small></h4>
        </div>
        <div class="col-sm-4">
        <div class="col-sm-6 text-right">
        <h6><strong>97.00 <span class="text-muted">x</span></strong></h6>
        </div>
        </div>
        <div class="col-sm-2">
        <input type="text" ng-model="lesson2_1010" name="lesson2_1010" placeholder="0" class="form-control input-sm">
        </div>
      </div>
      <hr />
      <div class="row">
        <div class="col-sm-12">
        <div class="form-group col-sm-6">
        <label for="cardName">NAME</label>
        <div class="input-group">
        <input type="text" class="form-control" name="cardName" placeholder="Name On Card" />
        </div>
        </div>
        </div>
      </div>
      <div class="row">
      <div class="col-sm-12">
        <div class="form-group col-sm-6">
        <label for="cardNumber">CARD NUMBER</label>
        <div class="input-group">
        <input type="text" class="form-control" name="cardNumber" placeholder="Valid Card Number" />
        </div>
        </div>
      </div>
      </div>
      <div class="row">
        <div class="form-group col-sm-8">
        <div class="col-sm-4">
        <label>EXPIRATION</label>
        </div>
        <div class="col-sm-3">
        <label for="cardCv">CV CODE</label>
        </div>
        </div>
      </div>
      <div class="row">
        <div class="form-group col-sm-6">
        <div class="col-sm-3">
        <input type="text" class="form-control" name="cardYear" placeholder="YY" />
        </div>
        <div class="col-sm-3">
        <input type="text" class="form-control" name="cardMonth" placeholder="MM" />
        </div>
        <div class="col-sm-3">
        <input type="text" class="form-control" name="cardCv" placeholder="CV" />
        </div>
        <div class="col-sm-3"></div>
        </div>
      </div>
      <hr>
    </div>
    <div class="panel-footer">
      <div class="row text-center">
      <div class="col-sm-9">
      <h4 class="text-right">Total $<strong>{{lesson1_1000 * 97 + lesson2_1010 * 97}}</strong></h4>
      </div>
      <div class="col-sm-3">
      <button type="submit" class="btn btn-success btn-block">
      Purchase
      </button>
      </div>
      </div>
    </div>
  </div>
  </div>
  </div>
  </div>
This code already has AngularJS added to it. Before we discuss the AngularJS code, let’s talk a little about the form layout and functionality.
To keep things simple, our entire checkout takes place on one form. This is accomplished by displaying available lessons on the same page. The user can increment the quantity of lessons. This will also total up the price near the Checkout button. If the user wants to remove an item, they simply set the quantity back to zero.
AngularJS Functionality
AngularJS is used to update the total price and display an error or success message. To add AngularJS to the project, open the bower.json file and add the AngularJS reference, as shown on the last line below:
"jquery-validation": "1.11.1",
"jquery-validation-unobtrusive": "3.2.2",
"hammer.js": "2.0.4",
"bootstrap-touch-carousel": "0.8.0",
"angularjs": "*"
With AngularJS, we can total prices because the product quantity is captured dynamically, as shown below
<input type="text" ng-model="lesson1_1000" name="lesson1_1000" placeholder="0" class="form-control input-sm">ng-model binds the input text field value to lesson1_1000. We then calculate a total using:
<h4 class="text-right">Total $<strong>{{lesson1_1000 * 97 + lesson2_1010 * 97}}</strong></h4>We take the quantity of a product and multiple it by the price of that product. To ensure we don’t get something like “NaN” in place of the total price, we need to initialize our AngularJS variables. That’s where the controller.js file comes in.
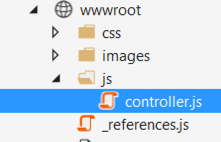
To add the controller file, open the wwwroot folder, and add a “js” folder. Then right click it and add controller.js:
We define our AngularJS controller in this file as follows:
angular.module('myapp', []).controller('ctrl',
    ['$scope', function ($scope) {
        function init() {
            $scope.lesson1_1000 = 0;
            $scope.lesson2_1010 = 0;
        }
        init();
    }]
);
All we’re doing is initializing our product variables to zero. Then we call the init() function to execute the code.
We do need to add the “myapp” and “ctrl” references on the client side. Open _Layout.cshtml and modify the body tag as follows:
<body ng-app="myapp">Now open Checkout.cshtml and modify the “container” div as follows:
<div class="container" ng-controller="ctrl">This ensure our product variables are within the correct scope. While we’re here, drag the controller.js file into the head section of _Layout.cshtml. This will create a reference to the controller file, as shown below:
<script src="~/js/controller.js"></script>You probably noticed the following code at the bottom of our Checkout.cshtml:
<div ng-hide="@Model.DisplaySuccess" class="alert alert-success" role="alert">Thank you for your purchase.<br />
You can <a href="/downloads/@Model.DownloadCode">download your product here</a>.</div>
<div ng-hide="@Model.DisplayError" class="alert alert-danger" role="alert">Sorry.  Your card was declined.  Please contact your bank or use another card.</div>
ng-hide will hide the related div when the expression within it is true. In this case, we’re only sending back a value of true or false. This value is accessed via Razor syntax. The model that we send back with the view contains the above two properties. Their values are set depending on the response of our transaction processing.
Model Classes
Before we begin modifying the controller, we’ll add a few needed model classes. Add the following files (classes) to the Models folder: Product.cs, Form.cs and Checkout.cs.
In Checkout.cs, add the following:
public class Checkout
{
    public string DisplayError { get; set; }
    public string DisplaySuccess { get; set; }
    public string DownloadCode { get; set; }
}
This code is only used for hiding or showing our success and error boxes. DownloadCode creates a code that can be appended to a URL, mimicking a download page for the purchased lessons. We send the Checkout class instance back with the view.
Add the following to Product.cs:
public class Product
{
public int Id { get; set; }
public string Name { get; set; }
public int Price { get; set; }
}
class FormProduct
{
public int Id { get; set; }
public int qty { get; set; }
}
class ProductManager
{
public static int productTotal(List<FormProduct> formProducts)
{
    int total = 0;
    List<Product> products = ProductManager.GetProducts();
    foreach (var item in formProducts)
    {
        var match = products.Where(x => x.Id == item.Id).FirstOrDefault();
        if (match != null)
        {
            total += (match.Price * item.qty);
        }
    }
    return total;
}
public static List<Product> GetProducts()
{
    List<Product> products = new List<Product>();
    Product lesson1 = new Product() { Id = 1000, Name = "Lesson 1", Price = 97 };
    Product lesson2 = new Product() { Id = 1010, Name = "Lesson 2", Price = 97 };
    products.Add(lesson1);
    products.Add(lesson2);
    return products;
}
The above code contains all of our product related classes. Product is our main product class, containing instances of products. FormProduct is a conduit class. It is meant to translate raw form data into a Product class. ProductManager is a helper class. It totals up product prices coming in from the form. GetProducts() is a mocked method that similates getting products from a data source.
Finally, add the following class to Form.cs:
public class myForm
{
    public string lesson1_1000 { get; set; }
    public string lesson2_1010 { get; set; }
    [JsonProperty("cardName")]
    public string cardName { get; set; }
    [JsonProperty("cardNumber")]
    public string cardNumber { get; set; }
    [JsonProperty("cardYear")]
    public string cardYear { get; set; }
    [JsonProperty("CardMonth")]
    public string CardMonth { get; set; }
    [JsonProperty("CardCv")]
    public string CardCv { get; set; }
    [JsonProperty("totalPrice")]
    public int totalPrice { get; set; }
}
This class will serve a dual purpose. It will bind to our form fields, making it easier to access them in the controller. Since this instance will contain all of the payment information, wouldn’t it be nice to just use it when we submit to the ecommerce processor?
By adding totalPrice, we have everything needed for processing a payment, allowing us to serialize myForm and submit to the payment processor.
Capturing submitted Form Data
The main processing for our checkout page occurs in the HomeController.cs file. Create the following method:
[HttpPost]
public IActionResult Checkout(myForm form)
{
    Checkout c = new Checkout();
    List<FormProduct> products = new List<FormProduct>();
    if (!string.IsNullOrEmpty(form.lesson1_1000))
    {
        products.Add(new FormProduct() { Id = 1000, qty = Convert.ToInt16(form.lesson1_1000) });
    }
    if (!string.IsNullOrEmpty(form.lesson2_1010))
    {
        products.Add(new FormProduct() { Id = 1010, qty = Convert.ToInt16(form.lesson2_1010) });
    }
    form.totalPrice = ProductManager.productTotal(products);
    var url = "http://localhost:50672/api/values/";
     string serializedData = JsonConvert.SerializeObject(form, Formatting.None);
    serializedData = JsonConvert.SerializeObject(serializedData);
     using (var client = new WebClient())
     {
         client.Headers[HttpRequestHeader.ContentType] = "application/json";
         var result = client.UploadData(url, "POST", Encoding.ASCII.GetBytes(serializedData));
         var response = System.Text.Encoding.UTF8.GetString(result);
         var decode = JsonConvert.DeserializeObject(response);
        c.DisplaySuccess = "true";
        c.DisplayError = "true";
        if (response.Contains("200"))
        {
            c.DisplaySuccess = "false";
            c.DownloadCode = DateTime.Now.Ticks.ToString();
        }
        else if (response.Contains("406"))
        {
            c.DisplayError = "false";
        }
     }
    return View(c);
}
We start by creating an instance of the Checkout class. This won’t be used until the end of the method, when we get back our response from the mocked third party ecommerce processor.
Next, we convert our form fields into FormProduct instances. The Checkout() parameter is of type myForm. This classes allows binding to form fields, making them easier to access. myForm class is below and defined at the top of HomeController:
We call:
form.totalPrice = ProductManager.productTotal(products);… to get the total price of submitted products. We assign the total back to the myForm instance. As mentioned earlier, we can submit this class to the ecommerce process by serializing it, which is what we do next.
You can see serliazation occurs twice. This might be more an issue with JsonConvert. By not serializing twice, our JSON is malformed and will result in a null submission to the ecommerce processor.
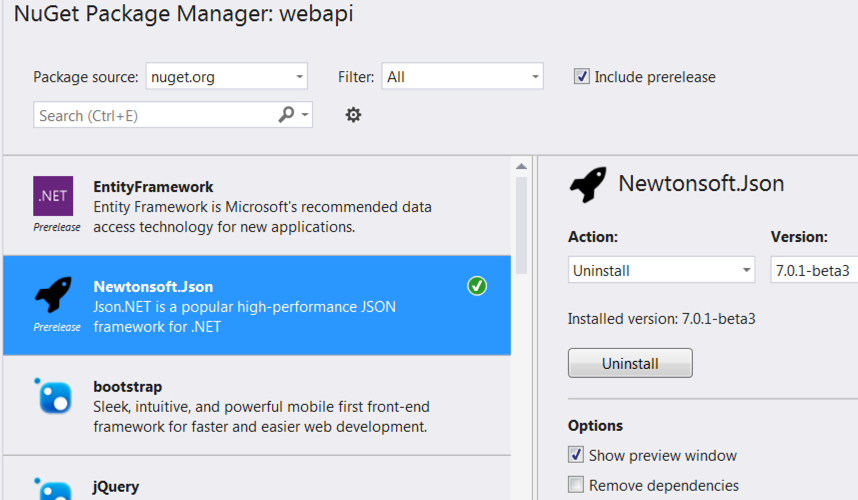
Before we move on, let’s add a Nuget Package for the JSON serialize class – JsonConvert.
Right click on the References node in the Solution Explorer. Click Manage Nuget Packages. Search for Newtonsoft.Json. You can see in the screenshot below that I have already added it:
Next, we queue up call to our Web API app. The Web API app must be running since we are referencing its local URL.
client.Headers[HttpRequestHeader.ContentType] = "application/json";
         var result = client.UploadData(url, "POST", Encoding.ASCII.GetBytes(serializedData));
         var response = System.Text.Encoding.UTF8.GetString(result);
         var decode = JsonConvert.DeserializeObject(response);
Once the response comes back, we deserialize it and looks for specific responses. If this were a real ecommerce response, we’d likely not be simply looking for a string. There would probably be a little more structure to how the response is received.
We set values for showing and hiding the success or failure divs.
A success will look like the following:
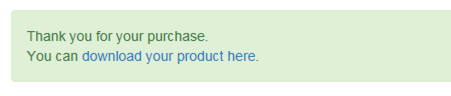
You can see our download link for the product.
A failure will look like:

You can simply change the return type in the Web API app to simulate different responses.
Ecommerce Processing
Ecommerce processing will basically be mocked by a Web API app. We will POST to a single endpoint in the Web API app. From this same endpoint, we’ll receive a success or failure on the transaction.
While ecommerce third party solutions vary largely, we are going to use a minimal but standard solution. We’ll send the user’s payment information along with a total to charge.
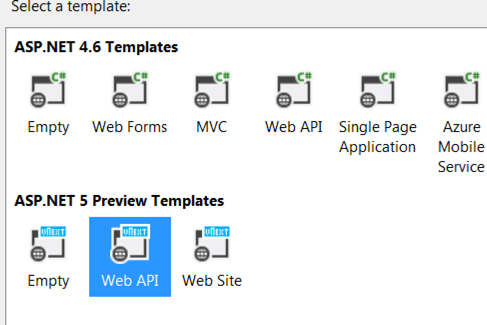
To create a Web API app, select File > New Project > ASP.NET Web Application > Web API:
The modifications we’ll need to make are going to be minimal. Open the Controllers folder and then the ValueControllers.cs file. Modify the POST method so it looks like the following:
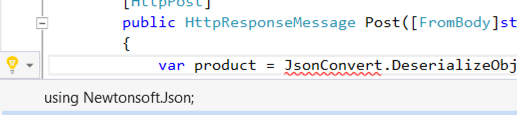
[HttpPost]
public HttpResponseMessage Post([FromBody]string value)
{
    var product = JsonConvert.DeserializeObject<Product>(value);
    //ecommerce processing
    return new HttpResponseMessage(HttpStatusCode.NotAcceptable);
}
The value parameter is JSON submitted from our website. This JSON is deserialized into a class with the help of JsonConvert, which we’ll add a reference for shortly. From there, we can do whatever is necessary to complete the ecommerce transaction.
Since this is only a mock solution, we’re going to send back a status immediately. This is why the return type is HttpResponseMessage. NotAcceptable will send back a status code of 406, which we’ll look for in our website as a failure and present the user with an appropriate message.
To add the JsonConvert reference, we’re going to add the Newtonsoft.Json Nuget Package, just as we did in our web app. Right click on the References node in the Solution Explorer. Click Manage Nuget Packages. Search for Newtonsoft.Json. You can see in the screenshot below that I have already added it:
If you hover over JsonConvert, you’ll see a yellow light bulb in the margin. Hover over it and you’ll get a hint to add the proper using statement for the JsonConvert class.
Now we need to create our product class. Remember, the Web API app is only mocking an ecommerce solution. But this will give us a chance to see that our submitted JSON is in fact being deserialized into a class. The following is what goes into the Product class:
class Product
{
[JsonProperty("cardName")]
public string cardName { get; set; }
[JsonProperty("cardNumber")]
public string cardNumber { get; set; }
[JsonProperty("cardYear")]
public string cardYear { get; set; }
[JsonProperty("CardMonth")]
public string CardMonth { get; set; }
[JsonProperty("CardCv")]
public string CardCv { get; set; }
[JsonProperty("totalPrice")]
public int totalPrice { get; set; }
}
Setting a breakpoint in the Post method, we can see what our binded data looks like from the web app:
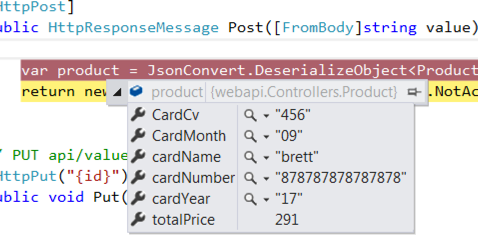
MVC gives us this binding free. There isn’t anything we need to make it happen except to ensure our class properties match those coming into our method.
Summary
We’ve extended our guitar lesson website, allowing our artist to now sell lessons directly from his site. By going with a simple solution, we’ve put the listing of products, cart and checkout all on the same page. With the help of some AngularJS, we were able to take advantage of dynamic functionality to provide instant feedback to the user.
In the next article, we’ll create a mobile app entirely in Visual Studio. The app’s purpose will be to notify the user of new lessons. By utilizing the Cordova framework, we can use our existing knowledge of web based languages to write a fully functional mobile application.
Brett Romero is a software developer versed in .NET, PHP, Python, and iOS to name a few. He builds desktop, web and mobile applications. As well, he knows Illustrator and Photoshop backwards and forward. His design skills aren't too shabby either. Brett also founded Bitesize Business School, which helps entrepreneurs develop needed technical skills for running an online business while also teaching them invaluable business skills. His undergraduate major was mathematics but he finished with a degree in business administration then went on to study mathematics at the University of Washington. He also has an MBA from Arizona State University.

Published in
·Business·Conversion·Entrepreneur·Entrepreneurship·Entrepreneurship·Marketing·Revenue·September 17, 2015